
Summary of Contents for EMG Mediair SUF01-A10
- Page 1 Suction Pump SUF01-A10 / SUF01-A12 To order, or for more information, please contact; MEDICAL EQUIPMENT SPECIALISTS DocStock Pty Ltd ABN 48 115 268 203 P: (02) 8850 7177 E: info@docstock.com.au 2460 www.DocStock.com.au...
-
Page 3: Table Of Contents
INDEX Important Safeguards..................1-2 International Travel....................2 Introduction......................2 Accessory/Replacement items ................3 Set-Up ........................4 How to Operate your Portable Suction Pump ............5-8 Battery Charging....................9 Check the battery quality..................10 Replace the battery ....................10 Cleaning Instructions................... 11 Maintenance ......................11 Troubleshooting.................... -
Page 4: Important Safeguards
SAFETY IMPORTANT SAFEGUARDS When using electrical products, especially when children are present, basic safety precautions should always be followed. Read all instructions before using. Important information is highlighted by these terms: DANGER Urgent safety information for hazards that will cause serious injury or death. -
Page 5: International Travel
SAFETY/ INTRODUCTION DANGER The unit is a vacuum suction device designed for the collection of nonflammable fluid materials in medical applications only. Improper use during medical applications can cause injury or death. For all medical applications: All suctioning should be done in strict accordance with appropriate procedures that have been established by a license medical authority. -
Page 6: Accessory/Replacement Items
IMPORTANT PARTS ACCESSORY/REPLACEMENT ITEMS The following items can be purchased separately as accessories or replacement items for your unit. Description 1. Collection Canister, 800cc 2. Bacterial Filter and 30cm Tubing set 3. Connection Tubing, 180cm , 1/4” ID... -
Page 7: Set-Up
SET UP Set-Up 1. Connect either end of the 180cm tubing to the tubing connector then connect the other end to the bacteria filter. Ensure that the clear side of the bacteria filter is toward elbow and bottle when installing/re-installing. Do not reverse direction of the filter. -
Page 8: How To Operate Your Portable Suction Pump
OPERATION How to Operate your Portable Suction Pump 1. Before connecting the unit to the AC adapter or 12V DC cord, make sure that the power switch located on the side of the unit is in the ’Off’ position. Select power source desired. - Page 9 OPERATION 2. Select Power Source Desired AC OPERATION: Plug the small connector of the AC adapter into the DC power input located on the side of the unit. Plug the AC end into a grounded wall-outlet power source. NOTE: The power supply may become warm to the touch during charging or running of the unit.
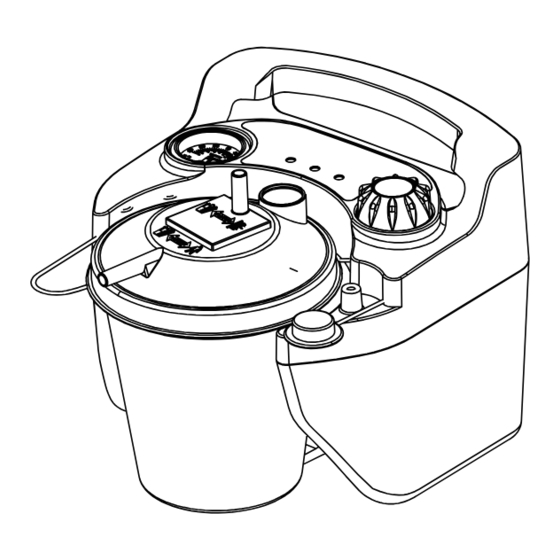
- Page 10 OPERATION 3. Once the power source is selected, simply turn the unit “On” using the power switch located on the top of the unit. The power indicator light (displayed on the top of the unit) will indicate which power source is being used by staying continuously lit when external power is connected.
- Page 11 OPERATION Adjust the vacuum level from 50 to 600 mmHg by turning the vacuum regulator knob located on the side of the unit (clockwise to increase vacuum and counter- clockwise to decrease vacuum). The desired level of vacuum can be set by using the gauge located on the top of the unit near the handle.
-
Page 12: Battery Charging
OPERATION / BATTERY CHARGING BATTERY CHARGING The unit is equipped with a factory-installed rechargeable battery. The unit will have a low battery and charge indication. Once you’ve determined that your unit is equipped with an internal rechargeable battery, connect the unit to the proper AC or DC power source using the AC adapter or DC power cord. -
Page 13: Check The Battery Quality
BATTERY NOTES 1. A discharged battery will require 1-1.5 hours (depending on depth of discharge) of charging to reach a full capacity. 2. Do not connect the AC adapter to an outlet controlled by a switch to ensure power is supplied to unit at all times. -
Page 14: Cleaning Instructions
BATTERY / CLEANING CLEANING INSTRUCTION 1. With the power switch in the “Off” position, disconnect the Suction Unit from all external power sources. 2. Wipe the housing with a clean cloth and any commercial (bacterial-germicidal) disinfectant. CAUTION Do not submerge in water and this will result in damage to the vacuum pump. MAINTENANCE Inspect suction tubing and collection canister for leakage, cracks, etc., before each use. -
Page 15: Troubleshooting
TROUBLESHOOTING TROUBLESHOOTING NOTE: Your unit contains no user-serviceable parts. If you believe your unit is not working properly, BEFORE YOU RETURN IT TO THE EQUIPMENT PROVIDER WHERE YOU PURCHASED IT OR TO OHIO MEDICAL CORPORATION, please take a few moments to check for these possible causes: PROBLEM ACTION 1. -
Page 16: Specifications/Classifications
SPECIFICATIONS / CLASSIFICATIONS Dimensions: (L) 8.3 x (W) 7.5 x (H) 7.7 inch (L) 210 x (W) 190 x (H) 195 mm Weight: 3.59 lb (1.63 kg) 600 ± 30 mmHg Maximum Vacuum: Flow Range (Free air Flow): 22±10% LPM Sound Level (at 1m,300mmHg): 60 ±... -
Page 17: Warranty
WARRANTY TWO-YEAR LIMITED WARRANTY The compressor portion of the suction unit is warranted to be free from defective workmanship and materials for a period of two years from date of purchase. Any defective part(s) will be repaired or replaced at our option if the unit has not been tampered with or used improperly during that period. - Page 20 EMG MANUFACTURING CO.,LTD. Second floor, no.8, weijian road, chashan town, dongguan city,guangdong China K14041100RA REV.0 2019/08...
Need help?
Do you have a question about the Mediair SUF01-A10 and is the answer not in the manual?
Questions and answers