ECOSTAR ECO 55 NG Installation, Operating And Maintenance Manual
Monoblock dual fuel (gaslight oil) burners
Hide thumbs
Also See for ECO 55 NG:
- Installation, operating and maintenance manual (26 pages) ,
- Installation, operating and maintenance manual (38 pages)
Table of Contents

Related Manuals for ECOSTAR ECO 55 NG


Summary of Contents for ECOSTAR ECO 55 NG
- Page 1 MONOBLOCK NG SERIES DUAL FUEL (GAS- LIGHT OIL) BURNERS INSTALLATION, OPERATING AND MAINTENANCE MANUAL TWO STAGE AND MODULATING OPERATION ECO 50 NG ECO 55 NG ECO 60 NG ECO 65 NG ECO 70 NG ECO 75 NG 10.08.2020 Rev. 00...
- Page 2 DEAR USER, ECOSTAR ECO 50 NG, ECO 55 NG, ECO 60 NG, ECO 65 NG, ECO 70 NG, ECO 75 NG Dual Fuel (Gas-Light Oil) burners are prepared and manufactured according to the latest technical developments and safety rules. It is easy to use for our customers.
-
Page 3: Table Of Contents
CONTENTS WARNINGS ............................3 1.1. Warning Symbols and Descriptions ....................3 1.2. General Safety Rules ........................4 TERMS OF WARRANTY ........................6 2.1. Out of Warranty Conditions ......................6 BURNER’S GENERAL FEATURES ....................7 3.1. Purpose of Use and Work Limits of Burners ................. 7 3.2. -
Page 4: Warnings
1. WARNINGS 1.1. Warning Symbols and Descriptions Symbols Symbol Descriptions Important information and useful hints. Warning of danger to life or property. Warning of electrical voltage. Product handling information. Impulse connection detecting combustion chamber pressure Impulse connection detecting combustion air pressure Impulse connection detecting burner gas head CLEAN THE GAS BURNER. -
Page 5: General Safety Rules
1.2. General Safety Rules • All personnel engaged in installation, disassembly, commissioning, operation, control, maintenance and repair should have received the necessary training and fully read and understood this manual. • No changes that might damage the safety of the burner unit must be made by persons and/or organizations on the burner unit. - Page 6 The burner installation must be carried out in accordance with the instructions. Vibration can damage the burner and its components. Keep boiler doors closed while starting burner and during burner operation. Check combustion values to be correct by using flue gas analyzer at the whole adjustment range between minimum, full load, and ignition load.
-
Page 7: Terms Of Warranty
2. TERMS OF WARRANTY Main and auxiliary equipment and all components used in Ecostar Dual Fuel (Gas-Light Oil) burners are guaranteed for 1 year by TERMO ISI SİST. A.Ş starting from the date of commissioning under the maintenance, adjustment, operating conditions and relevant mechanic, chemical and thermal effects explained herein. -
Page 8: Burner's General Features
3. BURNER’S GENERAL FEATURES ECOSTAR Dual Fuel (Gas-Light Oil) burners are designed and manufactured to work with liquid fuel with max. 2.5- 6 Cst (mm s) viscosity. and Natural Gas and Liquid Petroleum Gas at gas pressures of min.20 mbar, max.300 mbar and at -%15 to +%10 of nominal voltages, under environmental temperature of max.60˚C with rated capacity and burner pressure ranges. - Page 9 Temperature change of fuel used in ECOSTAR Dual Fuel (Gas-Light Oil) burners dependent on viscosity 10.08.2020 Rev. 00...
-
Page 10: Burner Components
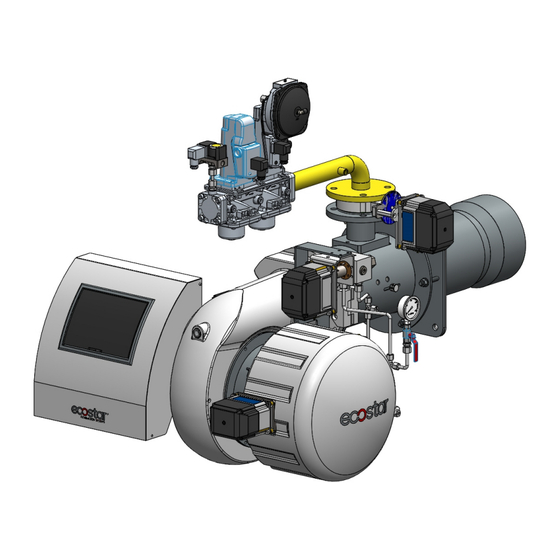
3.3. Burner Components ECO 55 KL 10.08.2020 Rev. 00... -
Page 11: Gas, Flue Gas And Heating Water Schema
4. GAS, FLUE GAS AND HEATING WATER SCHEMA 10.08.2020 Rev. 00... -
Page 12: Technical Data
5. TECHNICAL DATA 5.1. Capacity Table Natural Gas =8250 kcal/Nm Light Oil (L) = 10200 Kcal/kg 10.08.2020 Rev. 00... -
Page 13: Back Pressure-Capacity Diagrams
5.2. Back Pressure-Capacity Diagrams 10.08.2020 Rev. 00... -
Page 14: Burner Dimensions
5.3. Burner Dimensions 10.08.2020 Rev. 00... -
Page 15: Gas Hood Pressure Loss Diagram
5.4. Gas Hood Pressure Loss Diagram Gas hood pressure loss measurements are conducted in atmospheric pressure. Consider the below data while conducting measurement in counter pressure boilers. : Gas hood pressure while burner is connected to the boiler and working : Combustion chamber pressure : Burner net gas hood pressure 10.08.2020 Rev. - Page 16 10.08.2020 Rev. 00...
- Page 17 10.08.2020 Rev. 00...
-
Page 18: Flame Length And Diameter
5.5. Flame Length and Diameter Natural Gas Light Oil 5.6. Noise Level Product operates within the range of 75 decibels max. and 85 decibels. 10.08.2020 Rev. 00... -
Page 19: Burner Handling Information
6. BURNER HANDLING INFORMATION • Lift the product by holding the handles as seen in the picture. • Prevent strong impacts on top of the product and vibration while handling the product. • Do not leave the product in wet environment. Dimensions of the box used for handling Burner L x W x H (cm) -
Page 20: Installation
7. INSTALLATION 7.1. Burner Installation Picture 1- Drift Bolts 2- Burner 3- Boiler Connection Flange 4- Gasket 5- Boiler Studs Ø In the installation of the burner, use the installation materials supplied with the burner. Ø Secure the burner connection flange onto the burner cover by 4 bolts. Gasket must be connected such that it will remain between connecting flange and boiler cap. -
Page 21: In Reverse Flame Front Mirror Boilers
7.2. In reverse flame front mirror boilers While installing the burner in reverse flame front mirror boilers, flame tube tip must be adjusted such that it gets inside by 50 mm-100 mm from flue pipes (50mm≤A≤100mm). Otherwise flue gas temperature will rise and fuel consumption will increase. 7.3. -
Page 22: Commissioning
8. COMMISSIONING 8.1. Before Commissioning Electrical Connection Perform electrical connections according to the diagram provided with the burner. Follow general security rules during installation of electric wiring and making connections. Connect the earthing terminal in electric panel to the earthing installation. 8.2. - Page 23 Operating with Gas ; Operation of two-stage burner Ø Open the main gas valve, check the gas pressure from the manometer at the valve. (max.300 mbar) Ø Check the boiler thermostat or pressure switch settings. Ø Bring the operating switch on the burner panel to position 2. Ø...
-
Page 24: Combustion Adjustment
8.3. Combustion Adjustment Ø Fuel nozzle Use proper wrench in installation and dismantle of the fuel nozzle. Use diesel oil to clean the fuel nozzle. Do not use thinner and its derivatives. Ø Photocell Check the photocell weekly. Clean the dust or fume stains on the glass of photocell by a dry cloth. - Page 25 TA Type 1-Suction 2-Nozzle outlet 3-Return 4-Manometer inlet 5-Vacuum or inlet manometer and internal return inlet 6-Pressure adjustment 7-Pre heater location 10.08.2020 Rev. 00...
- Page 26 Ø Two Stages Light Oil Burner Fuel Circuit Ø Modulating Light Oil Burner Fuel Circuit 10.08.2020 Rev. 00...
- Page 27 CAUTION! Ø End of the line to the main tank must be open to the atmosphere and line pressure must be zero, otherwise no healthy modulating operation can be ensured since the pressure, which is to form in return, will also affect nozzle pressure. Fuel may drop from nozzle end during stops.
-
Page 28: Gas Adjustment
8.5. Gas Adjustment 8.5.1. VGD 40… Series Gas Valve 8.6. Air Pressure Switch Adjustment While the burner is working without any problem, the air pressure switch is adjusted to desired minimum pressure as follows. Ø Unscrew the screw of the transparent cover and remove the cover. Ø... -
Page 29: Bt 300
8.7. BT 300 10.08.2020 Rev. 00... -
Page 30: Operating Control And Displays
8.7.1. Operating Control and Displays 1 Display 2 Back key 3 Cursor keys 4 Enter key Display: The display shows in pictograms: 1 - the menu structure 2 - operating status 3 - parameters 4 - error messages Back key: Jump to previous window. Cursor keys: You navigate in the menu using the cursor keys. -
Page 31: Menu Functions
8.7.2. Menu Functions The menu is divided intothree paths: INFO MANUAL SETTINGS INFO Select the INFO path for information about the following: the burner • errors that have occurred • the software version • display of check sums • the serial number •... -
Page 32: Bt300 Connecting Diagram
8.7.3. BT300 Connecting Diagram X30 = User Interface UI 300 X31 = LSB Option X32 = continuous output 1, e.g. air damper X33 = continuous output 2, e.g. gas damper X34 = continuous output 3 (optional) SIC = safety interlock chain 230V AC 47 - 63Hz external fuse protection required (max 10A slow-blow) 230V AC for power supply to external devices Maximum Cable Length:... -
Page 33: Leakage Test For Main Gas Valves
8.8. Leakage Test for Main Gas Valves 10.08.2020 Rev. 00... - Page 34 Gas with pilot burner and leakage test BT300 10.08.2020 Rev. 00...
-
Page 35: Servomotors
8.9. Servomotors Servomotors drive air dampers, gas butterfly valve and oil regulator. With the help of servomotors electronic air and fuel ratio control is carried out, controlled by burner control. Ø Static electricity can damage servomotor. Ø Do not open servomotor. Do not interfere with or modify unit or equipment connected to it. It may damage servomotor or change burner settings. -
Page 36: Function Controls And Adjustments
8.10. Function Controls and Adjustments The BT300 combines the benefits of an electronic fuel-air ratio control system with up to three motorised actuating devices and an optional modules like an analogue output for speed control of the combustion air fan with an electronic burner control unit. The leakage test, flame monitoring system, power control unit and (optional) CO/O2 controller for control and optimi-sation of an oil or gas-fired forced-draught burner are all integrated. - Page 37 Ø Oil adjustment regulator 1- Connecting rod 2- Scale coupler 3- Fuel connection points 4- Adjustment fixing bolt 5- Adjustment bolt 6- Housing cover (screw hood) Fuel regulator adjustment 1- Remove the housing cover number 6 2- Loosen the fixing bolt number 4 3- When you rotate the shaft number 5 (when looked from the shaft end) clockwise, the pressure value you observe from return manometer will increase, and burner consumption will also increase since nozzle pressure increases.
- Page 38 Ø Set the burner to the correct capacity required by the boiler by considering the below nozzle pressure and consumption values. Diagram valid for fuel nozzles having 45° spraying angle Diagram valid for fuel nozzles having 60° spraying angle Ø Once the burner modulating adjustment is completed, set modulating control device to automatic position, change set values and observe capacity changes.
-
Page 39: Pilot Ignition System
8.12. Pilot Ignition System Pilot gas burner inlet pressure Pmax= 200 mbar 8.13. Emission Measurement In emission measurements, the following values are accepted as reference according to TS EN 676 +A2 standard. Ø CO < 100 mg/ kWh Ø %3 ≤ O ≤... - Page 40 If the value measure from PL point is below 0.5 bar, set the impulse pipe as follows. 10.08.2020 Rev. 00...
-
Page 41: Light Oil Burner Fuel Ring Line
8.14. Light Oil Burner Fuel Ring Line 10.08.2020 Rev. 00... -
Page 42: Gas Pass Equipment Required In Gas Line
8.15. Gas Pass Equipment Required in Gas Line Pe < 300 mbar Pe > 300 mbar Pe < 300 mbar Pe > 300 mbar Q<1200kW Q<1200kW Q>1200kW Q>1200kW 1- Compensator 1- Compensator 1- Compensator 1- Compensator 2- Ball valve 2- Ball valve 2- Ball valve 2- Ball valve 3- Gas filter... -
Page 43: Maintenance
9. MAINTENANCE 9.1. Weekly Maintenance Weekly maintenance is a routine cleaning and adjustment procedure which is performed to ensure smooth and continuous operation of the system. Burner components must be adjusted after each maintenance work in accordance with the instructions. Otherwise, the burner cannot be operated efficiently. -
Page 44: Seasonal Maintenance
9.3. Seasonal Maintenance Comprehensive maintenance work when the burner is re-started after long periods of shut-down or interruptions. After completion of maintenance and adjustment processes, make sure to perform a combustion analysis. Ø Check insulation resistance of electric motor. Ø Make surface cleaning of ignition electrodes and porcelains. Replace cracked or broken porcelains. -
Page 45: Troubleshooting
10. TROUBLESHOOTING Problem Cause Explanation-Suggestion Light Oil or Gas valve might be closed. Open Light Oil or Gas is the valve. cut or does not come Check burner power supply. The fuse on the Fuse failure main panel or the fuse on the burner might be tripped. -
Page 46: Periodical Flue Gas Measurement Report
11. PERIODICAL FLUE GAS MEASUREMENT REPORT Fuel Fuel Yield Flue Consumption Consumption (ppm) (ppm) (ppm) Temp. Date Signature (kg/h) (ºC) 10.08.2020 Rev. 00... -
Page 47: After Sales Services
Fax: +90 282 685 42 09 Also you can contact with us: Web site : www.ecostar.com.tr E - mail : servis@ecostar.com.tr Please observe the following recommendations. • Use the product in accordance with the principles of this manual. • For any service demands regarding the product, please contact our Service Center from the abovementioned phone numbers. -
Page 48: Notes
13. NOTES Please record and forward your measurements and observations to us www.ecostar.com.tr 10.08.2020 Rev. 00...
Need help?
Do you have a question about the ECO 55 NG and is the answer not in the manual?
Questions and answers