Advertisement
Available languages
Available languages
Quick Links
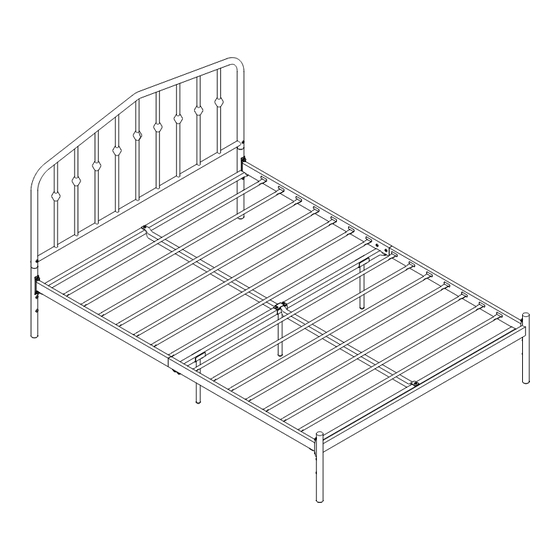
Weight Limit: 400 LBS / 181 KG
SXJ - 2022/12/16
2022 Dorel Home Products All Rights Reserved
Thank you for purchasing from DHP!
Questions, concerns, missing parts?
CONTACT OUR CUSTOMER SERVICE
DEPARTMENT BEFORE RETURNING PRODUCT
TO THE RETAILER.
If parts are missing or damaged, we will gladly ship your
replacement parts free of charge.
Visit www.dhpfurniture.com/eng/replacement-parts
or call Toll-Free 1-800-267-1739
You can also chat with us at www.dhpfurniture.com
Date of Purchase
THIS INSTRUCTION BOOKLET CONTAINS IMPORTANT SAFETY
INFORMATION. PLEASE READ AND KEEP FOR FUTURE REFERENCE.
4610029(Black)
Metal Bed
Lot Number
(TAKEN FROM CARTON)
B34461002900-KT
Full
1
Advertisement

Related Manuals for Dorel Home Products 4610029


Summary of Contents for Dorel Home Products 4610029
- Page 1 You can also chat with us at www.dhpfurniture.com Date of Purchase Lot Number (TAKEN FROM CARTON) THIS INSTRUCTION BOOKLET CONTAINS IMPORTANT SAFETY INFORMATION. PLEASE READ AND KEEP FOR FUTURE REFERENCE. SXJ - 2022/12/16 B34461002900-KT 2022 Dorel Home Products All Rights Reserved...
- Page 2 Limited 1 year Warranty Read Before Beginning Assembly DHP warrants this product to be free from defects in material and workmanship and agrees to remedy any such defect. This warranty covers Work in a spacious area and near where the unit will be used, preferably one year from the date of original purchase from authorized retailers.
- Page 3 PARTS...
-
Page 4: Parts List
2 PCS 2 PCS Each part has a unique part number. Please PART NUMBERS reference the appropriate part number when contacting customer service for replacement 4610029(Black) PART LABELS parts. T957860 Before throwing any packaging, please T1025490 verify all contents and make sure you have... - Page 5 Slat 3 PCS 1 PC 14 PCS 3 PCS Plastic Plug 28 PCS PART NUMBERS 4610029(Black) PART LABELS Each part has a unique part number. Please T919610 reference the appropriate part number when T1017830 contacting customer service for replacement T1017840 parts.
-
Page 6: Hardware List
12 PCS 4 PCS Hardware Pack Please do not completely tighten all the hardware, until the entire assembly is 4610029(Black) HP#: T4610029-00 complete, unless otherwise indicated in the step-by-step instructions. The screw(s), bolt(s) to be used at each step are shown in actual size in the lower right... - Page 7 Step 1 Insert A X 2 into C with...
- Page 8 Step 2 Screw X 2 into A X 2 and C as illustrated.
- Page 9 Step 3 Holes on the top side. Insert F X 2 into E X 2 with...
- Page 10 Step 4 4.1 Attach H X 2 to sub-assembly E/F x 2 from previous step with 4.2 Attach G to E X 2 with...
- Page 11 Step 5 This bed offers you 2 options for the height of the bed foundation. To assembly in Higher Position: From STEP 5 to STEP 10. To assembly in Lower Position: From STEP 11 to STEP 16. Attach M X 2 to G with...
- Page 12 Step 6 6.1 Attach sub-assembly E/F from previous step to A X 2 and D with 6.2 Screw into A X 2 and D.
- Page 13 Step 7 7.1 Insert one end of both I into the slot on G as illustrated. 7.2 Attach the other end of both I to H X 2 with...
- Page 14 Step 8 Attach M & K to G with...
- Page 15 Step 9 9.1 Insert P into E/F as illustrated. 9.2 Put the slat P downwards to the shorter slot.
- Page 16 Step 10 Lock P into place with Y on the longer slot.
- Page 17 Step 11 To assembly in Lower Position: From STEP 11 to STEP 16. Attach L X 2 to G with...
- Page 18 Step 12 12.1 Attach sub-assembly E/F from previous step to A X 2 and D with 12.2 Screw into A X 2 and D. 12.2 12.1...
- Page 19 Step 13 13.1 Insert one end of both I into the slot on G as illustrated. 13.2 Attach the other end of both I to H X 2 with 13.1 13.2...
- Page 20 Step 14 Attach L & K to G with...
- Page 21 Step 15 15.1 Insert P into E/F as illustrated. 15.2 Put the slat P downwards to the shorter slot. 15.1 15.2...
- Page 22 Step 16 Lock P into place with Y on the longer slot.
-
Page 23: Helpful Hints
Only use a mattress which is 74" - 75" long and 53" - 54" wide on bed. Do not use risers under this bed. 4610029(Black): T393770 4610029(Black): T392520 Weight Limit: 400 LBS / 181 KG That's it ! You've finished assembling your Metal Bed! - Page 24 Preguntas, inquietudes, partes que faltan? CONTACTE 4610029(Negro) NUESTRO DEPARTAMENTO DE SERVICIO AL CLIENTE ANTES DE DEVOLVER EL PRODUCTO A LA TIENDA. Si le faltan piezas o las que se incluyen est n da adas, con Cama de metal mucho gusto le enviaremos sus piezas de reemplazo sin cargo extra.
- Page 25 Partes Paquete de componentes Paquete #: Piezas de reemplazo, visite www.dhpfurniture.com/spa/replacement-parts 4610029(Negro) T4610029-00 Todo se incluye en 1 caja(s) grande(s)! Antes de deshacerse de las cajas de cart n, aseg rese de que est n vac as. Tambi n confirme que ha recibido todos los componentes necesarios para el...
- Page 26 Instrucciones Paso 1 Paso 14 Insertar A X 2 dentro de C con Una la parte L & K con G con Paso 2 Paso 15 15.1 Inserte P dentro de E/F como se ilustra. Atornille dentro de A X 2 & C. 15.2 Coloque el list n P hacia abajo hasta la ranura m s corta.
- Page 27 Des questions, des pr occupations ou des pi ces manquantes? CONTACTEZ NOTRE SERVICE 4610029(Noir) CLIENT LE AVANT DE RETOURNER LE PRODUIT AU D TAILLANT. Si des pi ces sont manquantes ou endommag es, nous Lit en m tal exp dierons volontiers vos pi ces de rechange gratuitement.
- Page 28 Pour des pi ces de rechange, visitez www.dhpfurniture.com/fre/replacement-parts # de paquet : T4610029-00 4610029(Noir) IMPORTANT: La liste des r f rences ci-dessous est propre votre produit. Veuillez l'avoir sous la main lorsque vous appelez pour des pi ces de rechange.
-
Page 29: Conseils Utiles
Instructions tape 1 tape 14 Ins rer A X 2 dans C avec Attacher L & K G avec tape 2 tape 15 15.1 Ins rer P E/F . Viser dans A X 2 & C . 15.2 Placez la latte P vers le bas dans la fente la plus courte. tape 3 tape 16 Ins rer F X 2 dans E X 2 avec...
Need help?
Do you have a question about the 4610029 and is the answer not in the manual?
Questions and answers