Table of Contents
Advertisement
Quick Links
Masonry Assembled
MODEL: COMMERCIAL 140 AOS
WOOD-FIRED OVEN
CO M M E R C I A L 140 A S S E M B LY O N S I T E /
W140 Oven
M A S O N RY CO N S T R U C T I O N M A N UA L
I TA L I A N WO O D - F I R E D OV E N
Includes: Venting and Oven Curing Instructions
Mugnaini Commercial Wood-Fired Ovens have been tested to:
UL 737–2007 ♦ UL 2162–2001
NSF-4 Sanitation Standards ♦ CAN/ULC S627-M93
A MAJOR CAUSE OF OVEN-RELATED FIRES IS FAILURE TO MAINTAIN
REQUIRED CLEARANCES (AIR SPACES) TO COMBUSTIBLE MATERIALS.
IT IS OF UTMOST IMPORTANCE THAT THIS OVEN BE INSTALLED ONLY
IN ACCORDANCE WITH THESE INSTRUCTIONS.
Mugnaini Imports, Inc. • 1530 Grove Street, Healdsburg, CA 95448
main: (707) 416-4106 • toll free: (888) 887-7206 • fax: (707) 857-7177
mugnaini.com • mugnaini@mugnaini.com
Advertisement
Table of Contents

Related Manuals for Mugnaini COMMERCIAL 140 AOS


Summary of Contents for Mugnaini COMMERCIAL 140 AOS
- Page 1 IT IS OF UTMOST IMPORTANCE THAT THIS OVEN BE INSTALLED ONLY IN ACCORDANCE WITH THESE INSTRUCTIONS. Mugnaini Imports, Inc. • 1530 Grove Street, Healdsburg, CA 95448 main: (707) 416-4106 • toll free: (888) 887-7206 • fax: (707) 857-7177 mugnaini.com • mugnaini@mugnaini.com...
- Page 2 RESTRICTIONS OR NEED FOR INSPECTION OF THE INSTALLATION. FOR YOUR SAFETY DO NOT STORE OR USE GASOLINE OR OTHER FLAMMABLE VAPORS OR LIQUIDS IN THE VICINITY OF THIS OR ANY OTHER APPLIANCES. SAVE THESE INSTRUCTIONS FOR FUTURE USE Commercial 140 Wood AOS Manual Mugnaini Imports, Inc.
-
Page 3: Table Of Contents
Fire Starting Tools ..............................19 Using The Door ............................... 20 How to Measure Oven Temperature ....................... 20 Starting a Fire ................................21 Curing The Oven ..............................21 Curing Schedule ..............................25 6. LIMITED WARRANTY ............................... 26 Commercial 140 Wood AOS Manual Mugnaini Imports, Inc. - Page 4 INTRODUCTION The following is intended to be used as a general reference for the installation of the Mugnaini Commercial W140 Oven 140 wood-burning oven, and more specifically for those individuals (like yourself, your architect, or your contractor) who will be involved with the design and the construction of your oven.
- Page 5 5’9” in height. If elevation adjustments are desired, modify the height of the lower base only (the wood storage area). Contractor to verify height of final installation with the owner. (wood storage area) Commercial 140 Wood AOS Manual Mugnaini Imports, Inc.
- Page 6 (minimum--wider if preferred) as support for shelf. Pour a leveled 3” concrete slab on top of the rosin paper and sand base. Once cured, go to Section 3 — Oven Assembly. Commercial 140 Wood AOS Manual Mugnaini Imports, Inc.
-
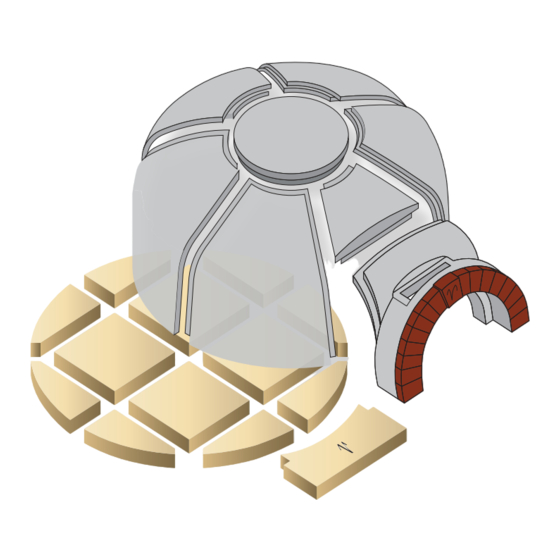
Page 7: Oven Assembly
Note: Due to the handmade characteristics of this product, a 1/8” gap may exist between floor elements. DO NOT mortar or grout in between the floor element joints. The natural gap between floor elements is designed to allow for thermal expansion. Commercial 140 Wood AOS Manual Mugnaini Imports, Inc. -
Page 8: Step 3 - Crown Assembly
DO NOT place mortar in the crown element joints. A small gap of roughly ¼”– ½” will also exist between the oven floor and crown elements. Commercial 140 Wood AOS Manual Mugnaini Imports, Inc. -
Page 9: Step 4 - Mortaring Crown Base
(Approximately 3” wide x ½” thick over the outside perimeter). STEP 5 – MORTARING CROWN JOINTS Wet sponge joints. Apply refractory mortar over the joints. (Approximately 4” wide x ½” thick over each joint). Do not allow mortar to enter joints. Commercial 140 Wood AOS Manual Mugnaini Imports, Inc. -
Page 10: Step 6 - Installing Flue Manifold
Note: Ensure the flue manifold is level on top of crown elements. STEP 7 – INSULATION Cover the entire oven with 2-layers of 1” or 1-layer of 2” Thermal Insulation Blanket (Item K). Commercial 140 Wood AOS Manual Mugnaini Imports, Inc. -
Page 11: Step 8 - Oven Venting
STEP 8 – OVEN VENTING Based on the overall oven design and architecture, each chimney system will vary. Contact your local licensed chimney or mechanical contractor. See page 14 for “Oven Venting Instructions”. Commercial 140 Wood AOS Manual Mugnaini Imports, Inc. -
Page 12: Enclosing The Oven
ENCLOSING THE OVEN Your Mugnaini Oven is now ready for the final step of the construction process – which relies entirely on your level of creativity and desired architectural effect. The oven enclosure protects the oven from atmospheric moisture, supplies ventilation to the oven (so that condensation does not occur within the compartment), and retains the insulating materials placed over and around the oven crown itself. - Page 13 ENCLOSING THE OVEN Your Mugnaini Oven is now ready for the final step of the construction process – which relies entirely on your level of creativity and desired architectural effect. The oven enclosure protects the oven from atmospheric moisture, supplies ventilation to the oven (so that condensation does not occur within the compartment), and retains the insulating materials placed over and around the oven crown itself.
- Page 14 @ 16” on center 4" Rebar @ 16” on center footing to concrete block Center block wall can run in opposite direction Front View 140 FLAT ROOF ENCLOSURE – FRONT VIEW Commercial 140 Wood AOS Manual Mugnaini Imports, Inc.
- Page 15 Perlite granules. Place a 2” diameter metal weatherproof air vent on the back near the top of your structure at the chimney to prevent condensation within the oven enclosure. Commercial 140 Wood AOS Manual Mugnaini Imports, Inc.
- Page 16 NOTE: If placing the oven under an overhang or patio structure follow local Building Codes and Fire Marshall requirements for passing the chimney through combustible ceilings. Commercial 140 Wood AOS Manual Mugnaini Imports, Inc.
- Page 17 4” conc. slab with #4 bars @ 16” O.C. each way #4 dowels @ 16” o.C. #4 cont. footing to conc. block 12” 4” aggregate base min. DOME SECTION SAMPLE DIMENSIONS 140 DOME SECTION SAMPLE DIMENSIONS Commercial 140 Wood AOS Manual Mugnaini Imports, Inc.
-
Page 18: Oven Venting Instructions
OVEN VENTING INSTRUCTIONS Commercial Model Wood-Fired Ovens OVERVIEW Your Mugnaini wood-fired oven has been listed to the UL Standard for Safety for Fireplace Stoves, UL 737 8th edition. These requirements cover fireplace stoves that are freestanding assemblies having fire chambers intended to be operated open to the room with the door either open or closed. -
Page 19: Recommended Chimney Pipe
• Direct vent by connecting the oven flue outlet to a 8-inch diameter listed chimney rated for use as a 2100° F chimney system. Chimney must terminate to an approved spark arrestor. • Your Mugnaini wood-fired oven was evaluated to meet the fire safety standards of UL 737-Eighth Edition by Intertek Testing Laboratories, ETL Listing Report #J20020124 www.interteksemco. -
Page 20: Elbow Offset Chart
48” + 6” 29 3/4” 60 1/2” 30° 63 1/8” 48“+ 9” 31 1/4” 30° 48“+ 12” 32 3/4” 65 3/4” 30° 71” 48“+ 18” 35 3/4” 30° 48“+ 24” 38 3/4” 76” 30° Commercial 140 Wood AOS Manual Mugnaini Imports, Inc. -
Page 21: Precautions
• UL 103 chimneys are available in double wall or triple wall pipe and various lengths in 6” increments. • Only 15° or 30° elbows are available. • An anchor plate is used as the starter piece and is to be installed per Mugnaini oven installation instructions. - Page 22 SINGLE WALL AND B-TYPE VENT PIPES ARE NOT ACCEPTABLE FOR THIS TYPE OF APPLIANCE! IT IS IMPORTANT FOR THE INSTALLER TO CONTACT THE LOCAL BUILDING OR FIRE INSPECTOR TO DETERMINE WHICH VENTING METHOD IS ACCEPTABLE. Commercial Factory-Assembled Manual Mugnaini Imports, Inc.
- Page 23 10 3/8” (+/- 1”) on center behind the front panel Connecting Factory Built Chimney to Oven Mugnaini offers an optional Direct Vent Flue Adaptor for Part# DVA with anchor plate attached installation in the factory. Part# DVA is a flush mount adaptor...
- Page 24 10 3/8” (+/- 1”) on center behind the front panel Connecting Factory Built Grease Duct to Oven Mugnaini offers an optional Direct Vent Flue Adaptor for Part # GDV Grease duct adaptor installation in the factory. Part# GDV has a 2” weldable stainless stub for a field welded grease duct adaptor.
- Page 25 6” beyond the sides of the oven opening. See diagram below Type 1 Hood Placement SEEK OUT A QUALIFIED PROFESSIONAL TO DESIGN AND INSTALL YOUR VENTING SYSTEM. CHECK WITH LOCAL AUTHORITIES FOR SPECIFIC CODE REQUIREMENTS Commercial Factory-Assembled Manual Mugnaini Imports, Inc.
- Page 26 CURING YOUR MUGNAINI WOOD-FIRED OVEN This section covers the following Mugnaini series models: 160×120 160×140 180×140 180×180 ♦ ♦ ♦ ♦ ♦ ♦ READ ALL INSTRUCTIONS BEFORE STARTING A FIRE AND CURING YOUR OVEN FOR USE WITH SOLID WOOD FUEL ONLY WARNING FOLLOW THE COMPLETE CURING SCHEDULE BEFORE COOKING IN THIS OVEN.
-
Page 27: Instructions
OVEN CURING INSTRUCTIONS Your Mugnaini wood-fired oven is made from Refrattari Cotto or refractory clay. The water used to form the clay must be cooked out before your oven can be put into use. Curing is the process of slowly heating an oven to first drive out the moisture from the oven components and surrounding mass, and then to temper the oven dome. -
Page 28: Using The Door
HOW TO MEASURE OVEN TEMPERATURE Mugnaini wood-fired ovens will self regulate based on the size of the flame and the floor temperature. We measure temperature inside a wood-fired oven with an infrared thermometer for accuracy. By checking the floor temperature, using visual cues and flame size we can create distinct repeatable oven environments for different styles of cooking. -
Page 29: Starting A Fire
Prior to starting the next fire, open the door slowly and measure the temperature of the sides of the dome paying attention to use the same spot each time you measure. Average left and right side temperatures and record on the chart. Commercial 140 Wood AOS Manual Mugnaini Imports, Inc. - Page 30 After the fire goes out, place the door through the arch into the fully closed position. The door should stay in place unit the next day’s fire. 160×120 160×140 180×140 180×180 ♦ ♦ ♦ ♦ ♦ Commercial 140 Wood AOS Manual Mugnaini Imports, Inc.
- Page 31 IF FLAMES EXTEND BEYOND THE OVEN DOOR OPENING AND UP THE EXHAUST FLUE – YOU ARE OVER FIRING THE OVEN. CONGRATULATIONS —you have fully cured your pizza oven! You can now fire your oven as per the operating instructions and start cooking. Commercial 140 Wood AOS Manual Mugnaini Imports, Inc.
- Page 32 Use the metal peel to shovel the ashes out of the oven. TECHNICAL ASSISTANCE We want your experience to be rewarding. Please call the office at 888.887.7206 if you have any questions or need help understanding these steps. Commercial 140 Wood AOS Manual Mugnaini Imports, Inc.
-
Page 33: Curing Schedule
DAY 1 DAY 2 Time Temperature Time Temperature Target 250° F maximum Target 400° F maximum DAY 3 DAY 4 Time Temperature Time Temperature Target 600° F maximum Target Burn off all soot Commercial 140 Wood AOS Manual Mugnaini Imports, Inc. -
Page 34: Limited Warranty
Oven, related equipment, and accessories; To any Oven, or related equipment or accessory, that is improperly installed or maintained; To products resold in other than Mugnaini original packaging or to Ovens modified or altered by the Original Purchaser;... - Page 35 Warranty Period by Mugnaini or its authorized representative. Any and all rights under this warranty or at law of Original Purchaser against Mugnaini shall terminate and be void in the event Warranty Claims are not submitted within the time set forth in the immediately preceding sentence. Such Warranty Claims must be in writing and include the Oven type, the model and serial number of the Oven, the purchase date and a full description of the circumstances giving rise to the Warranty Claim.
- Page 36 Original Purchaser can be reached. Mugnaini will review each notice and respond to the Original Purchaser in an effort to settle such dispute. Under federal law, no lawsuit may be initiated unless and until the dispute settlement procedures outlined in this warranty have been exhausted.
Need help?
Do you have a question about the COMMERCIAL 140 AOS and is the answer not in the manual?
Questions and answers