Table of Contents
Advertisement
Quick Links
Advertisement
Table of Contents

Subscribe to Our Youtube Channel
Related Manuals for Valet V110


Summary of Contents for Valet V110
- Page 1 Premium Cyclonic Central Vacuum System Installation & Operation Manual Rev 2.0...
- Page 2 - service - spares 1800 050 333 Ness Head Office 02 8825 9222 valet premium cyclONic ceNtral vacuum vac-154 v81 pOwer uNit vac-157 v110 pOwer uNit OwNer’s maNual rev 2, september 2022 cOpyrigHt NOtice all rights reserved. No part of this publication may be reproduced, transmitted or stored in a retrieval system in any form or by any means, electronic, mechanical, photocopying, recording, or otherwise, without the prior written permission of Ness.
-
Page 3: Table Of Contents
Contents safety instructions ........4 Handling &... -
Page 4: Safety Instructions
Owners manual intended only for Household and light commercial use valet v81 & v110 power units are designed to power central vacuum systems for residential buildings. the power unit is connected to the ducted piping serving the various rooms. inlet valves are installed in rooms in the house for plugging the vacuum hose and various cleaning accessories. -
Page 5: Handling & Unpacking
Warranty the instruction manual for use and your valet central vacuum system has been maintenance is an integral and essential part engineered for a long, trouble-free service life. of the vacuum power unit and must be handed the warranty period on parts only, excluding over to the user. -
Page 6: Components
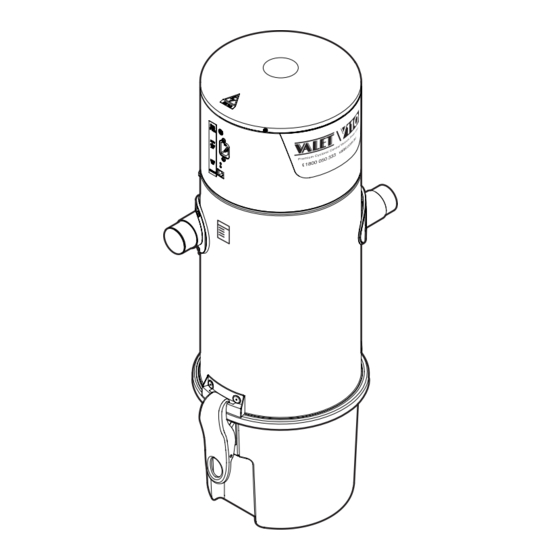
Components 13, 14 Rear of unit v110 shown 1 Sound-proofed motor chamber 10 Fuse 2 Electric motor 11 Filter cartridge 3 Exhaust 12 Fixing Knob 4 Dual right/left dust inlet 13 Mounting bracket 5 Dual right/left dust inlet... -
Page 7: Installing The Power Unit
1B. drill. using a spirit level check that the bracket is level 2. release the locking lever. v110 shown... - Page 8 Installing the power unit 3. remove the support from the 6. remove the dust container. guides. 4. fit the vibration blocks to the 7. secure the power unit to the support. support. 5a. If using a wall bracket. fix the 8.
-
Page 9: Connecting The Pvc Pipe
* two air intakes are provided - for left or right hand pipe entry. the unused intake must blocked with the cap provided. v110 shown Installation with optional exhaust pipe suitable for installation in enclosed spaces. Optional muffler exhaust... -
Page 10: Electrical
electrical Connections final check the electrical installation of the power unit Once the power unit has been connected must be done by qualified electrical installers to the mains, check all vacuum sockets according to local regulations. using the flexible hose. the manufacturer accepts no liability for danger: malfunction of the power unit or damage... -
Page 12: How To Empty The Dust Container
emptying the dust container without a filter cartridge. not Before any maintenance job, turn off observing this precaution may the mains power at the power point. result in serious damage to regular maintenance increases the motor and will void the the life span of the power unit and manufacturer’s warranty. -
Page 13: How To Clean The Filter Cartridge
Valet spare parts. 1. wash the cartridge with tap water taking care not to damage the filter if the central vacuum system is material. -
Page 14: How To Replace The Filter Cartridge
replacing the filter cartridge please wear a dust mask and turn off the mains power at the gloves power point. replace the filter cartridge every 2-3 years. this interval is variable depending on how often your central vacuum system is used. 1. -
Page 15: Technical Specifications
V110 Specifications voltage 220~240 vac motor power 1260 watts 1650 watts motor revolutions 43,507 rpm 46,480 rpm turbine stages vacuum socket voltage 12 v air flow 121 cfm 115 cfm max vacuum (water lift) 2753 mm 3192 mm filtering surface...
Need help?
Do you have a question about the V110 and is the answer not in the manual?
Questions and answers