Table of Contents
Advertisement
Quick Links
Advertisement
Table of Contents

Related Manuals for C-Tech EDG-1S


Summary of Contents for C-Tech EDG-1S
- Page 1 NON-NUCLEAR SOIL ELECTRICAL DENSITY GAUGE EDG-1S...
-
Page 2: Table Of Contents
CONTENTS Introduction ..............................1 Is EDG Safe to Use? ............................1 III. Introduction to the EDG Process ........................1 IV. Components of the EDG Units ........................2 The EDG Process in Depth ..........................3 VI. Making a Soil Model ............................5 VII. To create a Soil Model ............................6 VIII. -
Page 3: Introduction
I. Introduction Electrical Density Gauge (EDG) is capable of providing accurate readings of soil density, moisture content, and percent compaction on soils typically used for roads and foundations. The precision by which the EDG can determine these physical parameters depends highly upon you, the operator. Reading and understanding the contents of this manual is a very important step toward utilizing EDG to its maximum potential. -
Page 4: Components Of The Edg Units
moisture content make for more accurate Soil Models. Once the Soil Model has been created, the EDG is ready for testing at a Job Site. A Job Site is an area of similar soil characteristics in which the user wishes to determine the physical characteristics of the soil. -
Page 5: The Edg Process In Depth
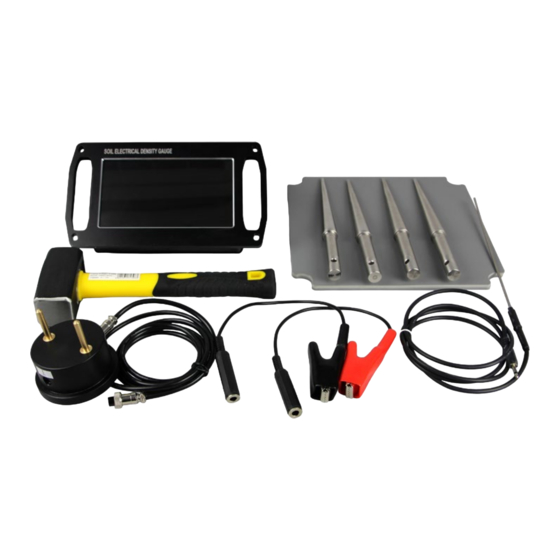
the nut against the enclosure. Soil Darts: To get electrical data from the soil, 4 Soil Darts are pounded into the ground with a hammer. A template is provided to accurately position the Soil Darts. The Soil Darts are machined from stainless steel, and are expected to last many years. - Page 6 system. The EDG automatically assigns numbers to newly-created Soil Models, Soil Tests, Job Sites, and Field Tests. Also, the user can assign names to Soil Models and Job Sites to help keep track of data. The operator is required to manually keep track of the location that is associated with a particular Soil Test or Field Test.
-
Page 7: Making A Soil Model
EDG tests are performed by first selecting the project menu, then testing with EDG. The EDG test is performed by (first) driving four Soil Darts into the Test Spot at four quadrant points of a twelve inch (12") circle. A Template is provided to ensure accurate positioning of the Soil Darts. The Soil Sensor is then set up on the Template to make it easy to connect the Sensor fins to the Darts in the required sequences. -
Page 8: To Create A Soil Model
98% compaction with 10% moisture 92% compaction with 5% moisture 92% compaction with 7.5% moisture 92% compaction with 10% moisture A minimum of three (3) Test Spots (or more specifically, Soil Tests) are required for a valid Soil Model. VII. To create a Soil Model 1. - Page 9 5、Create a new Soil Model by pressing New Model. Press bring up the keyboard, then input a name for the new model. - 7 -...
- Page 10 6. Press Config to save the name of the Soil Model and return to the Model List menu. Setup has two status, press Setup, the button will switch to Delete. When it is Setup, you can enter Model Settings menu by pressing a model name. On the contrary, when it is Delete, you can delete a model by pressing a model name.
- Page 11 9. Lay the Dart Template on the Test Spot. Drive the four (4) Darts into the soil through the holes in the Template until the Dart shoulder is just even with, or slightly lower than, the soil surface. Then connect it to the Soil Sensor. 10.
- Page 12 Content of the soil at the center of each Test Spot (Soil Test). A Sand Cone test must be performed for each Test Spot. Soil from the rat hole is removed and lab tested. Wrap or properly enclose the soil sample to prevent it from drying out before the moisture test can be run.
- Page 13 21. "No data" means that physical data of the Soil Model has not been entered into the EDG. The data requires to be input according to laboratory results. Select a test apot, then press Modify. You can enter the lab-determined physical data for this Test Spot (Soil Test) in the Soil Model. - 11 -...
-
Page 14: Associating A Soil Model With A Project
When you have completed entering physical data, the screen will show “Normal” for that Soil Test. 22. After entering all data, review the Soil Tests for Soil Model screen to be sure that there are at least three entries, and that they are all complete. Once a Soil Model becomes valid {3 complete Soil Tests), a check is run to see how well the Soil Model "fits"... - Page 15 2. Press New Project: After input a name to the project, press Confirm to save it. - 13 -...
- Page 16 3. Enter Model List menu by pressing Not associated. Press a soil model name to associate with project1. Note: the program will prevent an association of an incomplete Soil Model with a project. If correct association failed, it means the physical data has not been entered into the Soil Model or there is any other problem.
-
Page 17: Project Test & View The Results
After successful association, the next step is conducting a Field Test. The Soil Model and a project also can be associated after the Field Test, but the actual physical characteristics such as Wet Density and Moisture content are unable to be determined on the site. It needs to input correct physical characteristics of the Soil Model first and conduct association next before view the data from Test Results menu. - Page 18 Test Method is the same as soil model test. After read B-B, the results will show on the screen: 2. After saved the test data, you can view the results by pressing a project name in the Project List menu. In this menu, you can delete test spots and generate a report for this project.
-
Page 19: Features Setup
3. After making a report, you can check it on computer by Type-C data cable. Warning: a) If the EGD unit cannot shut down after the data transmission, you should shut down it with a magnet close to the "reset area for induction" which is on the back of EDG unit. b) The TYPE_C cable only be used to transmit data. -
Page 20: Notice
XI. Notice 1. EDG is a kind of instrument based on electromagnetic measurement. The measuring energy present when using EDG is less than one tenth of that when you are using a cell phone. There is no nuclear radiation and it is absolutely safe! 2. -
Page 21: Soil Density
Soil Tests per soil model: 16 Projects: Approx. 200 Field Tests per project: 500 XIII. Soil Density Soil Density Test is one of the three physical test indices, gravity, density and percent moisture. Combined with Percent Moisture and Soil Gravity, Soil Density can be used to calculate out six physical indices, Dry Density, Saturation Density, Buoyant Density, Pore Space Ratio, Porosity and Saturation. -
Page 22: Edg Error Messages And Warnings
���� ���� ���� ���� ���� In the formula: ���� ����/�������� ���� ——Soil Dry Density ( ���� ���� ���� —— Mass of Dry Soil (Soil Particle) ( ���� �������� ——Volume of the Soil ( ���� ���� ���� + ���� ���� 3. Soil Saturation Density ����... - Page 23 Method: The battery needs to be charged 2. Error: The bottom of the screen prompts “Not connected” Analysis: a) The Soil Probe maybe disconnected b) Probe cable maybe damaged c) Probe maybe damaged Method: a) Connect the Soil Probe b) Check whether the probe cable has a broken place. If there is a broken place, please use after soldering, or return to factory repair, or replace the probe cable.
- Page 24 5. Error: Cannot view measurement results Analysis: a) No associated Soil Model b) Sole model associated is abnormal Method: a) Associated Soil Model b) Fix the data of soil model - 22 -...
-
Page 25: Quality Warranty
Quality Warranty This company provides free repair of its products with manufacturing defects in material or workmanship. Substitution for the repaired parts of the product is provided during the maintenance. Product certificate and sales record are needed when asking for free repair. Free maintenance won’t be given when the damage caused by customer inappropriate use, repair, installment, operation, preservation, etc. -
Page 26: Packing List
Packing List Name Quantity EDG Unit Soil Sensor Soil Darts Temperature Probe connector HDB-4S Hammer Soil Darts Connection Cable Battery Charger Charging Connector (USB Cable) Type-C data cable Soil Sensor Cable Soil Template User Manual Packing Box Certificate After you open the package, check the contents of the delivery carefully against the packing list supplied. - Page 27 - 25 -...
Need help?
Do you have a question about the EDG-1S and is the answer not in the manual?
Questions and answers