Kenwood NEXEDGE NX-720 Series Instruction Manual
Vhf digital transceiver
Hide thumbs
Also See for NEXEDGE NX-720 Series:
- Service manual (127 pages) ,
- Instruction manual (23 pages) ,
- Technical details (2 pages)
Table of Contents
Advertisement
Quick Links
Advertisement
Table of Contents

Related Manuals for Kenwood NEXEDGE NX-720 Series


Summary of Contents for Kenwood NEXEDGE NX-720 Series
- Page 1 NX-720 Series NX-820 Series VHF DIGITAL TRANSCEIVER UHF DIGITAL TRANSCEIVER INSTRUCTION MANUAL ÉMETTEUR-RÉCEPTEUR NUMÉRIQUE VHF ÉMETTEUR-RÉCEPTEUR NUMÉRIQUE UHF MODE D’EMPLOI TRANSCEPTOR DIGITAL VHF TRANSCEPTOR DIGITAL UHF MANUAL DE INSTRUCCIONES © B62-2421-00 (K) 09 08 07 06 05 04 03 02 01 00...
- Page 2 VHF DIGITAL TRANSCEIVER UHF DIGITAL TRANSCEIVER NX-700 Series NX-800 Series INSTRUCTION MANUAL...
- Page 3 Terminal Descriptions ACC (D-SUB 15 Pin Connector) Pin No. Name Description Specification DC Power (Switched B) Output 13.6 V ±15% Max. 2 A Min. Input: 10.8 V Igintion Signal Input Max. Input: 16.0 V Loudspeaker Output 4 Ω DETO RX Detected Audio Output 280 mV (typ.) DATAI...
- Page 4 THANK YOU We are grateful you have chosen KENWOOD for your personal mobile applications. This instruction manual covers only the basic operations of your mobile radio. Ask your dealer for information on any customized features they may have added to your radio.
-
Page 5: Table Of Contents
◆ The transceiver operates in 12 V negative ground systems only! Check the battery polarity and voltage of the vehicle before installing the transceiver. ◆ Use only the supplied DC power cable or a KENWOOD optional DC power cable. ◆ Do not cut and/or remove the fuse holder on the DC power cable. -
Page 6: Getting Started
GETTING STARTED Note: The following instructions are for use by your KENWOOD dealer, an authorized KENWOOD service facility, or the factory. SUPPLIED ACCESSORIES Carefully unpack the transceiver. We recommend that you identify the items listed below before discarding the packing material. If any items are missing or have been damaged during shipment, file a claim with the carrier immediately. - Page 7 • Be sure to leave enough slack in the cables so the transceiver can be removed for servicing while keeping the power applied. ■ Installing the Transceiver For passenger safety, install the transceiver securely using the supplied mounting bracket and screw set, so the transceiver will not break loose in the event of a collision.
-
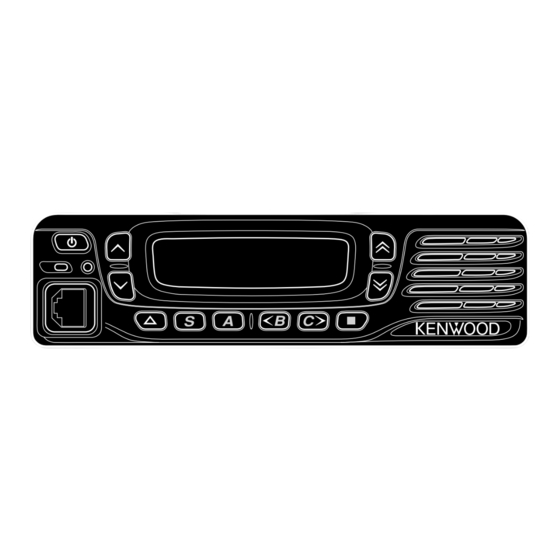
Page 8: Getting Acquainted
GETTING ACQUAINTED ⑭ (Power) switch ① Press to switch the transceiver ON or OFF. keys ② Press to activate their programmable functions {page 5}. keys ③ Press to activate their programmable functions {page 5}. ④ TX/RX Indicator Lights red while transmitting and green while receiving a signal. Flashes orange when receiving an optional signaling call. - Page 9 DISPLAY Icon Description Displays the signal strength. Not used. Appears when the GPS position is determined. Appears when the Monitor or Squelch Off is activated. Blinks when an incoming call matches your Optional Signaling. Appears when the Talk Around function is on. Lights while scanning or while paused on a channel.
-
Page 10: Programmable Functions
PROGRAMMABLE FUNCTIONS , S, A, <B, C>, and ■ keys can be programmed with the functions listed below. Ask your dealer for details on these functions. • None • Priority-channel Select • 2-tone • Public Address 1, 7 • Autodial •... -
Page 11: Basic Operations
Available only for Analog Trunking operation. Available only for NXDN Trunking operation. Available only for NXDN Conventional operation. Emergency can be programmed only on the key. When assigned, the dealer must set the key assignment hold to “Enable” and second function as “Emergency”. Available only for NXDN Conventional operation and NXDN Trunking operation. - Page 12 SELECTING A ZONE AND CHANNEL/GROUP ID Select the desired zone and channel/group ID using the keys programmed as [Zone Up]/ [Zone Down] and [CH/GID Up]/ [CH/GID Down]. • You can program names for zones and channels/group IDs with up to 10 characters. TRANSMITTING/ RECEIVING 1 Select the desired zone and channel/group ID.
-
Page 13: Scan
RECEIVING Select the desired zone and channel. If signaling has been programmed on the selected channel, you will hear a call only if the received signal matches your transceiver settings. Note: Signaling allows your transceiver to code your calls. This will prevent you from listening to unwanted calls. - Page 14 SCAN REVERT The Scan Revert channel is the channel selected when you press the PTT switch to transmit during scan. Your dealer can program one of the following types of Scan Revert channels: • Selected: The last channel selected before scan. •...
-
Page 15: Fleetsync: Alphanumeric 2-Way Paging Function
FleetSync: ALPHANUMERIC 2-WAY PAGING FUNCTION FleetSync is an Alphanumeric 2-way Paging Function, and is a protocol owned by JVC KENWOOD Corporation. Note: This function is available only in analog operation. SELCALL (SELECTIVE CALLING) A Selcall is a voice call to a station or group of stations. - Page 16 4 Press the S or key to enter Status mode. 5 Press the key to select the status you want to transmit. • If Manual Dialing is enabled, you can enter a station ID by using the DTMF keypad. (refer to step 3, above). 6 Press the PTT switch or Side 2 key to initiate the call.
-
Page 17: Trunking Calls (Analog)
TRUNKING CALLS (ANALOG) PLACING A DISPATCH CALL 1 Select the desired zone and channel/group ID. 2 Press and hold the PTT switch. 3 If the “PTT Proceed” tone sounds, communication is possible; start speaking into the microphone. Release the PTT switch to receive. •... -
Page 18: Advanced Operations
ADVANCED OPERATIONS DTMF (DUAL TONE MULTI FREQUENCY) CALLS ■ Making a DTMF Call Manual Dialing 1 Press and hold the PTT switch. 2 Enter the desired digits using the DTMF keypad. • If you release the PTT switch, transmit mode will end even if the complete number has not been sent. - Page 19 EMERGENCY CALLS If your transceiver has been programmed with the Emergency function, you can make emergency calls. 1 Press and hold the key programmed as [Emergency]. • Ask your dealer for the length of time necessary to hold this key before the transceiver enters Emergency mode.
- Page 20 ■ Radio Access Number (RAN) RAN is a new signaling system designed for digital radio communications. When a channel is set up with a RAN, squelch will only open when a call containing a matching RAN is received. If a call containing a different RAN is made on the same channel you are using, you will not hear the call.
- Page 21 SIGNAL STRENGTH INDICATOR The signal strength indicator displays the strength of received calls. No icon appears when no signal is available. Strong Sufficient Weak Very weak flashes when out of range (NXDN Trunking only). PUBLIC ADDRESS (PA) The PA system can only be used with an external speaker. 1 Press the key programmed as [Public Address] to activate the Public Address function.
-
Page 22: Background Operations
BACKGROUND OPERATIONS TIME-OUT TIMER (TOT) The Time-out Timer prevents you from using a channel for an extended duration. If you continuously transmit for a preset time, the transceiver will stop transmitting and an alert tone will sound. Release the PTT switch. AUXILIARY PORT Press the key programmed as [AUX A] or [AUX B] to activate the auxiliary port. - Page 24 MANDATORY SAFETY INSTRUCTIONS TO INSTALLERS AND USERS • Use only manufacturer or dealer supplied antennas. • Antenna Minimum Safe Distance: 40 cm (16 inches), 50% duty Cycle. • Antenna Gain: 0 dBd referenced to a dipole. The Federal Communications Commission has adopted a safety standard for human exposure to RF (Radio Frequency) energy which is below the OSHA (Occupational Safety and Health Act) limits. • Antenna Mounting: The antenna supplied by the manufacturer or radio dealer must not be mounted at a location such that during radio transmission, any person or persons can come closer than the above indicated minimum safe distance to the antenna, i.e. 40 cm (16 inches) , 50% duty Cycle. • To comply with current FCC RF Exposure limits, the antenna must be installed at or exceeding the minimum safe distance shown above, and in accordance with the requirements of the antenna manufacturer or supplier. •...
Need help?
Do you have a question about the NEXEDGE NX-720 Series and is the answer not in the manual?
Questions and answers