Yaesu FT-65R, FT-65E - Transceiver Quick Manual
- Operating manual (52 pages) ,
- Advance manual (39 pages) ,
- Instruction manual (22 pages)
Advertisement
- 1 OVERVIEW
- 2 Basic Operation
- 3 Frequency Navigation
- 4 Transmission
- 5 Activating the Set Mode
- 6 Setting the Memory Channels
- 7 Changing the Transmit Power Level
- 8 Setting the Preferred Operating Mode
- 9 Locking the Keys and Switches
- 10 Turning the Keylock Feature ON and OFF
- 11 Change the key locking scheme
- 12 Using the Flash Light / the Emergency Alarm
- 13 Documents / Resources
![]()
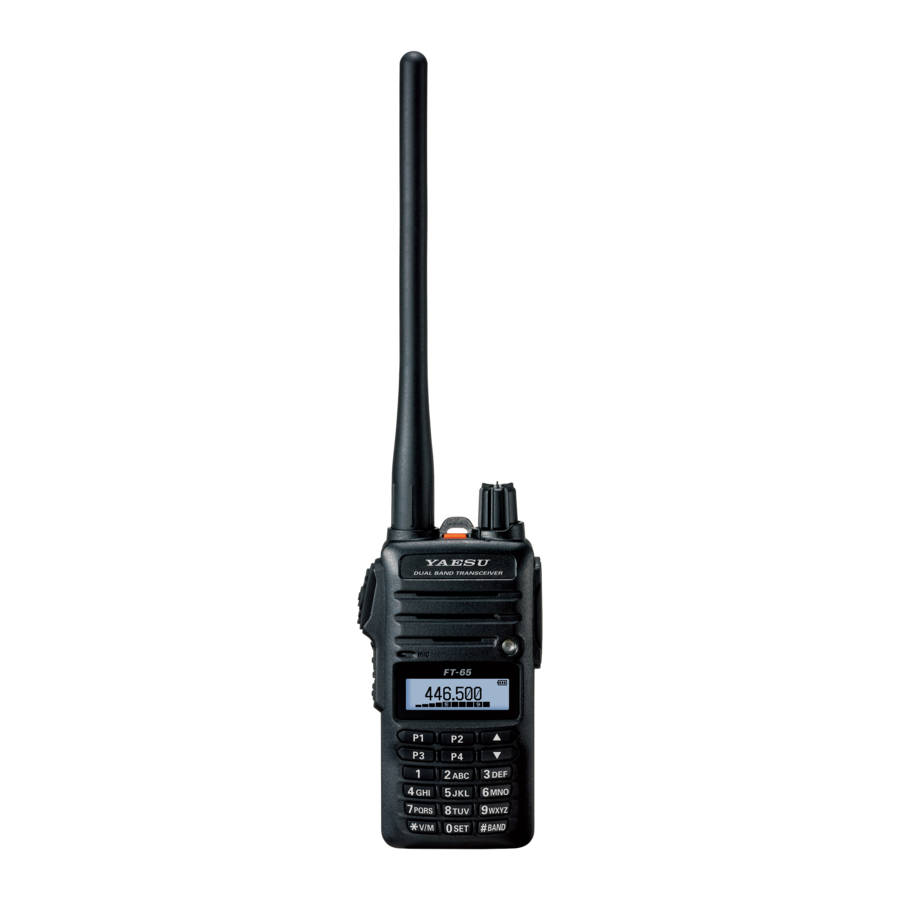
OVERVIEW

- Speaker
- Microphone
- LCD (Liquid Crystal Display)
- Quick Recall key
- Alphabet / Numeric keys
- V/M key
- LED Flash-Light
![]() key
key- BAND key
- 0 / zero-set key
 key
key*The circled numbers in the table correspond to the circled numbers in the procedures of this manual.

- Antenna Jack
- EMERGENCY Key
- TX/BUSY Indicator Lamp
- PWR/VOL Knob

- PTT (Push To Talk) Switch
- MONI/T.CALL Key (Function is selectable from Set mode)
- F key
- SP Jack
- MIC Jack
Basic Operation
Turn the Power ON and OFF
Rotate the  PWR/VOL knob out of the click-stop to turn the transceiver ON. The current DC supply voltage will be shown on the display for two seconds. After the two second interval, the display will commence the normal operating frequency indication.
Changing between VFO mode and Memory mode
]Press the  [* V/M] key repeatedly to toggle the frequency control between the VFO mode and the Memory mode.
For details on Memory channels, see "Setting the Memory Channels".
Selecting the Operating Band
Press the  [#BAND] key repeatedly to change the operating frequency between the 144 MHz Band, the 430 MHz Band, and the 95 MHz (FM Radio Broadcast) Band. Frequency ranges are shown in the table.
| Frequency Range (MHz) | ||||
| RX | TX | RX | TX | |
| USA version | 136-174 | 144-148 | 400-480 | 430-450 |
| EU version | 136-174 | 144-146 | 400-480 | 430-440 |
| Asian version | 136-174 | 136-174 | 400-480 | 400-480 |
Frequency Navigation
Tuning Frequency
Pressing the  [
[ ] key tunes the FT-65R/E toward a higher frequency, while pressing the [
 ] key will lower the operating frequency, in steps preprogrammed for the current operating band.
Direct Keypad Frequency Entry
The operating frequency may be entered directly from the keypad by pressing the numbered digits on the keypad in the proper sequence.
Example:
To enter 145.000 MHz*, press [1] à [4] à [5] à [0] à [0] à [0]
*There is a short-cut to enter frequencies ending in zeros - after the last nonzero digit, press and hold the ![]() to enter the remaining zeros.
to enter the remaining zeros.
Scanning
Manual VFO Scan:
To manually initiate VFO scanning, press and hold either the ![]() [] or
[] or ![]() [] key to begin upward or downward scanning, respectively.
[] key to begin upward or downward scanning, respectively.
Programmed Mode VFO Scan:
To begin scanning within a limited sub-band range from the VFO mode, press and hold the  [#BAND] key to select the bandwidth for the|Programmed Mode (VFO) scanner. Then press the
 ![]() F key and the [#BAND] key to start scanning.
F key and the [#BAND] key to start scanning.
Transmission
To transmit, press the  PTT switch, and speak into the front panel microphone (located in the lower left-hand corner of the speaker grille) in a normal voice level. The
 ![]() TX/BUSY indicator will glow red during transmission.
TX/BUSY indicator will glow red during transmission.
Activating the Set Mode
Use the following procedure to activate the Set Mode and configure the transceiver parameters.
- Press and hold the
![]() F key to enter the Set mode.
F key to enter the Set mode. - Repeatedly press the
![]() [▲] or
[▲] or ![]() [▼] key to select the Set Mode Item to be adjusted.
[▼] key to select the Set Mode Item to be adjusted. - Press the F key momentarily to enable adjustment of the Set Mode Item.
- Press the
![]() [▲] or
[▲] or ![]() [▼] key to adjust the level, or choose the parameter, of the selected Set Mode Item.
[▼] key to adjust the level, or choose the parameter, of the selected Set Mode Item. - After completing the selection and adjustment, press the
![]() PTT switch to save the new setting and exit to normal operation.
PTT switch to save the new setting and exit to normal operation.
Setting the 4 Quick Recall Keys
The four keys (P1, P2, P3 & P4), are user programmable.
| Quick Recall Key | Press | Press after pressing F key | Press and hold |
 | recall the stored or assigned setting | HOME (Fixed setting) | store or assign a setting to the key |
 | TX PWR (Fixed setting) | ||
 | SQL TYPE (Fixed setting) | ||
 | REV (Fixed setting) |
Assigning Set Mode Items to the 4 Quick Recall Keys (Set Mode Recall feature)
- Press and hold the
![]() F key to enter the Set mode.
F key to enter the Set mode. - Press the
![]() [▲] or
[▲] or ![]() [▼] key to select the Set Mode Item to be assigned to the Quick Recall Key as a recalled Menu item. The Quick Recall Keys can store and recall favorite frequency settings, and are also short-cut keys to the Set Mode menu items.
[▼] key to select the Set Mode Item to be assigned to the Quick Recall Key as a recalled Menu item. The Quick Recall Keys can store and recall favorite frequency settings, and are also short-cut keys to the Set Mode menu items. - Press and hold the [P1], [P2], [P3] or [P4] key(
![]() ) to assign the Set Mode Item to the Quick Recall Key.
) to assign the Set Mode Item to the Quick Recall Key. - Press the [P1], [P2], [P3] or [P4] key(
![]() ) to recall the assigned Set Mode Item.
) to recall the assigned Set Mode Item.
 F key to enter the Set mode.
 ) to assign the Set Mode Item to the Quick Recall Key.
Storing a displayed frequency and Settings to a 4 Quick Recall Key (Quick memory feature)
- While operating in the VFO mode or the Memory mode, set the desired frequency and associated settings.
- Press and hold the [P1], [P2], [P3] or [P4] key(
![]() ) to store the frequency to a Quick Recall key.
) to store the frequency to a Quick Recall key. - Press the [P1], [P2], [P3] or [P4] key(
![]() ) to recall the stored settings.
) to recall the stored settings.
A Quick Recall Key may also store the frequency and associated settings in the Memory Mode.
Setting the Memory Channels
Memory Storage
- Select the desired frequency, while operating in the VFO mode. Be sure to set up the desired CTCSS or DCS tones, as well as any desired repeater offset. The power level may also be set at this time, if you wish to store it.
- Press and hold the
![]() [*V/M] key. A blank memory channel will be displayed automatically.
[*V/M] key. A blank memory channel will be displayed automatically. - If it is desired to change to another channel number, press the
![]() [▲] or
[▲] or ![]() [▼] key.
[▼] key. - Press the Alphabet / Numeric keys and [0/SET] key(
![]() ,
,![]() ) to input characters and create a "Tag" (label) for the memory channel.
) to input characters and create a "Tag" (label) for the memory channel.
If not inputting a "Tag" (label), proceed to step 5.- To move the cursor to the next character, press the
![]() F key.
F key. - To correct a mistake, press the
![]() F key repeatedly until the cursor returns to the character position.
F key repeatedly until the cursor returns to the character position.
- To move the cursor to the next character, press the
- Press and hold the
![]() [*V/M] key to store the frequency and settings into the selected memory channel.
[*V/M] key to store the frequency and settings into the selected memory channel.
"MEM-IN" on the display will blink twice and the tone will sound to complete the memory setting.
 [*V/M] key. A blank memory channel will be displayed automatically.
 ,
, ) to input characters and create a "Tag" (label) for the memory channel.
Memory Recall
- While operating in the VFO mode, press the
![]() [*V/M] key to enter the Memory mode.
[*V/M] key to enter the Memory mode. - Press the
![]() [▲] or
[▲] or ![]() [▼] key to select the desired memory channel.
[▼] key to select the desired memory channel. - To return to the VFO mode, press the
![]() [*V/M] key.
[*V/M] key.
When the transceiver is already set to the Memory mode, an easy way to recall a memory channel is to enter the memory channel number using the numeric keypad.
Deleting Memories
- Press and hold the
![]() F key to enter the Set mode.
F key to enter the Set mode. - Press the
![]() [▲] or
[▲] or ![]() [▼] key to select Set Mode item "18: MEM DEL" and then press the
[▼] key to select Set Mode item "18: MEM DEL" and then press the ![]() F key.
F key. - Press the
![]() [▲] or
[▲] or ![]() [▼] key to select the memory channel to be "deleted".
[▼] key to select the memory channel to be "deleted". - Press the
![]() F key to delete the selected memory channel.
F key to delete the selected memory channel. - Press the
![]() PTT switch to return to normal operation.
PTT switch to return to normal operation.
For additional details, refer to the Operating manual and the Advanced Manual, which may be the Yaesu website.
Changing the Transmit Power Level
- Press the
![]() F key and then press the
F key and then press the ![]() [P2] key.
[P2] key. - The present TX power output level will appear on the display.
- To adjust the TX power in the Set Mode, press and hold the
![]() F key.
F key.
Then repeatedly press the![]() [▲] or
[▲] or ![]() [▼] key to select Set Mode item "32 TX PWR" and then press the
[▼] key to select Set Mode item "32 TX PWR" and then press the ![]() F key.
F key.
- Press the
![]() [▲] or
[▲] or ![]() [▼] key to select the desired power output level. Available selections are "HI" (5 W), "MID" (2.5 W), and "LOW" (0.5 W).
[▼] key to select the desired power output level. Available selections are "HI" (5 W), "MID" (2.5 W), and "LOW" (0.5 W). - Press the
![]() PTT switch to save the new setting and return to normal operation.
PTT switch to save the new setting and return to normal operation.
Setting the Preferred Operating Mode
The following reset or preferred operating modes may be selected.
| Menu | Description |
| F1:SET RESET | Reset the Set Mode settings to factory defaults. |
| F2:MEM RESET | Clear the Memory settings to factory defaults. |
| F3:BANK RESET | Clear the Memory Bank assignments. |
| F4:ALL RESET | Clear the All memories and other settings to factory defaults. |
| F5:MEM-ONLY | Operation on the Memory mode only. |
| F6:VHF-ONLY | Operation on the VHF Band only. |
| F7:UHF-ONLY | Operation on the UHF Band only. |
| F8:DUAL DISP | Display both VFO-A and VFO-B. |
| F9:CLONE | Clone mode. |
- Turn the radio OFF.
- Press and hold the
![]() MONI/T.CALL key and the
MONI/T.CALL key and the ![]() PTT switch simultaneously, while turning the radio ON.
PTT switch simultaneously, while turning the radio ON. - When the LCD backlight comes on, release the
![]() MONI/T.CALL key and the
MONI/T.CALL key and the ![]() PTT switch.
PTT switch. - Referring to the above table, press the
![]() [▼] key to select the desired preference mode.
[▼] key to select the desired preference mode. - Press the
![]() F key momentarily to activate the selected operating mode.
F key momentarily to activate the selected operating mode.
Locking the Keys and Switches
The FT-65R/E keypad may be locked to prevent accidental frequency change or inadvertent transmissions.
Turning the Keylock Feature ON and OFF
- Press and hold the [6] key to lock the keys and switches.
- The
![]() icon will appear on the LCD display.
icon will appear on the LCD display. - To unlock the keys and switches, press and hold the
![]() [6] key again.
[6] key again.
![]()
- The

Change the key locking scheme
The following locking schemes may be selected.
| Item | Description |
| KEY(default setting) | Only the front panel keypad is locked out |
| PTT | The  PTT switch is locked out (TX is not possible) PTT switch is locked out (TX is not possible) |
| P+K | Both the PTT switch and keypad are locked out |
- Press and hold the
![]() F key to enter the Set mode.
F key to enter the Set mode. - Press the
![]() [▲] or
[▲] or ![]() [▼] key to select Set Mode Item "15 KEY LOCK".
[▼] key to select Set Mode Item "15 KEY LOCK". - Press the F key to enable adjustment of this Item.
- Press the
![]() [▲] or
[▲] or ![]() [▼] key to choose one of the above listed locking schemes.
[▼] key to choose one of the above listed locking schemes. - Press the
![]() PTT switch to save the new setting and return to normal operation.
PTT switch to save the new setting and return to normal operation.
Using the Flash Light / the Emergency Alarm
The Flash Light
- Press the
![]() EMERGENCY key briefly to turn the LED Flash-Light ON.
EMERGENCY key briefly to turn the LED Flash-Light ON.
The Emergency Alarm
- Press and hold the
![]() EMERGENCY key for three seconds to enable the emergency alarm function.
EMERGENCY key for three seconds to enable the emergency alarm function. - Emergency Alarm will sound from the speaker and the flash-light will blink with the SOS signal.
- VHF "Home" channel will appear on the LCD display.
- Press the
![]() EMERGENCY key to stop the Alarm.
EMERGENCY key to stop the Alarm.
Documents / ResourcesDownload manual
Here you can download full pdf version of manual, it may contain additional safety instructions, warranty information, FCC rules, etc.
Advertisement


Need help?
Do you have a question about the FT-65R and is the answer not in the manual?
Questions and answers