BenQ Portable Series User Manual
Hide thumbs
Also See for Portable Series:
- User manual (78 pages) ,
- User manual (81 pages) ,
- User manual (35 pages)
Table of Contents
Advertisement
Quick Links
Advertisement
Table of Contents

Related Manuals for BenQ Portable Series


Summary of Contents for BenQ Portable Series
- Page 1 Digital Projector User Manual Portable Series | GV31 V 1.00...
-
Page 2: Servicing
Available files vary by model. 1. Make sure your computer is connected to the Internet. 2. Visit the local website from Support.BenQ.com. The website layout and content may vary by region/country.Look for the following regularly to get the most up-to-date information. -
Page 3: Q&A Index
Q&A index Start with the topics you are interested in: Setup How do I set up the projector and turn it on? Choosing a location Powering on and initial setup Image adjustment How do I adjust the focus of the projected image? Adjusting the projection angle Fine-tuning the image clarity How do I fit the projected image to the screen? -
Page 4: Table Of Contents
Table of Contents Product support ..................2 Servicing .......................2 Q&A index .....................3 Safety instructions ..................7 Package contents ...................10 Introduction ....................11 Projector overview ..................11 Overview ......................11 I/O ports ......................13 Dimensions ....................14 Projector connections ................15 Wireless connection (via ATV Dongle) ............15 Wired connection (HDMI port) .............. - Page 5 Power LED indicator ..................29 Power menu options ................. 30 Shutting down the projector ..............31 Upgrading your projector ..............32 Adjusting the projected image ............33 Adjusting the projection angle ............. 33 Fine-tuning the image clarity ............... 34 Fitting the image to your screen ............34 Keystone ......................
- Page 6 Working with a tripod (purchased separately) ......62 Pairing with a new remote control ............63 Copyright & disclaimer ...............64 Copyright ....................... 64 Disclaimer ...................... 64 Warranty......................65 Statement regarding hyperlinks and third-party websites ..65 BenQ ecoFACTS ................... 66...
-
Page 7: Safety Instructions
Safety instructions Your projector is designed and tested to meet the latest standards for safety of information technology equipment. However, to ensure safe use of this product, it is important that you follow the instructions mentioned in this manual and marked on the product. 1. - Page 8 contaminate optical components, shorten the projector’s lifespan and darken the screen. • Locations near fire alarms. • Locations with an ambient temperature above 40°C /104°F • Locations where the altitudes are higher than 2000 m (6562 feet). 2000 m (6562 feet) (0 feet) 5.
- Page 9 8. Do not place liquids near or on the projector. Liquids spilled into the projector will void your warranty. If the projector does become wet, disconnect it from the power point and call BenQ to have the projector repaired. 9. Do not look straight into the projector lens during operation. It may harm your sight.
- Page 10 11. Do not attempt to disassemble this projector. There are dangerous high voltages inside which may cause death if you should come into contact with live parts. Under no circumstances should you ever undo or remove any other covers. Refer servicing only to suitably qualified professional service personnel.
- Page 11 Disposal This product contains the following materials which are harmful to human bodies and environment. • Lead, which is contained in solder. To dispose of the product, consult your local environment authorities for regulations. Note • The illustrations and the images shown in this document are for your reference. •...
-
Page 12: Package Contents
Package contents Carefully unpack and verify that you have all of the items shown below. Some of the items may not be available depending on your region of purchase. If any of these items are missing, please contact your place of purchase. -
Page 13: Introduction
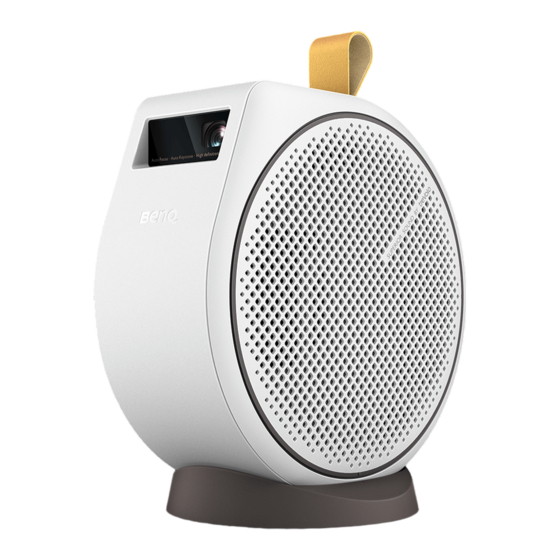
Introduction Projector overview Overview Descriptions Strap Volume up button Left speaker and vent I/O ports • See "I/O ports" on page 13 for details. • See "Projector connections" on page 15 for connections. Input source button Volume down button Power button and LED... - Page 14 Descriptions Projection lens IR sensor 10. Auto focus camera 11. Top speaker 12. Right speaker and vent Tripod screw hole "Working with a tripod (purchased separately)" on page 62 for details.
-
Page 15: I/O Ports
I/O ports Descriptions USB Type-A port See the following for details. • "Playing multimedia files from a USB flash drive" on page 44 • Power supply. See "Specifications" on page HDMI port (Version 1.4b) "Wired connection (HDMI port)" on page 15 for details. -
Page 16: Dimensions
Dimensions With Base: 131.3 (W) x 203.2 (H) x 191.4 (D) mm (5.2 x 8 x 7.5 in) Without Base: 104 (W) x 191.4 (H) x 191.4 (D) mm (4.1 x 7.5 x 7.5 in) -
Page 17: Projector Connections
Projector connections You can connect your device to the projector in various ways to project video content. Wireless connection (via ATV Dongle) • Smartphone, tablet, laptop/PC (see "Wireless projection" on page • Bluetooth devices (speakers, headphone, mouse, etc.) Before making any wireless connections, be sure to: •... - Page 18 Notebook or desktop computer A/V device Certified devices with USB-C DisplayPort USB drive Speakers USB drive QS02 ATV dongle Wireless AP Wireless Connections Descriptions Descriptions USB flash drive for media reader Certified USB-C cable HDMI cable Audio cable...
- Page 19 Note • In the connections above, some cables may not be included with the projector (see "Package con- tents" on page 10). They are commercially available from electronics stores. • The connection illustrations are for reference only. • If the selected video image is not displayed after the projector is turned on and the correct video source has been selected, check that the video source device is turned on and operating correctly.
-
Page 20: Remote Control (Projector Remote Control Only)
Remote control Descriptions (projector remote Back Mute control only) Rewind Wireless speaker mode Focus Geometry setting: Keystone Projector menu Voice Search Android TV home screen Android TV Settings Volume up Volume down Fast forword Play/Pause Sound mode Picture mode Descriptions Microphone Power Source... -
Page 21: Remote Control Effective Range
Remote control effective range The projector has one IR remote control sensor located at the front of the projector with a range of 8 meters (~26 feet) at an angle of 30 degrees (left and right) and 20 degrees (up and down). Prior to remote control pairing process during the setup wizard (see "Powering on and initial setup"... -
Page 22: Turning Remote Control Backlight On/Off
Turning remote control backlight on/ With the remote control backlight, you can see the buttons when they are pressed in the dark. Press and hold the Mute button and Volume up button on the remote control to turn the backlight function on/off. To save battery power, you can turn off the backlight. -
Page 23: Installation
Installation Choosing a location Before choosing an installation location for your projector, take the following factors into consideration: • Size and position of your screen • Electrical outlet location • Location and distance between the projector and the rest of your equipment •... - Page 24 • Rear Table Select this location with the projector placed near the floor behind the screen. Turn on the projector and select the following settings in the projector’s settings menu. See "Installation" on page 50 for more details: Installation > Projector Position > Rear Table Note A special rear projection screen is required.
-
Page 25: Obtaining A Preferred Image Size
Obtaining a preferred image size The distance from the projector lens to the screen, the zoom setting, and the video format each factors in the projected image size. Projection dimensions The screen aspect ratio is 16:9 and the projected picture is in a 16:9 aspect ratio . -
Page 26: Using The Projector In An Outdoor Setting
• To optimize your projection quality, we suggest referring to the values listed in the non-gray rows for projection. • BenQ recommends that if you intend to permanently install the projector, you should physically test the projection size and distance using the actual projector in situ before you permanently install it, so as to make allowance for this projector’s optical characteristics. -
Page 27: Installing The Atv Dongle
4. Peel off the adhesive sponge covering the micro USB power cable compartment. 5. Orient the ATV dongle so that the BenQ logo faces up, then connect the micro USB power cable to the port at the rear side of the dongle and then push the dongle into the HDMI connector on the projector until you hear a click. - Page 28 6. Align the right speaker cover over the projector so that the hooks on the cover line up with the corresponding openings on the projector, and then re-install the top cover onto the projector.
-
Page 29: Power Supply
Power supply Supply power to your projector by one of the following methods. • (Recommended) Via the provided power adapter and power cord. The Power Mode is switched to Normal or the previous mode you set. • Via a power bank or power adapter with USB-C connector or USB-C cable that are certified by USB-IF. -
Page 30: Getting Started
Getting started Powering on and initial setup 1. Choose a preferred location and image size as instructed in "Choosing a location" on page 21. Make sure the ATV dongle has been installed. "Installing the ATV dongle" on page 25 for more details. 2. -
Page 31: Power Led Indicator
When you're promted to set up your remote, select "Not now" to proceed. You can refer to the QS02 user manual from Support.BenQ.com for more information. 5. Check if an updated firmware is available for your product. Refer to "Upgrading your projector"... -
Page 32: Power Menu Options
Scenario LED status Power status Solid/Breathing Battery capacity: 60% - green 100% Battery mode • Power on: Solid Solid/Breathing Battery capacity: 21% - 59% • Power saving/Audio only: Breathing Flashing/ Battery capacity: < 20% Breathing red Power menu options Press the button on the remote control or projector to bring up the power menu. -
Page 33: Shutting Down The Projector
Shutting down the projector Press and hold the power button on the projector for over 3 seconds and the projector will shut down directly. The power LED will flash green. The fans may continue to run in order to cool the system. If the projector will not be used for an extended period, unplug the power cable from the power outlet and remove the batteries from the remote control. -
Page 34: Upgrading Your Projector
How-to Video Firmware Upgrade 1. Visit Support.BenQ.com and download the new firmware files (if available) of your projector. Save the firmware files to a USB flash drive in FAT32 disk format. You should download the latest user manual for reference as well. -
Page 35: Adjusting The Projected Image
Adjusting the projected image Adjusting the projection angle The projector features a base that holds the projector and allows you to adjust the projection angle. Place the projector properly on the base until it clicks, and rotate the projector to adjust the projection angle. 1 3 5 °... -
Page 36: Fine-Tuning The Image Clarity
Fine-tuning the image clarity To sharpen the picture, adjust the focus. • Real-time focus adjustment: You may allow the projector to automatically focus the image in real-time via the settings menu by configuring Focus > Real Time Adjustment to On. When the projector is moved or the projection distance is changed, the function will be performed automatically. -
Page 37: Changing The Input Source
performs keystone correction as the projector moves. • Auto Vertical Keystone: Available from Installation > Auto Vertical Keystone in the settings menu. When the projector is moved or the projection angle is changed, the function will be performed automatically. • Manual Keystone: Available by pressing the button on the remote control or from Installation >... -
Page 38: Watching Streaming Videos
Android TV is the projector’s operating system that allows you to project videos wirelessly and use streaming apps. Note For the ATV dongle (QS02) user manual, visit Support.BenQ.com. ATV home screen Upon initial startup or when the input source is set to ATV the projector will display the Android TV interface. -
Page 39: Choosing A Proper Picture Mode For Video Streaming
Item Description Apps Access to all the installed apps and Google Play. • Access to the recommended apps or video Recommended on demand services. apps/My favorites • Access to the apps that have been added to favorites by the Bookmark key. Recommended Access to the content recommended by the content... -
Page 40: Customizing A Sound Mode
Customizing a sound mode 1. Go to Sound > User. 2. Adjust the frequency as desired. 3. Press on the remote control to save the changes and exit. To apply the customized sound mode, press the button on the remote control and select User. -
Page 41: Projection
Wireless projection is available only after the supplied ATV dongle (QS02) is installed, and the projector and your device are connected to the same wireless network. Refer to the QS02 user manual from Support.BenQ.com or scan the following QR code for instructions on how to perform wireless projection. - Page 42 again, press the source button , and then select the corresponding port in the source menu. Note • Some computers feature HDMI ports that do not transmit audio, in such cases a separate audio cable must be connected to the projector. •...
-
Page 43: Playing Music With Your Projector
Playing music with your projector With the built-in speakers, you can enjoy music playback via the projector without a projection screen. The projector can work as an ordinary speaker or a wireless speaker. Making your projector a wireless speaker 1. Make sure the ATV dongle is installed properly (see "Installing the ATV dongle"... -
Page 44: Turning The Screen Off During Music Playback
Turning the screen off during music playback You can enjoy music playback via the projector without a projection screen. Press the button on the remote control or projector, and select the Audio-Only Mode to switch the projector to audio-only mode. The screen is turned off while the music playback continues. - Page 45 connected, the device will be labelled as connected in the Network & Internet. You can now output the audio from the ATV to the speaker or headphone. Note • This function is available only when the input source is set to ATV. Even when the projector is switched to other input sources, such as HDMI, as ATV is still running in the background, it will continue to transmit audio from ATV to the connected Bluetooth speaker or headphones.
-
Page 46: Playing Multimedia Files From A Usb Flash Drive
Playing multimedia files from a USB flash drive To play media files stored on a USB flash drive, you must make connections and settings properly. 1. Make sure the ATV dongle is installed properly (see ""Installing the ATV dongle" on page 25). -
Page 47: Power Delivery To A Usb-C Device
Power delivery to a USB-C device Available only when the projector is supplied power via the included power adapter. With the power delivery function, your projector is able to supply power to a connected USB-C device certified by USB-IF. Supported USB-C power delivery: •... -
Page 48: Menu Navigation
Menu navigation To let you make various adjustments or settings on the projector, the projector provides a settings menu. To access the menu, either press the button on the remote control. Note For settings related to the system including wireless connection, account, and app related setting, use the Android TV Settings menu accessible on the home screen. -
Page 49: Picture Mode
Picture Mode Item Options and descriptions Maximizes the brightness of the projected image. This Bright mode is the brightest mode on your projector. With well-saturated colors and fine-tuned sharpness, this mode is slightly brighter than Cinema mode and Living Room suitable for playing TV streaming under a small amount of ambient light. -
Page 50: Picture
Item Options and descriptions This mode emphasizes total balance (low, middle, high frequency) to fully display the timbre of musical instrument, rhythm of symphony and solos of singer in the hot concert or in live hall for different type of music, like pop, rock, and jazz. To reproduce Music immersive atmosphere or the presence of sound stage, this mode especially enhances the beat of... -
Page 51: Sound
Item Options and descriptions The higher the value, the sharper the picture becomes. Sharpness Sound Item Options and descriptions Sound Mode utilizes sound enhancement technology, which incorporates Waves’ algorithms to deliver great effects of the bass and treble and provide you Sound Mode with immersive cinematic audio experience. -
Page 52: Installation
Installation Item Options and descriptions Chooses the position in which the projector is installed. See "Choosing a location" on page Projector Position for more details. Enables/Disables the projector’s automatic Auto Vertical Keystone keystone adjustment. Allows you to manually adjust the keystone settings for the projected image. -
Page 53: Power Mode
Item Options and descriptions We recommend you use the High Altitude Mode when your environment is between 1500 m - 2000 m above sea level, and ambient temperature is between 0°C to 30°C. Operation under High Altitude Mode may cause a higher decibel operating noise level because of increased fan speed necessary to improve overall system cooling and performance. -
Page 54: System
System Item Options and descriptions Sets the language for the projector. Language Sets to power on the projector via the power button on the remote control. Once enabled, the projector scans for Use remote control to power on remote control signals when it is powered off and may drain battery power quickly. -
Page 55: Maintenance
Maintenance Care of the projector Your projector needs little maintenance. The only thing you have to do on a regular basis is keep the lens clean. Never remove any parts of the projector. Contact your dealer or local customer service center if the projector fails to operate as expected. Cleaning the lens Clean the lens whenever you notice dirt or dust on the surface. -
Page 56: Transporting The Projector
Transporting the projector It is recommended that you ship the projector with its original packing or equivalent. Light source information Go to > System > Projector Information and press OK. The Projector Information page appears. Extending LED life The LED headlight includes a bulb which features a light-source life far beyond traditional bulbs, yet it is still a consumable item. -
Page 57: Troubleshooting
Troubleshooting The LED indicator is flashing. Scenario LED status Flashing red/blue Driver board error Flashing blue/green Fan error Flashing red Optical engine temperature error Flashing red/blue/green G sensor Error Contact customer service for assistance. Note Refer to "Power LED indicator" on page 29 for power LED indicator details. - Page 58 Cause Remedy The input signal has not Select the correct input signal with the key. been correctly selected. Blurred image Cause Remedy The projection lens is Adjust the focus of the lens. not correctly focused. "Fine-tuning the image clarity" on page The projector and the Adjust the projection angle and direction as well screen are not aligned...
-
Page 59: Specifications
Specifications Projector specifications Category Item Descriptions Display Brightness (ANSI lumens) Native Resolution 1080P (1920x1080) Native Aspect Ratio 16:9 Contrast Ratio (FOFO) 100,000:1 Display Color 24-bit (16.7 million colors) Light Source Eco: 30000 hours Light Source Life Normal: 20000 hours Optical Throw Ratio Zoom Ratio Fixed... - Page 60 Category Item Descriptions Environment Power Supply AC 100 to 240 V, 50/60 Hz Typical Power Consumption 45W@100 – 240VAC Acoustic Noise (Typ./Eco.)(dB) 28dBA/26dBA Operating Temperature 0 – 400 Storage Temperature -20 – 60°C, without condensation Operating Relative Humidity 10 – 90%RH, without condensation Storage Relative Humidity 10 –...
-
Page 61: Timing Chart
XGA_75 75.029 60.023 78.750 XGA_85 84.997 68.667 94.500 1152 x 864 1152 x 864_75 75.000 67.500 108.000 1024x576 BenQ Notebook Timing 60.000 35.820 46.996 1024x600 BenQ Notebook Timing 64.995 41.467 51.419 1280x720 1280 x 720_60 60.000 45.000 74.250 1280 x 768_60 60.000... -
Page 62: Video Timings
Vertical Horizontal Dot Clock Resolution Resolution frequency frequency Frequency (Hz) (KHz) (MHz) 1360 x 768 1360 x 768_60 60.015 47.712 85.500 WXGA+_60 60.000 55.469 88.750 (Reduce Blanking) 1440 x 900 WXGA+_60 59.887 55.935 106.500 1400X1050 SXGA+_60 59.978 65.317 121.750 1600x1200 UXGA 60.000 75.000... -
Page 63: Supported File Formats
60.000 148.500 Supported file formats The projector's media reader is powered by the supplied Android TV dongle QS02. See QS02 user manual from Support.BenQ.com for the supported file formats. For details on the supported media formats, please visit: https://developer. android.com/guide/topics/media/media-formats... -
Page 64: Appendix
Appendix Working with a tripod (purchased separately) Use a tripod plate to mount the projector onto a tripod: 1. Install the tripod’s quick release plate to the projector’s tripod screw hole and tighten the plate’s screw. 2. Install the projector onto the tripod. The tripod screw hole on the bottom of your projector is not designed for ceiling mount installation. -
Page 65: Pairing With A New Remote Control
Pairing with a new remote control Compatible BenQ remote control model: RCI077 In case you have received a new remote control from BenQ customer service, you need to pair it with your projector (with ATV dongle QS02 installed) before use. -
Page 66: Copyright & Disclaimer
Android™ is a trademark of Google LLC. The Bluetooth® word mark and logos are registered trademarks owned by Bluetooth SIG, Inc. and any use of such marks by BenQ Corporation is under license. iOS is a trademark or registered trademark of Cisco in the U.S. and other countries and is used under license. -
Page 67: Warranty
Any third party content or service preinstalled in this product is provided “as is”. BenQ does not, by expression or by implication, make any warrant to the content or to the services provided by third parties. BenQ does not warrant or guarantee that the content or services provided by third parties are accurate, effective, most up-to-date, legal, or complete. -
Page 68: Benq Ecofacts
In addition, BenQ is not involved in any transactions you conduct in the websites or similar resources maintained by third parties. You should contact the content or service providers for any questions, concerns, or disputes. - Page 69 BenQ.com © 2023 BenQ Corporation. All rights reserved. Rights of modification reserved.
Need help?
Do you have a question about the Portable Series and is the answer not in the manual?
Questions and answers