Oregon Scientific TW223 - Radio-Controlled Projection Clock Manual
- User manual (2 pages)
Advertisement
GETTING STARTED
If using the DC Adaptor to power the clock, plug the adaptor to the clock. If using battery, insert 2pcs AA size batteries into the battery compartment, pay attention to the polarity.
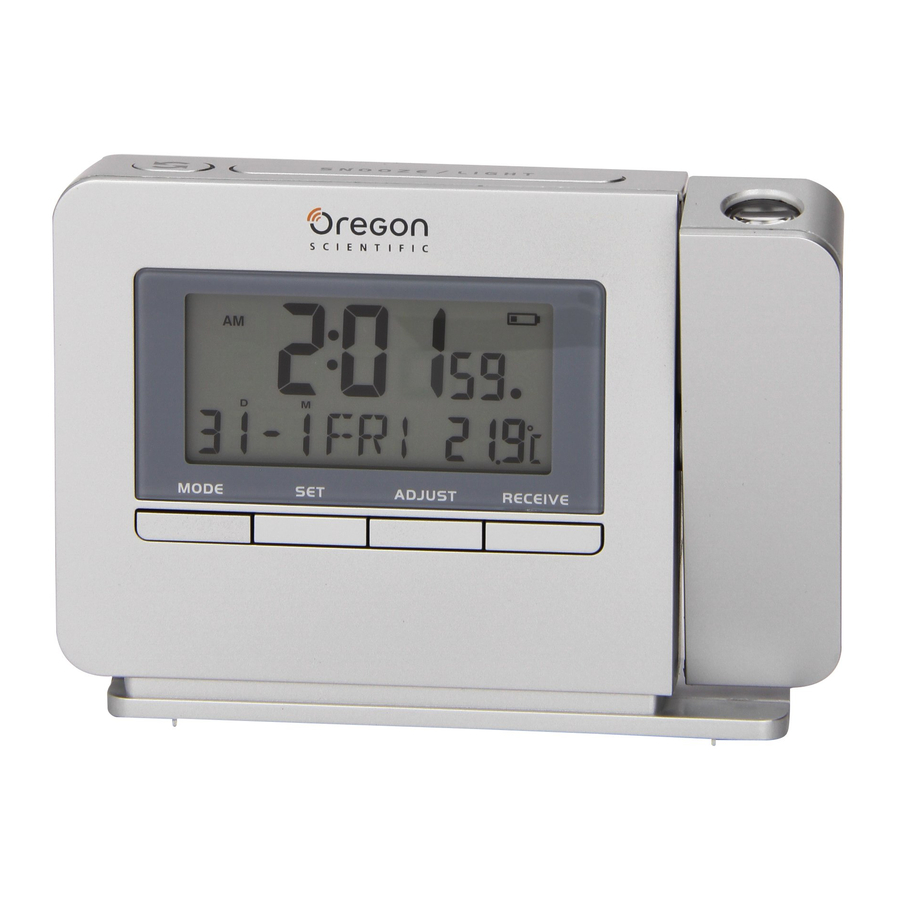
PRODUCT DESCRIPTION

- SNOOZE / LIGHT key
- REVERSE key
- LCD display
- PROJECTOR
- MODE key
- SET key
- ADJUST key
- RECEIVE key
- RESET key
- DC adaptor
- FOCUS key
- Battery door
DISPLAY SYMBOLS

US version display
- Time
- Month
- Date
- Day of the week
- Temperature
- Signal strength indicator
- Daylight savings time
- Low battery indicator
RADIO-CONTROLLED CLOCK
This product is designed to synchronize its clock automatically with a clock signal.
EU version: DCF-77 signal from Frankfurt, Germany
US version: WWVB-60 signal from Fort Collins Colorado, USA
UK version: MSF-60 signal from Anthorn, England
The signal indicator displays different level of signal strength.
 |  |  |
| No signal quality | Weak signal quality | Excellent signal quality |
The unit is already synchronized with the time signal transmitter. Otherwise the antenna segment  disappear from the LCD display.
NOTE
You may use the RECEIVE button to receive the time signal manually.
NOTE
Time-zone offset from the received clock signal time is available for US version. You can change the time zone of Pacific time, Mountain time, Central time and Eastern time as indicated on the MAP shown on the display. To adjust time-zone offset.
- Press "MODE" to enter Alarm Time mode.
- Press "ADJUST" to toggle different time zones.
- Press "MODE" to back to clock mode
USING THE PROJECTOR
Press the SNOOZE / LIGHT key to turn on the projector and display backlight for 5 seconds. Press and hold the SNOOZE / LIGHT key for 3 seconds, the projector will be turned on for 30 minutes. If using DC power, the projector will be always ON. Press the " " key will invert the projected image by 180 degree.
Adjust the projected image focus by turning the FOCUS key.
NOTE
If using DC power, press the "SNOOZE/LIGHT" key and the " " key will invert the projected image by 180 degree.
MANUAL SETTING THE TIME AND DATE
If the clock does not receive the time signal successfully, you can set the clock manually.
- Press "SET" key for 2 seconds until HOUR digit flashing.
- Press "ADJUST" key to adjust the value.
- Press "SET" key again to step the setting items. The setting sequence will be: Hour > Minute > Second >12 / 24Hr > Date > Month > Year > Language (GB=English FR=French DE=German ES=Spanish IT=Italian)
- Press "MODE" key to save and exit the setting mode.
SETTING THE ALARM
- In normal time display, press "MODE" key to enter the Alarm Time Mode.
- Enable the alarm by pressing "ADJUST" key so that the bell icon "
![]() " appears.
" appears. - Enable the snooze function by pressing "ADJUST" key so that the snooze icon "Zz" appears.
- Press "SET" key for 2 seconds until the HOUR digit flashing.
- Press "ADJUST" key to increase the setting value.
 " appears.
- Press "SET" key again to step the setting items. The sequence will be: Hour > Minute.
- Press "MODE" key to save and exit the setting modee.
NOTE
When alarm sounds and the snooze button is pressed, the alarm will automatically start again after 4 minutes. The snooze function can be repeated for 4 times per day, and alarm will sound again until the next day. The alarm duration is 2 minutes.
TEMPERATURE DISPLAY
- In normal time display, press "set" key to toggle between ºC / ºF temperature format.
PRECAUTIONS
This product is engineered to give you years of satisfactory service if you handle it carefully. Here are a few precautions:
- Do not cover the ventilation holes. Make sure items that are nearby such as newspapers, tablecloths, curtains etc cannot accidentally cover the ventilation holes.
- Do not subject the unit to excessive force, shock, dust, temperature or humidity, which may result in malfunction, shorter electronic life span, damaged battery and distorted parts.
- Placement of this product on wood surfaces with certain types of finishes, such as clear varnish, may result in damage to the finish. Consult the furniture manufacturer's care instructions for direction as to the types of objects that may safely be placed on the wood surface. Oregon Scientific shall not be responsible for any damage to wood surfaces from contact with this product.
- Do not immerse the unit in water. If you spill liquid over it, dry it immediately with a soft, lint-free cloth.
- Do not clean the unit with abrasive or corrosive materials.
- Do not tamper with the unit's internal components. Doing so will invalidate the warranty on the unit and may cause unnecessary damage. The unit contains no user-serviceable parts.
- Only use fresh batteries as specific in the user's instructions. Do not mix new and old batteries.
- Due to printing limitations, the displays shown in this manual may differ from the actual display.
- The contents of this manual may not be reproduced without the permission of the manufacturer.
- Do not dispose this product as unsorted municipal waste. Collection of such waste separately for special treatment is necessary.
NOTE
The technical specifications for this product and the contents of the user manual are subject to change without notice.

Documents / ResourcesDownload manual
Here you can download full pdf version of manual, it may contain additional safety instructions, warranty information, FCC rules, etc.
Download Oregon Scientific TW223 - Radio-Controlled Projection Clock Manual
Advertisement


Need help?
Do you have a question about the TW223 and is the answer not in the manual?
Questions and answers