Oregon Scientific RM822 (UK VERSION RM823) - Controlled Clock Manual
- Instruction manual (2 pages) ,
- Instruction manual (2 pages) ,
- Instruction manual (2 pages)
Advertisement
- 1 INTRODUCTION
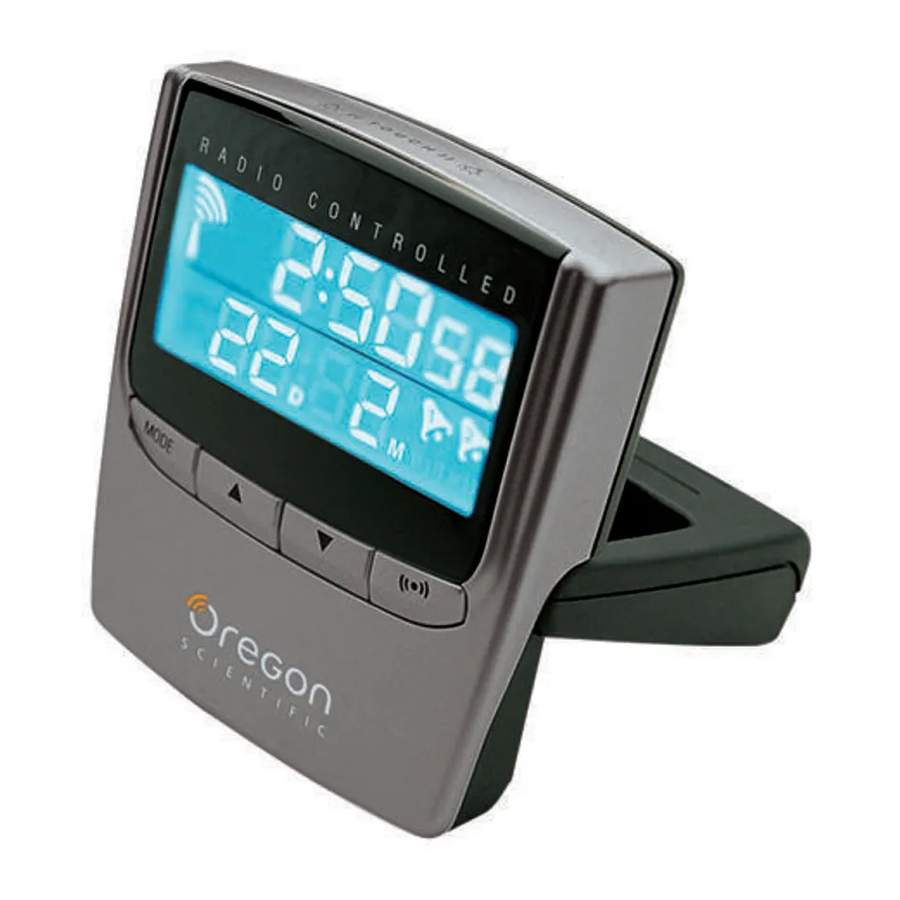
- 2 DESCRIPTION OF PARTS [FIG. A]
- 3 BATTERY INSTALLATION
- 4 ABOUT RADIO RECEPTION
- 5 LOCKING AND UNLOCKING THE UNIT
- 6 CALENDAR CLOCK DISPLAY MODES
- 7 HOW TO SET THE CALENDAR CLOCK MANUALLY
- 8 ABOUT THE ALARM TIME
- 9 SETTING AN ALARM TIME
- 10 ABOUT ALARM SOUND
- 11 HOW TO USE THE SNOOZE
- 12 LITE TOUCH HiGloTM BACKLIGHT
- 13 HOW TO RESET THE UNIT
- 14 THE TABLE STAND
- 15 SPECIFICATION
- 16 Documents / Resources
INTRODUCTION
The RM822 / RM823 is a multifunction (RF) controlled clock. It can automatically synchronize its current time and date when brought within an approximate 1500 km radius of the radio signal DCF77 generated from Frankfurt, Germany (the UK version from MSF Rugby, England).
Other features of the RM822 include:
- Back light for easy reading in the dark
- Displays time, date and day of the week in 4 languages (E/F/G/I)
- A second time-zone display with time, date and day-of-the-week
- 2 alarm times with 8-minute snooze function
- 2-minute crescendo alarm that increase in volume & low battery indication.
DESCRIPTION OF PARTS [FIG. A]

- [
![]() ] Radio reception signal
] Radio reception signal
Indicates the condition of radio reception - 2-line LCD
- [
![]() ON/OFF ] button
ON/OFF ] button
Activates or deactivates alarm - [
![]() ] button
] button
Toggles between calendar and alarm-time displays
Displays the alarm time or sets the alarm status - [
![]() ] Battery-low indicator
] Battery-low indicator
Lights up when batteries are running dry - [
![]() ] Alarm-on icon
] Alarm-on icon
Appears when the alarm is activated - [
![]() ] Alarm icon
] Alarm icon
Appears when the alarm time is displayed - [MODE] button
Toggles between display modes and activates the calendar clock setting mode - [
![]() LOCK] button
LOCK] button
To lock all the key of the unit - UP [
![]() ] button
] button
Increases the value of a setting
Initiates radio reception
(Press and hold for rapids settings) - DOWN [
![]() ] button
] button
Decreases the value of a setting
Stops radio reception
(Press and hold for rapids settings) - Battery compartment
Accommodates two UM-4 or "AAA" size batteries - Table stand
- [RESET] button
Resets the unit to its original factory settings
 ] Radio reception signal
 ON/OFF ] button
 ] button
BATTERY INSTALLATION
The unit uses two (2) UM-4 or "AAA" size 1.5V batteries.
To insert batteries:
- Slide the battery door in the direction of the arrow. [FIG. D]

- Insert the batteries strictly according to the polarities shown therein.[FIG. B]

- Replace the battery compartment door.


 If not disposed of properly batteries can be harmful. Protect the environment by taking exhausted batteries to authorized disposal stations.
Note: Battery-low indicator " "
"
Replace the batteries when the battery-low indicator lights up.
Note: After replacing the batteries, the entire display will activate for about 1 second, then LCD will show as in.
ABOUT RADIO RECEPTION
The RM822 / RM823 is a radio frequency (RF) controlled clock. When located within a 1500km radius of radio signal (DCF77) at Frankfurt, Germany, the clock time will automatically synchronize with DCF77 time-signal transmission. The benefit of a RF controlled clock is that highly-accurate time is maintained and manual adjustments to the time and date are not be required.
(UK version within a 1500km radius of radio signal (MSF) from Rugby, England)
When the batteries are first installed, the RM822 / RM823 will automatically search for a radio signal.
When in search mode, the antenna icon [ ]will blink. This process takes between two (2) and ten (10) minutes. After initial search, short periodic reception signal scans will commence several times a day.
The antenna icon indicates the quality of reception.
 | Strong |
 | Weak |
 | No signal |
 | Receiving |
To disable the RF function:
Press and hold the [ ] button for 3-seconds. The radio-reception signal will disappear.
To enable the RF function:
Press [ ]and hold for 3-seconds. The radio-reception signal will appear and a signal search will automatically commence.
Interference
Reception can be affected by a number of factors. For best reception, place the device away from metal objects and electrical appliances.
Note: Interference from sources such as TV sets can affect the signal. If, after batteries have been inserted for ten minutes, the signal is not received, then set the time manually (see section: How To Set The Calendar Clock Manually).
LOCKING AND UNLOCKING THE UNIT
The RM822 / RM823 has a special locking feature that locks all keys to prevent accidental operation of the unit. To unlock the unit, slide the [ LOCK] switch to the unlocked position.
The unit must be unlocked before activating any keys.
CALENDAR CLOCK DISPLAY MODES
The RM822 /RM823 supports four display modes in the sequence of:
 Display description for each time / date / time-zone mode
To select a different time-display mode:
- Press [MODE]. The display will advance in the order as mentioned above.
Note: The bottom line of the display will be replaced by the alarm time if [![]() ] is pressed.
] is pressed.
HOW TO SET THE CALENDAR CLOCK MANUALLY
When the unit is outside of the 1500km radius of the radio signal generated from DCF77 Frankfurt, Germany (UK version MSF Rugby), the unit may require manual setting.
To manually set the clock:
Press [MODE] hold for 3 seconds.

Note: Adjusting the time may conflict with radio signal. In this case, the received signal takes priority and will override the manual setting.
The day-of-the-week is displayed as an abbreviation in four languages.

Abbreviated Four Language Day-Of-The-Week Chart
ABOUT THE ALARM TIME
Two independent alarm times are available: alarm 1 and alarm 2.
- Press [
![]() ON / OFF], alarm-time 1 is displayed and indicated by [
ON / OFF], alarm-time 1 is displayed and indicated by [![]() ].
]. - Press [
![]() ON / OFF] again, alarm-time 2 is displayed and indicated by [
ON / OFF] again, alarm-time 2 is displayed and indicated by [![]() ].
].
 ].
]. ].
].SETTING AN ALARM TIME
To set an alarm time:
- Press [
![]() ] to select alarm 1. Press again and hold 3-seconds.
] to select alarm 1. Press again and hold 3-seconds. - Set the alarm time

- Press [
![]() ]to confirm. Press a final time to exit alarm set mode.
]to confirm. Press a final time to exit alarm set mode.

Setting Alarm Two
- Enter alarm-2 setting mode and follow instructions as for alarm 1.
ABOUT ALARM SOUND
The four-step crescendo function allows the alarm to start off gently and step up its intensity. Without interruption, the alarm will activate for a total of two minutes. If a second alarm activates when the first alarm is sounding, the first alarm will be automatically disabled.
To stop an alarm sound:
- To stop the alarm, press [
![]() ] or [
] or [![]() ON/OFF], the alarm will stop and will activate at the same time the following day.
ON/OFF], the alarm will stop and will activate at the same time the following day. - To disable the alarm, press [
![]() ON/OFF ] again.
ON/OFF ] again.
HOW TO USE THE SNOOZE
The Lite Touch feature enables you to activate the 8 minute snooze by gently rocking the RF clock backwards on its stand with the touch of your fingers. [see FIG.D]
LITE TOUCH HiGloTM BACKLIGHT
Using the Lite Touch feature, the display will activate for 8 seconds so you can see the display in the dark. The light then automatically turns off. [see FIG.D]
HOW TO RESET THE UNIT
The RESET button allows you to return all settings to its factory values, which are, 1-1 (1st of January) for date, 00:00 for time and 0:00 for alarm, which will be deactivated.
The button is required only when the unit is not operating in a favorable way, such as in the rare case of a malfunction.
THE TABLE STAND
To use the cover as a stand, rotate the hinges cover over the back of the clock.
SPECIFICATION
| 24-h display | hh: mm: ss (DCF version) |
| 12-h display | hh: mm: ss (MSF version) |
| Power | Two (2) UM4 or "AAA" size batteries |
| Size | 87 X 67 X 18 mm ( H x W x D ) |
| Weight | 66 g (without battery) |

- The content of this manual is subject to change without further notice.
- Due to printing limitation, the displays shown in this manual may differ from the actual display.
- The contents of this manual may not be reproduced without the permission of the manufacturer.

Documents / ResourcesDownload manual
Here you can download full pdf version of manual, it may contain additional safety instructions, warranty information, FCC rules, etc.
Download Oregon Scientific RM822 (UK VERSION RM823) - Controlled Clock Manual
Advertisement


Need help?
Do you have a question about the RM822 and is the answer not in the manual?
Questions and answers