Table of Contents
Advertisement
Quick Links
Advertisement
Table of Contents

Related Manuals for Airflow Adroit


Summary of Contents for Airflow Adroit
- Page 1 Digital Controller Instruction Manual...
- Page 2 Digital Controller...
- Page 3 Setting and editing the weekly clock program ● Partial by-pass settings ● Switching the unit off ● User level diagrams ● Troubleshooting ● NOTE: You can sign into your Adroit account at: www.airflowadroitcontrol.com © Airflow • We reserve the right to make changes without prior notice...
- Page 4 INTRODUCTION Digital Controller...
-
Page 5: General Safety Instructions
Furthermore, observe all local health and electrical safety regulations. INTENDED USE All Adroit units have been designed to provide appropriate and continuous ventilation, in such a way that people and structures will remain healthy. © Airflow • We reserve the right to make changes without prior notice... - Page 6 DV51CH(R) Adroit EPH with white cooker 90001174 90001174EPH hood (Integral CO Sensor) (Integral CO Sensor) DV51CH(L) Adroit with white cooker hood DV51CH(L) Adroit EPH with white cooker hood 90001175 90001175EPH (Integral CO Sensor) (Integral CO Sensor) DV51CH(R) Adroit with stainless steel cooker...
-
Page 7: System Description
4. Double click on the Airflow icon. tablet, smartphone etc using a 5. Now you are connected to the Adroit Home service, you are network created by the router. able to control the Adroit unit. -
Page 8: Installation
You can control and automate the ventilation unit operation in the following ways: • By using a Digital Controller installed in the building • Through the Adroit Home local network connection and the Web interface • Through the Adroit Cloud Service and the Web interface •... - Page 9 (1 day or 1 week). Indicate the chosen user level. Indicates when the feature is locked at your user level. The parental controls lock code is 1001. © Airflow • We reserve the right to make changes without prior notice...
-
Page 10: Starting The Unit
Digital Controller INTRODUCTION Each ventilation unit has two control settings Transfer the update file you have downloaded onto available, basic and expert. The basic settings are: the ventilation unit. Copy the update file HSWUPD. • User interface language. • Time and date. (Please note! Do not alter the file name!) you have downloaded at the root of the controller (the The expert settings are:... -
Page 11: Basic Settings
If you want to use the 12 hour clock, proceed as follows: Press the Minus button. The 24 Hour Time setting value is changed to Off. Proceed to the next phase by pressing the Right arrow button. © Airflow • We reserve the right to make changes without prior notice... -
Page 12: Set The Date
Digital Controller BASIC SETTINGS SET THE AUTOMATIC DAYLIGHT SAVING TIME By default, the system automatically switches to the summer time. If you want to use the automatic daylight saving time, proceed to the next step by pressing the Right arrow button. If you want to use the manual daylight saving time, proceed as follows: Press the Minus button. - Page 13 Set the parental controls on or off by using the Plus and Minus buttons. PARENTAL CONTROLS Press the OK button. ACCESS CODE: The parental controls are now set. © Airflow • We reserve the right to make changes without prior notice...
-
Page 14: Fan Settings
If, at the beginning, the air flows differ greatly from the designed rate, check the air flows by measuring them at the valves and adjust the airflow rates if necessary by first adjusting the units fans, then by adjusting the room valves. - Page 15 - The carbon dioxide or VOC level is significantly higher than normal. • The fan speed will be automatically increased if automatic adjustment has been chosen. © Airflow • We reserve the right to make changes without prior notice...
-
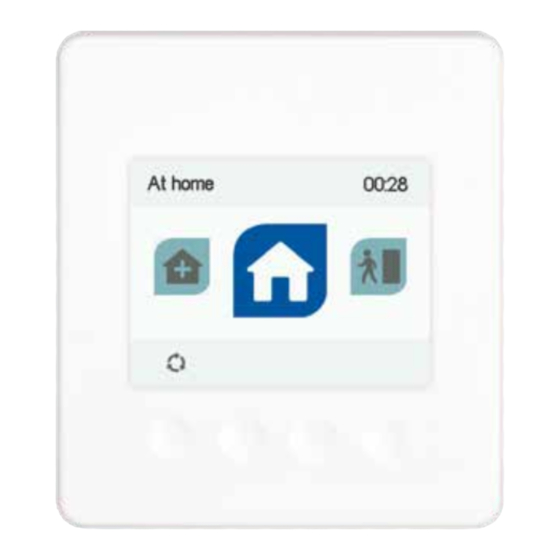
Page 16: Profile Settings
Digital Controller EXPERT SETTINGS PROFILE SETTINGS In the following sections you can make ventilation settings for the system profiles. AT HOME PROFILE If you want to set the At home profile settings, proceed as follows: 1. The setup of At home screen will open. NOTE When the units fans have been set (step 5 in the setup settings) these values will default to the At home profile fan speed value. - Page 17 VOC content, is used or not. 15. The automatic fan speed control, based on the carbon dioxide or VOC content, is now set. 16. Press the OK button. © Airflow • We reserve the right to make changes without prior notice...
- Page 18 Digital Controller EXPERT SETTINGS BOOST PROFILE If you want to set the Boost profile settings, proceed as follows: 1. The setup of Boost profile screen is opened. NOTE Once you have set the fan speed for the At home profile, the fan speed for the Boost profile will default to +30% of the At home profile fan speed.
-
Page 19: Custom Profile
(or the Week clock) change the profile. 15. The profile timer function is now set. 16. Press the OK button. 17. The Custom function settings are now complete. © Airflow • We reserve the right to make changes without prior notice... - Page 20 Digital Controller EXPERT SETTINGS FINISHING UP When you have completed the setup settings, the Setup done screen will open. Finish up the setup as follows: If you want to go back to repair or change a value, use the arrow buttons to select the desired line and press the OK button.
-
Page 21: Changing The Profile
Change filters — Indicates the next recommended filter change date. • Days in use — Indicates how long the unit has been running in days and years. © Airflow • We reserve the right to make changes without prior notice... - Page 22 Digital Controller VENTILATION PROFILES VIEWING THE AWAY PROFILE INFORMATION If you want to view the Away profile settings, proceed as follows: Open the Away profile main view. Press the Profile information button. The first information screen for the profile appears. This screen contains the following information: •...
- Page 23 If you want to view the Custom function settings, proceed as follows: Open the Custom function main view. The profile main screen contains a summary of the profile data. Also see Table 2, “Profile symbols. © Airflow • We reserve the right to make changes without prior notice...
- Page 24 Digital Controller VENTILATION PROFILES Press the Profile information button. The first information screen for the profile opens. This screen shows the following information: • Duration — Indicates the duration of enhanced ventilation when the Custom profile is activated. The value is shown in hours and minutes.
- Page 25 14. Use the Plus and Minus buttons to select whether the automatic fan speed control, based on the carbon dioxide or VOC level, is used or not. 15. Press the OK button. © Airflow • We reserve the right to make changes without prior notice...
- Page 26 Digital Controller VENTILATION PROFILES MODIFYING THE BOOST PROFILE SETTINGS If you want to edit the Boost profile settings, proceed as follows: Open Boost profile main view. Press the Profile information button. Press the Edit button. The fan speed setup opens. Set the Boost profile fan speed as a percentage of the maximum output ratio by using the Plus and Minus buttons.
- Page 27 Off — When the timer is disabled, the Custom function is used until manually changed (or the Week clock) or the profile is changed. 15. Press the OK button. © Airflow • We reserve the right to make changes without prior notice...
-
Page 28: Viewing Temperature Data
Digital Controller TEMPERATURES AND SENSORS VIEWING TEMPERATURE DATA If you want to view the system temperature and sensor data, proceed as follows: Select Settings > Temperatures and sensors. Press the OK button. The temperature and sensors summary screen is opened. This screen contains the following information: •... - Page 29 11. A screen displaying the maximum carbon dioxide value from the air carbon dioxide extract air sensor is opened again 12. To exit the menu, press the Back button. © Airflow • We reserve the right to make changes without prior notice...
- Page 30 Digital Controller TEMPERATURES AND SENSORS VIEWING HUMIDITY AND CARBON DIOXIDE STATISTICS If you want to view statistics on the humidity and carbon dioxide values, proceed as follows: Select Settings > Temperatures and sensors. Press the OK button. The temperature and supply and extract air sensors summary screen is opened.
-
Page 31: Filter Settings
Press the Edit button. The Filter status 1/2 screen is opened. Press the Plus button. The Filters changed field value changes to Today. Press the OK button. © Airflow • We reserve the right to make changes without prior notice... - Page 32 Digital Controller SETTINGS NOTE The system will automatically set the service reminder to remind you of the filter replacement. The reminder will be displayed when the set reminder interval has elapsed. SETTING THE FILTER REPLACEMENT REMINDER INTERVAL This section describes how to set the filter replacement reminder interval.
-
Page 33: Display Settings
You can select the user interface language as follows: Select Settings > Language. Press the OK button. Select the language you want, for example, English. Press the OK button. © Airflow • We reserve the right to make changes without prior notice... -
Page 34: Setting The Time And Date
Digital Controller SETTINGS TIME AND DATE SETTING THE TIME AND DATE The following sections explain how to set: • Time • 24- or 12-hour clock • Automatic daylight-saving time • Date NOTE The system time will stay active for a few hours if the power is cut to the unit. -
Page 35: Setting The Date
A confirmation screen is opened. You can switch the Week clock ON or OFF by pressing the OK button in the Week clock screen for a few seconds. © Airflow • We reserve the right to make changes without prior notice... - Page 36 Digital Controller SETTINGS WEEK CLOCK SETTING AND EDITING THE WEEKLY PROGRAM If you want to set the weekly timer program or edit an existing program, proceed as follows: Select Settings > Week clock. Press the OK button. The week view in the Week clock is displayed. Use the Right arrow button to select the desired day.
- Page 37 • At 21.00, select the At home profile. Ensure that the Week clock is enabled. The figures above depict a Week The weekly program is now set clock set in line with this example. © Airflow • We reserve the right to make changes without prior notice...
-
Page 38: Switching The Unit Off
Digital Controller SETTINGS PARTIAL BY-PASS To turn the partial by-pass on: Select Expert settings. Find HR cell bypass settings. Select On from the pop down list menu of the Partial bypass option. The partial bypass has now been turned on and will run automatically based on temperature sensors inputs. - Page 39 External sensor settings Display settings Heating settings Panel address Professional settings Basic fan settings Modbus settings I/O and bus settings Lock code and access rights Defrost settings © Airflow • We reserve the right to make changes without prior notice...
- Page 40 Digital Controller USER LEVEL DIAGRAMS Limited Away Away information Edit Unit information Turn unit on At home At home information Edit Error log Boost Boost information Fan test Edit Setup Custom mode Custom information Edit Heater test HR cell bypass test Service menu Self-test Language...
-
Page 41: Troubleshooting
Check the cables from the unit to the controller. ing, but the controller is not power is lost or the controller is Contact the service centre if necessary. working. damaged. © Airflow • We reserve the right to make changes without prior notice... -
Page 42: Commissioning The System
Applicable to units installed and used within the United Kingdom. Airflow Developments Ltd guarantees the DV96 / DV110 / DV145 Adroit unit for 5 YEARS from date of purchase against faulty material or workmanship. Motors are only covered for 1 YEAR from date of purchase against faulty material or workmanship.
Need help?
Do you have a question about the Adroit and is the answer not in the manual?
Questions and answers