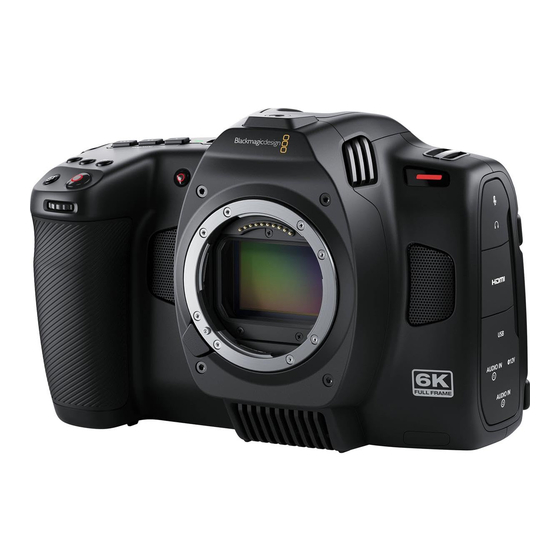
Summary of Contents for Blackmagicdesign Cinema Camera 6K
Page 1
September 2023 Installation and Operation Manual Blackmagic Cinema Camera 6 K Blackmagic Cinema Camera 6 K...
Page 2
Since then we have listened to your wonderful feedback and have now built our new cinema camera. Welcome to Blackmagic Cinema Camera 6K! Blackmagic Cinema Camera 6K features a full height 6K sensor that is 3 times larger than a Super 35 sensor with a 3:2 aspect ratio and large photosites. That means the pictures look even more amazing, you get a larger image using full frame lenses and you get to use anamorphic lenses without cropping.
58 Using a Battery Grip 138 Monitor Settings 58 Developer Information 140 Audio Settings 65 Setup Settings 68 Camera Control REST API 140 Presets 79 Transport Control API 141 3D LUTs 81 Timeline Control API 144 Blackmagic Cinema Camera 6K...
Page 4
Blackmagic Embedded Tally Control Protocol 181 Preset Control API 153 Help 183 Audio Control API 155 Regulatory Notices 184 Lens Control API 160 Safety Information 185 Video Control API 162 Color Correction Control API 166 Warranty 186 Blackmagic Cinema Camera 6K...
Getting Started Getting started with your Blackmagic Cinema Camera 6K is as simple as mounting a lens and powering your camera. Attaching a Lens Your Blackmagic Cinema Camera 6K uses L-mount lenses. To attach a lens to your camera, begin by removing the protective dust cap. To remove the protective dust cap, hold down the locking button and rotate the cap counterclockwise until it is released.
Powering your Camera With a lens attached, you can now supply power to your camera. Blackmagic Cinema Camera 6K can be powered by inserting the supplied NP-F570 battery or by connecting the AC power adapter. To insert the battery: On the underside of the camera, press the door release to open the battery door. With the contacts facing the terminal, insert the battery until you feel it click into place under the locking tab.
This is convenient as you can use a portable power bank to charge the camera when not in use. Blackmagic Cinema Camera 6K supports support charging via standard 5V 10W USB wall chargers. Chargers that support USB power delivery, or USB PD, can also be used. USB PD chargers typically have a USB-C connection and up to 20V output, so can provide a faster charge.
Page 8
To insert a CFexpress card: To access the CFexpress card slot, hold the camera The spring loaded door opens so you can access with the LCD facing you. Slide the door on the right the CFexpress card slot. side towards you and then let it swing open. Insert the CFexpress card into the slot until you The storage information at the bottom of the LCD feel it lock into place.
This is because CFexpress cards have different read and write speeds. For the most up to date information on supported CFexpress Type B cards on Blackmagic Cinema Camera 6K, please refer to the Blackmagic Design support center at www.blackmagicdesign.com/support.
6K and 4K video. For the most up to date list of recommended USB-C flash disks please go to www.blackmagicdesign.com/support. Important Notes About USB-C flash disk Speed Some models of USB-C flash disk can’t save video data at the speed the manufacturer claims.
Preparing Media using your Camera Tap either storage indicator at the bottom of the LCD touchscreen to enter the storage manager. Tap the ‘format’ button at the bottom of the screen. The ‘format’ button allows you to select the media storage you want to prepare for recording On the ‘select media’...
Page 12
Check that you have selected the correct media before formatting Hold down the format button for three seconds to format your media. The camera notifies you when the format is complete and your media is ready to use, or if formatting has failed. Tap ‘ok’...
Blackmagic Design website for the latest information at www.blackmagicdesign.com Partitioned media can be used with your Blackmagic Cinema Camera 6K, though your camera will only recognize the first partition of your media for recording and playback. It’s worth noting that if you use the storage and formatting menu to format your media, the entire drive including all partitions will be erased, not just the first partition that has been used for recording and playback.
Proxy files recorded on Blackmagic Cinema Camera 6K are automatically recognized by DaVinci Resolve and linked to the Blackmagic RAW original media files, so you have the option to edit with proxy media straight away. For more...
Proxy media files are always recorded matching your camera’s project frame rate. Blackmagic RAW Blackmagic Cinema Camera 6K supports the Blackmagic RAW file format. This format offers superior image quality, wide dynamic range and a broad selection of compression ratios.
Page 16
allowing the size of the file to grow if your images need extra data. There is no upper limit on the file size if you need to encode an image but maintain quality. So Blackmagic RAW set to the constant quality setting will just let the file grow as big as it needs to be to encode your images.
Page 17
The Blackmagic RAW SDK supports Mac, Windows and Linux, and is available as a free download from the developer page of the Blackmagic website at www.blackmagicdesign.com/developer Recording...
The values in these tables assume shots with a high complexity, which means you may get slightly longer record times depending on the nature of your shoot. TIP You can estimate record duration times based on different storage media capacities, frame rates and codec settings using the data rate calculator at: https://www.blackmagicdesign.com/products/blackmagiccinemacamera/ blackmagicraw#data-rate-calculator Recording...
Page 19
For more information on using off speed sensor frame rates to achieve creative effects, refer to the ‘touchscreen controls’ section. Trigger Record Blackmagic Cinema Camera 6K automatically sends a signal via the HDMI output that will trigger recording when connected to equipment that supports the trigger record feature, such as Blackmagic Video Assist.
Shooting using a Vertical Aspect Ratio Your Blackmagic Cinema Camera 6K supports vertical aspect ratios so you can craft cinematic content for platforms like YouTube and TikTok with the color and dynamic range of digital film.
Page 21
You can fill the sides automatically using solid colors or even using DaVinci’s ‘blanking fill’ effect. For more information refer to the ‘Resolve FX overview’ section in the DaVinci Resolve manual available at the Blackmagic Design support center at www.blackmagicdesign.com/support Shooting using a Vertical Aspect Ratio...
Playback Once you have recorded your video, you can use the transport control buttons to play back your video on the LCD. Press the play button to switch to playback mode. Press the button again for instant playback of the last recorded clip on the LCD and on any display connected to the HDMI output.
Lens Mount Your Blackmagic Cinema Camera 6K features an active lens mount for L-mount lenses. This means you can use lenses with built-in stabilization, as well as use auto focus and auto exposure with compatible lenses. To use the image stabilizer or ‘IS’ feature found in many active lenses, set the stabilizer switch to ‘on’...
Left Side Left side ports on Blackmagic Cinema Camera 6K 3.5mm Microphone Input Connect a microphone to your camera’s 3.5mm stereo connector. Mic and line level audio are supported. The microphone level audio is lower than the line level, so if you are connecting a microphone to the camera and have line level selected, you will find the levels are too low.
To mount heavier accessories, we strongly recommend using a camera cage designed for the Blackmagic Cinema Camera 6K that attaches to both the top and bottom 1/4” mount simultaneously.
Page 26
For more information refer to the ‘touchscreen controls’ section. Viewfinder Connector Port Blackmagic Cinema Camera 6K has a connector port for Blackmagic Pocket Cinema Camera Pro EVF. If the optional electronic viewfinder is not installed, you can attach the supplied protective cover.
Camera Underside Underside of Blackmagic Cinema Camera 6K 1/4-20 Mounting Points Attach your Blackmagic Cinema Camera 6K to a tripod, rigging or accessories using the bottom 1/4-20 mounting points. Battery Door Push the battery door release towards the lens mount to open the battery door. To close, simply push the door in until it clicks shut.
Page 28
Your Blackmagic Cinema Camera 6K has a tilt screen so you can angle the LCD touchscreen up or down for a wide range of viewing angles and a power save setting to dim the LCD when it’s inactive. You can also set the LCD touchscreen to operate at an extreme brightness that is suitable for shooting in very bright sunlight.
LCD, and on any display connected to the HDMI output. Blackmagic Pocket Cinema Camera Pro EVF Blackmagic Cinema Camera 6K has an optional electronic viewfinder. The viewfinder tilts vertically 70 degrees and comes with four eyecup types for left or right eye. A sensor in the viewfinder detects when it is in use, and will switch off the LCD touchscreen to conserve battery power and prevent accidental taps on touchscreen controls.
Page 30
LCD Monitor Options Tap the ‘monitor’ icon at the top left of the touchscreen to access the LCD monitor settings. These settings let you toggle and adjust the appearance of your camera’s monitoring features, including zebra, focus assist, frame guides, grids, safe area guides and false color. When accessing LCD monitor options, the controls for these features appear in a tabbed menu along the bottom edge of the LCD touchscreen.
Page 31
To set the level of focus assistance for all outputs on your Blackmagic Cinema Camera 6K, drag the slider left and right along the bottom of your touchscreen, or tap the arrow buttons next to the focus assist level. The optimum level of focus assistance varies shot by shot. When focusing on actors, for example, a higher level of focus assistance can help resolve edge detail in faces.
Page 32
Displays a ratio slightly wider than 16:9 but not as wide as 2.35:1. 1.85:1 Displays another common flat widescreen cinema aspect ratio. This ratio is slightly wider than HDTV 1.78:1 but not as wide as 2.39:1. 16:9 Displays a 1.78:1 aspect ratio compatible with 16:9 HD television and computer screens. This ratio is most commonly used for HD broadcasting and online videos.
Page 33
TIP You can change the opacity of frame guide overlays. For more information see the ‘monitor settings’ section of this manual. Grids The ‘grids’ setting toggles the appearance of a rule of thirds grid, horizon meter, crosshair or center dot on the LCD touchscreen, as well as setting the overlay that will be visible on the HDMI output.
Page 34
Horizon The ‘horizon’ meter indicates when your camera is rolled left or right and tilted up or down. This can help you keep the horizon is level during handheld shots and balance the camera tilt on a gimbal. The direction the light gray vertical line moves away from the dark gray crosshair in the middle indicates the direction your camera is rolled.
Page 35
Safe Area Guides The ‘safe area guides’ setting toggles the safe area guides on or off the LCD touchscreen, as well as setting the size of safe area guides for the HDMI output. Safe areas can be used in broadcast production so the most important parts of a shot can be seen by viewers.
Page 36
The IRE false color chart on the left side of your camera’s display shows you how to interpret the different false colors. False Color Meaning 95%WC White clipping 80%WC Near white clipping MG+1 One stop over middle gray 18%MG Middle gray NBDL Near black detail loss Black detail loss...
Page 37
Frames Per Second The ‘FPS’ indicator displays your currently selected frames per second. Tap the frames per second indicator to access frame rate settings Tapping the ‘FPS’ indicator lets you change your camera’s sensor and project frame rates via a menu at the bottom of the LCD touchscreen. Project Frame Rate The project frame rate is the camera’s recording format frame rate and provides a selection of common frame rates used in the film and television industry.
Page 38
By default, the project and sensor frame rates are matched for a natural playback speed. However, by tapping the ‘off speed frame rate’ switch icon in the bottom right hand side of your camera’s ‘FPS’ menu, you can independently set the sensor frame rate. To change the sensor frame rate, tap the arrows next to the sensor frame rate indicator in the lower left of your touchscreen.
Page 39
NOTE When shooting under lights, your shutter can reveal light flicker. Blackmagic Cinema Camera 6K will automatically calculate a flicker free shutter value for your current frame rate. It will display up to three suggested flicker free shutter options at the bottom of the touchscreen display when adjusting your shutter. These shutter values are affected by mains power frequency in your region.
Page 40
Tap the iris indicator to access iris settings To adjust the Iris from the LCD touchscreen, your Blackmagic Cinema Camera 6K must be fitted with a lens that supports changing aperture via the camera.
Page 41
Iris This setting automatically adjusts the aperture to maintain a constant exposure while keeping shutter angle consistent. This will keep motion blur unaffected, but may affect your depth of field. Iris + Shutter Maintains the correct exposure levels by adjusting the aperture, then the shutter value. If the maximum or minimum available aperture is reached and exposure still cannot be maintained, your camera adjusts the shutter value to keep exposure consistent.
Page 42
In bright conditions ISO 100 can provide richer colors. Dual Native ISO Your Blackmagic Cinema Camera 6K has a dual native ISO of 400 and 3,200, which means that the sensor is optimized for shooting in both low light conditions, as well as bright daylight.
Page 44
TIP White balance settings can also be used creatively by warming or cooling the image based on the story you are telling. Your Blackmagic Cinema Camera 6K comes with white balance presets for a variety of color temperature conditions. These are:...
Page 45
25% steps. At 20% charge remaining, the battery bar turns red. Blackmagic Pocket Camera Battery Pro Grip can power Blackmagic Cinema Camera 6K from its two batteries as well as Battery grip bars the camera’s internal battery. These battery meters show the states of all three batteries.
Page 46
LUT indicator When you are using a LUT as a preview tool on set, a a white LUT icon will be displayed in the top left corner of the screen to indicate that the LUT is currently active. This icon will be blue if you also have ‘apply LUT in file’...
Page 47
Refer to the ‘storage media’ section for more information. Dropped frame indicator for the CFexpress card NOTE You can set your Blackmagic Cinema Camera 6K to stop recording if dropped frames are detected to avoid recording unusable footage. See the ‘record settings’...
Page 48
TIP Tapping the card or drive name in the storage menu sets it as the active card or drive. Your Blackmagic Cinema Camera 6K fills this card or drive first. Audio Meter The peak audio meters display audio levels for channels 1 and 2 when using the internal microphone, or via external audio when connected.
Page 49
You can tap the audio meter to bring up volume controls for audio input channels 1 and 2, as well as headset or speaker volume. Tap the audio meters on the LCD touchscreen to easily access volume and headset or speaker settings Double Tap to Zoom You can magnify any part of your camera’s preview image by double tapping the LCD touchscreen.
Page 50
Swipe up or down to hide all status indicators on the LCD touchscreen Playback Menu Press your camera’s ‘play’ button to play back a clip. You can control previously recorded clips using transport control buttons on the LCD touchscreen. A timeline of segments represents all the recorded clips and each segment represents an individual clip.
Page 51
Tap the ‘record’ button in playback mode to return your camera to standby mode, ready to record. Tap the ‘play’ button to view your clips. You are now in ‘playback’ mode. Press the ‘stop’ button to stop playback. Pressing the ‘stop’ button a second time will return your camera to standby mode.
Tap the ‘record,’ ‘monitor,’ ‘audio,’ ‘setup,’ ‘presets,’ and ‘LUTS’ headings to move between your Cinema Camera 6K’s dashboard tabs Record Settings The ‘record’ tab lets you set your video format, codec, and resolution, as well as other settings that are important for your recorded video, such as dynamic range and detail sharpening.
Page 53
Resolution This setting works in combination with the ‘codec’ setting to define the resolution of your image. The resolution options on Blackmagic Cinema Camera 6K Settings...
Page 54
Record Settings 2 The second page of the ‘record’ settings tab contains the following options. Dynamic Range Adjust the ‘dynamic range’ setting by tapping the dynamic range icons. Your camera has three dynamic range settings: Video The ‘video’ setting is the best choice for recording to a high contrast, saturated look suitable for direct delivery or minimal post processing.
Page 55
Off Speed Recording By default, the project and sensor frame rates are matched for a natural playback speed. However, tapping the ‘off speed recording’ switch icon lets you set your sensor frame rate independently. Off Speed Frame Rate With ‘off speed recording’ enabled, tap the arrows next to the ‘off speed frame rate’ indicator to set your camera’s sensor frame rate.
Page 56
Timelapse This setting activates the timelapse feature to automatically record a still frame at the following intervals: Frames 2 – 10 Seconds 1 – 10, 20, 30, 40, 50 Minutes 1 – 10 For example, you can set the camera to record a still frame every 10 frames, five seconds, 30 seconds, five minutes etc.
Page 57
Record Settings 4 The fourth page of the ‘record’ settings tab contains the following settings. Vertical Recording Your Cinema Camera 6K is capable of shooting vertically for social media delivery and for general creative purposes. Auto When set to auto, recorded clips will follow the position of the camera when the record button is pressed.
The ‘monitor’ tab lets you adjust status text, overlays and other monitoring options for your Blackmagic Cinema Camera 6K. Options are arranged by output between ‘LCD’ and ‘HDMI’. The ‘viewfinder’ button provides monitoring options if you have a Blackmagic Pocket Cinema Camera EVF installed on your camera.
Page 59
Your camera will display a record tally even in clean feed mode Display 3D LUT Blackmagic Cinema Camera 6K can apply 3D LUTs to any output to approximate the look of color graded footage. This is especially useful when recording clips using ‘film’ dynamic range.
Page 60
Cinema Camera 6k’s preview outputs and in recorded files. Select an ‘anamorphic desqueeze’ option to correct the preview image on your Cinema Camera 6K as well as recording the desqueeze amount used in the clip metadata for easy correction in post production.
Page 61
Anamorphic desqueeze options include: Resolution and Aspect Ratio Desqueeze Amount 6K 3:2 1.6x 6:5 Anamorphic 6K DCI 1.33x 6K 2.4:1 No desqueeze Super35 4:3 1.8x 4K DCI 1.33x Super16 16:9 1.33x 1080HD 1.33x TIP If your image appears horizontally stretched when shooting with a standard spherical lens, you may have an anamorphic desqueeze enabled by accident.
Page 62
These settings act globally across all three monitoring outputs. For example, if focus assist is enabled on your Blackmagic Cinema Camera 6K’s LCD, HDMI and viewfinder outputs changing the ‘focus assist type’ from ‘peaking’ to ‘colored lines’ will effect all three outputs.
Page 63
Setting the focus assist intensity level does not affect whether focus assistance is enabled on your Blackmagic Cinema Camera 6K’s LCD, HDMI output and viewfinder. You need to turn focus assistance on individually for each output in the LCD, HDMI output and viewfinder monitor menus.
Page 64
For more information, see the ‘grids’ guide in the ‘touchscreen features’ section. Monitor Settings 5 The fifth page of your Cinema Camera 6K’s ‘LCD’ and ‘Viewfinder” monitor tab contains some settings that vary depending on the selected output. These settings are not available for the ‘HDMI’...
• Camera Left or Right Records from your camera’s internal microphones. • Camera Mono Creates a single audio channel from your Blackmagic Cinema Camera 6K’s built in microphone’s left and right channels. • XLR Line Uses your camera’s XLR input to record line level audio. You can also use this setting to accept a timecode signal through the XLR port.
Page 66
phantom powered microphone. You can also use this setting to accept a timecode signal through the XLR port. • 3.5mm Left – Line Uses only the left channel of the 3.5mm input as line level audio. You can also use this setting to accept a timecode signal on the left channel of the 3.5mm microphone input.
Page 67
If you are using VU metering, adjust the input levels on your Blackmagic Cinema Camera 6K so that the meter peaks at the 0db indicator on the audio meter. This maximizes the signal to noise ratio and ensures your audio is at the highest quality.
XLR audio equipment. Setup Settings The ‘setup’ tab contains your Blackmagic Cinema Camera 6K’s identification settings, software version, function button settings and other camera settings not directly linked to recording or monitoring. This menu has seven pages that you can cycle through by tapping the arrows at the edge of the LCD touchscreen, or swiping left or right.
Page 69
When setting manually, tap on each field to enter the time and date and tap ‘update’ to confirm. When set to ‘automatically’, your Cinema Camera 6K will update the date and time when connected to a network via Ethernet, or the next time you update your camera. The camera’s default network time protocol server is time.cloudflare.com but you can set it yourself by...
Page 70
When shooting under lights, your shutter can affect the visibility of flicker. Your Blackmagic Cinema Camera 6K automatically calculates a flicker free shutter value for your current frame rate and suggests up to three shutter values. Shutter values are affected by the frequency of the local mains power supply used to drive those lights.
Page 71
The third page of your camera’s ‘setup’ tab contains the following settings. Set Function Button On the top of your Blackmagic Cinema Camera 6K you’ll notice three function buttons. The dots on the buttons represent function 1, function 2 and function 3. These can be mapped to frequently used features and are quickly accessible when using your camera.
Page 72
Function Button Behaves as Preset or Toggle Once you have selected the function button you want to map, you can select a behavior. The available options are: • Preset When set to this behavior, pressing a function button will recall a combination of a setting and a parameter.
Page 73
Tally Light LED Your Blackmagic Cinema Camera 6K has a small LED on the front to indicate the recording status of the camera. To enable or disable the tally light indicator, use the ‘tally light LED’ switch. LED Brightness To set the brightness of the tally light LED, tap ‘low,’ ‘medium,’ or ‘high.’...
Page 74
DaVinci Resolve color corrector or even lens control. For more information see the ‘Blackmagic Camera Control’ document available at www.blackmagicdesign.com/developer To pair your camera with an iPad for the first time: Enable Bluetooth by tapping the ‘Bluetooth’ switch icon in the ‘setup’ menu.
Page 75
When you install the Blackmagic Camera Control App and run it for the first time, you will be asked if you want to ‘allow location access.’ If you select ‘while using the app,’ GPS readings from your iPad will be included in the metadata of the files you shoot, allowing you to geotag your footage.
Page 76
If you are not using Bluetooth to control your Blackmagic Cinema Camera 6K, it is a good idea to turn Bluetooth off for the purpose of security. Disconnect Current Device Use this setting to disconnect your Blackmagic Cinema Camera 6K from the iPad it is currently paired with. Clear Paired Devices Use this setting to clear the list of devices that your camera has been paired with.
Page 77
Tap the slate icon in the lower right corner to access and update the slate Blackmagic Cinema Camera 6K uses Bluetooth LE to communicate with devices for wireless control. This is the same type of protocol used in portable devices, and uses a minimal amount of battery power.
Page 78
Pixel Recalibration The CMOS sensor used in your Blackmagc Cinema Camera 6K is made up of millions of pixels that respond to light. Some pixels can change in brightness over time following sensor calibration in the factory. As a result, they become more visible and become what is known commonly as hot pixels.
You can also import and export presets that are useful for setting up a multi camera shoot. Simply set up one Blackmagic Cinema Camera 6K to suit your project, then export that preset for all the other Blackmagic Cinema Camera 6Ks on set.
Page 80
‘load’ icon. You can update a preset by tapping the ‘update’ icon. This will bring up a prompt asking you if you want to update the preset with your Blackmagic Cinema Camera 6K’s current setting. Tap ‘update’ to confirm.
Tap a preset to select it, then tap ‘import’ to confirm your selection and copy it to the next available slot on the camera. If the preset you want to import has the same name as a preset already saved to your camera, you can choose to overwrite the existing preset or keep both.
Page 82
Your Blackmagic Cinema Camera 6K supports 33 point 3D LUTs in .cube format created in DaVinci Resolve and 17 point 3D LUTs converted to Resolve .cube format via LUT conversion programs. Your camera processes 3D LUTs using high quality tetrahedral interpolation.
Page 83
When you are prompted to confirm your choice, tap ‘delete’. Embedded 3D LUTs When a 3D LUT is used while shooting Blackmagic RAW on Blackmagic Cinema Camera 6K, the selected LUT will be embedded into the Blackmagic RAW file that you are recording. The 3D LUT is actually saved with your recorded files in the header of the .braw file, and can easily be...
VFX assets to plates. Your Blackmagic Cinema Camera 6K automatically saves some metadata to each clip, such as camera settings, timecode, date and time. You can use your camera’s slate to add many additional details.
Page 85
Lens Data If you are using a lens with in built electronics that communicate with your camera, you can see the lens model information here. To change or add any information regarding the lens you are using, press the ‘lens data’ option above. For more information refer to the ‘lens data metadata’...
Page 86
A small 'A' appears next to the take number on the slate when enabled. When entering ‘take’ metadata, your Blackmagic Cinema Camera 6K will offer prompts for additional shot types to the right of the touch keyboard Entering Metadata...
Page 87
Good take Tap the ‘good take’ indicator to tag good takes for easy recall in post production. This button applies the ‘good take’ tag to the clip currently being viewed in playback mode. If the camera is in standby mode and ready to record, the ‘good take last clip’ button applies a ‘good take’ tag to the last clip recorded.
Page 88
can tap the pencil icon in this setting to enter the information manually. This will bring up the ‘lens data’ menu, which contains the following information: The ‘lens data’ menu showing information automatically populated from an attached lens, and filter information that has been manually entered •...
Gyro Stabilization Your Blackmgaic Cinema Camera 6K automatically records pan, tilt and roll data captured by an internal motion sensor. This data is also known as gyro data, which DaVinci Resolve can then use to stabilize handheld shots.
Page 90
Enter ‘lens data’ when using lenses that do not have electronic communication with the camera NOTE You will need to update this information each time you change manual lenses of different focal lengths. Lenses with in built electronics will automatically overwrite the metadata. Applying Gyro Stabilization in DaVinci Resolve After importing your clips and setting them up on a timeline: Go to the ‘edit’...
Blackmagic Cinema Camera 6K’s USB port. Using DaVinci Resolve Shooting with your Blackmagic Cinema Camera 6K is only part of the process of creating film and television content, and just as important is the process of media backup and management as well as editing, color correction and encoding final master files.
DaVinci Resolve is the same tool used on most major blockbuster movies, so it’s much more than a simple NLE software tool, as it has extremely advanced technology built in for high end digital film. You get the advantage of this technology when you use DaVinci Resolve to edit and color correct your work.
Page 93
The Cut Page Layout When you open the cut page, you will see the media pool, viewer window and timeline. These three primary windows give you complete control over your edit. The Cut page default workspace, with the Media Pool in icon view For more information on the Cut page, see the ‘The Cut Page’...
Page 94
TIP Use the search tool near the media tab icons to find the exact items you are looking for. For example, if you have the transitions tab selected, type “dissolve” in the search tool and only dissolve transition types will be shown in the viewer, making it quicker for you to find the dissolve transition you want.
Page 95
Resolve Manual. Using Proxy Media Your Blackmagic Cinema Camera 6K simultaneously records proxy media files when recording to Blackmagic RAW. Proxy media files are smaller, compressed versions of Blackmagic RAW files that make it easy to edit projects remotely or using portable computers that may not have the same power as a desktop PC.
Select ‘proxy handling’ and click on ‘prefer proxies’. Your timeline will now use the proxy files. You can also select proxy files in the ‘cut’ page using the proxy handling quick select icon: Click on the small camera ‘proxy handling’ icon near the top right side of the screen. Select ‘prefer proxies’...
Page 97
NOTE If you are editing clips using a vertical aspect ratio, you can easily set your timeline to vertical by clicking on the ‘timeline resolution’ quick menu and selecting ‘portrait 1080x1920’. Set the timeline for vertical aspect ratios using the timeline resolution quick menu Appending Clips When selecting takes and assembling an edit, you will likely want to add these shots to your timeline one after the other.
Appending clips ensures there are no gaps between them on the timeline TIP You can speed up the process further by assigning a keyboard shortcut to the ‘append’ icon. For example, if you assign the ‘P’ key, you can set your in and out points using ‘I’...
Audio trim view expands the audio waveform in the timeline. After you have finished editing clips using the ‘cut’ page, you might want to add a title. The next section will show you how. Adding Titles Placing a title on your timeline is easy and you have many options. To see the different types of titles you can use, click on the ‘titles’...
To add a standard title: Click on the title and drag it onto the timeline. It doesn’t matter which timeline, but for greater accuracy we recommend using the detailed timeline. The title will automatically create a new video track for the title and will snap to the playhead. Release the mouse and the title will appear on the new track.
Page 101
for each clip in the ‘camera raw’ tab will show you just how powerful and flexible working with Blackmagic RAW can be. In the ‘camera raw’ tab, select ‘clip’ from the ‘decode using’ menu to make adjustments to your clip’s Blackmagic RAW settings Changing Blackmagic RAW Settings Once you have set DaVinci Resolve to enable clip settings for Blackmagic RAW, the clip...
Page 102
Midpoint In Blackmagic Design Film, your middle gray value defaults to 0.38, or 38.4%. Drag the slider to the left to lower your midpoint or to the right to raise it to 100. When contrast is adjusted away from the default setting, you can modify your highlight and shadow rolloff. Highlight Rolloff Adjust the highlights by dragging the slider to the left to lower the value to 0, or to the right to increase the highlights to 2.
Saving your Blackmagic RAW changes Adjust the gamma controls for your Blackmagic RAW clip. Click the ‘update sidecar’ button. A ‘sidecar’ file will now be created in the same folder as your .braw file. When another user imports the Blackmagic RAW files, the sidecar files will automatically be read by DaVinci Resolve.
Page 104
First click on the ‘color’ tab to open the color page. You’ll see the camera raw settings, color wheels, curves palettes and general color correction tools as well as the preview and nodes window. Don’t feel overwhelmed by the vast array of features in front of you, they are all there to help you get the most amazing looking pictures.
Page 105
The ‘lift, ‘gamma’, ‘gain’ and ‘offset’ color wheels give you total control over the color and tonal balance of your clips. To make a uniform adjustment to all colors for each tonal region, drag the dial underneath the color wheels back and forth The primaries bars make color adjustments easier when using a mouse.
Page 106
between 50 to 70% on the waveform scope. However, this can be subjective based on the look you are creating and the lighting conditions in the clip. You can also use the curves palette to make primary color corrections. Simply click to create control points on the diagonal line inside the curve graph, and drag them up or down to adjust the master RGB contrast at different areas of image tonality.
To qualify a color: Add a new serial node. Open the ‘qualifier’ palette and make sure the ‘selection range’ picker tool is selected. Click on the color in your clip you want to affect. Usually you’ll need to make some adjustments to soften the edges of your selection and limit the region to only the desired color.
Page 108
Power windows let you make secondary corrections to specific parts of your image Tracking a Window The camera, object or area in your shot may be moving, so to make sure your window stays on your selected object or area, you can use DaVinci Resolve’s powerful tracking feature. The tracker analyzes the pan, tilt, zoom and rotation of the camera or object in your clip so you can match your windows to that movement.
Using Plugins While making secondary color corrections you can also add Resolve FX or Open FX plugins to create fast, interesting looks and effects using the ‘color’ page, or imaginative transitions and effects on your clips on the ‘cut’ and ‘edit’ pages. Resolve FX are installed with DaVinci Resolve, OFX plugins can be purchased and downloaded from third party suppliers.
Page 110
TIP If you wish to change the type of track after creating it, right click next to the name of the track and select ‘change track type to’ and select the type of audio track you want, such as stereo, mono or 5.1. Adjusting Audio Levels in the Timeline Each clip of audio in the timeline has a volume overlay that lets you set that clip’s level by simply dragging it up or down with the pointer.
Page 111
The Audio Timeline • Track Header: At the left of each track is a header area that displays the track number, track name, track color, audio channels, fader value and audio meters. The track header also contains different controls for locking and unlocking tracks, plus solo and muting controls. These controls can help to keep your tracks organized, and let you preview individual tracks one at a time.
Page 112
The audio mixer, with channel strips corresponding to the tracks in the timeline Using the Equalizer to Enhance your Audio After adjusting the audio levels of your audio clips in your project, you may find that the audio needs further finessing. In some cases you may find that the dialogue, music and sound effects are competing for the same frequency on the audio spectrum, making your audio too busy and unclear.
Page 113
Outer bands let you make band filter adjustments using hi-shelf, lo-shelf, hi-pass and lo- pass filters. A pass filter affects all the frequencies above or below a particular frequency, by removing those frequencies completely from the signal. For example, a high pass filter will allow the high frequencies to pass through the filter while cutting the low frequencies.
Once you have added EQ to your clip or track, you can adjust the EQ for each band. Note that controls may vary depending on which band filter type is selected. To adjust the EQ for a band filter: Select the band filter type from the dropdown menu for the band you want to adjust. Adjust the ‘frequency’...
Page 115
• Media Pool: The media pool functions the same way as it appears in the edit page. Simply drag additional media from your bins directly to your composition. • Effects Library: The effects library is where you will find your Fusion tools and templates sorted into categories including particle, tracking, filters and generators.
Page 116
• Nodes: The nodes window is the heart of the Fusion page where you build your node tree by connecting tools together from one node’s output to another node’s input. This area will change size depending on which editors are open, for example the spline or keyframes editor.
Page 117
Understanding Nodes It can be helpful to think of each node as a visual icon representing a single tool or effect. Nodes are connected to other nodes to build the overall composition, much like ingredients in a cake. It’s important to understand the inputs and outputs of each node as this will help you navigate the flow of your composition while building detailed visual effects.
Page 118
Adjusting Nodes Using the Inspector Panel Adjust your node settings using the inspector panel. Simply click on the node you want to modify and the panel will update to display its settings and controls. With Fusion, you don’t have to be viewing the node you’re editing, as you can modify one node while viewing another in your composition.
Page 119
The splines panel gives you further control over keyframe animation. You can select keyframes, such as the first and last, and smooth the animation between them into a bezier curve by typing ‘shift’ + ’s’, or right clicking on a keyframe and selecting ‘smooth’. Using the Motion Tracker and Adding Text To get a better idea of how to use Fusion, we have included the following examples to show how to use the tracker tool to track an element in a clip, plus add text and attach it to the...
Page 120
Click on the ‘text+’ node icon from the toolbar of commonly used nodes and drag it to the node panel near the ‘tracker’ node. Connect the ‘text’ output square to the green foreground input on the ‘tracker’. Click on the ‘tracker’ node and type ‘1’ so you can see the merged results on your left hand viewer.
Page 121
For some shots you might want to remove track points after tracking, such as when the object you are tracking disappears off the screen. The keyframe editor makes this a very simple process. Click on the keyframes tab above the inspector to open the keyframes editor. Any nodes with keyframes applied will have a small arrow next to the node label, and only the parameter with keyframes added will appear in the list below.
We believe you will have lots of fun with Fusion and exploring Fusion’s visual effects with the power of DaVinci Resolve’s edit, color, and Fairlight pages. With all these tools at your finger tips, DaVinci Resolve is incredibly powerful and there is really no limit to what you can create! Mastering Your Edit Now you’ve edited, graded, added vfx and mixed your audio, you’ll want to share it with others.
NOTE When uploading directly to online accounts such as TikTok, you will need to sign in using DaVinci’s Internet accounts settings. These settings are located in the ‘system’ tab of the DaVinci Resolve preferences. Directly upload to TikTok when exporting your project by clicking the ‘upload directly’...
Mount CFexpress cards on your computer using a CFexpress reader To import your clips from a CFexpress card: Remove the CFexpress card from your Blackmagic Cinema Camera 6K. Mount the CFexpress card to your Mac or Windows computer using a CFexpress Type B card reader.
It’s important to note that Final Cut Pro does not support Blackmagic RAW files natively. To edit Blackmagic RAW files recorded on your Cinema Camera 6K in Final Cut Pro, you will first need to create ProRes versions of the Blackmagic RAW files.
When the clips appear in the media bin you can drag your clips onto the timeline and begin editing. NOTE To edit Blackmagic RAW files recorded using Blackmagic Cinema Camera 6K in Media Composer, you will need the Blackmagic RAW Installer. This can be found here https://www.blackmagicdesign.com/blackmagicrawinstaller...
To change your resolution or audio channel format, click on the sequence and then choose settings from the sequence menu. NOTE To edit Blackmagic RAW files recorded using Blackmagic Cinema Camera 6K in Premiere Pro, you will need the Blackmagic RAW Installer. This can be found here https://www.blackmagicdesign.com/blackmagicrawinstaller...
Blackmagic Camera Setup Updating Camera Software – Mac After downloading the Blackmagic Camera Setup utility software and unzipping the downloaded file, open the resulting disk image to reveal the Blackmagic Camera Setup Installer. Launch the installer and follow the on screen instructions. After the installation has finished, go to your applications folder and open the Blackmagic Cameras folder where you’ll find this manual, the Blackmagic Camera setup utility, plus a documents folder containing readme files and information.
Using Blackmagic Camera Setup Blackmagic Camera Setup is used to change settings and update the internal software in your camera. To use Blackmagic Camera Setup: Connect your camera to your computer via USB. Launch Blackmagic Camera Setup. Your camera model will be named in the setup utility home page.
Page 130
If you encounter a conflict, simply change the identifying number in the unit’s IP address. Network Access Your Blackmagic Cinema Camera 6K can be accessed via a network for transferring files. Access will be disabled by default, but you can choose to enable individually or via a username and password for added security when using the web manager.
Page 131
File Transfer Protocol Enable or disable access via FTP using the checkbox. If you are supplying access via an FTP client such as CyberDuck, click the icon to copy the FTP address. For more information, refer to the section ‘transferring files over a network’. File Sharing At the bottom left corner you will notice a button named ‘Show in Finder’...
Page 132
To enable web media manager access via HTTPS, you will require a secure certificate. This digital certificate acts as an identification card for your Cinema Camera 6K so that any incoming connections can confirm they are connecting to the correct unit. Along with confirming the identity of the unit, using a secure certificate ensures data transmitted between your camera and a computer or server will be encrypted.
Page 133
Certif icate Authority Blackmagic Cinema Camera 6K To generate the certificate signing request CSR: Click on the ‘generate signing request’ button. A window will appear prompting you to enter a common name and subject alternative name for your camera. Adjust any other details as required using the table below.
Page 134
Since a domain name was selected, you will need to speak to your IT department about resolving the DNS entry for your Cinema Camera 6K. This will point all traffic for the IP address of the camera to the selected domain address in the signing request.
Access to your Blackmagic Cinema Camera 6K via any of these protocols can be enabled or disabled via the Camera Setup utility. For example, you could disable FTP access and enable HTTPS access at the same time.
Page 136
Copy the domain address and paste into a browser Open your web browser and paste the address into a new window. If you have enabled access with security only you will be prompted to enter the username and password set in Camera Setup.
Page 137
With your camera connected to your network, open Camera Setup and click on URL or press the copy icon to paste it manually. You may need to click the link a second time if the FTP program doesn’t open a connection. If you are manually opening an FTP connection, paste the URL into the client’s server field.
Using a Battery Grip Adding a battery grip to your Blackmagic Cinema Camera 6K adds a horizontal handle and is a portable way to extend the duration of your shooting sessions. If you have a battery grip then it’s a good idea to install it now before you continue.
Page 139
Turn the knob on the front of the battery grip to the right to tighten the screw firmly and secure the battery grip to the camera. Inserting Batteries into the Battery Pro Grip Twist the locking tab on the end of the battery grip Place two NP-F570 batteries into the battery tray, anticlockwise to unlock the battery tray.
Enable the web media manager in the Blackmagic Camera Setup ‘network access’ settings for each camera you are controlling. The following Blackmagic cameras are compatible with Camera Control REST API: • Blackmagic Cinema Camera 6K • Blackmagic Studio Camera 4K Plus • Blackmagic Studio Camera 6K Pro •...
Downloading API’s from your Camera You can download REST API YAML documentation from your camera by adding /control/documentation.html to the end of the camera’s Web media manager URL or IP address. For example, https://Studio-Camera-6K-Pro.local/control/documentation.html NOTE It’s worth noting that changing the camera name in Blackmagic Camera Setup will also change the camera’s Web media manager URL.
Page 142
GET /transports/0/stop Determine if transport is stopped. Response 200 - OK The response is a JSON object. PUT /transports/0/stop Stop transport. Response 204 - No Content GET /transports/0/play Determine if transport is playing. Response 200 - OK The response is a JSON object. PUT /transports/0/play Start playing on transport.
Page 143
PUT /transports/0/playback Set playback state. Parameters Name Type Description type string Possible values are: Play, Jog, Shuttle, Var. When true playback loops from the end of the timeline to loop boolean the beginning of the timeline When true playback loops from the end of the current clip to singleClip boolean the beginning of the current clip...
GET /transports/0/timecode Get device’s timecode. Response 200 - OK The response is a JSON object. Name Type Description The time of day timecode in units of binary-coded decimal timecode number (BCD). The position of the clip timecode in units of binary-coded clip number decimal (BCD).
POST /timelines/0/add Add a clip to the end of the timeline. Parameters This parameter can be one of the following types: Name Type Description clips integer Unique ID used to identify this clip Name Type Description clips array clips[i] integer Unique ID used to identify this clip Response 204 - No Content...
System Control API API for controlling the System Modes on Blackmagic Design products. GET /system Get device system information. Response 200 - OK The response is a JSON object. Name Type Description codecFormat object codecFormat.codec string Currently selected codec codecFormat.container string Multimedia container format videoFormat...
Page 147
GET /system/codecFormat Get the currently selected codec. Response 200 - OK The response is a JSON object. Name Type Description codec string Currently selected codec container string Multimedia container format 501 - This functionality is not implemented for the device in use. PUT /system/codecFormat Set the codec.
Page 148
PUT /system/videoFormat Set the video format. Parameters Name Type Description Frame rate Possible values are: 23.98, 24.00, 24, 25.00, 25, frameRate string 29.97, 30.00, 30, 47.95, 48.00, 48, 50.00, 50, 59.94, 60.00, 60, 119.88, 120.00, 120. height number Height dimension of video format width number Width dimension of video format...
Page 149
GET /system/supportedFormats Get supported formats. Response 200 - OK The response is a JSON object. Name Type Description supportedFormats array supportedFormats[i] object Possible values are: 23.98, 24.00, 24, 25.00, 25, supportedFormats[i].codecs array 29.97, 30.00, 30, 47.95, 48.00, 48, 50.00, 50, 59.94, 60.00, 60, 119.88, 120.00, 120.
Page 150
recordResolution.width number Width of the resolution sensorResolution object sensorResolution.height number Height of the resolution sensorResolution.width number Width of the resolution 501 - This functionality is not implemented for the device in use. PUT /system/format Set the format. Parameters Name Type Description codec string...
Media Control API API for controlling media devices in Blackmagic Design products. GET /media/workingset Get the list of media devices currently in the working set. Response 200 - OK The response is a JSON object. Name Type Description size integer The fixed size of this device’s working set workingset (required) array...
Page 152
GET /media/devices/doformatSupportedFilesystems Get the list of filesystems available to format the device. Response 200 - OK The response is a JSON object. GET /media/devices/{deviceName} Get information about the selected device. Parameters Name Type Description {deviceName} string Response 200 - OK The response is a JSON object.
PUT /media/devices/{deviceName}/doformat Perform a format of the media device. Parameters Name Type Description {deviceName} string Name Type Description The key used to format this device, it must be fetched with string the GET request and then provided back with a PUT request Filesystem to format to (supportedFilesystems returns list of filesystem string...
Page 154
GET /presets/active Get the list of the presets on the camera Response 200 - OK The response is a JSON object. Name Type Description preset string PUT /presets/active Set the active preset on the camera Parameter Name Type Description preset string Response 200 - OK...
DELETE /presets/{presetName} Delete a preset from a camera if exists Parameter Name Type Description {presetName} string Response 200 - OK The response is a JSON object. Audio Control API API For controlling audio on Blackmagic Design Cameras GET /audio/channel/{channelIndex}/input Get the audio input (source and type) for the selected channel Parameter Name Type...
Page 156
PUT /audio/channel/{channelIndex}/input Set the audio input for the selected channel Parameter Name Type Description {channelIndex} integer Name Type Description Possible values are: None, Camera - Left, Camera - Right, Camera - Mono, XLR1 - Mic, XLR1 - Line, XLR2 - Mic, XLR2 input string - Line, 3.5mm Left - Line, 3.5mm Left - Mic, 3.5mm Right -...
Page 157
GET /audio/channel/{channelIndex}/supportedInputs Get the list of supported inputs and their availability to switch to for the selected channel Parameter Name Type Description {channelIndex} integer Response 200 - The list of supported inputs The response is a JSON object. Name Type Description supportedInputs array...
Page 158
PUT /audio/channel/{channelIndex}/level Set the audio input level for the selected channel Parameter Name Type Description {channelIndex} integer Name Type Description gain number normalised number Response 200 - OK 400 - Invalid input 404 - Channel does not exist GET /audio/channel/{channelIndex}/phantomPower Get the audio input phantom power for the selected channel if possible Parameter Name...
Page 159
GET /audio/channel/{channelIndex}/padding Get the audio input padding for the selected channel Parameter Name Type Description {channelIndex} integer Response 200 - Currently set padding for the selected channel The response is a JSON object. Name Type Description padding boolean 404 - Channel does not exist PUT /audio/channel/{channelIndex}/padding Set the audio input padding for the selected channel Parameter...
PUT /audio/channel/{channelIndex}/lowCutFilter Set the audio input low cut filter for the selected channel Parameter Name Type Description {channelIndex} integer Name Type Description lowCutFilter boolean Response 200 - OK 400 - Low cut filter is not supported for this input 404 - Channel does not exist GET /audio/channel/{channelIndex}/available Get the audio input’s current availability for the selected channel.
Page 161
PUT /lens/iris Set lens’ aperture Parameter Name Type Description apertureStop number Aperture stop value normalised number Normalised value apertureNumber number Aperture number Response 200 - OK GET /lens/zoom Get lens’ zoom Response 200 - OK The response is a JSON object. Name Type Description...
PUT /lens/focus Set lens’ focus Parameter Name Type Description focus number Normalised value Response 200 - OK PUT /lens/focus/doAutoFocus Perform auto focus Response 200 - OK Video Control API API For controlling the video on Blackmagic Design products GET /video/iso Get current ISO Response 200 - OK...
Page 163
GET /video/gain Get current gain value in decibels Response 200 - OK The response is a JSON object. Name Type Description gain integer Current gain value in decibels PUT /video/gain Set current gain value Parameter Name Type Description gain integer Gain value in decibels to set Response 200 - OK...
Page 164
GET /video/whiteBalanceTint Get white balance tint Response 200 - OK The response is a JSON object. Name Type Description whiteBalanceTint integer Current white balance tint PUT /video/whiteBalanceTint Set white balance tint Parameter Name Type Description whiteBalanceTint integer White balance tint to set Response 200 - OK GET /video/ndFilter...
Page 165
GET /video/ndFilter/displayMode Get ND filter display mode on the camera Response 200 - OK The response is a JSON object. Name Type Description displayMode string Possible values are: Stop, Number, Fraction. PUT /video/ndFilter/displayMode Set ND filter display mode on the camera Parameter Name Type...
GET /video/autoExposure Get current auto exposure mode Response 200 - OK The response is a JSON object. Name Type Description mode object Auto exposure mode mode.mode string Possible values are: Off, Continuous, OneShot. mode.type string Possible values are: , Iris, Shutter, Iris,Shutter, Shutter,Iris. PUT /video/autoExposure Set auto exposure Parameter...
Page 167
PUT /colorCorrection/lift Set color correction lift Parameter Name Type Description number green number blue number luma number Response 200 - OK GET /colorCorrection/gamma Get color correction gamma Response 200 - OK The response is a JSON object. Name Type Description number green number...
Page 168
GET /colorCorrection/gain Get color correction gain Response 200 - OK The response is a JSON object. Name Type Description number green number blue number luma number PUT /colorCorrection/gain Set color correction gain Parameter Name Type Description number green number blue number luma number...
Page 169
PUT /colorCorrection/offset Set color correction offset Parameter Name Type Description number green number blue number luma number Response 200 - OK GET /colorCorrection/contrast Get color correction contrast Response 200 - OK The response is a JSON object. Name Type Description pivot number Default value is: 0.5.
Page 170
PUT /colorCorrection/color Set color correction color properties Parameter Name Type Description number saturation number Default value is: 1. Response 200 - OK GET /colorCorrection/lumaContribution Get color correction luma contribution Response 200 - OK The response is a JSON object. Name Type Description lumaContribution...
Blackmagic SDI Camera Control Protocol Version 1.6.2 If you are a software developer you can use the Blackmagic SDI to construct devices that integrate with our products. Here at Blackmagic Design, our approach is to open up our protocols and we eagerly look forward to seeing what you come up with! Overview This document describes an extensible protocol for sending a unidirectional stream of small control...
Page 172
The command data may contain between 0 and 60 bytes of data. Command data (uint8[]) The format of the data section is defined by the command itself. Messages must be padded up to a 32 bit boundary with 0x0 bytes. Padding (uint8[]) Any padding bytes are NOT included in the command length.
Page 173
Data types 129 through 255 are available for device specific purposes. The operation type specifies what action to perform on the specified Operation type (uint8) parameter. Currently defined values are: The supplied values are assigned to the specified parameter. Each element will be clamped according to its valid range.
Page 174
Group Parameter Type Index Minimum Maximum Interpretation fps as integer [0] = frame rate – – (eg 24, 25, 30, 50, 60) [1] = M-rate – – 0 = regular, 1 = M-rate 0 = NTSC, 1 = PAL, 2 = 720, 3 = 1080, 4 = 2kDCI, 5 = 2k16:9, Video mode int8...
Page 175
Group Parameter Type Index Minimum Maximum Interpretation [0] = stop 15.0 filter power, as f-stop 0 = stop 1.16 ND Filter Stop fixed16 [1] = display mode – – 1 = density 2 = transmittance Mic level fixed16 – 0.0 = minimum, 1.0 = maximum Headphone level fixed16 –...
Page 176
Group Parameter Type Index Minimum Maximum Interpretation Brightness fixed16 – 0.0 = minimum, 1.0 = maximum bit flags: uint16 [0] = Zebra Exposure and focus tools [0] = bit field – – bit field [1] = Focus Assist [2] = False Color bit flags: [0] = LCD uint16...
Page 177
Group Parameter Type Index Minimum Maximum Interpretation [0] time BCD - HHMMSSFF (UCT) Real Time Clock int32 [1] date BCD - YYYYMMDD ISO-639-1 two character System language string [0-1] language code Timezone int32 Minutes offset from UTC BCD - s0DDdddddddddddd Confi- where s is the sign: guration...
Page 178
Group Parameter Type Index Minimum Maximum Interpretation 0 = CinemaDNG, 1 = DNxHD, [0] = basic codec – – 2 = ProRes, 3 = Blackmagic RAW CinemaDNG: 0 = uncompressed, – – 1 = lossy 3:1, 2 = lossy 4:1 ProRes: 0 = HQ, 1 = 422,...
Page 179
Group Parameter Type Index Minimum Maximum Interpretation -1.0 = full speed left, [0] = pan velocity -1.0 1.0 = full speed right 11.0 Pan/Tilt Velocity fixed 16 -1.0 = full speed down, [1] = tilt velocity -1.0 1.0 = full speed up 0 = reset, Control int8...
Example Protocol Packets Packet Operation Length Byte header command data trigger instantaneous auto focus on camera 4 turn on OIS on all cameras set exposure to 10 ms on camera 4 (10 ms = 10000 0x10 0x27 0x00 0x00 us = 0x00002710) add 15% to zebra level 0x33 0x01 (15 % = 0.15 f = 0x0133 fp)
Blackmagic Embedded Tally Control Protocol Version 1.0 (30/04/10) This section is for third party developers or anybody who may wish to add support for the Blackmagic Embedded Tally Control Protocol to their products or system. It describes the protocol for sending tally information embedded in the non-active picture region of a digital video stream.
Page 182
uint8[1] bit 0: slave device 3 program tally status (0=off, 1=on) bit 1: slave device 3 device preview tally status (0=off, 1=on) bit 2-3: reserved (0b00) bit 4: slave device 4 program tally status (0=off, 1=on) bit 5: slave device 4 preview tally status (0=off, 1=on) bit 6-7: reserved (0b00) …...
Blackmagic Design Online Support Pages The latest manual, software and support notes can be found at the Blackmagic Design support center at www.blackmagicdesign.com/support. Contacting Blackmagic Design Support If you can’t find the help you need in our support material, please use the ‘Send us an email’...
Regulatory Notices Disposal of Waste of Electrical and Electronic Equipment Within the European Union. The symbol on the product indicates that this equipment must not be disposed of with other waste materials. In order to dispose of your waste equipment, it must be handed over to a designated collection point for recycling.
Certified for Mexico (NOM) for Bluetooth module manufactured by Silicon Labs. model number BGM113A. Safety Information Blackmagic Cinema Camera 6K is suitable for use in tropical locations with an ambient temperature of up to 40°C. No operator serviceable parts inside product. Refer servicing to your local Blackmagic Design service center.
Warranty Limited Warranty Blackmagic Design warrants that this product will be free from defects in materials and workmanship for a period of 12 months from the date of purchase. If a product proves to be defective during this warranty period, Blackmagic Design, at its option, either will repair the defective product without charge for parts and labor, or will provide a replacement in exchange for the defective product.
Need help?
Do you have a question about the Cinema Camera 6K and is the answer not in the manual?
Questions and answers