TRENDnet TU2-ETG User Manual
Usb to gigabit ethernet adapter
Hide thumbs
Also See for TU2-ETG:
- User manual (15 pages) ,
- Quick installation manual (10 pages) ,
- Installation manual (8 pages)
Table of Contents
Advertisement
Quick Links
Advertisement
Table of Contents

Related Manuals for TRENDnet TU2-ETG


Summary of Contents for TRENDnet TU2-ETG
- Page 1 Cover Page TRENDnet User’s Guide...
-
Page 2: Table Of Contents
Mac 10.6 ......................... 13 Mac 10.5 ......................... 15 Mac 10.4 ......................... 17 Verifying the Driver Installation on Mac ..............20 TCP/IP Setting in Mac ....................20 Technical Specifications ................. 24 Limited Warranty ................... 25 © Copyright 2011 TRENDnet. All Rights Reserved. -
Page 3: Product Overview
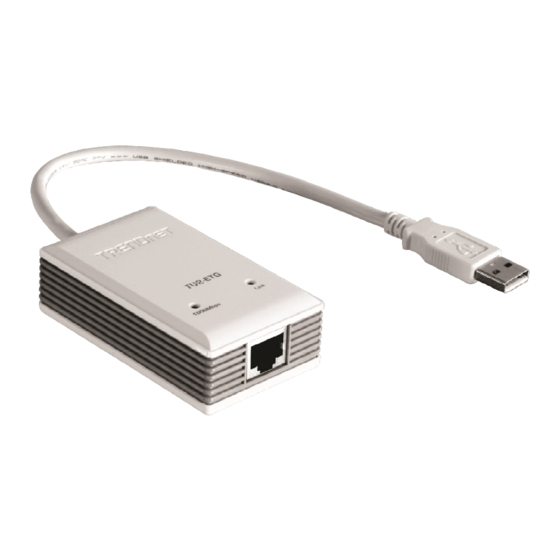
Product Overview Features The TU2-ETG is a Gigabit USB network adapter that allows you to instantly connect to a 10/100/1000Mbps network from a USB enabled desktop or Notebook PC. Compliant with USB 2.0 and backwards compatible with the USB 1.0 and 1.1, you can share files and printers and also gain access to broadband Internet to explore valuable resources on the web. -
Page 4: Product Hardware Features
Gigabit Ethernet Port – Connect one end of the network cable to Gigabit Ethernet Port and the other end to your Gigabit Router. USB Port – Connect the USB port to your computer. © Copyright 2011 TRENDnet. All Rights Reserved. -
Page 5: Windows Installation
3. Click Install Driver to install the driver. For Windows 7/ Vista / XP 1. Insert the Driver CD-ROM into your CD-ROM Drive. 2. Click Run Install.exe (Windows 7 & Vista only) 4. Click Next. © Copyright 2011 TRENDnet. All Rights Reserved. -
Page 6: Verifying The Driver Installation In Windows
TRENDnet User’s Guide 5. Click Install. 9. The adapter’s drivers will install automatically. 10. Connect a network cable from the TU2-ETG to a switch, router or cable/DSL modem. Verifying the Driver Installation in Windows To verify the driver installation on your Ethernet adapter, please launch Device Manager through the steps below. -
Page 7: Tcp/Ip Setting In Windows
Properties. 1. Click Start, Control Panel and, then click Network and Sharing Center, and then clicking Change Adapter settings 2. Right-click on the Local Area Connection of the adapter, and then click Properties. © Copyright 2011 TRENDnet. All Rights Reserved. - Page 8 To obtain IP settings automatically, click Obtain an IP address gateway boxes, and then specify the IP address on the Preferred DNS automatically, and then click OK. server and Alternate DNS server boxes, and then click OK. © Copyright 2011 TRENDnet. All Rights Reserved.
- Page 9 DNS server and Alternate DNS server boxes, and then click OK. To obtain IP settings automatically, click Obtain an IPv6 address automatically and Obtain DNS server address automatically, and then click OK. © Copyright 2011 TRENDnet. All Rights Reserved.
- Page 10 3. Under General tab, click Install. 1. Click Start, click Control Panel, click Network and Internet Connections, and then click Network Connections. 2. Right-click the network connection that you want to configure, and then click Properties. © Copyright 2011 TRENDnet. All Rights Reserved.
-
Page 11: Mac Installation
5. Click Microsoft TCP/IP version 6, and then click OK. 2. In the directory of Mac10.x, please double-click AX88178_v3.6.0 to execute the installer program. 6. Click Close to save changes to your network connection. © Copyright 2011 TRENDnet. All Rights Reserved. - Page 12 TU2-ETG TRENDnet User’s Guide 3. Please click Continue to install this software. Click Install. 6. Click Continue Installation. Select a destination driver to install the driver and click Continue. © Copyright 2011 TRENDnet. All Rights Reserved.
- Page 13 7. Click “Restart”, the computer will be restarted once installation is completed. 10. You will find that a new Ethernet network interface is available. 8. Connect the TU2-ETG to a free USB port. 9. Start System Preferences and select Network, the following screen will appear Start System Preferences and select Network, you’ll see the screen as below...
-
Page 14: Mac 10.6
\Driver\Mac_OSX10.4_10.6 2. Double-click AX88178.dmg to mount the driver installer image . 5. Select a destination driver to install the driver and click Continue. 3. Double-click AX88178_v3.5.0 to execute the installer program. © Copyright 2011 TRENDnet. All Rights Reserved. - Page 15 8. Click “Restart”, the computer will be restarted once installation is completed. 7. Click Continue installation. 9. Start System Preferences and select Network, you’ll see the screen as below prompted and please select OK. © Copyright 2011 TRENDnet. All Rights Reserved.
-
Page 16: Mac 10.5
The Link LED should light up green to indicate a proper physical connection between 3. Double-click AX88178_v3.5.0 to execute the installer program. the Ethernet adapter and the network. If the Link LED doesn’t light up, please verify the cable connections between all the network devices. © Copyright 2011 TRENDnet. All Rights Reserved. - Page 17 4. Please click Continue to install this software. 6. Click Install to perform a basic installation of software package. 5. Select a Destination volume to install the driver and click Continue. 7. Click “Continue installation” to install. © Copyright 2011 TRENDnet. All Rights Reserved.
-
Page 18: Mac 10.4
Connect the Ethernet adapter to a free USB port. 10. Start System Preferences and select Network, you’ll see the screen as below prompted and please select OK. 3. Double-click AX88178_v3.5.0 to execute the installer program. © Copyright 2011 TRENDnet. All Rights Reserved. - Page 19 6. Click Install to perform a basic installation of software package. 4. Please click Continue to install this software. 7. Click “Continue installation” to install. 5. Select a Destination volume to install the driver and click Continue. © Copyright 2011 TRENDnet. All Rights Reserved.
- Page 20 11. You will find that a new Ethernet network interface is available. Connect the Ethernet adapter to a free USB port. 10. Start System Preferences and select Network, you’ll see the screen as below prompted and please select OK. © Copyright 2011 TRENDnet. All Rights Reserved.
-
Page 21: Verifying The Driver Installation On Mac
Choose Apple > System Preferences, and then click Network. Hardware > USB > to verify if your Ethernet adapter is properly installed. 2. Select USB Ethernet service, then click Advanced to setup IP address. © Copyright 2011 TRENDnet. All Rights Reserved. - Page 22 4. If manually setting is selected, enter the IPv4 or IPv6 address, router address, and prefix length you received from your network administrator or Internet service provider. Your router’s address may be referred to as your gateway address by some ISPs. © Copyright 2011 TRENDnet. All Rights Reserved.
- Page 23 4. If manually setting is selected, enter the IPv4 or IPv6 address, router address, and prefix length you received from your network administrator or Internet service provider. Your router’s address may be referred to as your gateway address by some ISPs. © Copyright 2011 TRENDnet. All Rights Reserved.
- Page 24 4. If manually setting is selected, enter the IPv4 or IPv6 address, router address, and prefix length you received from your network administrator or Internet service provider. Your router address may be referred to as your gateway address by some ISPs. © Copyright 2011 TRENDnet. All Rights Reserved.
-
Page 25: Technical Specifications
Your router address may be referred to as your gateway address by Management Wake on LAN some ISPs. Temperature Operating: 0 C~ 40 C (32 F~ 104 F) Storage: -10 C~ 55 C (14 F~ 131 F) Humidity Max. 85% (non-condensing) Certifications CE, FCC © Copyright 2011 TRENDnet. All Rights Reserved. -
Page 26: Limited Warranty
General Public License ("LGPL"). Go to http://www.trendnet.com/gpl http://www.trendnet.com Download section and look for the desired TRENDnet product to access to the GPL Code or LGPL Code. © Copyright 2011 TRENDnet. All Rights Reserved. - Page 27 TU2-ETG TRENDnet User’s Guide These codes are distributed WITHOUT WARRANTY and are subject to the copyrights of the developers. TRENDnet does not provide technical support for these codes. Please go to http://www.gnu.org/licenses/gpl.txt http://www.gnu.org/licenses/lgpl.txt for specific terms of each license. P05202009v2 2011/11/02 ©...
- Page 28 TEW-711BR TRENDnet User’s Guide P05202009v2 © Copyright 2011 TRENDnet. All Rights Reserved.
Need help?
Do you have a question about the TU2-ETG and is the answer not in the manual?
Questions and answers