Advertisement
Quick Links
498LCH / TN498LCHE(with white LED Flashlight) Thermometer Operating Instructions
TN498LCH / TN498LCHE(with white LED Flashlight) Thermometer Operating Instructions
Model with thermocouple socket
0MFX
For Model with thermocouple socket
Thermometer Operating Instructions
thermometer is a non-contact infrared thermometer. There are many mathematical modes for the Infrared function. Please remember to keep
MFX
Thermometer Operating Instructions
The thermometer is a non-contact infrared thermometer. There are many mathematical modes for the Infrared function. Please remember to keep
/ TN498LCHE(with white LED Flashlight) Thermometer Operating Instructions
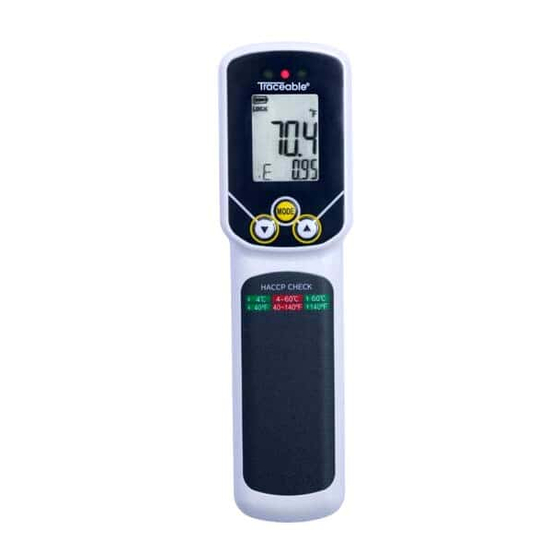
Traceable® Circle Laser Infrared Thermometer
y from children and don't use it for safety related applications.
meter is a non-contact infrared thermometer. There are many mathematical modes for the Infrared function. Please remember to keep
away from children and don't use it for safety related applications.
eter is a non-contact infrared thermometer. There are many mathematical modes for the Infrared function. Please remember to keep
with HACCP Check
hildren and don't use it for safety related applications.
hermocouple socket
ildren and don't use it for safety related applications.
is a non-contact infrared thermometer. There are many mathematical modes for the Infrared function. Please remember to keep
(ffe.) HACCP checkLEO
(ffe.) HACCP checkLEO
n and don't use it for safety related applications.
}.) Infrared Lem
@Mode Key
}.) Infrared Lem
498LCH / TN498LCHE(with white LED Flashlight) Thermometer Operating Instructions
@Mode Key
@Down Key--
@Meas.Key
Model with thermocouple socket
@Down Key--
@Meas.Key
s
�
s
thermometer is a non-contact infrared thermometer. There are many mathematical modes for the Infrared function. Please remember to keep
y from children and don't use it for safety related applications.
(f Battery Cover
(f Battery Cover
�8
�8
,a : i1 R l , l fM , IIMiJiWl if llf' r•
a : i1 R l , l fM , IIMiJiWl if llf' r•
een)
een)
SPECIFICATIONS
Range: –30 to 250 °C (–22 to 482 °F)
N498LCHE(with white LED Flashlight) Thermometer Operating Instructions
Resolution: 0.1°C/0.1°F at –9.9 to 199.9(°C/°F),
P CHEC K" feature is incorporaled in our 1!1ermomeler temperature to indicate critical temperature
otherwise 1°C/1°F
P CHEC K" feature is incorporaled in our 1!1ermomeler temperature to indicate critical temperature
ocouple socket
ED light indicates a food product stays in a sale or unsafe HAC CP "
Accuracy:
ED light indicates a food product stays in a sale or unsafe HAC CP "
TN498LCH / TN498LCHE(with white LED Flashlight) Thermometer Operating Instructions
ed LED lights will always be lit before power off.
on-contact infrared thermometer. There are many mathematical modes for the Infrared function. Please remember to keep
shlight) Thermometer Operating Instructions
4.o•c
d LED lights will always be lit before power off.
D light indicates a safe cool or frozen condition below
between –30 to 0 °C/°F: ±(1 °C +0.1°)
4.o•c
(40.D"FJ or indicates a safe holding
For Model with thermocouple socket
don't use it for safety related applications.
D light indicates a safe cool or frozen condition below
(40.D"FJ or indicates a safe holding
above 60.0"C ( 140.0"F).
The thermometer is a non-contact infrared thermometer. There are many mathematical modes for the Infrared function. Please remember to keep
between 0 to 65 °C/°F: ±1 °C/F
fault Screen)
above 60.0"C ( 140.0"F).
erature is between 4.o•c (40.0"F) and 60.0"C (140.0"F), the red LED light indicates that the
away from children and don't use it for safety related applications.
ply aim the thermometer at the measure target with Lens (○ ○
erature is between 4.o•c (40.0"F) and 60.0"C (140.0"F), the red LED light indicates that the
y mathematical modes for the Infrared function. Please remember to keep
(Default Screen)
between 65 to 250 °C/°F: ±1.5% of reading
is fallen within the HAC CP "Danger Zone' from 4.o•c (40.0"F) to 60.0"C (140.0"F).
is fallen within the HAC CP "Danger Zone' from 4.o•c (40.0"F) to 60.0"C (140.0"F).
Simply aim the thermometer at the measure target with Lens (○ ○
ance:Spot is 12:1. Please make sure the target area is within the field of view. Press Mode key (○ ○
nstructions
Response Time: 1 second
STORAGE & CLEANING
Distance:Spot is 12:1. Please make sure the target area is within the field of view. Press Mode key (○ ○
tion as follows.
Emissivity: 0.95 default; adjustable 0.1 to 1
It should be stored at room temperature. The sensor lens is the most delicate part of the thermometer. The lens should be kept clean at all times,
n)
e Key \Qi') for strolting more display function as follows.
function as follows.
step 0.01
CTION
Key \Qi') for strolting more display function as follows.
ase remember to keep
hermometer at the measure target with Lens (○ ○
care should be taken when cleaning the lens using only a soft cloth or cotton swab with water or medical alcohol, allowing the lens to fully dry
) and press Meas. key (○ ○
7
Here will show the emissivity data. (The default emissivity is 0.95.)
Distance-to-Spot Ratio: 8:1
FUNCTION
12:1. Please make sure the target area is within the field of view. Press Mode key (○ ○
Here will show the emissivity data. (The default emissivity is 0.95.)
Here will show the emissivity data. (The default emissivity is 0.95.)
before using the thermometer. Do not submerge any part of the thermometer.
Press Mode Key(©), then press Up Key(®) or Down Key (0) to
TCT70MFX
Operating Range: 0 to 50°C (32 to 122°F)
w
Press Mode Key(©), then press Up Key(®) or Down Key (0) to
ws.
Thermometer Operating Instructions
Press Mode key (○
Here will show the emissivity data. (The default emissivity is 0.95.)
) , then press Up key (○
2
The emissivity can be changed from 0.10 (10E) to 1 (100E).
I
LCD ERROR MESSAGES
'
The emissivity can be changed from 0.10 (10E) to 1 (100E).
Power: two AAA alkaline batteries; minimum
'
Press Mode key (○
The emissivity can be changed from 0.10 (10E) to 1 (100E).
) , then press Up key (○
The thermometer is a non-contact infrared thermometer. There are many mathematical modes for the Infrared function. Please remember to keep
2
\
fault Screen)
The thermometer incorporates visual diagnostic messages as follows:
90 hours continuous use (without laser and
I
away from children and don't use it for safety related applications.
The emissivity can be changed from 0.10 (10E) to 1 (100E).
ply aim the thermometer at the measure target with Lens (○ ○
'4
> Press Mode Key(©) for the Maximum (MAX), Minimum (MIN), Different between MAX and MIN (DIF) and Average (AVG)
Here will show the emissivity data. (The default emissivity is 0.95.)
backlight)
> Press Mode Key(©) for the Maximum (MAX), Minimum (MIN), Different between MAX and MIN (DIF) and Average (AVG)
ance:Spot is 12:1. Please make sure the target area is within the field of view. Press Mode key (○ ○
modes. During the measurement, the special modes reading will be displayed beside the mode icon.
Press Mode key (○
) , then press Up key (○
) or Down key (○
modes. During the measurement, the special modes reading will be displayed beside the mode icon.
Press Mode key (○
) for the Maximum (MAX), Minimum (MIN), Different between MAX and MIN (DIF) and Average (AVG)
G
Dimensions: 166.87 x 55.93 x 46 mm (6.57 x
(ffe.) HACCP checkLEO
2
2
4
tion as follows.
The emissivity can be changed from 0.10 (10E) to 1 (100E).
2.2 x 1.81 inch)
modes. During the measurement, the special modes reading will be displayed beside the mode icon.
) for the Maximum (MAX), Minimum (MIN), Different between MAX and MIN (DIF) and Average (AVG)
L
Press Mode key (○
2
Press Up Key (®) or Down Key (0) to change the High Alarm (HAL) or Lo Alarm (LAL), then press Meas. Key (@)) to
CTION
Press Up Key (®) or Down Key (0) to change the High Alarm (HAL) or Lo Alarm (LAL), then press Meas. Key (@)) to
Weight: 165 g (5.82 oz) including batteries
modes. During the measurement, the special modes reading will be displayed beside the mode icon.
L
}
confirm it. When the reading is outside the
High Alarm (HAL)
}
confirm it. When the reading is outside the
High Alarm (HAL)
Here will show the emissivity data. (The default emissivity is 0.95.)
will hear a beeo sound.
Press Mode key (○
will hear a beeo sound.
Default LCD
Press Up key (○
) for the Maximum (MAX), Minimum (MIN), Different between MAX and MIN (DIF) and Average (AVG)
) or Down key (○
) to change the High Alarm (HAL) or Lo Alarm (LAL), then press Meas. key (○
4
「
3
」 「
2
mometer will automatically shut off if left idle for more than 60 seconds.
Press Mode key (○
) , then press Up key (○
2
(Default Screen)
ometer will automatically shut off if left idle for more than 60 seconds.
modes. During the measurement, the special modes reading will be displayed beside the mode icon.
it. When the reading is outside the High Alarm (HAL) or Lo Alarm (LAL) limit. The High or Low icon will flash and you will hear
Press Up key (○
) or Down key (○
) to change the High Alarm (HAL) or Lo Alarm (LAL), then press Meas. key (○
is3 . · s
1!!9&,�
4
3
Simply aim the thermometer at the measure target with Lens (○ ○
The emissivity can be changed from 0.10 (10E) to 1 (100E).
E
a beep sound.
Distance:Spot is 12:1. Please make sure the target area is within the field of view. Press Mode key (○ ○
it. When the reading is outside the High Alarm (HAL) or Lo Alarm (LAL) limit. The High or Low icon will flash and you will hear
Press Up Key(®) for
LOCK mode
ON/OFF. The lock mode is particularly useful for continuous monitoring of
Press Up Key(®) for
LOCK mode
function as follows.
ON/OFF. The lock mode is particularly useful for continuous monitoring of
Connect the thermocouple with Thermocouple socket (○
MIN, DIF, AVG
temperatures for up to 60 minutes.
a beep sound.
MIN, DIF, AVG
) to change the High Alarm (HAL) or Lo Alarm (LAL), then press Meas. key (○
Press Up key (○
temperatures for up to 60 minutes.
) or Down key (○
4
3
FUNCTION
temperature automatically without pressing any button. To see the minimum or maximum data during the probe measurement,
「
Press Mode key (○
Press Down Key ( ®) for
) for the Maximum (MAX), Minimum (MIN), Different between MAX and MIN (DIF) and Average (AVG)
°C
or
°F transferred.
Connect the thermocouple with Thermocouple socket (○
2
Press Down Key ( ®) for
°C
or
°F transferred.
9�8
it. When the reading is outside the High Alarm (HAL) or Lo Alarm (LAL) limit. The High or Low icon will flash and you will hear
Here will show the emissivity data. (The default emissivity is 0.95.)
please hold down the Up key (○
tWJ
) or Down key (○
and press Up Key(®) for green
* Circle Laser
backlighl
ON/OFF.
modes. During the measurement, the special modes reading will be displayed beside the mode icon.
4
s: First hold on
temperature automatically without pressing any button. To see the minimum or maximum data during the probe measurement,
backlighl
and press Up Key(®) for green
ON/OFF.
Press Mode key (○
: First hold on
a beep sound.
Key(®)
and press Down Key(@) for
laser function
ON/OFF.
. ,a : i1 R l , l fM , IIMiJiWl if llf' r•
After measure high temp, the probe may remain HOT for a while.
specify the approximate measurement
ey(®)
please hold down the Up key (○
) or Down key (○
and press Down Key(@) for
laser function
The emissivity can be changed from 0.10 (10E) to 1 (100E).
ON/OFF.
4
(Default Screen)
「
」 「
Connect the thermocouple with Thermocouple socket (○
OPERATION
ometer at the measure target with Lens (○ ○
) and press Meas. key (○ ○
7
area for better targeting.
e thermometer will automatically shut off if left idle for more than 60sec, unless in PRB mode. (In PRB mode, it will shut off if left idle for more than 12 minutes.)
N
After measure high temp, the probe may remain HOT for a while.
Press Up key (○
) or Down key (○
) to change the High Alarm (HAL) or Lo Alarm (LAL), then press Meas. key (○
temperature automatically without pressing any button. To see the minimum or maximum data during the probe measurement,
4
3
N
Simply aim the thermometer at the measure
BATTERIES
Please make sure the target area is within the field of view. Press Mode key (○ ○
EVICE IS IN USE, DO NOT LOOK DIRECTLY INTO THE LASER BEAM-PERMANENT EYE DAMAGE MAY RESULT.
Press Mode key (○
EVICE IS IN USE, DO NOT LOOK DIRECTLY INTO THE LASER BEAM-PERMANENT EYE DAMAGE MAY RESULT.
please hold down the Up key (○
VALUE
it. When the reading is outside the High Alarm (HAL) or Lo Alarm (LAL) limit. The High or Low icon will flash and you will hear
) or Down key (○
).
** The thermometer will automatically shut off if left idle for more than 60sec, unless in PRB mode. (In PRB mode, it will shut off if left idle for more than 12 minutes.)
REME CAUTION WHEN OPERATING THE LASER.
target and press Meas. key to display surface
4
3
The thermometer incorporates visual low battery indication as follows:
modes. During the measurement, the special modes reading will be displayed beside the mode icon.
REME CAUTION WHEN OPERATING THE LASER.
rement
nd press Meas. key (○ ○
) to display the surface temperature. The
POINT THE DEVICE TOWARDS ANYONE'S EYES.
) for LOCK mode ON/OFF. The lock mode is particularly useful for continuous monitoring
a beep sound.
6
Press Up key (○
temperature.
4
OINT THE DEVICE TOWARDS ANYONE'S EYES.
After measure high temp, the probe may remain HOT for a while.
�� , . � , ; · • -- . • • -- � . : -:, >1 : - •� �l: J lll lll k . ; -•,
ADD VALUE
UT OF REACH OF ALL CHILDREN.
Operating Instructions
e field of view. Press Mode key (○ ○
Connect the thermocouple with Thermocouple socket (○
) for scrolling more display
T OF REACH OF ALL CHILDREN.
of temperatures for up to 60 minutes.
2
Press Up key (○
MAX, MIN, DIF, AVG mode:
Press Up key (○
) for LOCK mode ON/OFF. The lock mode is particularly useful for continuous monitoring
will automatically shut off if left idle for more than 60sec, unless in PRB mode. (In PRB mode, it will shut off if left idle for more than 12 minutes.)
HACCP CHECK
4
&
CLEANING The thermometer should be stored
The "
H AC CP CHEC K" feature is incorporaled in our 1!1ermomeler temperature to indicate critical temperature
at
room temperature between -20 to +65 °C (•4-149
will show the emissivity data. (The default emissivity is 0.95.)
CLEANING The thermometer should be stored
temperature automatically without pressing any button. To see the minimum or maximum data during the probe measurement,
room temperature between -20 to +65 °C (•4-149
it. When the reading is outside the High Alarm (HAL) or Lo Alarm (LAL) limit. The High or Low icon will flash and you will hear
&
at
lens is the most delicate part of the thermometer. The lens should be kept clean at all times, care should be taken when cleaning the
Press Down key (○
'Battery OK': measurements
) for
zone. The LED light indicates a food product stays in a sale or unsafe HAC CP "
of temperatures for up to 60 minutes.
3
ens is the most delicate part of the thermometer. The lens should be kept clean at all times, care should be taken when cleaning the
mometer. There are many mathematical modes for the Infrared function. Please remember to keep
• The "HACCP CHECK" feature is incorporated
a beep sound.
n E,MAX, MIN, DIF, AVG mode:
please hold down the Up key (○
) or Down key (○
only a soft cloth or cotton swab with water or medical alcohol. Allowing the lens to fully dry before using the thermometer. Do not
4
mperature. The
Mode key (○
) , then press Up key (○
) or Down key (○
green and red LED lights will always be lit before power off.
nly a soft cloth or cotton swab with water or medical alcohol. Allowing the lens to fully dry before using the thermometer. Do not
2
4
are possible
Connect the thermocouple with Thermocouple socket (○
in thermometer temperature to indicate
ny part of the thermometer.
Press Up key (○
Press Down key (○
) for LOCK mode ON/OFF. The lock mode is particularly useful for continuous monitoring
) for backlight function ON/OFF.
and press Up key (○
elated applications.
4
3
y part of the thermometer.
After measure high temp, the probe may remain HOT for a while.
A Green LED light indicates a safe cool or frozen condition below
4
more display
temperature automatically without pressing any button. To see the minimum or maximum data during the probe measurement,
l modes: First hold on the
missivity can be changed from 0.10 (10E) to 1 (100E).
When the 'Low Battery' icon indicates the battery is low, the battery should be replaced immediately with AAA, 1.5V batteries. Please note: It
vity is 0.95.)
critical temperature zone. The LED light
of temperatures for up to 60 minutes.
temperature above 60.0"C ( 140.0"F).
please hold down the Up key (○
s. key (○ ○ 6 )
DIF, AVG mode:
e thermometer will automatically shut off if left idle for more than 60sec, unless in PRB mode. (In PRB mode, it will shut off if left idle for more than 12 minutes.)
and press Up key (○
and press Down key (○
is important to turn the instrument off before replacing the battery otherwise the thermometer may malfunction.
) for ClassIIIa laser function ON/OFF.
indicates a food product stays in a safe or
When temperature is between 4.o•c (40.0"F) and 60.0"C (140.0"F), the red LED light indicates that the
wn key (○
) to set the emissivity, then press Mode key (○
3
After measure high temp, the probe may remain HOT for a while.
n all modes: First hold on the
3
o
o
Press Down key (○
) for
C or
F transferred.
3
temperature is fallen within the HAC CP "Danger Zone' from 4.o•c (40.0"F) to 60.0"C (140.0"F).
VALUE
unsafe HACCP "Danger Zone" temperature.
Dispose of used battery promptly and keep away from children.
Meas. key (○ ○ 6 )
** The thermometer will automatically shut off if left idle for more than 60sec, unless in PRB mode. (In PRB mode, it will shut off if left idle for more than 12 minutes.)
00E).
Mode key (○
) for the Maximum (MAX), Minimum (MIN), Different between MAX and MIN (DIF) and Average (AVG)
and press Down key (○
2
Press Up key (○
) for LOCK mode ON/OFF. The lock mode is particularly useful for continuous monitoring
The green and red LED lights will always be
If the device is not to be used for a long time, turn the power off, remove and store the batteries in a cool, dry place.
4
AUTION
ADD VALUE
and press Up key (○
) for backlight function ON/OFF.
4
FUNCTION
es. During the measurement, the special modes reading will be displayed beside the mode icon.
st hold on the
lit before power off.
of temperatures for up to 60 minutes.
HEN DEVICE IS IN USE, DO NOT LOOK DIRECTLY INTO THE LASER BEAM–PERMANENT EYE DAMAGE MAY RESULT.
MAX, MIN, DIF, AVG mode:
key (○
) to confirm it.
SPECIFICATION
2
CAUTION
Press Mode Key \Qi') for strolting more display function as follows.
}.) Infrared Lem
In E,MAX, MIN, DIF, AVG mode:
mum (MIN), Different between MAX and MIN (DIF) and Average (AVG)
• A Green LED light indicates a safe cool or
and press Down key (○
) for ClassIIIa laser function ON/OFF.
SE EXTREME CAUTION WHEN OPERATING THE LASER.
3
Press Down key (○
E
) for
3
1. WHEN DEVICE IS IN USE, DO NOT LOOK DIRECTLY INTO THE LASER BEAM–PERMANENT EYE DAMAGE MAY RESULT.
frozen condition below 4.0 °C (40.0 °F or
EVER POINT THE DEVICE TOWARDS ANYONE'S EYES.
es reading will be displayed beside the mode icon.
Item
Here will show the emissivity data. (The default emissivity is 0.95.)
Up key (○
) or Down key (○
) to change the High Alarm (HAL) or Lo Alarm (LAL), then press Meas. key (○
4
3
2. USE EXTREME CAUTION WHEN OPERATING THE LASER.
and press Up key (○
,,.f
) for backlight function ON/OFF.
indicates a safe holding temperature above
EEP OUT OF REACH OF ALL CHILDREN.
4
Press Mode Key(©), then press Up Key(®) or Down Key (0) to
In all modes: First hold on the
l modes: First hold on the
en the reading is outside the High Alarm (HAL) or Lo Alarm (LAL) limit. The High or Low icon will flash and you will hear
@Meas.Key
w
3. NEVER POINT THE DEVICE TOWARDS ANYONE'S EYES.
Meas. key (○ ○ 6 )
Measurement Range
60.0"C ( 140.0 °F).
The emissivity can be changed from 0.10 (10E) to 1 (100E).
s. key (○ ○ 6 )
IS IN USE, DO NOT LOOK DIRECTLY INTO THE LASER BEAM–PERMANENT EYE DAMAGE MAY RESULT.
"" Q \I
) and Average (AVG)
'
) for ClassIIIa laser function ON/OFF.
p sound.
and press Down key (○
4. KEEP OUT OF REACH OF ALL CHILDREN.
3
gh Alarm (HAL) or Lo Alarm (LAL), then press Meas. key (○
• When temperature is between 4.0 °C (40.0
Operating Range
CAUTION WHEN OPERATING THE LASER.
I I
n.
I\
ect the thermocouple with Thermocouple socket (○
CAUTION
°F) and 60.0 °C (140.0 °F), the red LED light
M
/II
or Lo Alarm (LAL) limit. The High or Low icon will flash and you will hear
THE DEVICE TOWARDS ANYONE'S EYES.
Accuracy
I
1. WHEN DEVICE IS IN USE, DO NOT LOOK DIRECTLY INTO THE LASER BEAM–PERMANENT EYE DAMAGE MAY RESULT.
+1 '4
> Press Mode Key(©) for the Maximum (MAX), Minimum (MIN), Different between MAX and MIN (DIF) and Average (AVG)
1
AUTION
erature automatically without pressing any button. To see the minimum or maximum data during the probe measurement,
indicates that the temperature has fallen
d1.F
REACH OF ALL CHILDREN.
2. USE EXTREME CAUTION WHEN OPERATING THE LASER.
(Tobj=15~35°C, Tamb=25°C)
modes. During the measurement, the special modes reading will be displayed beside the mode icon.
HEN DEVICE IS IN USE, DO NOT LOOK DIRECTLY INTO THE LASER BEAM–PERMANENT EYE DAMAGE MAY RESULT.
e hold down the Up key (○
) or Down key (○
).
within the HACCP "Danger Zone" from 4.0 °C
4
RVG
3. NEVER POINT THE DEVICE TOWARDS ANYONE'S EYES.
3
(f Battery Cover
as. key (○
(○
) and put the probe in/on the target, the thermometer will display the
) to confirm
5
6
SE EXTREME CAUTION WHEN OPERATING THE LASER.
4. KEEP OUT OF REACH OF ALL CHILDREN.
(40.0 °F) to 60.0 °C (140.0 °F).
Accuracy(Tamb=23±3°C)
After measure high temp, the probe may remain HOT for a while.
HRL
n. To see the minimum or maximum data during the probe measurement,
lash and you will hear
EVER POINT THE DEVICE TOWARDS ANYONE'S EYES.
Press Up Key (®) or Down Key (0) to change the High Alarm (HAL) or Lo Alarm (LAL), then press Meas. Key (@)) to
utomatically shut off if left idle for more than 60sec, unless in PRB mode. (In PRB mode, it will shut off if left idle for more than 12 minutes.)
EEP OUT OF REACH OF ALL CHILDREN.
}
For Model with thermocouple socket
The thermometer is a non-contact infrared thermometer. There are many mathematical modes for the Infrared function. Please remember to keep
TN498LCH / TN498LCHE(with white LED Flashlight) Thermometer Operating Instructions
away from children and don't use it for safety related applications.
HACCP Check Indicator LED
For Model with thermocouple socket
The thermometer is a non-contact infrared thermometer. There are many mathematical modes for the Infrared function. Please remember to keep
away from children and don't use it for safety related applications.
TN498LCH / TN498LCHE(with white LED Flashlight) Thermometer Operating Instructions
For Model with thermocouple socket
The thermometer is a non-contact infrared thermometer. There are many mathematical modes for the Infrared function. Please remember to keep
HACCP Check
away from children and don't use it for safety related applications.
↓
4.0 °C
4.0 to 59 °C
↓
40.0 °F
40.0 to 139 °F
• Multi-Beams Laser
• Multi-Beams Laser
specify the approximate
specify the approximate
FUNCTION
measurement area for better
measurement area for better
(Default Screen)
1 ·Mf\M
1 ®M !iiii
1
1
1 ·Mf\M
1 ®M !iiii
1® Mr1
Simply aim the thermometer at the measure target with Lens (○ ○
Press Mode key
1
for scrolling more display
1
1® Mr1
Distance:Spot is 12:1. Please make sure the target area is within the field of view. Press Mode key (○ ○
function as follows:
(Default Screen)
function as follows.
Simply aim the thermometer at the measure target with Lens (○ ○
a.I: ..
FUNCTION
a.I: ..
'.ii'(
'. : .
f.,
Distance:Spot is 12:1. Please make sure the target area is within the field of view. Press Mode key (○ ○
'.ii'(
'. : .
f.,
* Circle Laser
Emissivity data (The default emissivity is 0.95.)
O
function as follows.
(Default Screen)
Here will show the emissivity data. (The default emissivity is 0.95.)
• (t
O
* Circle Laser
Danger Zone" temperature. The
• (t
Simply aim the thermometer at the measure target with Lens (○ ○
specify the approximate measurement
Press Mode key (○
) , then press Up key (○
Danger Zone" temperature. The
HACCP CliECK
2
FUNCTION
HACCP CliECK
Distance:Spot is 12:1. Please make sure the target area is within the field of view. Press Mode key (○ ○
STORAGE & CLEANING
specify the approximate measurement
The emissivity can be changed from 0.10 (10E) to 1 (100E).
area for better targeting.
Press Mode Key
Here will show the emissivity data. (The default emissivity is 0.95.)
HACCPCHECK
function as follows.
HACCPCHECK
(Default Screen)
area for better targeting.
It should be stored at room temperature. The sensor lens is the most delicate part of the thermometer. The lens should be kept clean at all times,
Press Mode key (○
Down Key
to set the emissivity, then press
) , then press Up key (○
* Circle Laser
2
FUNCTION
Simply aim the thermometer at the measure target with Lens (○ ○
Press Mode key (○
) for the Maximum (MAX), Minimum (MIN), Different between MAX and MIN (DIF) and Average (AVG)
The emissivity can be changed from 0.10 (10E) to 1 (100E).
Mode Key
2
to confirm it. The emissivity can
) and press Meas. key (○ ○
) to display the surface temperature. The
care should be taken when cleaning the lens using only a soft cloth or cotton swab with water or medical alcohol, allowing the lens to fully dry
7
6
Distance:Spot is 12:1. Please make sure the target area is within the field of view. Press Mode key (○ ○
Here will show the emissivity data. (The default emissivity is 0.95.)
specify the approximate measurement
modes. During the measurement, the special modes reading will be displayed beside the mode icon.
be changed from 0.10 (10E) to 1 (100E).
) and press Meas. key (○ ○
function as follows.
) to display the surface temperature. The
) for scrolling more display
7
Press Mode key (○
6
) , then press Up key (○
before using the thermometer. Do not submerge any part of the thermometer.
2
2
area for better targeting.
Press Mode key (○
) for the Maximum (MAX), Minimum (MIN), Different between MAX and MIN (DIF) and Average (AVG)
) for scrolling more display
2
FUNCTION
The emissivity can be changed from 0.10 (10E) to 1 (100E).
2
Press Mode Key
Press Up key (○
) or Down key (○
LCD ERROR MESSAGES
modes. During the measurement, the special modes reading will be displayed beside the mode icon.
4
Here will show the emissivity data. (The default emissivity is 0.95.)
it. When the reading is outside the High Alarm (HAL) or Lo Alarm (LAL) limit. The High or Low icon will flash and you will hear
Minimum (MIN), Different between MAX and
) to display the surface temperature. The
6
* Circle Laser
The thermometer incorporates visual diagnostic messages as follows:
Press Mode key (○
) , then press Up key (○
Press Mode key (○
2
) for the Maximum (MAX), Minimum (MIN), Different between MAX and MIN (DIF) and Average (AVG)
2
a beep sound.
MIN (DIF) and Average (AVG) modes. During
) for scrolling more display
Press Up key (○
) or Down key (○
The emissivity can be changed from 0.10 (10E) to 1 (100E).
2
4
modes. During the measurement, the special modes reading will be displayed beside the mode icon.
specify the approximate measurement
Connect the thermocouple with Thermocouple socket (○
set the emissivity,
then press Mode Key(©) to confirm it.
the measurement, the special modes reading
set the emissivity,
then press Mode Key(©) to confirm it.
it. When the reading is outside the High Alarm (HAL) or Lo Alarm (LAL) limit. The High or Low icon will flash and you will hear
) or Down key (○
) to set the emissivity, then press Mode key (○
4
3
temperature automatically without pressing any button. To see the minimum or maximum data during the probe measurement,
area for better targeting.
a beep sound.
will be displayed beside the mode icon.
please hold down the Up key (○
Press Mode key (○
) for the Maximum (MAX), Minimum (MIN), Different between MAX and MIN (DIF) and Average (AVG)
) to set the emissivity, then press Mode key (○
) or Down key (○
Press Up key (○
) or Down key (○
2
4
3
Connect the thermocouple with Thermocouple socket (○
4
modes. During the measurement, the special modes reading will be displayed beside the mode icon.
After measure high temp, the probe may remain HOT for a while.
it. When the reading is outside the High Alarm (HAL) or Lo Alarm (LAL) limit. The High or Low icon will flash and you will hear
temperature automatically without pressing any button. To see the minimum or maximum data during the probe measurement,
Press Up Key
) and press Meas. key (○ ○
) to display the surface temperature. The
7
6
a beep sound.
** The thermometer will automatically shut off if left idle for more than 60sec, unless in PRB mode. (In PRB mode, it will shut off if left idle for more than 12 minutes.)
please hold down the Up key (○
'Hi' or 'Lo' is displayed when the temperature being measured is outside of the settings of HAL and
the High Alarm (HAL) or Lo Alarm (LAL), then
) for scrolling more display
Connect the thermocouple with Thermocouple socket (○
2
) to set the emissivity, then press Mode key (○
Press Up key (○
) or Down key (○
3
ADD VALUE
After measure high temp, the probe may remain HOT for a while.
4
LAL.
「
」 「
press Measurement Key
temperature automatically without pressing any button. To see the minimum or maximum data during the probe measurement,
it. When the reading is outside the High Alarm (HAL) or Lo Alarm (LAL) limit. The High or Low icon will flash and you will hear
Press Up key (○
** The thermometer will automatically shut off if left idle for more than 60sec, unless in PRB mode. (In PRB mode, it will shut off if left idle for more than 12 minutes.)
please hold down the Up key (○
the reading is outside the High Alarm (HAL) or
'Er2' is displayed when the thermometer is exposed to rapid changes in the ambient temperature. 'Er3'
a beep sound.
of temperatures for up to 60 minutes.
In E,MAX, MIN, DIF, AVG mode:
* Circle Laser
ADD VALUE
}.) Infrared Lem
After measure high temp, the probe may remain HOT for a while.
Connect the thermocouple with Thermocouple socket (○
Lo Alarm (LAL) limit. The High or Low icon will
or
Lo Alarm (LAL)
limit. The High or Low icon will flash and you
is displayed when the ambient temperature exceeds the range of 0
Press Down key (○
@Mode Key
specify the approximate measurement
or
Lo Alarm (LAL)
limit. The High or Low icon will flash and you
Press Up key (○
** The thermometer will automatically shut off if left idle for more than 60sec, unless in PRB mode. (In PRB mode, it will shut off if left idle for more than 12 minutes.)
temperature automatically without pressing any button. To see the minimum or maximum data during the probe measurement,
flash and you will hear a beep sound.
area for better targeting.
of temperatures for up to 60 minutes.
」
thermometer should be allowed plenty of time (minimum 30 minutes) to stabilize to the working/room
In E,MAX, MIN, DIF, AVG mode:
please hold down the Up key (○
and press Up key (○
@Down Key--
) or Down key (○
) to set the emissivity, then press Mode key (○
@Meas.Key
ADD VALUE
4
3
In all modes: First hold on the
「
Note: The thermometer will automatically shut
Press Down key (○
temperature.
After measure high temp, the probe may remain HOT for a while.
Meas. key (○ ○ 6 )
Press Up key (○
) and press Meas. key (○ ○
) to display the surface temperature. The
7
6
and press Down key (○
off if left idle for more than 60 seconds.
** The thermometer will automatically shut off if left idle for more than 60sec, unless in PRB mode. (In PRB mode, it will shut off if left idle for more than 12 minutes.)
of temperatures for up to 60 minutes.
and press Up key (○
Error 5~9, for all other error messages it is necessary to reset the thermometer. To reset it, turn the
* Circle Laser
In E,MAX, MIN, DIF, AVG mode:
In all modes: First hold on the
) and put the probe in/on the target, the thermometer will display the
5
ADD VALUE
Press Down key (○
Meas. key (○ ○ 6 )
Add value
CAUTION
「
」 「
instrument off, remove the battery and wait for a minimum of one minute, reinsert the battery and turn
and press Down key (○
specify the approximate measurement
(f Battery Cover
Press Up key (○
」
1. WHEN DEVICE IS IN USE, DO NOT LOOK DIRECTLY INTO THE LASER BEAM–PERMANENT EYE DAMAGE MAY RESULT.
) and put the probe in/on the target, the thermometer will display the
and press Up key (○
5
on. If the error message remains please contact the Service Department for further assistance.
BATTERIES
In all modes: First hold on the
of temperatures for up to 60 minutes.
area for better targeting.
2. USE EXTREME CAUTION WHEN OPERATING THE LASER.
).
�
In E,MAX, MIN, DIF, AVG mode:
3
�
- �
CAUTION
Meas. key (○ ○ 6 )
Press Up Key
) , then press Up key (○
3. NEVER POINT THE DEVICE TOWARDS ANYONE'S EYES.
) or Down key (○
) to set the emissivity, then press Mode key (○
- �
2
4
The thermometer incorporates visual low battery indication as follows:
3
Press Down key (○
and press Down key (○
'Hi' or 'Lo' is displayed when the temperature being measured is outside of the measurement range.
1. WHEN DEVICE IS IN USE, DO NOT LOOK DIRECTLY INTO THE LASER BEAM–PERMANENT EYE DAMAGE MAY RESULT.
).
4. KEEP OUT OF REACH OF ALL CHILDREN.
OFF. The lock mode is particularly
3
」
) and put the probe in/on the target, the thermometer will display the
2. USE EXTREME CAUTION WHEN OPERATING THE LASER.
In E, MAX, MIN,
5
) to display the surface temperature. The
and press Up key (○
6
In all modes: First hold on the
useful for continuous monitoring of
CAUTION
3. NEVER POINT THE DEVICE TOWARDS ANYONE'S EYES.
DIF, AVG mode:
Meas. key (○ ○ 6 )
) for scrolling more display
1. WHEN DEVICE IS IN USE, DO NOT LOOK DIRECTLY INTO THE LASER BEAM–PERMANENT EYE DAMAGE MAY RESULT.
temperatures for up to 60 minutes.
) for the Maximum (MAX), Minimum (MIN), Different between MAX and MIN (DIF) and Average (AVG)
4. KEEP OUT OF REACH OF ALL CHILDREN.
2
and press Down key (○
2
'Battery OK': measurements
2. USE EXTREME CAUTION WHEN OPERATING THE LASER.
3. NEVER POINT THE DEVICE TOWARDS ANYONE'S EYES.
Press Down Key
CAUTION
are possible
4. KEEP OUT OF REACH OF ALL CHILDREN.
) and put the probe in/on the target, the thermometer will display the
1. WHEN DEVICE IS IN USE, DO NOT LOOK DIRECTLY INTO THE LASER BEAM–PERMANENT EYE DAMAGE MAY RESULT.
transferred.
5
) to change the High Alarm (HAL) or Lo Alarm (LAL), then press Meas. key (○
) or Down key (○
When the 'Low Battery' icon indicates the battery is low, the battery should be replaced immediately with AAA, 1.5V batteries. Please note: It
4
3
°
2. USE EXTREME CAUTION WHEN OPERATING THE LASER.
F).
°
F).
o
o
C or
F transferred.
'Battery Low': battery needs to be
is important to turn the instrument off before replacing the battery otherwise the thermometer may malfunction.
3. NEVER POINT THE DEVICE TOWARDS ANYONE'S EYES.
and press Up Key
Danger Zone" temperature. The
).
3
In all modes: First
) to set the emissivity, then press Mode key (○
4. KEEP OUT OF REACH OF ALL CHILDREN.
3
replaced, measurements are still possible
Dispose of used battery promptly and keep away from children.
) and put the probe in/on the target, the thermometer will display the
green backlight ON/OFF.
5
4.o•c
o
o
) for
C or
F transferred.
hold on the Meas,
(40.D"FJ or indicates a safe holding
If the device is not to be used for a long time, turn the power off, remove and store the batteries in a cool, dry place.
) or Down key (○
Key
).
and press Down Key
4
3
) for backlight function ON/OFF.
4
) to confirm it.
SPECIFICATION
laser function ON/OFF.
2
) for ClassIIIa laser function ON/OFF.
3
Multi-Beams Laser specify the approximate
Item
measurement area for better
Press Up key (○
) for LOCK mode ON/OFF. The lock mode is particularly useful for continuous monitoring
4
Measurement Range
of temperatures for up to 60 minutes.
o
o
C or
F transferred.
o
o
Press Down key (○
) for
C or
F transferred.
3
Operating Range
Non-contact Infrared Scan function
) for backlight function ON/OFF.
and press Up key (○
4
Accuracy
o
o
-60 to +550
C (-76 to +1022
F)
and press Down key (○
) for ClassIIIa laser function ON/OFF.
(Tobj=15~35°C, Tamb=25°C)
3
) to confirm
6
0 to +50°C (32 to +122°F)
) and put the probe in/on the target, the thermometer will display the
Accuracy(Tamb=23±3°C)
5
±1.0°C (1.8°F)
Emissivity Range
LCD ERROR MESSAGES
Tobj=-60~0: ±(2+0.05/°C)°C, Tobj=0~550:
• Multi-Beams Laser
Resolution
±2% of reading or 2°C (4°F) whichever is greater
Response Time (90%)
specify the approximate
STORAGE & CLEANING
It should be stored at room temperature. The sensor lens is the most delicate part of the thermometer. The lens should be kept clean at all times,
It should be stored at room temperature. The sensor lens is the most delicate part of the thermometer. The lens should be kept clean at all times,
LCD ERROR MESSAGES
care should be taken when cleaning the lens using only a soft cloth or cotton swab with water or medical alcohol, allowing the lens to fully dry
LCD ERROR MESSAGES
care should be taken when cleaning the lens using only a soft cloth or cotton swab with water or medical alcohol, allowing the lens to fully dry
The thenmometer incorporates visual diagnostic messages as follows:
The thermometer incorporates visual diagnostic
STORAGE & CLEANING
The thenmometer incorporates visual diagnostic messages as follows:
before using the thermometer. Do not submerge any part of the thermometer.
before using the thermometer. Do not submerge any part of the thermometer.
messages as follows:
It should be stored at room temperature. The sensor lens is the most delicate part of the thermometer. The lens should be kept clean at all times,
LCD ERROR MESSAGES
'
H i' or 'Lo' is displayed when the temperature being measured is outside of the settings of HAL and LAL.
H i' or 'Lo' is displayed when the temperature being measured is outside of the settings of HAL and LAL.
'
LCD ERROR MESSAGES
care should be taken when cleaning the lens using only a soft cloth or cotton swab with water or medical alcohol, allowing the lens to fully dry
The thermometer incorporates visual diagnostic messages as follows:
'Er2' is displayed when the thenoorneler is exposed to rapid changes in the ambient temperature. '
The thermometer incorporates visual diagnostic messages as follows:
before using the thermometer. Do not submerge any part of the thermometer.
,f,-2
,£,- 3
'Er2' is displayed when the thenoorneler is exposed to rapid changes in the ambient temperature. '
,f,-2
,£,- 3
is displayed when the ambient te�erature exceeds the range of 0
J
J
is displayed when the ambient te�erature exceeds the range of 0
LCD ERROR MESSAGES
J
J
thermometer should be allowed
STORAGE & CLEANING
thermometer should be allowed
The thermometer incorporates visual diagnostic messages as follows:
temperature.
,E
temperature.
It should be stored at room temperature. The sensor lens is the most delicate part of the thermometer. The lens should be kept clean at all times,
,E
Error 5-9, for all other error messages it is necessary to reset the thermometer. To reset iL turn the
rj
Error 5-9, for all other error messages it is necessary to reset the thermometer. To reset iL turn the
↑
rj
care should be taken when cleaning the lens using only a soft cloth or cotton swab with water or medical alcohol, allowing the lens to fully dry
instrument off, remove the battery and wait for a minimum of one minute, reinsert the battery and turn
60.0 °C
instrument off, remove the battery and wait for a minimum of one minute, reinsert the battery and turn
「
」 「
before using the thermometer. Do not submerge any part of the thermometer.
on. If the error message remains please contact the Service Department for further assistance.
↑
,H,
CLo
on. If the error message remains please contact the Service Department for further assistance.
「
140.0 °F
,H,
CLo
J
J
H i' or 'Lo' is displayed when the temperature being measured is outside of the measurement range.
'
* Circle Laser
LCD ERROR MESSAGES
J
J
'
H i' or 'Lo' is displayed when the temperature being measured is outside of the measurement range.
specify the approximate measurement
The thermometer incorporates visual diagnostic messages as follows:
BATTERIES
area for better targeting.
「
」 「
BATTERIES
* Circle Laser
「
The thermometer incorporates visual low battery indication as follows:
The thermometer incorporates visual low battery indication as follows:
specify the approximate measurement
��
「
�J
) and press Meas. key (○ ○
) to display the surface temperature. The
7
6
��
�J
area for better targeting.
) for scrolling more display
* Circle Laser
2
B attery OK': measurements
'
B attery Low': battery needs to be
'
「
」 「
B attery OK': measurements
'
B attery Low': battery needs to be
'
specify the approximate measurement
) and press Meas. key (○ ○
) to display the surface temperature. The
are possible
7
6
replaced, measurements are still possible
「
」
「
are possible
STORAGE & CLEANING
replaced, measurements are still possible
area for better targeting.
BATTERIES
) for scrolling more display
BATTERY REPLACEMENT
2
BATTERY REPLACEMENT
「
」 「
1. Loosen the screw and pull out the battery cover(®).
* Circle Laser
It should be stored at room temperature. The sensor lens is the most delicate part of the thermometer. The lens should be kept clean at all times,
BATTERIES
The thermometer incorporates visual low battery indication as follows:
1. Loosen the screw and pull out the battery cover(®).
) and press Meas. key (○ ○
) to display the surface temperature. The
) or Down key (○
) to set the emissivity, then press Mode key (○
7
6
2. Replace and reinstall with new batteries.
4
3
specify the approximate measurement
care should be taken when cleaning the lens using only a soft cloth or cotton swab with water or medical alcohol, allowing the lens to fully dry
STORAGE & CLEANING
The thermometer incorporates visual low battery indication as follows:
2. Replace and reinstall with new batteries.
「
」 「
) for scrolling more display
」
3. Place the battery cover(®) back and fasten the screw.
2
area for better targeting.
then press Up Key
or
It should be stored at room temperature. The sensor lens is the most delicate part of the thermometer. The lens should be kept clean at all times,
3. Place the battery cover(®) back and fasten the screw.
&
before using the thermometer. Do not submerge any part of the thermometer.
When the 'Low Battery' icon indicates the battery is low, the battery
BATTERIES
&
) or Down key (○
) to set the emissivity, then press Mode key (○
care should be taken when cleaning the lens using only a soft cloth or cotton swab with water or medical alcohol, allowing the lens to fully dry
4
3
When the 'Low Battery' icon indicates the battery is low, the battery
'Battery OK': measurements
) and press Meas. key (○ ○
) to display the surface temperature. The
Please note: It is important to turn the instrument off before replacing lhe oottery otherwise the thenmometer may ma�unction.
7
6
before using the thermometer. Do not submerge any part of the thermometer.
「
The thermometer incorporates visual low battery indication as follows:
LCD ERROR MESSAGES
&
Please note: It is important to turn the instrument off before replacing lhe oottery otherwise the thenmometer may ma�unction.
'Battery OK': measurements
) for scrolling more display
are possible
Dispose of used battery promptly and keep away from children,
2
&
LCD ERROR MESSAGES
Dispose of used battery promptly and keep away from children,
&
) or Down key (○
The thermometer incorporates visual diagnostic messages as follows:
) to set the emissivity, then press Mode key (○
If the device is not to be used for a long time, tum the power off, rerro;e
4
3
When the 'Low Battery' icon indicates the battery is low, the battery should be replaced immediately with AAA, 1.5V batteries. Please note: It
&
The thermometer incorporates visual diagnostic messages as follows:
If the device is not to be used for a long time, tum the power off, rerro;e
「
」 「
SPECIFICATION
is important to turn the instrument off before replacing the battery otherwise the thermometer may malfunction.
When the 'Low Battery' icon indicates the battery is low, the battery should be replaced immediately with AAA, 1.5V batteries. Please note: It
for the Maximum (MAX),
) to change the High Alarm (HAL) or Lo Alarm (LAL), then press Meas. key (○
3
SPECIFICATION
'Battery OK': measurements
is important to turn the instrument off before replacing the battery otherwise the thermometer may malfunction.
Item
Non-<:ontact Infrared Scan function
BATTERIES
Dispose of used battery promptly and keep away from children.
) or Down key (○
) to set the emissivity, then press Mode key (○
Item
Non-<:ontact Infrared Scan function
are possible
4
3
The thermometer incorporates visual low battery indication as follows:
If the device is not to be used for a long time, turn the power off, remove and store the batteries in a cool, dry place.
Dispose of used battery promptly and keep away from children.
°
°
Measurement Range
) to change the High Alarm (HAL) or Lo Alarm (LAL), then press Meas. key (○
-30-250
C (-22-482
F)
3
When the 'Low Battery' icon indicates the battery is low, the battery should be replaced immediately with AAA, 1.5V batteries. Please note: It
) and put the probe in/on the target, the thermometer will display the
°
°
Measurement Range
-30-250
C (-22-482
F)
5
'Hi' or 'Lo' is displayed when the temperature being measured is outside of the settings of HAL and
If the device is not to be used for a long time, turn the power off, remove and store the batteries in a cool, dry place.
「
」 「
) to confirm it.
°
Operating Range
o-so·c (32-122
SPECIFICATION
F)
2
is important to turn the instrument off before replacing the battery otherwise the thermometer may malfunction.
°
Operating Range
o-so·c (32-122
F)
LAL.
) or Down key (○
).
Accuracy
4
3
) to change the High Alarm (HAL) or Lo Alarm (LAL), then press Meas. key (○
) to confirm it.
SPECIFICATION
3
2
) and put the probe in/on the target, the thermometer will display the
Dispose of used battery promptly and keep away from children.
°
「
」 「
Accuracy
5
±0.6
C
Item
'Battery OK': measurements
°
'Er2' is displayed when the thermometer is exposed to rapid changes in the ambient temperature. 'Er3'
°
°
ITobi=15-35
C, Tamb=25
C)
±0.6
C
or Down Key
°
to change
°
ITobi=15-35
C, Tamb=25
C)
If the device is not to be used for a long time, turn the power off, remove and store the batteries in a cool, dry place.
「
are possible
-30-0: ± ( 1 "C-+-0.1 /degree)
Item
) or Down key (○
).
4
3
is displayed when the ambient temperature exceeds the range of 0
Accuracy
-30-0: ± ( 1 "C-+-0.1 /degree)
Measurement Range
) and put the probe in/on the target, the thermometer will display the
Accuracy
) to confirm it.
°
SPECIFICATION
5
0- 65: ±1
When the 'Low Battery' icon indicates the battery is low, the battery should be replaced immediately with AAA, 1.5V batteries. Please note: It
C
) to change the High Alarm (HAL) or Lo Alarm (LAL), then press Meas. key (○
2
3
°
0- 65: ±1
(Tamb=23±3"C )
」
thermometer should be allowed plenty of time (minimum 30 minutes) to stabilize to the working/room
C
to confirm it. When
(Tamb=23±3"C )
65-250: ±1.5% of readinq
Operating Range
Measurement Range
「
」 「
) for LOCK mode ON/OFF. The lock mode is particularly useful for continuous monitoring
4
is important to turn the instrument off before replacing the battery otherwise the thermometer may malfunction.
65-250: ±1.5% of readinq
) or Down key (○
).
4
3
temperature.
Item
Emissivity Range
0.95 default - adjustable 0.1 to 1 step .01
BATTERIES
「
」
Accuracy
Dispose of used battery promptly and keep away from children.
Operating Range
Emissivity Range
0.95 default - adjustable 0.1 to 1 step .01
) and put the probe in/on the target, the thermometer will display the
The thermometer incorporates visual low battery indication as follows:
5
o
o
o
Error 5~9, for all other error messages it is necessary to reset the thermometer. To reset it, turn the
C(32°F)~50
) for
C or
F transferred.
) for LOCK mode ON/OFF. The lock mode is particularly useful for continuous monitoring
(Tobj=15~35°C, Tamb=25°C)
Resolution (-9.9-199.9
3
°
C /
°
F)
0.1 ·c10.1
°
F, otherwise 1•c11
°
F
4
If the device is not to be used for a long time, turn the power off, remove and store the batteries in a cool, dry place.
Accuracy
°
°
Measurement Range
°
°
Resolution (-9.9-199.9
C /
F)
0.1 ·c10.1
F, otherwise 1•c11
F
) to confirm
6
instrument off, remove the battery and wait for a minimum of one minute, reinsert the battery and turn
) or Down key (○
) for backlight function ON/OFF.
).
4
3
BATTERIES
Response Time (90%)
4
1sec
(Tobj=15~35°C, Tamb=25°C)
) to confirm it.
SPECIFICATION
」
2
Accuracy(Tamb=23±3°C)
Response Time (90%)
Operating Range
1sec
「
」 「
o
o
'Battery OK': measurements
) for
C or
F transferred.
on. If the error message remains please contact the Service Department for further assistance.
3
) to confirm
) for LOCK mode ON/OFF. The lock mode is particularly useful for continuous monitoring
6
4
Thermometer incorporates visual low battery
Distance:Spot
8: 1 (90% energy covered)
) for ClassIIIa laser function ON/OFF.
are possible
3
Accuracy
Distance:Spot
8: 1 (90% energy covered)
Accuracy(Tamb=23±3°C)
BATTERIES
) for scrolling more display
Item
) for backlight function ON/OFF.
Emissivity Range
2
4
When the 'Low Battery' icon indicates the battery is low, the battery should be replaced immediately with AAA, 1.5V batteries. Please note: It
indication as follows:
Battery Life
'Hi' or 'Lo' is displayed when the temperature being measured is outside of the measurement range.
Typ.100, min 90 hours continuous use (Alkaline, without Laser and Back Light.)
(Tobj=15~35°C, Tamb=25°C)
Battery Life
o
o
Typ.100, min 90 hours continuous use (Alkaline, without Laser and Back Light.)
) for
C or
F transferred.
The thermometer incorporates visual low battery indication as follows:
is important to turn the instrument off before replacing the battery otherwise the thermometer may malfunction.
3
」
Resolution
) for ClassIIIa laser function ON/OFF.
TCT70MFX
Emissivity Range
) to confirm
Measurement Range
3
Dimensions
6
) for LOCK mode ON/OFF. The lock mode is particularly useful for continuous monitoring
166.87 x 55.93 x 46mm (6.57 x 2.2 x 1.81incll)
Thermometer Operating Instructions
Dispose of used battery promptly and keep away from children.
4
• Multi-Beams Laser
Dimensions
166.87 x 55.93 x 46mm (6.57 x 2.2 x 1.81incll)
) for backlight function ON/OFF.
Accuracy(Tamb=23±3°C)
4
If the device is not to be used for a long time, turn the power off, remove and store the batteries in a cool, dry place.
Response Time (90%)
Operating Range
Resolution
Weight
165grams (5.82oz) including batteries (MA•2p::s)
specify the approximate
The thermometer is a non-contact infrared thermometer. There are many mathematical modes for the Infrared function. Please remember to keep
Weight
for LOCK mode ON/
165grams (5.82oz) including batteries (MA•2p::s)
) to confirm it.
&
o
o
SPECIFICATION
) for
) for ClassIIIa laser function ON/OFF.
C or
F transferred.
2
3
EMC/RF!:
3
&
Readings may be affected if the unit is operated within
Emissivity Range
Distance:Spot
Accuracy
TCT70MFX
measurement area for better
away from children and don't use it for safety related applications.
Response Time (90%)
'Battery OK': measurements
EMC/RF!:
Readings may be affected if the unit is operated within
Thermometer Operating Instructions
meter, but the performance of the instrument will not be permanently
Item
) for backlight function ON/OFF.
(Tobj=15~35°C, Tamb=25°C)
1 ·Mf\ M
meter, but the performance of the instrument will not be permanently
4
1 ®M !iiii
Battery Life
Resolution
1
Distance:Spot
are possible
1
) to confirm
1® Mr1
(ffe.) HACCP checkLEO
6
The thermometer is a non-contact infrared thermometer. There are many mathematical modes for the Infrared function. Please remember to keep
Measurement Range
) for ClassIIIa laser function ON/OFF.
3
Dimensions
When the 'Low Battery' icon indicates the battery is low, the battery should be replaced immediately with AAA, 1.5V batteries. Please note: It
Accuracy(Tamb=23±3°C)
Response Time (90%)
away from children and don't use it for safety related applications.
Battery Life
'Battery Low': battery needs to be
Operating Range
is important to turn the instrument off before replacing the battery otherwise the thermometer may malfunction.
Weight
Accuracy
for °C or °F
Distance:Spot
Dimensions
replaced, measurements are still possible
Emissivity Range
(ffe.) HACCP checkLEO
a.I: ..
LCD ERROR MESSAGES
(Tobj=15~35°C, Tamb=25°C)
@Mode Key
Dispose of used battery promptly and keep away from children.
'.ii'(
'. : .
Note: Under the electromagnetic field of 3V/m from 200 to 600 MHz, the maximum error is 10
f.,
) to confirm
6
Battery Life
Weight
Resolution
Accuracy(Tamb=23±3°C)
@Down Key--
O
If the device is not to be used for a long time, turn the power off, remove and store the batteries in a cool, dry place.
The thenmometer incorporates visual diagnostic messages as follows:
• (t
Caution: The measure range is for thermometer only. User should choose proper probe types for different kinds of application. Please make sure
'Battery Exhausted': measurements are not
for
Dimensions
Note: Under the electromagnetic field of 3V/m from 200 to 600 MHz, the maximum error is 10
Response Time (90%)
is3 . · s
1!!9&,�
Emissivity Range
HACCP CliECK
BATTERY REPLACEMENT
the target to be measured will not exceed the temperature range of the probe to avoid permanent damage of the thermocouple probe.
@Mode Key
) to confirm it.
SPECIFICATION
2
possible
Caution: The measure range is for thermometer only. User should choose proper probe types for different kinds of application. Please make sure
Weight
Resolution
Distance:Spot
Caution: To avoid electric shock and thermometer damage, do not measure live circuit where voltage exceeding 24V AC RMS or 60V DC with the
1. Loosen the screw and pull out the battery
HACCPCHECK
@Down Key--
the target to be measured will not exceed the temperature range of the probe to avoid permanent damage of the thermocouple probe.
Response Time (90%)
for
Note: Under the electromagnetic field of 3V/m from 200 to 600 MHz, the maximum error is 10
Item
thermocouple probe.
Battery Life
cover
is3 . · s
1!!9&,�
Caution: To avoid electric shock and thermometer damage, do not measure live circuit where voltage exceeding 24V AC RMS or 60V DC with the
Distance:Spot
9�8
EMC/RFI: Readings may be affected if the unit is operated within radio frequency electromagnetic field strength of approximately 3 volts per meter,
Caution: The measure range is for thermometer only. User should choose proper probe types for different kinds of application. Please make sure
2. Replace and reinstall with new batteries.
Dimensions
tWJ
Battery Life
thermocouple probe.
Measurement Range
but the performance of the instrument will not be permanently affected.
the target to be measured will not exceed the temperature range of the probe to avoid permanent damage of the thermocouple probe.
3. Place the battery cover
. ,a : i1 R l , l fM , IIMiJiWl if llf' r•
Weight
Dimensions
Non-contact Infrared Scan function
EMC/RFI: Readings may be affected if the unit is operated within radio frequency electromagnetic field strength of approximately 3 volts per meter,
Operating Range
,f,-2
(Default Screen)
Caution: To avoid electric shock and thermometer damage, do not measure live circuit where voltage exceeding 24V AC RMS or 60V DC with the
the screw.
Weight
9�8
Note: Under the electromagnetic field of 3V/m from 200 to 600 MHz, the maximum error is 10
but the performance of the instrument will not be permanently affected.
tWJ
thermocouple probe.
Accuracy
o
o
-60 to +550
C (-76 to +1022
Note: Under the electromagnetic field of 3V/m from 200 to 600 MHz, the maximum error is 10
F)
When the 'Low Battery' icon indicates the
Caution: The measure range is for thermometer only. User should choose proper probe types for different kinds of application. Please make sure
. ,a : i1 R l , l fM , IIMiJiWl if llf' r•
EMC/RFI: Readings may be affected if the unit is operated within radio frequency electromagnetic field strength of approximately 3 volts per meter,
Caution: The measure range is for thermometer only. User should choose proper probe types for different kinds of application. Please make sure
Thermocouple Probe Scan function
(Tobj=15~35°C, Tamb=25°C)
(Default Screen)
0 to +50°C (32 to +122°F)
battery is low, the battery should be replaced
the target to be measured will not exceed the temperature range of the probe to avoid permanent damage of the thermocouple probe.
the target to be measured will not exceed the temperature range of the probe to avoid permanent damage of the thermocouple probe.
) to confirm
but the performance of the instrument will not be permanently affected.
6
(K type; probe not included.)
�� , . � , ; · • -- . • • -- � . : -:, >1 : - •� �l: J lll lll k . ; -•,
immediately with AAA, 1.5V batteries. Note:
Caution: To avoid electric shock and thermometer damage, do not measure live circuit where voltage exceeding 24V AC RMS or 60V DC with the
Caution: To avoid electric shock and thermometer damage, do not measure live circuit where voltage exceeding 24V AC RMS or 60V DC with the
set the emissivity,
then press Mode Key(©) to confirm it.
Accuracy(Tamb=23±3°C)
±1.0°C (1.8°F)
thermocouple probe.
-64 to +1400°C (-83.2 to +2552°F)
It is important to turn the instrument off
thermocouple probe.
The "
H AC CP CHEC K" feature is incorporaled in our 1!1ermomeler temperature to indicate critical temperature
EMC/RFI: Readings may be affected if the unit is operated within radio frequency electromagnetic field strength of approximately 3 volts per meter,
before replacing the battery otherwise the
zone. The LED light indicates a food product stays in a sale or unsafe HAC CP "
Emissivity Range
EMC/RFI: Readings may be affected if the unit is operated within radio frequency electromagnetic field strength of approximately 3 volts per meter,
Tobj=-60~0: ±(2+0.05/°C)°C, Tobj=0~550:
but the performance of the instrument will not be permanently affected.
�� , . � , ; · • -- . • • -- � . : -:, >1 : - •� �l: J lll lll k . ; -•,
green and red LED lights will always be lit before power off.
thermometer may malfunction.
but the performance of the instrument will not be permanently affected.
±2% of reading or 2°C (4°F) whichever is greater
Resolution
A Green LED light indicates a safe cool or frozen condition below
The "
H AC CP CHEC K" feature is incorporaled in our 1!1ermomeler temperature to indicate critical temperature
Dispose of used battery promptly and keep
temperature above 60.0"C ( 140.0"F).
zone. The LED light indicates a food product stays in a sale or unsafe HAC CP "
0.95 default – adjustable 0.1 to 1 step .01
+/-1% of reading or 1°C (1.8°F) whichever is
Response Time (90%)
,H,
When temperature is between 4.o•c (40.0"F) and 60.0"C (140.0"F), the red LED light indicates that the
green and red LED lights will always be lit before power off.
away from children.
greater (Test under Tamb=23±6°C)
0.1°C/0.1°F at -83.2 to 999.9(°C/°F), otherwise 1°C/1°F
temperature is fallen within the HAC CP "Danger Zone' from 4.o•c (40.0"F) to 60.0"C (140.0"F).
A Green LED light indicates a safe cool or frozen condition below
Distance:Spot
temperature above 60.0"C ( 140.0"F).
1sec
Battery Life
When temperature is between 4.o•c (40.0"F) and 60.0"C (140.0"F), the red LED light indicates that the
FUNCTION
It should be stored at room temperature. The sensor lens is the most delicate part of the thermometer. The lens should be kept clean at all tim
LCD ERROR MESSAGES
care should be taken when cleaning the lens using only a soft cloth or cotton swab with water or medical alcohol, allowing the lens to fully
The thermometer incorporates visual diagnostic messages as follows:
STORAGE & CLEANING
before using the thermometer. Do not submerge any part of the thermometer.
It should be stored at room temperature. The sensor lens is the most delicate part of the thermometer. The lens should be kept clean at all tim
LCD ERROR MESSAGES
care should be taken when cleaning the lens using only a soft cloth or cotton swab with water or medical alcohol, allowing the lens to fully
The thermometer incorporates visual diagnostic messages as follows:
before using the thermometer. Do not submerge any part of the thermometer.
STORAGE & CLEANING
'Hi' or 'Lo' is displayed when the
LCD ERROR MESSAGES
It should be stored at room temperature. The sensor lens is the most delicate part of the thermometer. The lens should be kept clean at all time
temperature being measured is
「
」 「
」
The thermometer incorporates visual diagnostic messages as follows:
care should be taken when cleaning the lens using only a soft cloth or cotton swab with water or medical alcohol, allowing the lens to fully d
'Hi' or 'Lo' is displayed when the temperature being measured is outside of the settings of HAL and
°
°
°
°
C(32
F)-S0
C(122
°
°
°
°
C(32
F)-S0
C(122
before using the thermometer. Do not submerge any part of the thermometer.
'Hi' or 'Lo' is displayed when the temperature being measured is outside of the settings of HAL and
outside of the alarm settings of
plenty
of time (minimum 30 minutes) to stabilize to the working/room
LAL.
plenty
of time (minimum 30 minutes) to stabilize to the working/room
LCD ERROR MESSAGES
LAL.
「
」 「
」
HAL and LAL.
'Er2' is displayed when the thermometer is exposed to rapid changes in the ambient temperature. 'Er3'
The thermometer incorporates visual diagnostic messages as follows:
「
」
'Er2' is displayed when the thermometer is exposed to rapid changes in the ambient temperature. 'Er3'
'Hi' or 'Lo' is displayed when the temperature being measured is outside of the settings of HAL and
is displayed when the ambient temperature exceeds the range of 0
'Er2' is displayed when the
is displayed when the ambient temperature exceeds the range of 0
「
」 「
」
LAL.
」
thermometer should be allowed plenty of time (minimum 30 minutes) to stabilize to the working/room
thermometer is exposed to
「
」 「
」
「
」
」 「
」
thermometer should be allowed plenty of time (minimum 30 minutes) to stabilize to the working/room
temperature.
'Er2' is displayed when the thermometer is exposed to rapid changes in the ambient temperature. 'Er3'
BATTERIES
rapid changes in the ambient
temperature.
The thermometer incorporates visual low battery indication as follows:
Error 5~9, for all other error messages it is necessary to reset the thermometer. To reset it, turn the
temperature. 'Er3' is displayed
is displayed when the ambient temperature exceeds the range of 0
「
」 「
」
「
」 「
」
「
」
Error 5~9, for all other error messages it is necessary to reset the thermometer. To reset it, turn the
」
instrument off, remove the battery and wait for a minimum of one minute, reinsert the battery and turn
BATTERIES
when the ambient temperature
thermometer should be allowed plenty of time (minimum 30 minutes) to stabilize to the working/room
」
'Hi' or 'Lo' is displayed when the temperature being measured is outside of the settings of HAL and
instrument off, remove the battery and wait for a minimum of one minute, reinsert the battery and turn
The thermometer incorporates visual low battery indication as follows:
on. If the error message remains please contact the Service Department for further assistance.
'Battery OK': measurements
exceeds the range of 0 °C (32 °F)
temperature.
」
「
」 「
」
, 111 /
-D-
are possible
LAL.
on. If the error message remains please contact the Service Department for further assistance.
, 111 /
-D-
「
/L !'-
」
Error 5~9, for all other error messages it is necessary to reset the thermometer. To reset it, turn the
~50 °C (122 °F). The thermometer
BATTERIES
'Hi' or 'Lo' is displayed when the temperature being measured is outside of the measurement range.
When the 'Low Battery' icon indicates the battery is low, the battery should be replaced immediately with AAA, 1.5V batteries. Please note:
/L !'-
'
B attery Exhausted': measurements are not
'Er2' is displayed when the thermometer is exposed to rapid changes in the ambient temperature. 'Er3'
The thermometer incorporates visual low battery indication as follows:
'Battery OK': measurements
」
should be allowed plenty of time
B attery Exhausted': measurements are not
'
'Hi' or 'Lo' is displayed when the temperature being measured is outside of the measurement range.
instrument off, remove the battery and wait for a minimum of one minute, reinsert the battery and turn
is important to turn the instrument off before replacing the battery otherwise the thermometer may malfunction.
possible
are possible
」 「
」
is displayed when the ambient temperature exceeds the range of 0
「
」 「
」
possible
Dispose of used battery promptly and keep away from children.
(minimum 30 minutes) to stabilize
on. If the error message remains please contact the Service Department for further assistance.
When the 'Low Battery' icon indicates the battery is low, the battery should be replaced immediately with AAA, 1.5V batteries. Please note
」
thermometer should be allowed plenty of time (minimum 30 minutes) to stabilize to the working/room
BATTERIES
If the device is not to be used for a long time, turn the power off, remove and store the batteries in a cool, dry place.
'Battery OK': measurements
to the working/room temperature.
is important to turn the instrument off before replacing the battery otherwise the thermometer may malfunction.
The thermometer incorporates visual low battery indication as follows:
'Hi' or 'Lo' is displayed when the temperature being measured is outside of the measurement range.
) to confirm it.
SPECIFICATION
2
temperature.
are possible
Dispose of used battery promptly and keep away from children.
When the 'Low Battery' icon indicates the battery is low, the battery should be replaced immediately with AAA, 1.5V batteries. Please note:
Error 5-9, for all other error
Error 5~9, for all other error messages it is necessary to reset the thermometer. To reset it, turn the
If the device is not to be used for a long time, turn the power off, remove and store the batteries in a cool, dry place.
Item
is important to turn the instrument off before replacing the battery otherwise the thermometer may malfunction.
slJJuld
be replaced immediately with AAA, 1.5V batteries.
) to confirm it.
'Battery OK': measurements
messages it is necessary to reset
SPECIFICATION
2
instrument off, remove the battery and wait for a minimum of one minute, reinsert the battery and turn
slJJuld
be replaced immediately with AAA, 1.5V batteries.
'Battery Low': battery needs to be
Measurement Range
Dispose of used battery promptly and keep away from children.
」
are possible
the thermometer. To reset it, turn
on. If the error message remains please contact the Service Department for further assistance.
If the device is not to be used for a long time, turn the power off, remove and store the batteries in a cool, dry place.
Item
'Battery Low': battery needs to be
replaced, measurements are still possible
Operating Range
When the 'Low Battery' icon indicates the battery is low, the battery should be replaced immediately with AAA, 1.5V batteries. Please note:
the instrument off, remove the
.m
) to confirm it.
SPECIFICATION
Accuracy
are possible
2
store the batteries in a cool, dry place.
is important to turn the instrument off before replacing the battery otherwise the thermometer may malfunction.
replaced, measurements are still possible
.m
Measurement Range
'Hi' or 'Lo' is displayed when the temperature being measured is outside of the measurement range.
store the batteries in a cool, dry place.
(Tobj=15~35°C, Tamb=25°C)
battery and wait for a minimum of
Dispose of used battery promptly and keep away from children.
」
'Hi' or 'Lo' is displayed when the temperature being measured is outside of the settings of HAL and
Item
Operating Range
'Hi' or 'Lo' is displayed when the temperature being measured is outside of the settings of HAL and
) to confirm
6
'Battery Low': battery needs to be
If the device is not to be used for a long time, turn the power off, remove and store the batteries in a cool, dry place.
one minute, reinsert the battery
LAL.
Accuracy(Tamb=23±3°C)
Accuracy
LAL.
Measurement Range
) to confirm it.
replaced, measurements are still possible
SPECIFICATION
2
'Er2' is displayed when the thermometer is exposed to rapid changes in the ambient temperature. 'Er3'
(Tobj=15~35°C, Tamb=25°C)
and turn on. If the error message
Emissivity Range
) to confirm
Operating Range
6
is displayed when the ambient temperature exceeds the range of 0
'Er2' is displayed when the thermometer is exposed to rapid changes in the ambient temperature. 'Er3'
Item
remains please contact the
Accuracy(Tamb=23±3°C)
LCD ERROR MESSAGES
Resolution
Accuracy
」
thermometer should be allowed plenty of time (minimum 30 minutes) to stabilize to the working/room
is displayed when the ambient temperature exceeds the range of 0
(Tobj=15~35°C, Tamb=25°C)
Service Department for further
temperature.
Measurement Range
Response Time (90%)
Emissivity Range
The thenmometer incorporates visual diagnostic messages as follows:
) to confirm
6
」
Error 5~9, for all other error messages it is necessary to reset the thermometer. To reset it, turn the
thermometer should be allowed plenty of time (minimum 30 minutes) to stabilize to the working/room
Operating Range
assistance.
Non-contact Infrared Scan function
Distance:Spot
'Battery Low': battery needs to be
Accuracy(Tamb=23±3°C)
Resolution
instrument off, remove the battery and wait for a minimum of one minute, reinsert the battery and turn
Accuracy
temperature.
」
Battery Life
replaced, measurements are still possible
Response Time (90%)
Non-contact Infrared Scan function
'
H i' or 'Lo' is displayed when the temperature being measured is outside of the settings of HAL
o
on. If the error message remains please contact the Service Department for further assistance.
Emissivity Range
C(32°F)~50
'Hi' or 'Lo' is displayed when the
(Tobj=15~35°C, Tamb=25°C)
o
o
-60 to +550
C (-76 to +1022
F)
Dimensions
Error 5~9, for all other error messages it is necessary to reset the thermometer. To reset it, turn the
Distance:Spot
) to confirm
6
Resolution
'Hi' or 'Lo' is displayed when the temperature being measured is outside of the measurement range.
temperature being measured
Accuracy(Tamb=23±3°C)
o
0 to +50°C (32 to +122°F)
-60 to +550
C (-76 to +1022
」
Weight
'Er2' is displayed when the thenoorneler is exposed to rapid changes in the ambient tempera
Battery Life
instrument off, remove the battery and wait for a minimum of one minute, reinsert the battery and turn
Response Time (90%)
,f,-2
,£,- 3
is outside of the measurement
Non-contact Infrared Scan function
Note: Under the electromagnetic field of 3V/m from 200 to 600 MHz, the maximum error is 10
is displayed when the ambient te�erature exceeds the range of 0
Emissivity Range
Dimensions
0 to +50°C (32 to +122°F)
J
Distance:Spot
J
on. If the error message remains please contact the Service Department for further assistance.
±1.0°C (1.8°F)
range.
o
Caution: The measure range is for thermometer only. User should choose proper probe types for different kinds of application. Please make sure
C (122°F). The
thermometer should be allowed
Resolution
Weight
Battery Life
o
o
-60 to +550
C (-76 to +1022
F)
the target to be measured will not exceed the temperature range of the probe to avoid permanent damage of the thermocouple probe.
±1.0°C (1.8°F)
Note: Under the electromagnetic field of 3V/m from 200 to 600 MHz, the maximum error is 10
temperature.
'Hi' or 'Lo' is displayed when the temperature being measured is outside of the measurement range.
Tobj=-60~0: ±(2+0.05/°C)°C, Tobj=0~550:
Response Time (90%)
Dimensions
,E
Caution: To avoid electric shock and thermometer damage, do not measure live circuit where voltage exceeding 24V AC RMS or 60V DC with the
」
0 to +50°C (32 to +122°F)
Caution: The measure range is for thermometer only. User should choose proper probe types for different kinds of application. Please make sure
'Battery Low': battery needs to be
'Battery Exhausted': measurements are not
Distance:Spot
Error 5-9, for all other error messages it is necessary to reset the thermometer. To reset iL
±2% of reading or 2°C (4°F) whichever is greater
Weight
thermocouple probe.
rj
Tobj=-60~0: ±(2+0.05/°C)°C, Tobj=0~550:
replaced, measurements are still possible
the target to be measured will not exceed the temperature range of the probe to avoid permanent damage of the thermocouple probe.
Battery Life
EMC/RFI: Readings may be affected if the unit is operated within radio frequency electromagnetic field strength of approximately 3 volts per mete
instrument off, remove the battery and wait for a minimum of one minute, reinsert the battery
Non-contact Infrared Scan function
Note: Under the electromagnetic field of 3V/m from 200 to 600 MHz, the maximum error is 10
0.95 default – adjustable 0.1 to 1 step .01
±1.0°C (1.8°F)
Caution: To avoid electric shock and thermometer damage, do not measure live circuit where voltage exceeding 24V AC RMS or 60V DC with the
±2% of reading or 2°C (4°F) whichever is greater
but the performance of the instrument will not be permanently affected.
Dimensions
on. If the error message remains please contact the Service Department for further assistance.
Caution: The measure range is for thermometer only. User should choose proper probe types for different kinds of application. Please make sure
thermocouple probe.
,H,
CLo
0.1°C/0.1°F at -83.2 to 999.9(°C/°F), otherwise 1°C/1°F
0.95 default – adjustable 0.1 to 1 step .01
o
o
-60 to +550
C (-76 to +1022
F)
the target to be measured will not exceed the temperature range of the probe to avoid permanent damage of the thermocouple probe.
Tobj=-60~0: ±(2+0.05/°C)°C, Tobj=0~550:
Weight
EMC/RFI: Readings may be affected if the unit is operated within radio frequency electromagnetic field strength of approximately 3 volts per met
Battery OK: measurements are
J
J
H i' or 'Lo' is displayed when the temperature being measured is outside of the measurement ra
'
Caution: To avoid electric shock and thermometer damage, do not measure live circuit where voltage exceeding 24V AC RMS or 60V DC with the
but the performance of the instrument will not be permanently affected.
Note: Under the electromagnetic field of 3V/m from 200 to 600 MHz, the maximum error is 10
1sec
0 to +50°C (32 to +122°F)
0.1°C/0.1°F at -83.2 to 999.9(°C/°F), otherwise 1°C/1°F
possible.
±2% of reading or 2°C (4°F) whichever is greater
thermocouple probe.
Caution: The measure range is for thermometer only. User should choose proper probe types for different kinds of application. Please make sure
radi:l
BATTERIES
frequency electromagnetic field strength of approximately 3 volts per
0.95 default – adjustable 0.1 to 1 step .01
12:1(90% energy covered)
EMC/RFI: Readings may be affected if the unit is operated within radio frequency electromagnetic field strength of approximately 3 volts per mete
1sec
'Battery Low': battery needs to be
radi:l
frequency electromagnetic field strength of approximately 3 volts per
the target to be measured will not exceed the temperature range of the probe to avoid permanent damage of the thermocouple probe.
Battery Low: battery needs to be
±1.0°C (1.8°F)
Thermocouple Probe Scan function
affected.
Non-contact Infrared Scan function
but the performance of the instrument will not be permanently affected.
The thermometer incorporates visual low battery indication as follows:
affected.
Caution: To avoid electric shock and thermometer damage, do not measure live circuit where voltage exceeding 24V AC RMS or 60V DC with the
Typ.180, min 140 hours continuous use (Alkaline, without Laser and Back Light.)
(K type; probe not included.)
0.1°C/0.1°F at -83.2 to 999.9(°C/°F), otherwise 1°C/1°F
replaced, measurements are still possible
12:1(90% energy covered)
replaced, measurements are still
��
thermocouple probe.
Tobj=-60~0: ±(2+0.05/°C)°C, Tobj=0~550:
o
o
-60 to +550
C (-76 to +1022
F)
-64 to +1400°C (-83.2 to +2552°F)
possible.
119.2*47.5*171.8 mm (4.7×1.87×6.76 inch)
1sec
EMC/RFI: Readings may be affected if the unit is operated within radio frequency electromagnetic field strength of approximately 3 volts per mete
Typ.180, min 140 hours continuous use (Alkaline, without Laser and Back Light.)
'Battery Exhausted': measurements are not
0 to +50°C (32 to +122°F)
±2% of reading or 2°C (4°F) whichever is greater
'
B attery OK': measurements
but the performance of the instrument will not be permanently affected.
255.7 grams(9.02 oz) including batteries (AAA*2pcs)
!
12:1(90% energy covered)
119.2*47.5*171.8 mm (4.7×1.87×6.76 inch)
Battery Exhausted: measurements
}.) Infrared Lem
possible
0.95 default – adjustable 0.1 to 1 step .01
±1.0°C (1.8°F)
!
are possible
replaced, measurements are still possible
0
+/-1% of reading or 1°C (1.8°F) whichever is
,& ( (
:E(
0
are not are possible.
BATTERY REPLACEMENT
,& ( (
:E(
Typ.180, min 140 hours continuous use (Alkaline, without Laser and Back Light.)
Tobj=-60~0: ±(2+0.05/°C)°C, Tobj=0~550:
255.7 grams(9.02 oz) including batteries (AAA*2pcs)
greater (Test under Tamb=23±6°C)
0.1°C/0.1°F at -83.2 to 999.9(°C/°F), otherwise 1°C/1°F
Ref.No, : 062022
Ref.No, : 062022
@Meas.Key
1. Loosen the screw and pull out the battery cover(®).
±2% of reading or 2°C (4°F) whichever is greater
119.2*47.5*171.8 mm (4.7×1.87×6.76 inch)
}.) Infrared Lem
1sec
2. Replace and reinstall with new batteries.
0.95 default – adjustable 0.1 to 1 step .01
255.7 grams(9.02 oz) including batteries (AAA*2pcs)
3. Place the battery cover(®) back and fasten the screw.
0.1°C/0.1°F at -83.2 to 999.9(°C/°F), otherwise 1°C/1°F
12:1(90% energy covered)
&
@Meas.Key
1sec
'
H i' or 'Lo' is displayed when the temperature being measured is outs
When the 'Low Battery' icon indicates the battery is low, the battery
Non-contact Infrared Scan function
.
Typ.180, min 140 hours continuous use (Alkaline, without Laser and Back Light.)
(f Battery Cover
12:1(90% energy covered)
Please note: It is important to turn the instrument off before replacing lhe oottery otherwise the thenmometer may ma�unction.
119.2*47.5*171.8 mm (4.7×1.87×6.76 inch)
&
Typ.180, min 140 hours continuous use (Alkaline, without Laser and Back Light.)
o
o
Dispose of used battery promptly and keep away from children,
-60 to +550
C (-76 to +1022
F)
Thermocouple Probe Scan function
back and fasten
&
'Er2' is displayed when the thenoorneler is exposed to rapid change
119.2*47.5*171.8 mm (4.7×1.87×6.76 inch)
255.7 grams(9.02 oz) including batteries (AAA*2pcs)
(f Battery Cover
If the device is not to be used for a long time, tum the power off, rerro;e
,£,- 3
0 to +50°C (32 to +122°F)
(K type; probe not included.)
255.7 grams(9.02 oz) including batteries (AAA*2pcs)
1 ®M !iiii
is displayed when the ambient te�erature exceeds the range
SPECIFICATION
o
o
J
-64 to +1400°C (-83.2 to +2552°F)
J
C (18
±1.0°C (1.8°F)
Item
Non-<:ontact Infrared Scan function
thermometer should be allowed
Tobj=-60~0: ±(2+0.05/°C)°C, Tobj=0~550:
°
Measurement Range
-30-250
C (-22-482
temperature.
,E
±2% of reading or 2°C (4°F) whichever is greater
°
Operating Range
o-so·c (32-122
F)
+/-1% of reading or 1°C (1.8°F) whichever is
Error 5-9, for all other error messages it is necessary to reset the
rj
0.95 default – adjustable 0.1 to 1 step .01
Danger Zone" temperature. The
Accuracy
greater (Test under Tamb=23±6°C)
°
±0.6
C
instrument off, remove the battery and wait for a minimum of one m
°
°
ITobi=15-35
C, Tamb=25
C)
4.o•c
0.1°C/0.1°F at -83.2 to 999.9(°C/°F), otherwise 1°C/1°F
(40.D"FJ or indicates a safe holding
-30-0: ± ( 1 "C-+-0.1 /degree)
on. If the error message remains please contact the Service Departm
Accuracy
Danger Zone" temperature. The
1sec
CLo
°
0- 65: ±1
C
(Tamb=23±3"C )
4.o•c
65-250: ±1.5% of readinq
J
J
12:1(90% energy covered)
(40.D"FJ or indicates a safe holding
H i' or 'Lo' is displayed when the temperature being measured is outs
'
Emissivity Range
0.95 default - adjustable 0.1 to 1 step .01
Typ.180, min 140 hours continuous use (Alkaline, without Laser and Back Light.)
'Hi' or 'Lo' is displayed when the temperature being measured is outside of the settings of HAL a
If the device is not to be used for a long
LAL.
time, turn the power off, remove and store the
'Er2' is displayed when the thermometer is exposed to rapid changes in the ambient temperature. 'E
'Hi' or 'Lo' is displayed when the temperature being measured is outside of the settings of HAL a
is displayed when the ambient temperature exceeds the range of 0
batteries in a cool, dry place.
LAL.
Er3'
thermometer should be allowed plenty of time (minimum 30 minutes) to stabilize to the working/roo
Er3'
'Er2' is displayed when the thermometer is exposed to rapid changes in the ambient temperature. 'E
F). The
temperature.
F). The
CAUTION
'Hi' or 'Lo' is displayed when the temperature being measured is outside of the settings of HAL a
is displayed when the ambient temperature exceeds the range of 0
Error 5~9, for all other error messages it is necessary to reset the thermometer. To reset it, turn t
LAL.
thermometer should be allowed plenty of time (minimum 30 minutes) to stabilize to the working/ro
instrument off, remove the battery and wait for a minimum of one minute, reinsert the battery and tu
'Er2' is displayed when the thermometer is exposed to rapid changes in the ambient temperature. 'E
temperature.
on. If the error message remains please contact the Service Department for further assistance.
is displayed when the ambient temperature exceeds the range of 0
o
o
C(32°F)~50
C (122°F). The
Error 5~9, for all other error messages it is necessary to reset the thermometer. To reset it, turn
1. WHEN DEVICE IS IN USE, DO NOT
'Hi' or 'Lo' is displayed when the temperature being measured is outside of the settings of HAL an
o
C(32°F)~50
'Hi' or 'Lo' is displayed when the temperature being measured is outside of the measurement range.
thermometer should be allowed plenty of time (minimum 30 minutes) to stabilize to the working/roo
instrument off, remove the battery and wait for a minimum of one minute, reinsert the battery and t
LAL.
LOOK DIRECTLY INTO THE LASER BEAM
temperature.
on. If the error message remains please contact the Service Department for further assistance.
'Er2' is displayed when the thermometer is exposed to rapid changes in the ambient temperature. 'E
PERMANENT EYE DAMAGE MAY RESULT.
Error 5~9, for all other error messages it is necessary to reset the thermometer. To reset it, turn t
is displayed when the ambient temperature exceeds the range of 0
'Hi' or 'Lo' is displayed when the temperature being measured is outside of the measurement range.
instrument off, remove the battery and wait for a minimum of one minute, reinsert the battery and tu
o
o
C(32°F)~50
C (122°F). The
thermometer should be allowed plenty of time (minimum 30 minutes) to stabilize to the working/roo
2. USE EXTREME CAUTION WHEN OPERATING
on. If the error message remains please contact the Service Department for further assistance.
temperature.
THE LASER.
Error 5~9, for all other error messages it is necessary to reset the thermometer. To reset it, turn th
'Hi' or 'Lo' is displayed when the temperature being measured is outside of the measurement range.
'Battery Low': battery needs to be
'Battery Exhausted': measurements are no
instrument off, remove the battery and wait for a minimum of one minute, reinsert the battery and tu
replaced, measurements are still possible
3. NEVER POINT THE DEVICE TOWARDS
on. If the error message remains please contact the Service Department for further assistance.
'Battery Low': battery needs to be
'Battery Exhausted': measurements are no
ANYONE'S EYES.
'Hi' or 'Lo' is displayed when the temperature being measured is outside of the measurement range.
replaced, measurements are still possible
o
o
C(32°F)~50
C (122°F). The
4. KEEP OUT OF REACH OF ALL CHILDREN.
'Battery Low': battery needs to be
'Battery Exhausted': measurements are no
replaced, measurements are still possible
EMC/RFI: Readings may be affected if
Thermocouple Probe Scan function
Non-contact Infrared Scan function
(K type; probe not included.)
the unit is operated within radio frequency
'Battery Low': battery needs to be
'Battery Exhausted': measurements are not
'Battery Exhausted': measurements are not
o
o
-60 to +550
C (-76 to +1022
F)
-64 to +1400°C (-83.2 to +2552°F)
replaced, measurements are still possible
electromagnetic field strength of approximately
Thermocouple Probe Scan function
Non-contact Infrared Scan function
'Battery Exhausted': measurements are not
0 to +50°C (32 to +122°F)
possible
(K type; probe not included.)
3 volts per meter, but the performance of the
possible
o
o
-60 to +550
C (-76 to +1022
F)
-64 to +1400°C (-83.2 to +2552°F)
±1.0°C (1.8°F)
instrument will not be permanently affected.
+/-1% of reading or 1°C (1.8°F) whichever
Thermocouple Probe Scan function
Non-contact Infrared Scan function
0 to +50°C (32 to +122°F)
Tobj=-60~0: ±(2+0.05/°C)°C, Tobj=0~550:
greater (Test under Tamb=23±6°C)
'Battery Exhausted': measurements are not
(K type; probe not included.)
±2% of reading or 2°C (4°F) whichever is greater
±1.0°C (1.8°F)
o
o
-60 to +550
C (-76 to +1022
F)
-64 to +1400°C (-83.2 to +2552°F)
possible
STORAGE & CLEANING
+/-1% of reading or 1°C (1.8°F) whichever
0.95 default – adjustable 0.1 to 1 step .01
0 to +50°C (32 to +122°F)
Thermocouple Probe Scan function
Tobj=-60~0: ±(2+0.05/°C)°C, Tobj=0~550:
o
C(32°F)~50
o
C (122°F). The
greater (Test under Tamb=23±6°C)
Non-contact Infrared Scan function
0.1°C/0.1°F at -83.2 to 999.9(°C/°F), otherwise 1°C/1°F
(K type; probe not included.)
The thermometer should be stored at room
±2% of reading or 2°C (4°F) whichever is greater
±1.0°C (1.8°F)
o
o
C(32°F)~50
o
o
+/-1% of reading or 1°C (1.8°F) whichever
-60 to +550
C (-76 to +1022
F)
-64 to +1400°C (-83.2 to +2552°F)
1sec
0.95 default – adjustable 0.1 to 1 step .01
temperature between -20 to +65 °C (•4-149°F).
Thermocouple Probe Scan function
Tobj=-60~0: ±(2+0.05/°C)°C, Tobj=0~550:
greater (Test under Tamb=23±6°C)
0 to +50°C (32 to +122°F)
12:1(90% energy covered)
'Battery Exhausted': measurements are not
0.1°C/0.1°F at -83.2 to 999.9(°C/°F), otherwise 1°C/1°F
The sensor lens is the most delicate part of the
±2% of reading or 2°C (4°F) whichever is greater
(K type; probe not included.)
Thermocouple Probe Scan function
Typ.180, min 140 hours continuous use (Alkaline, without Laser and Back Light.)
1sec
possible
±1.0°C (1.8°F)
o
0.95 default – adjustable 0.1 to 1 step .01
C (122°F). The
thermometer. The lens should be kept clean at
+/-1% of reading or 1°C (1.8°F) whichever
-64 to +1400°C (-83.2 to +2552°F)
(K type; probe not included.)
119.2*47.5*171.8 mm (4.7×1.87×6.76 inch)
12:1(90% energy covered)
Tobj=-60~0: ±(2+0.05/°C)°C, Tobj=0~550:
0.1°C/0.1°F at -83.2 to 999.9(°C/°F), otherwise 1°C/1°F
greater (Test under Tamb=23±6°C)
all times, care should be taken when cleaning
o
F)
-64 to +1400°C (-83.2 to +2552°F)
255.7 grams(9.02 oz) including batteries (AAA*2pcs)
Typ.180, min 140 hours continuous use (Alkaline, without Laser and Back Light.)
±2% of reading or 2°C (4°F) whichever is greater
Thermocouple Probe Scan function
1sec
the lens using only a soft cloth or cotton swab
o
o
C (18
F).
0.95 default – adjustable 0.1 to 1 step .01
119.2*47.5*171.8 mm (4.7×1.87×6.76 inch)
12:1(90% energy covered)
(K type; probe not included.)
with water or medical alcohol. Allowing the lens
plenty
of time (minimum 30 minutes) to stabilize to the wor
0.1°C/0.1°F at -83.2 to 999.9(°C/°F), otherwise 1°C/1°F
255.7 grams(9.02 oz) including batteries (AAA*2pcs)
+/-1% of reading or 1°C (1.8°F) whichever is
Typ.180, min 140 hours continuous use (Alkaline, without Laser and Back Light.)
-64 to +1400°C (-83.2 to +2552°F)
to fully dry before using the thermometer. Do
o
o
C (18
F).
1sec
greater (Test under Tamb=23±6°C)
119.2*47.5*171.8 mm (4.7×1.87×6.76 inch)
+/-1% of reading or 1°C (1.8°F) whichever is
not submerge any part of the thermometer.
12:1(90% energy covered)
255.7 grams(9.02 oz) including batteries (AAA*2pcs)
greater (Test under Tamb=23±6°C)
possible
Thermocouple Probe Scan function
Typ.180, min 140 hours continuous use (Alkaline, without Laser and Back Light.)
o
o
C (18
F).
(K type; probe not included.)
119.2*47.5*171.8 mm (4.7×1.87×6.76 inch)
+/-1% of reading or 1°C (1.8°F) whichever is
-64 to +1400°C (-83.2 to +2552°F)
255.7 grams(9.02 oz) including batteries (AAA*2pcs)
greater (Test under Tamb=23±6°C)
LCD ERROR MESSAGES
o
o
C (18
F).
The thenmometer incorporates
'Battery Exhausted': measurements are not
LCD ERROR MESSAGES
+/-1% of reading or 1°C (1.8°F) whichever is
possible
The thenmometer incorpor
�J
greater (Test under Tamb=23±6°C)
,f,-2
B attery Low': battery needs to be
'
'
B attery Exhausted': measurements
o
o
C (18
F).
o
o
C (18
F).
Thermocouple Probe Scan function
o
o
slJJuld
be replaced immediately with AAA, 1.5V batteries.
C (18
F).
• Multi-Beams Laser
(K type; probe not included.)
specify the approximate
-64 to +1400°C (-83.2 to +2552°F)
.m
BATTERIES
measurement area for better
store the batteries in a cool, dry place.
• Multi-Beams Laser
The thermometer incorporates
1 ·Mf\ M
o
o
C (18
F).
1
1
specify the approximate
1® Mr1
F).
BATTERIES
measurement area for better
plenty
of time (minimum 30 minute
+/-1% of reading or 1°C (1.8°F) whichever is
'
B attery OK': measurem
The thermometer incorpor
1 ·Mf\ M
Ref.No.:082018
1 ®M !iiii
1
°
greater (Test under Tamb=23±6°C)
F)
1
1® Mr1
a.I: ..
'.ii'(
'. : .
f.,
BATTERY REPLACEMENT
O
• (t
1. Loosen the screw and pull o
a.I: ..
HACCP CliECK
2. Replace and reinstall with n
'.ii'(
'. : .
f.,
BATTERY REPLACEMEN
3. Place the battery cover(®)
Ref.No.:082018
HACCPCHECK
O
&
• (t
1. Loosen the screw and p
When the 'Low Battery' ic
HACCP CliECK
2. Replace and reinstall w
Ref.No.:082018
Please note: It is importan
3. Place the battery cover
&
HACCPCHECK
Dispose of used battery p
&
&
Ref.No.:082018
If the device is not to be u
o
o
C(32°F)~50
C (122°F). T
o
o
C(32°F)~50
C (122°F). T
o
o
C(32°F)~50
C (122°F). T
o
C (122°F). The
o
o
C(32°F)~50
C (122°F). Th
possible
possible
possible
possible
C (122°F). The
°
°
°
C(32
F)-S0
C(122
Ref.No.:0820
, 111 /
Ref.No.:0820
-D-
/L !'-
,£,-
J
Ref.No.:0820
possible
,f,-2
,£
,E
J
Ref.No.:08201
rj
,E
,H,
CLo
rj
J
,H,
CL
J
��
��
are possible
Ref.No.:082018
B attery OK': measu
'
are possib
When the 'Low Batte
Please note: It is imp
Advertisement

Related Manuals for Traceable 4487


Summary of Contents for Traceable 4487
- Page 1 / TN498LCHE(with white LED Flashlight) Thermometer Operating Instructions Traceable® Circle Laser Infrared Thermometer HACCP Check Indicator LED...
- Page 2 Thermometer with support@traceable.com Type K Input traceable.com Traceable Products are ISO 9001:2018 Quality- Instructions ® Certifi ed by DNV and ISO/IEC 17025:2017 accredited as a Calibration Laboratory by A2LA. Item No. 94460-89 Model No. 4487 ©2023 1065TR_M_92-4487-00 Rev. 0 041223...
Need help?
Do you have a question about the 4487 and is the answer not in the manual?
Questions and answers