Table of Contents
Advertisement
Quick Links
1.800.561.8187
BEGIN SET UP
Unit is powered by (4) AAA batteries.
Install batteries into battery compartment on
back of device. Make sure batteries are in correct
polarity and good contact.
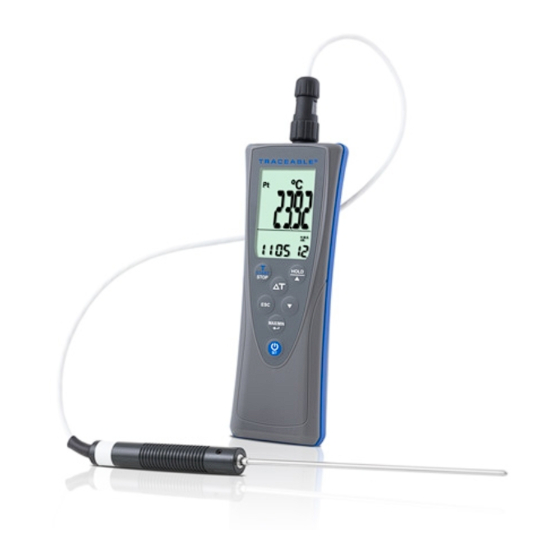
Probe Connection Port
Small notch in Connection Port will help easily
install probe the correct way. Once probe is
aligned with notch, push slightly and then screw
probe guard to lock in place.
LCD
SYMBOLS
Upper LCD Temperature reading
Lower LCD Real time display
Pt
RTD (Pt) type thermo probe
HOLD
Readings are frozen unchanged
MIN/MAX
Minimum/Maximum readings
Low battery indicator
Temperature Alarm indicator
°C/°F
Celsius/Fahrenheit of temp.
REC
Manual logging
RECALL
Recall mode
D-M-Y
Day-Month-Year
H:M:S
Hour-Minute-Second
AM
AM
PM
PM
www.
.com
BUTTONS
Power Button—Powers on and off meter.
Press and hold to enter setup mode while
meter is on.
Turn on with
to become non-sleep mode
Recall/ESC (Escape) Button—Press to enter
recall mode.
Exits setup/recall /max/min mode.
Differential Button—Press to show differential
temperature.
Press again to return to normal.
HOLD Button—Freezes current readings.
Selects unit or increases value in setup.
Cancels data hold function.
Memory Button—Press to record reading into
memory. Selects unit or decreases value in
MIN/MAX Button— Activates MIN/MAX
function. Saves and finishes settings.
Timer Start/Stop Button— Activates or deac-
tivates timer
OPERATION
POWER ON/OFF
Press
to turn the meter on and off. Full
display is shown for 3 seconds, then enters normal
mode.
AUTO POWER OFF
The meter turns off automatically after 10 minutes
of inactivity. To override the function, while the me-
ter is off, hold down
and
turn on the meter until 'n" appears.
Fig. 1
DATE&TIME
The LCD can show time-of-day. While the meter is
on, press
for 2 seconds to enter setup mode.
Press
or
to select P40 and press
to enter.
Press
or
to adjust the number of the year
then press
to save. Repeat above to finish
month and date setup.
Press
to enter time format selection. 12 & 24
hour time formats are selectable. Press
information@itm.com
for 2 seconds to
or
Advertisement
Table of Contents

Related Manuals for Traceable RTD PLATINUM 4132


Summary of Contents for Traceable RTD PLATINUM 4132
- Page 1 BEGIN SET UP BUTTONS Unit is powered by (4) AAA batteries. Power Button—Powers on and off meter. Install batteries into battery compartment on Press and hold to enter setup mode while back of device. Make sure batteries are in correct meter is on.
- Page 2 In case of fast temperature changes, press to choose format and press to save. first to freeze a value as baseline and then press Continue to setup hour/min/sec by pressing to activate the temperature change display to adjust number and then press function.
- Page 3 SET COUNT DOWN TIMER When entering setup mode, P10 and ( Fig .13) are displayed on LCD. Press to go enter. Press to adjust the timer value you need from hour to second. (Fig.14) Then, press to save. Press to exit. TEMPERATURE ALARM When entering setup mode, P20 and (Fig.15)
- Page 4 E03: The value is over range. E31: Temperature sensor is damaged. E32: Memory IC damaged. WARRANTY, SERVICE, OR RECALIBRATION For warranty, service, or recalibration, contact: TRACEABLE® PRODUCTS Traceable Products are ISO 9001:2018 Quality- ® Certi ied by DNV and ISO/IEC 17025:2017 accredited as a Calibration Laboratory by A2LA.
Need help?
Do you have a question about the RTD PLATINUM 4132 and is the answer not in the manual?
Questions and answers