
Related Manuals for Totally Wicked OPAL


Summary of Contents for Totally Wicked OPAL
- Page 1 USER MANUAL TW-Opal-Manual-UK.indd 1 TW-Opal-Manual-UK.indd 1 21/06/2023 13:47 21/06/2023 13:47...
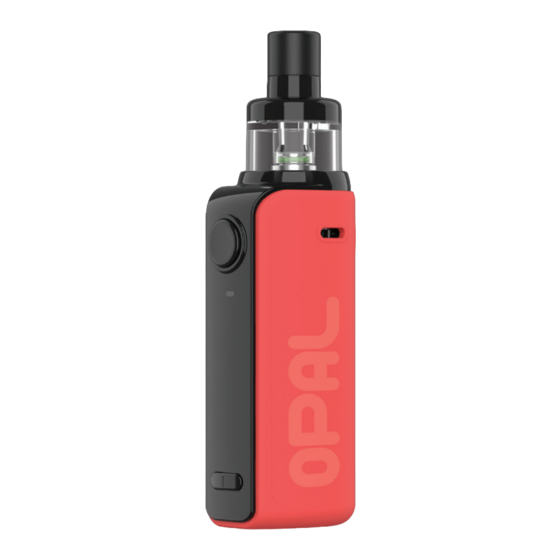
- Page 2 YOUR OPAL KIT YOUR Mouthpiece Top cap Filling port Cartridge Atomizer head Airflow control ring Power button Adjustment buttons charging port TW-Opal-Manual-UK.indd 2-3 TW-Opal-Manual-UK.indd 2-3 21/06/2023 13:47 21/06/2023 13:47...
- Page 3 REMOVE THE CARTRIDGE QUICK START GUIDE TW-Opal-Manual-UK.indd 4-5 TW-Opal-Manual-UK.indd 4-5 21/06/2023 13:47 21/06/2023 13:47...
- Page 4 PRIME THE FIT THE ATOMIZER HEAD ATOMIZER HEAD Wait 5 minutes before vaping a new atomizer head. TW-Opal-Manual-UK.indd 6-7 TW-Opal-Manual-UK.indd 6-7 21/06/2023 13:47 21/06/2023 13:47...
- Page 5 REATTACH THE CARTRIDGE FILL THE CARTRIDGE Push and slide the top cap where marked to reveal the filling port. Insert e-liquid nozzle and fill. TW-Opal-Manual-UK.indd 8-9 TW-Opal-Manual-UK.indd 8-9 21/06/2023 13:47 21/06/2023 13:47...
-
Page 6: Turn Power On
ADJUST AIRFLOW TURN POWER ON On/Off TW-Opal-Manual-UK.indd 10-11 TW-Opal-Manual-UK.indd 10-11 21/06/2023 13:47 21/06/2023 13:47... - Page 7 SET WATTAGE VAPING Press the up or down Press and hold to vape. buttons to adjust the power. TW-Opal-Manual-UK.indd 12-13 TW-Opal-Manual-UK.indd 12-13 21/06/2023 13:47 21/06/2023 13:47...
-
Page 8: Charge The Battery
CHARGE THE BATTERY USING YOUR OPAL PRIMING THE ATOMIZER HEAD It is important to “prime” a new atomizer head before first use. Failure to do so can damage the atomizer head. Take an atomizer head from the box and remove all packaging, drip a few drops of e-liquid onto the cotton inlets on the side of the atomizer head. - Page 9 FILLING THE TANK SETTING THE WATTAGE Slide the top of the cartridge in the direction The Opal has adjustable wattage that can be indicated by the arrow on the top cap to reveal set from 10-25W in increments of 2 or 3W.
- Page 10 BATTERY LIFE INDICATION The colour of the LED below the power button will change dependant on the level of remaining charge the Opal has. The table below displays what battery percentage each colour indicates. Colour of LED Battery Level...
- Page 11 If the battery voltage drops below 3.3V, the NO ATOMIZER DETECTED PROTECTION LED will flash 20 times and the Opal will not produce vapour. Charge the battery using If no atomizer head is detected, the LED will the steps outlined in “Charging the Battery” to slowly flash until the button is released, and allow normal operation to resume.
-
Page 12: Cleaning And Maintenance
SPECIFICATIONS Note: Do not attempt to clean the atomizer head with water. Do not submerge the Opal battery unit in water or allow it to get wet. Dimensions: 102mm (length) x 25mm (width) x 31mm (depth) -
Page 13: Additional Product Information
15cm from where your device is • Do not attempt to repair a faulty Opal implanted. battery as these are sealed units with no serviceable parts. Attempted repairs will void the warranty. -
Page 14: Warranty
WARRANTY The Opal has a 6 month parts warranty, with the exception of atomizer heads, which are consumable items and covered by “dead on arrival” warranty only. The USB cable supplied has a 12-month warranty. If any parts are found to be faulty within this time, please... - Page 15 Manufactured in China under the authority of Pillbox38 (UK) Ltd, Stancliffe Street, Blackburn, Lancashire, BB2 2QR. Tel: 01254 692244 www.totallywicked.co.uk TW-Opal-Manual-UK.indd 28 TW-Opal-Manual-UK.indd 28 21/06/2023 13:47 21/06/2023 13:47...
Need help?
Do you have a question about the OPAL and is the answer not in the manual?
Questions and answers