Table of Contents
Advertisement
Quick Links
OWNER'S MANUAL
DISHWASHER
Before beginning installation, read these instructions
carefully. This will simplify installation and ensure that the
product is installed correctly and safely. Leave these
instructions near the product after installation for future
reference.
ENGLISH
XD3A25UNS XD3A25UMB
MFL70282471
Rev.05_073123
Copyright © 2021-2023 LG Electronics Inc. All Rights Reserved.
www.lg.com
Advertisement
Table of Contents

Related Manuals for LG XD3A25UNS


Summary of Contents for LG XD3A25UNS
- Page 1 This will simplify installation and ensure that the product is installed correctly and safely. Leave these instructions near the product after installation for future reference. ENGLISH XD3A25UNS XD3A25UMB www.lg.com MFL70282471 Rev.05_073123 Copyright © 2021-2023 LG Electronics Inc. All Rights Reserved.
-
Page 2: Table Of Contents
Wash Cycles ......................27 Options and Extra Functions ................28 Programme Table ....................31 Information for Energy Test (AS/NZS 2007)..........33 Loading the Dishwasher .................33 Adding Cleaning Agents..................39 Refilling......................40 Useful Tips......................41 SMART FUNCTIONS LG ThinQ Application ..................42 Smart Diagnosis ....................44 MAINTENANCE Cleaning and Caring ..................46... - Page 3 TROUBLESHOOTING Before Calling for Service................50...
-
Page 4: Safety Instructions
SAFETY INSTRUCTIONS SAFETY INSTRUCTIONS READ ALL INSTRUCTIONS BEFORE USE The following safety guidelines are intended to prevent unforeseen risks or damage from unsafe or incorrect operation of the appliance. The guidelines are separated into ‘WARNING’ and ‘CAUTION’ as described below. Safety Messages This symbol is displayed to indicate matters and operations that can cause risk. - Page 5 • Do not modify the power cord provided with the appliance. Please contact the LG Customer information centre to advise of its incompatibility. • This appliance should only be transported by two or more people holding the appliance securely.
- Page 6 • Connect the ground wire to the green ground connector in the terminal box. Operation • Immediately unplug the power plug and contact an LG Electronics customer information centre if you detect a strange sound, odour, or smoke coming from the appliance.
- Page 7 • In case of flood, disconnect the power plug and contact the LG Electronics Customer Information Centre. • Under certain conditions, hydrogen gas may be produced in a hot- water system that has not been used for two weeks or more.
- Page 8 SAFETY INSTRUCTIONS • Do not operate the appliance unless all enclosure panels are properly in place. • Use only detergents or wetting agents recommended for use in a appliance and keep them out of the reach of children. • Do not wash and dry articles that have been soaked in explosive substances such as gasoline, solvents, solvent-based detergent.
-
Page 9: Caution
SAFETY INSTRUCTIONS Maintenance • Never unplug the appliance by pulling on the power cable. Always grip the power plug firmly and pull straight out from the socket outlet. • Securely plug the power plug in the socket outlet after completely removing any moisture and dust. - Page 10 SAFETY INSTRUCTIONS Operation • Turn off the water tap and unplug the appliance if the appliance is to be left for an extended period of time, such as during vacations. • Do not place objects on the top of the appliance. •...
-
Page 11: Installation Parts And Specifications
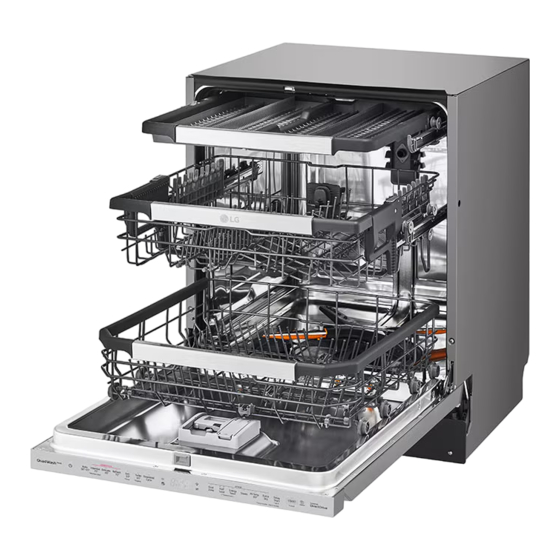
INSTALLATION INSTALLATION Parts and Specifications NOTE • Appearance and specifications may change without notice to improve the quality of the appliance. Front View Interior View Control Panel & Door Handle Top Wash Impeller Front Cover Upper Spray Arm Levelling Feet Lower Spray Arm Power Cord Salt Container Cap... - Page 12 Side Fixable Screws (Φ 4.5 x 12 mm) Installation Brackets Bracket Fixing Screws (Φ 4 x 12 mm) Lower Cover Specifications Model XD3A25UNS / XD3A25UMB Power Supply 220 - 240 V~, 50 Hz Dimension 600 mm X 815 mm X 567 mm (Width X Height X Depth) Product Weight Approx.
-
Page 13: Preparing Cabinet Opening
INSTALLATION Preparing Cabinet Opening NOTE Choosing the Proper Location • This installation must be conducted by qualified service personnel to ensure it has been installed correctly. • Do not pull or lift the appliance using the handle; dosing so can damage the door and hinges. Open the door and grab the body frame and the top front opening of the tub to move or lift the appliance. -
Page 14: Levelling The Appliance
INSTALLATION Levelling the Appliance Clean and dry the underside of the counter top on which the tape will be attached. Checking the Level Levelling the appliance prevents unnecessary leakage and poor washing. Check whether the appliance is perfectly level after installation. •... - Page 15 INSTALLATION Adjusting Back Levelling Feet Check the opening of door and repeat if necessary until the door opens and closes • Use a phillips screwdriver to adjust the rear properly. levelling foot and the rear of the tub using the centre screw at the base of the appliance in the front.
- Page 16 INSTALLATION Attaching a Custom Kick Plate NOTE • Please ensure that the height levelling of the Adjust the position of the installation brackets dishwasher is done by adjusting the feet before by bending the metal tab. installing the side cabinet securing screws. Attaching the Lower Cover Adjust the position of the installation brackets by bending the metal tab.
-
Page 17: Installing The Drain Hose
INSTALLATION Installing the Drain Hose Case 3 The custom Kick Plate is connected, and the dishwasher is in the middle of the kitchen If the end of the drain hose does not fit to the drain cabinet. (Using the brackets is not required.) line, use a drain extension kit (optional) that is resistant to heat and detergent. -
Page 18: Preparing Water And Electrical Connections
INSTALLATION Preparing Water and Method 1 Electrical Connections When the drain hose is connected to a waste spigot, the hose must be looped up to the underside of the bench top and secured. Connecting the Hose to the Water Tap Connect the water supply hose to the water tap. -
Page 19: Final Installation Check
INSTALLATION Final Installation Check • Use sealant tape or sealing compound on the tap’s thread to avoid water leaks. Testing the Dishwasher • Make sure that the line is not kinked or sharply bent. Turn on electrical power. NOTE • Before connecting the water supply hose to the Turn on house water supply. - Page 20 INSTALLATION Error Possible Cause and Solution Code Water supply line kinked under dishwasher. • Feed the drainage and supply hoses through the hole under the sink. Then gradually slide the dishwasher into the cabinet while pulling on the hoses under the sink to take up any slack.
-
Page 21: Operation Operation Overview
OPERATION OPERATION Operation Overview Load the dishes in the rack. • Make certain that no dishes or utensils are in Using the Appliance the path of the spray arms. • Do not place one dish on top of another. Press the Power button. •... -
Page 22: Before Using
OPERATION Set the softening system level of the appliance NOTE according to the water hardness level. • Never use liquid dishwashing detergent in the appliance. • It is not recommended to rinse the dishes manually before operating the dishwasher because it increases water and energy consumption. - Page 23 OPERATION Water Hardness Table Water Hardness Softening mmol/l mg/l level °d °e °f Range (Ca+Mg) (Ca) <4 <5 <7 <0.7 <29 Soft 4 - 7 5 - 9 7 - 13 0.7 - 1.3 29 - 50 7 - 14 9 - 17.5 13 - 25 1.3 - 2.5...
- Page 24 OPERATION When refilling the salt, use a funnel. Refer to rust or damage to the appliance if the left Before Using section. unwashed. NOTE Refit the cap tightly. • The salt can be purchased from salt distributors. Run the Rinse cycle without dishes. Salt Refill Cycle (1 kg for each load) Adding Rinse Aid The Rinse Aid indicator appears in the display...
- Page 25 OPERATION Close the lid to lock the dispenser. Rinse aid is NOTE dispensed automatically during the final rinse • The Rinse Aid Refill icon will illuminate when cycle. more rinse aid is needed. CAUTION • If you notice cloudy spots, streaks or water marks on the glassware after washing, increase •...
-
Page 26: Control Panel
OPERATION Control Panel Control Panel Features For Steam Models Power • Press Power button to turn power on and off. • After the cycle is complete, the power automatically turns off for purposes of safety and economy. • If there is a power surge, power outage, or disruption of any kind, power is automatically turned off for safety. -
Page 27: Wash Cycles
OPERATION Chime On/Off • To activate or deactivate the button sounds, press and hold Dual Zone and Energy Saver simultaneously for 3 seconds. The error alert sound cannot be turned off. Cancel • The drain pump activates and the cycle cancels. Once the appliance finishes draining, the power turns off. -
Page 28: Options And Extra Functions
OPERATION Machine Clean Dual Zone This cycle is for cleaning the inside of the appliance. This option automatically sets the spray intensity to Use the cycle without dishes in the appliance. It soft for the upper spray arm and strong for the eliminates residual soils, odor, white spots, lower spray arm. - Page 29 OPERATION • When the rinse aid is empty, this option is The Auto Open Dry feature enhances the drying selected automatically. performance by opening the door automatically during the drying stage within the displayed program time. For optimum drying results wait until the program ends before unloading the Delay Start dishwasher.
- Page 30 OPERATION Red (left) The red lamp flashes when the appliance encounters an error. For more information about the error, see the Error Code part of the TROUBLESHOOTING section. White (middle) The white lamp flashes when you select an option cycle or when a cycle has been paused. •...
-
Page 31: Programme Table
OPERATION Programme Table Programme Guide Wash Rinse Program Soil Level Pre-wash Main wash Rinse Heating rinse Auto All levels (50 - 55 ℃) (70 ℃) Intensive Heavy (75 ℃) (70 ℃) Delicate Light (45 ℃) (70 ℃) Refresh (75 ℃) Moderate (53 ℃) (70 ℃) - Page 32 OPERATION Available Options NOTE • The Energy Saver option is not available with the Hi-Temp. or Extra Dry option. Programm Dual Half Energy Delay Steam Hi-Temp. Extra Dry Zone Load Saver Start Auto Intensive Delicate Refresh Turbo Express Rinse Machine Clean Download Cycle...
-
Page 33: Information For Energy Test (As/Nzs 2007)
OPERATION Information for Energy Knives Test (AS/NZS 2007) Upper Rack Appliance loaded in accordance with standardspecifications. For Model with Cutlery Rack • Model: XD3*25U** • Capacity: 15 place settings • Comparability programme: Eco + Energy Saver • Rinse Aid setting: L4 •... - Page 34 OPERATION • Remove large particles of food debris from plates including bones etc. before loading. Always rinse off plates when loading if they are not to be washed immediately. • Items with burnt on food should be soaked prior to loading the dishwasher. •...
- Page 35 OPERATION Folding Down the Rack Tines • Water proof or long lasting lipstick smudges on glasses may not be removed during the wash. Fold tines down to fit larger dishes; pull tines back up to fit smaller dishes. Loading the Lower Rack Daily Use Load The lower rack is suitable for dinner plates, soup bowls, dishes, pots, pans, lids and even a grill tray.
- Page 36 OPERATION Removing and Replacing Cup The cup racks provide support for long steam glasses. Racks The left and right cup racks are interchangeable and can be removed. Slide cup rack down into its closed position. The left side row of tines can be folded down or the cup racks can be folded up out of the way for tall crockery items.
- Page 37 OPERATION Raising the Rack Slide cup rack off support bar on opposite side. Lift the rack at the centre of each side until the rack locks into place in the upper position. It is not necessary to lift the lock levers to raise the rack. Reverse instructions to replace cup rack.
- Page 38 OPERATION rack help keep utensils separated to avoid damage NOTE and improve cleaning. • To set the rack to the middle position, it may be easier to lower the rack all the way down and then raise each side of the rack individually until it clicks into place.
-
Page 39: Adding Cleaning Agents
OPERATION of different sizes. Remove dishes before adjusting • The amount of detergent needed depends on the tray. Adjust the tray by sliding the lever. the cycle, load size, and soil level of dishes. • Put detergent into the detergent compartment before starting any cycle, except the Rinse cycle. -
Page 40: Refilling
OPERATION • Use of an unsuitable detergent and rinse aid Amount of detergent may result in a risk of damage, corrosion, poor washing results, poor drying or leakage. Programme Pre-wash Main wash • Only use the detergent and rinse aid that has (onto the lid) (dispenser) been qualified with standard. -
Page 41: Useful Tips
OPERATION any spilled salt inside the appliance may cause rust or damage to the appliance if the left unwashed. When the salt refill icon illuminates, it means the salt is almost empty. If necessary, refill the salt chamber. CAUTION • Do not add detergent or any other solution into the water softener housing other than dishwasher salt. -
Page 42: Smart Functions
When the cycle is complete or the appliance has problems, you have the option of receiving push Run the LG ThinQ application and sign in with notifications on a smartphone. The notifications your existing account or create an LG account are triggered even if the LG ThinQ application is to sign in. - Page 43 Internet service provider or refer to your Run the LG ThinQ application. wireless router manual. • LG ThinQ is not responsible for any network connection problems or any faults, Select and touch the Dishwasher in the malfunctions, or errors caused by network application.
-
Page 44: Smart Diagnosis
• Only one wireless module applies to the product. LG ThinQ application. • Launch the LG ThinQ application and select the Smart Diagnosis feature in the menu. Follow the instructions provided in the LG ThinQ Open Source Software Notice application. - Page 45 SMART FUNCTIONS After the data transfer is complete, the diagnosis will be displayed in the application. NOTE • For best results, do not move the smartphone while the tones are being transmitted.
-
Page 46: Maintenance
MAINTENANCE MAINTENANCE To maintain performance and prevent problems, Food residue may be stuck in the narrow gaps check the outside and inside of the appliance, inside the appliance after completion of washing. including filters and spray arms regularly. Wipe off all food residue. WARNING •... - Page 47 MAINTENANCE white vinegar into shallow bowl and place in upper Clean the filters with a soft brush under rack. Run Auto cycle. Do not use detergent. When running water. Reassemble the filters before the cycle is finished, restart. reinstalling them. CAUTION •...
- Page 48 MAINTENANCE Cleaning the Upper Spray Arm NOTE • When assembling, rotate it firmly until it clicks. Pull the upper rack forward. Make sure that the water jet holes are not blocked by food particles. When cleaning is necessary, remove the upper spray arm by turning the nut on the bottom of the spray arm 1/8 turn counterclockwise and pulling down.
- Page 49 MAINTENANCE After cleaning the upper spray arm, press it up Refit the filter and gasket and make sure that it into place. Turn the nut 1/8 turn clockwise to is sitting correctly. make sure that the nut locks back into place. Refit and secure the water supply hose in reverse order.
- Page 50 The appliance is equipped with an automatic error-monitoring system to detect and diagnose problems at an early stage. If this appliance does not function properly or does not function at all, check the following before you call LG Electronics service centre. Symptoms Possible Cause &...
- Page 51 TROUBLESHOOTING Symptoms Possible Cause & Solution Motor trouble • Call for service if the same problem occurs again. Vario motor trouble • Call for service if the same problem occurs again. Operation Symptoms Possible Cause & Solution Noise Some level of noise is normal during operation. •...
- Page 52 TROUBLESHOOTING Symptoms Possible Cause & Solution Water remains in sump Water may remain if the power supply was lost before normal end of the after completion of course or was manually disconnected. cycle. • Re-start the course. Sprays arms do not Holes of spray arms are blocked by food particles.
- Page 53 TROUBLESHOOTING Symptoms Possible Cause & Solution Yellow or brown film Coffee or tea stains on inside surfaces of • Eliminate the stain by using a stain removal product. appliance Yellow water remains When initially using the appliance, Yellow water may generate in the inside the dishwasher.
- Page 54 TROUBLESHOOTING Symptoms Possible Cause & Solution Odour There is food in the bottom of the unit or in the filter. • Clean the filter and the interior according to the MAINTENANCE section of the owner’s manual. Unwashed dishes are left in the unit for a long time. •...
- Page 55 • Find the Wi-Fi network connected to your smartphone and remove it, then not connected to the register your appliance on LG ThinQ. Wi-Fi network. Mobile data for your smartphone is turned on. • Turn off the Mobile data of your smartphone and register the appliance using the Wi-Fi network.
Need help?
Do you have a question about the XD3A25UNS and is the answer not in the manual?
Questions and answers