Table of Contents
Advertisement
Available languages
Available languages
Quick Links
MASCHIO GASPARDO S.p.A.
MONICA
IT
USO E MANUTENZIONE
EN
USE AND MAINTENANCE
DE
GEBRAUCH UND WARTUNG
FR
EMPLOI ET ENTRETIEN
ES
EMPLEO Y MANTENIMIENTO
Cod. G19502562
2010-02
*)
*) Valido per Paesi UE
*) Valid for EU member countries
*) Valable dans les Pays UE
*) Gilt für EU-Mitgliedsländer
*) Válido para Países UE
Advertisement
Table of Contents

Related Manuals for Gaspardo MONICA


Summary of Contents for Gaspardo MONICA
- Page 1 MASCHIO GASPARDO S.p.A. MONICA USO E MANUTENZIONE USE AND MAINTENANCE GEBRAUCH UND WARTUNG EMPLOI ET ENTRETIEN EMPLEO Y MANTENIMIENTO *) Valido per Paesi UE *) Valid for EU member countries *) Valable dans les Pays UE *) Gilt für EU-Mitgliedsländer Cod.
-
Page 2: Table Of Contents
ITALIANO ENGLISH DEUTSCH INDICE INDEX INHALT Premessa Introduction Vorwort Garanzia Guarantee Garantie 1.1.1 Scandenza garanzia 1.1.1 Expiry of guarantee 1.1.1 Verfall des Garantieanspruchs Descrizione della seminatrice Description of the seeder Beschreibung der Sämaschine Dati tecnici Technical data Technische Daten Identificazione Identification Identifizierung Movimentazione... - Page 3 FRANÇAIS ESPAÑOL TABLES DE MATIERES INDICE Introduction Premisa Garantie Garantía 1.1.1 Expiration de la garantie 1.1.1 Vencimiento de la garantía Description du semoir Descripción de la sembradora Donnees techniques Datos técnicos Identification Identificacíon Manutention Desplazamiento Dessin global Diseño general signaux d'avertissement Señales de advertencia 2.1.1 Signaux de recommandation...
- Page 4 cod. G19502562...
-
Page 5: Premessa
ITALIANO 1.2 DESCRIZIONE DELLA SEMINATRICE 1.0 PREMESSA La seminatrice di precisione “MONICA” è una macchina partico- larmente adatta per semine di precisione, per impieghi poliva- Questo manuale descrive le norme d’uso e di manutenzione per lenti e con qualsiasi tipo di seme su terreni lavorati, preparati la seminatrice. -
Page 6: Dati Tecnici
ITALIANO USO E MANUTENZIONE 1.3 DATI TECNICI U.M. MONICA 250 Numero max file [nr.] Interfila standard [cm] 45-50 - 70-75 Larghezza telaio 4,00 Larghezza telaio chiuso 2,55 Capacità tramoggia seme Capacità tramoggia concime 650x2 Presa di forza [g.p.m.] Peso (*) -
Page 7: Movimentazione
ITALIANO USO E MANUTENZIONE 1.5 MOVIMENTAZIONE ATTENZIONE! Il Cliente deve applicare quanto previsto dalle Direttive Comunitarie CEE 391/89 e 269/90 e modifiche successive, per quel che riguarda il rischio da movimentazione manuale dei carichi per gli addetti alle operazioni di carico e scarico. Durante le operazioni di movimentazione, utilizzare gli idonei dispositivi di protezione individuale: Tuta Guanti... -
Page 8: Disegno Complessivo
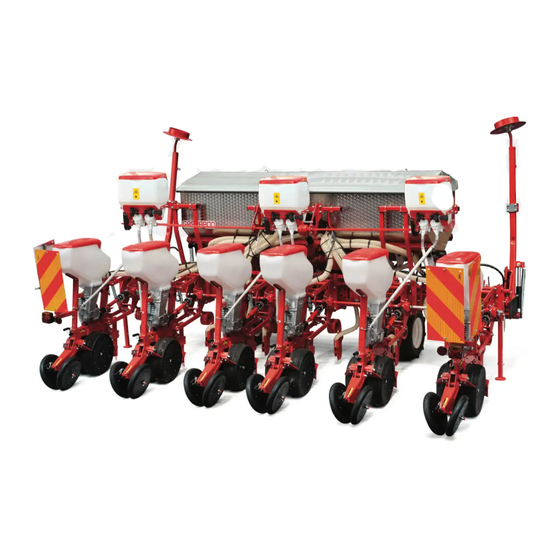
ITALIANO USO E MANUTENZIONE 1.6 DISEGNO COMPLESSIVO (fig. 3) Distributore semi Serbatoio concime 12 Cardano per moto seminatore Depressore 13 Ruote di profondità Vacuometro 14 Telaio Distributore aria 15 Targhetta di identificazione Serbatoio sementi 16 Regolatore distribuzione fertilizzante (Minimax) Regolatore profondità di semina 17 Comando segnafile Ruote di compressione 18 Attacco presa di potenza... -
Page 9: Segnali Di Sicurezza
ITALIANO USO E MANUTENZIONE 1.7 SEGNALI DI SICUREZZA I segnali descritti sono riportati sulla macchina (Fig. 4). Tenerli 7) Pericolo di schiacciamento in fase di chiusura. Tenersi a puliti e sostituirli se staccati o illeggibili. Leggere attentamente debita distanza dalla macchina. quanto descritto e memorizzare il loro significato. -
Page 10: Norme Di Sicurezza E Prevenzione Infortuni
ITALIANO USO E MANUTENZIONE 2.0 NORME DI SICUREZZA E PREVENZIONE 15) Prima di abbandonare il trattore, abbassare l’attrezzatura agganciata al gruppo sollevatore, arrestare il motore, inseri- INFORTUNI re il freno di stazionamento e togliere la chiave di accensio- ne dal quadro comandi, assicurarsi che nessuno possa Fare attenzione al segnale di pericolo, dove riportato, in que- avvicinarsi alle sostanze chimiche. - Page 11 ITALIANO USO E MANUTENZIONE Circolazione su strada Albero cardanico 29) Per la circolazione su strada, è necessario attenersi alle 38) L’attrezzatura applicata, può essere comandata solo con al- normative del codice stradale in vigore nel relativo Paese. bero cardanico completo delle necessarie sicurezze per i 30) Gli eventuali accessori per il trasporto devono essere muniti sovraccarichi e delle protezioni fissate con l’apposita di segnalazioni e protezioni adeguate.
- Page 12 ITALIANO USO E MANUTENZIONE Sicurezza relativa all’idraulica Manutenzione in sicurezza 53) Al momento dell’allacciamento dei tubi idraulici all’impianto Durante le operazioni di lavoro e manutenzione, utilizzare gli idraulico del trattore, fare attenzione che gli impianti idraulici idonei dispositivi di protezione individuale (es.): della macchina operatrice e della trattrice non siano in pres- sione.
-
Page 13: Norme D'uso
ITALIANO USO E MANUTENZIONE 3.0 NORME D’USO Per ottenere le migliori prestazioni dell’attrezzatura, seguire at- tentamente quanto di seguito riportato. ATTENZIONE Tutte le operazioni di manutenzione, regolazione e di approntamento alla lavorazione, devono essere eseguite tas- sativamente con presa di forza del trattore disinserita, semi- natrice al suolo sui piedini di appoggio, trattore spento, ben fermo e chiave disinserita. -
Page 14: Sgancio Della Seminatrice Dalla Trattrice
ITALIANO USO E MANUTENZIONE 3.2 ADATTAMENTO ALBERO CARDANICO 3.1.2 SGANCIO DELLA SEMINATRICE DALLA TRATTRICE L’albero cardanico, fornito con la macchina, è di lunghezza standard. Si può quindi rendere necessario l'adattamento dell'albero cardanico. In questo caso prima di intervenire sull'albero cardanico, interpellare PERICOLO il Costruttore del medesimo per l'eventuale adattamento. -
Page 15: Seminatrice Trattore
ITALIANO USO E MANUTENZIONE 3.3 STABILITA’ IN TRASPORTO SEMINATRICE-TRATTORE Quando una seminatrice viene accoppiata al trattore, divenendo ai fini della circolazione stradale parte integrante dello stesso, la stabilità del complesso trattore-seminatrice può variare causan- do difficoltà nella guida o nel lavoro (impennamento o sbandamento del trattore). -
Page 16: Telaio Telescopico
ITALIANO USO E MANUTENZIONE 3.4.1 DESCRIZIONE DEL FUNZIONAMENTO 3.4 TELAIO TELESCOPICO Il telaio della macchina permette di far scorrere longitudinalmente L’attrezzatura è idonea esclusivamente per l’impiego indicato. le travi tubolari sulle quali vengono portati gli elementi di semina Ogni altro uso diverso da quello descritto in queste istruzioni laterali (Fig. - Page 17 3.5 IMPOSTAZIONE INTERFILA 3.5.1 IMPOSTAZIONE DELL’INTERFILA L’impostazione dell’interfila di semina sulla semiantrice modello Le seminatrice MONICA permette di modificare la distanza tra le MONICA si ottiene cambiando la posizione dei perni sulle aste file di semina da 40-50-70-75 cm. di fine corsa A e B (Fig. 15): A - asta di fine corsa del telaio telescopico;...
- Page 18 ITALIANO USO E MANUTENZIONE cod. G19502562...
- Page 19 ITALIANO USO E MANUTENZIONE cod. G19502562...
-
Page 20: Selezione Del Seme
ITALIANO USO E MANUTENZIONE 3.6 SELEZIONE DEL SEME 3.6.1 DISTRIBUTORE SEMI All’interno dei distributori (Fig. 16) va montato un disco (1 Fig. 16) scelto in funzione della dimensione del seme (il seme non deve in nessun modo poter entrare nel foro). I semi, che per risucchio vanno a tappare i fori del disco, verran no poi rilasciati sul terre- no. -
Page 21: Aspiratore
ITALIANO USO E MANUTENZIONE fig. 21 fig. 20 REGOLAZIONE DEL SELETTORE fig. 22 Spostando l’indice (1 Fig. 20) si comanda un cursore (2 Fig. 20) che sfiora il disco in prossimità dei fori, provocando la caduta dei semi in eccesso. Il selettore si regola ad ogni cambio di seme e di disco, verso i numeri bassi per semi piccoli (A Fig. - Page 22 ITALIANO USO E MANUTENZIONE 3.6.3 REGOLAZIONI PER LA DISTRIBUZIONE Tabella 3 TABELLA INVESTIMENTO SEMI cod. G19502562...
-
Page 23: Regolazioni Per La Distribuzione
ITALIANO USO E MANUTENZIONE REGOLAZIONI PER LA DISTRIBUZIONE 1) Dalla Tabella Investimento Semi: Le regolazioni per la distribuzione devono essere fatte in base a: In base all'interfila della seminatrice ed all'investimento di semi - tipo di seme da distribuire; per ettaro desiderato, ricavare la distanza longitudinale di semi- - distanza langitudinale tra seme e seme. - Page 24 ITALIANO USO E MANUTENZIONE fig. 26 3) Dalla Tabella Distanze Longitudinali di Semina (Tabella 5): - Cercare la tabella che riporta la coppia di pignoni uguali a quel- la della seminatrice; - Ricercare il valore della distanza longitudinale di semina pre- cedentemente ricavato.
- Page 25 ITALIANO USO E MANUTENZIONE TABELLA DISTANZE LONGITUDINALI DI SEMINA Tabella 5 4 - 4 4 - 3 4 - 2 4 - 1 3 - 4 3 - 3 3 - 2 3 - 1 2 - 4 2 - 3 2 - 2 2 - 1 1 - 4...
-
Page 26: Deposizione Del Seme
ITALIANO USO E MANUTENZIONE 3.7 DEPOSIZIONE DEL SEME 3.7.1 ELEMENTO SEMINATORE Per ottenere una corretta ed omogenea profondità d’interramen- to dei semi, è necessario compiere alcune semplici regolazioni sugli elementi seminatori. Regolare la profondità di semina variando l’altezza delle ruote laterali (1 Fig. -
Page 27: Esclusione Del Seminatore
ITALIANO USO E MANUTENZIONE 3.7.4 ESCLUSIONE DEL SEMINATORE Spegnere il trattore e disinserire la chiave di avviamento motore. Alzare il singolo seminatore da terra nel seguente modo: - Ruotare la farfalla (1 Fig. 32) della leva di aggancio in senso antiorario. -
Page 28: Segnafile
ITALIANO USO E MANUTENZIONE 3.8 MARCAFILE Il segnafile è un dispositivo che traccia una linea di riferimento sul terreno, parallela al tragitto del trattore. Quando il trattore avrà terminato la corsa e invertito la marcia, si procederà correndo sulla linea di riferimento con una delle ruo- te anteriori (L1, Fig. -
Page 29: Regolazione Dischi Marcafile
ITALIANO USO E MANUTENZIONE 3.8.1 REGOLAZIONE DISCHI MARCAFILE n° file nr.rows Reihen. Segnafile con traccia sulla ruota della trattrice (L1) Nr. Rangs Ricavare dalla Tabella 6 la distanza (L1 Fig. 36) alla quale il nr. Hileras 1575 disco deve tracciare la linea di riferimento. Portare il disco alla 1150 1100 1050 1000 1750 distanza corretta, inclinarlo leggermente e serrare a fondo i dadi... -
Page 30: Distribuzione Dei Prodotti Chimici
ITALIANO USO E MANUTENZIONE 3.9 DISTRIBUZIONE DEI PRODOTTI CHIMICI La distribuzione dei prodotti fertilizzanti e dei prodotti insetticida, avviene per mezzo di appositi dosatori (Fig. 42) montati sotto ai rispettivi serbatoi. La regolazione dei dosatori avviene ruotando la ghiera (1 Fig. 42). In base alla regolazione dei dosatori ed al peso specifico del prodotto, dalle tabelle di seguito riportate si può... -
Page 31: Speedy Set
ITALIANO USO E MANUTENZIONE 3.9.2 SPEEDY SET fig. 46 Il serbatoio spandiconcime può essere equipaggiato con lo SPEEDY SET (Fig. 46), che permette di regolare i dosatori volumetrici MINIMAX (propriamente modificati) su ogni singolo serbatoio con una sola manovra. Controllare periodicamente che le portine di scorrimento siano allineate. - Page 32 ITALIANO USO E MANUTENZIONE 3.9.3 SPEEDY SET Tabella della quantità in Kg/Ha cod. G19502562...
- Page 33 ITALIANO USO E MANUTENZIONE 3.9.4 MICROGRANULATORE Tabella delle quantità in kg/ha cod. G19502562...
-
Page 34: Operazioni Per La Messa In Servizio
ITALIANO USO E MANUTENZIONE 4.0 OPERAZIONI PER LA MESSA IN SERVIZIO DELLA 4.4 PREPARATIVI PER LA SEMINA - Dalla tabella investimento semi, in base all’interfila, ricavare la MACCHINA distanza longitudinale tra seme e seme. 4.1 A MACCHINA NUOVA - Dalla tabella regolazione della distanza di semina ricavare le com- binazioni degli ingranaggi sul cambio e sulla ruota di trasmissio- - Assemblare all’attrezzatura eventuali parti che, per cause legate ne, per soddisfare tale distanza. -
Page 35: Durante La Semina
ITALIANO USO E MANUTENZIONE 4.6 DURANTE LA SEMINA 4.7 FINE LAVORO Alla fine di ogni corsa, durante la manovra di inversione di - Disinserire la presa di potenza. marcia, tenere sempre azionata la presa di forza ad un regi- - Bloccare in posizione di trasporto i bracci segnafile ed il telaio me di giri sufficiente a mantenere i semi attaccati ai dischi con le apposite spine di sicurezza. -
Page 36: Manutenzione
ITALIANO USO E MANUTENZIONE 5.0 MANUTENZIONE 5.0.6 PERIODICAMENTE - Controllare la pressione dei pneumatici della seminatrice (ve- dere «1.3 Dati tecnici»). Sono di seguito elencate le varie operazioni di manutenzione da eseguirsi con periodicità. Il minor costo di esercizio ed una lun- 5.0.7 OGNI 5 ANNI ga durata della seminatrice dipende, tra l'altro, dalla metodica e - Sostituire tutti i tubi degli impianti oleodinamici. - Page 37 ITALIANO USO E MANUTENZIONE INCONVENIENTI CAUSE RIMEDI Semina irregolare 1) Usura falcione assolcatore. 1) Sostituire. (distanza tra i semi im- 2) Molla tensionamento ruote copriseme a 2) Allentare. precisa). "V" troppo tensionata. 3) Ruote copriseme posteriori non adatte. 3) Sostituire. 4) Disco di semina deformato o usurato (ol- 4) Sostituire il disco di semina.
- Page 38 ITALIANO USO E MANUTENZIONE INCONVENIENTI CAUSE RIMEDI Semi in superficie. 1) Regolazione errata della profondità di se- 1) Correggere la regolazione della profondi- mina. tà. 2) Tubo discesa seme intasato. 2) Pulizia. 3) Scarsa pressione delle ruote copriseme 3) Aumentare la pressione sul terreno delle posteriori.
-
Page 39: Demolizione E Smaltimento
ITALIANO USO E MANUTENZIONE 6.0 DEMOLIZIONE E SMALTIMENTO Operazione da eseguirsi a cura del Cliente. Prima di effettuare la demolizione della macchina, si raccomanda di verificare attentamente lo stato fisico della stessa, valutando che non ci siano parti della struttura eventualmente soggette a possibili cedimenti strutturali o rotture in fase di demolizione. Il Cliente dovrà... - Page 40 cod. G19502562...
-
Page 41: Introduction
ENGLISH 1.0 INTRODUCTION 1.2 DESCRIPTION OF THE SEEDER The "MONICA" precision planting unit is a machine that is particularly suitable for precision seed planting, for multiple uses This booklet describes the regulations for use, maintenance for and with any type of seed on soil that has been tilled and prepared seeding machine. -
Page 42: Technical Data
ENGLISH USE AND MAINTENANCE 1.3 TECHNICAL DATA U.M. MONICA 250 Max row number [nr.] Row distance [cm] 45-50 - 70-75 Toolbar width 4,00 Toolbar width (closed) 2,55 Seed hopper capacity Fertilizer hopper capacity 650x2 PTO (rpm) [g.p.m.] Weight (*) [kg]... -
Page 43: Handling
ENGLISH USE AND MAINTENANCE 1.5 HANDLING ATTENTION The Customer must apply the rules envisaged in the European Directives EEC 391/89 and 269/90 and subsequent modifications on the possible risks for loading and unloading operators caused by manual handling of loads. During handling operations wear suitable personal protection equipment: Overalls Gloves... -
Page 44: Assembly Drawing
ENGLISH USE AND MAINTENANCE 1.6 ASSEMBLY DRAWING (fig. 3) Seed distributors; 11 Disc-type planter shoe part of planting unit; Fertilizer distributor hopper; 12 Universal joint for planting unit drive; Vacum pump; 13 Depht wheels; Vacum gauge; 14 Load bearing structure; Air distributor;... -
Page 45: Warning Signs
ENGLISH USE AND MAINTENANCE 1.7 WARNING SIGNS The signs described in Fig. 4 are reproduced on the machine. keep them clean and replace them if they should come off or become illegible. Carefully read each description and learn their meanings by heart. 2.1.1 WARNING SIGNALS 8) When using anticryptogamic chemicals, use adequate 1) Before operating, carefully read the instruction booklet. -
Page 46: Safety Regulations And Accident Prevention
ENGLISH USE AND MAINTENANCE 2.0 SAFETY REGULATIONS AND ACCIDENT 17) Before starting the equipment, check that the supporting feet have been removed from under the seeder; check that PREVENTION the seeder has been correctly assembled and regulated; check that the machine is in perfect working order, and that Pay careful attention to the danger signs shown in this manual. - Page 47 ENGLISH USE AND MAINTENANCE Transport on Road Cardan shaft 29) When driving on public roads, be sure to follow the highway 38) The equipment installed can only be controlled by means of code of the country involved. the Cardan shaft complete with the necessary overload safety 30) Any transport accessories must be provided with suitable devi-ces and guards fastened with the appropriate chain.
- Page 48 ENGLISH USE AND MAINTENANCE Safety measures concerning the hydraulics Maintenance in safety 53) At the moment of connecting the hydraulic tubes to the Durante le operazioni di lavoro e manutenzione, utilizzare gli hydraulic system of the tractor, make sure that the hydraulic idonei dispositivi di protezione individuale (es.): systems of the operating machine and the tractor are not under pressure.
-
Page 49: Instructions For Use
ENGLISH USE AND MAINTENANCE 3.0 INSTRUCTIONS FOR USE To obtain the best performance from the equipment, carefully follow what is set up below. ATTENTION All maintenance work, adjustments and preparation for operation, must be carried out with the power take-off of the tractor disconnected, the seeder on the ground on its supporting feet, the tractor not running, the wheels blocked and the key turned off. -
Page 50: Adapting The Cardan Shaft
ENGLISH USE AND MAINTENANCE 3.1.2 UNHOOKING THE SEED DRILL FROM THE TRACTOR 3.2 ADAPTING THE CARDAN SHAFT The Cardan shaft, supplied with the machine, is of standard length. It might, therefore, be necessary to adapt the cardan shaft. Should this be the case, before proceeding, consult the DANGER Manufacturer. -
Page 51: Stability Of Planting Unit And Tractor
ENGLISH USE AND MAINTENANCE 3.3 STABILITY OF PLANTING UNIT AND TRACTOR DURING TRANSPORT When a planting unit is coupled to a tractor, so becoming an integral part of it for the purposes of road travel, the stability of the planting unit-tractor complex may change and cause driving or operating difficulties (rearing up or side-slipping of the tractor). -
Page 52: Telescopic Frame
ENGLISH USE AND MAINTENANCE 3.4 TELESCOPIC FRAME 3.4.1 DESCRIPTION OF FUNCTIONING The frame of the machine allows the tubular beams, on which The seeder is suitable only for the uses indicated. Any other the side seeding elements are carried, to be slid lengthways use different from that described in these instructions could (Fig. -
Page 53: Determination Of The Row Distance
3.5 DETERMINATION OF THE ROW DISTANCE 3.5.1 DETERMINATION OF THE ROW DISTANCE The row spacing is set on the MONICA seed drill by changing the The MONICA seed drill allows the distance between the sowing position of the pins on the end stop bars A and B (Fig. 15): rows to be changed to 40-50-70-75 cm. - Page 54 ENGLISH USE AND MAINTENANCE cod. G19502562...
- Page 55 ENGLISH USE AND MAINTENANCE cod. G19502562...
-
Page 56: Seed Selection
ENGLISH USE AND MAINTENANCE 3.6 SEED SELECTION 3.6.1 SEED DISTRIBUTOR A plate (1 Fig. 16), chosen according to the size of the seed, is installed inside the distributors (Fig. 16) (the seed should not be able to enter the hole). Should suction cause some seeds to clog the holes of the plate, these will be left on the ground. -
Page 57: Vacuum Pump
ENGLISH USE AND MAINTENANCE fig. 21 fig. 20 SELECTOR ADJUSTMENT fig. 22 When the indicator (1 Fig. 20) is moved, it commands a cursor (2 Fig. 20), which slightly touches the plate near the holes, causing the excess seeds to fall. The selector is adjusted at each seed and plate change, towards the lower numbers for small seeds (Fig. - Page 58 ENGLISH USE AND MAINTENANCE 3.6.3 DISTRIBUTION ADJUSTMENT Table 3 SEED CHART cod. G19502562...
-
Page 59: Distribution Adjustment
ENGLISH USE AND MAINTENANCE DISTRIBUTION ADJUSTMENT 1) From the Seed Investment Table: Distribution adjustment must be done in compliance with: Depending on both the row distance of the planter and the - the kind of seed that has to be distributed; selected seed investment per hectare, calculate the longitudinal - the longitudinal distance between one seed and another. - Page 60 ENGLISH USE AND MAINTENANCE fig. 26 3) From the Table of Longitudinal Seed Planting Distances (Table - Look for the table that lists the couple of pinions equal to the seed planter's one; - Seek the value of the longitudinal seed planting distance previously calculated.
- Page 61 ENGLISH USE AND MAINTENANCE LONGITUDINAL SEEDING DISTANCE Table 5 4 - 4 4 - 3 4 - 2 4 - 1 3 - 4 3 - 3 3 - 2 3 - 1 2 - 4 2 - 3 2 - 2 2 - 1 1 - 4 1 - 3...
-
Page 62: Deposition Of The Seed
ENGLISH USE AND MAINTENANCE 3.7 DEPOSITION OF THE SEED 3.7.1 PLANTING UNIT In order to ensure that the seeds are all planted at a uniform depth, a few simple adjustments should be made to the planting unit. Adjust the seeding depth by changing the height of the side wheels (1 Fig. -
Page 63: Planting Unit Exclusion
ENGLISH USE AND MAINTENANCE 3.7.4 PLANTING UNIT EXCLUSION Switch off the tractor and remove the ignition key. Raise the single seeder from the ground as follows: - Turn the winged nut (1 Fig. 32) of the hooking lever anticlockwise. fig. 32 - Lift the planting unit using the lever (2, Fig. -
Page 64: Row Marker
ENGLISH USE AND MAINTENANCE 3.8 ROW MARKER The row marker is a machine that traces a reference line parallel to the tracks of the tractor on the ground. Once the tractor has completed its run and it has turned around, follow the reference row with one of the front wheels (L1, Fig. -
Page 65: Row Marker Disk Adjustment
ENGLISH USE AND MAINTENANCE 3.8.2 ROW MARKER DISK ADJUSTMENT n° file nr.rows Reihen. Row marker with trace on the tractor wheel (L1) Nr. Rangs Using the Table 6 shown, read the distance (L1 Fig. 36) at which nr. Hileras 1575 the disc is to draw the reference line. -
Page 66: Chemical Products Distribution
ENGLISH USE AND MAINTENANCE 3.9 DISTRIBUTION OF CHEMICAL PRODUCTS Fertilizers and insecticides are distrib-uted by means of special dosers (Fig. 42) fitted under the corre-sponding hoppers. These dosers can be adjusted by turning the knob (1 Fig. 42). Depending on how the dosers are regulated please refer to the tables below you can determine the quantity of fertilizer and insecticide needed to cover a hectare of land. -
Page 67: Speedy Set
ENGLISH USE AND MAINTENANCE 3.9.2 SPEEDY SET fig. 46 The fertilizer spreader hopper can be equipped with the SPEEDY SET (Fig. 46), which allows the MINIMAX volume batchers (properly modified) to be adjusted on each hopper with just one operation. Regularly check that the sliding hatches are aligned. -
Page 68: Speedy Set - Table Kg/Ha
ENGLISH USE AND MAINTENANCE 3.9.3 SPEEDY SET - Table of distribution quantity in kg/ha cod. G19502562... - Page 69 ENGLISH USE AND MAINTENANCE 3.9.4 MICROGRANULATOR - Table of distribution quantity in kg/ cod. G19502562...
-
Page 70: Operations For Putting The
ENGLISH USE AND MAINTENANCE 4.0 OPERATIONS FOR PUTTING THE MACHINE 4.4 PREPARING FOR SEEDING - From the seed chart, according to the row spacing, obtain the INTO SERVICE distance between one seed and the next along the row. 4.1 WHEN THE MACHINE IS NEW - From the longitudinal sowing distance adjustment table, obtain the combinations of gears on the gearbox and on the drive wheel - Assemble onto the equipment any parts that may have been delivered... -
Page 71: During Seeding
ENGLISH USE AND MAINTENANCE 4.6 DURING SEEDING 4.7 THE END OF OPERATION - At the end of each run, while reversing, always keep the power - Disconnect the power take-off. take-off running at sufficient revs. per minute to ensure that the - Lock the row marker arms and the toolbar in transport position seeds remain attached to the distributor plates. -
Page 72: Maintenance
ENGLISH USE AND MAINTENANCE 5.0 MAINTENANCE 5.0.6 PERIODICALLY - Check the pressure of the seed drill tyres (see «1.3 Technical Data»). The following is a list of various maintenance operations to be carried out periodically. Reduced operating costs and a longer 5.0.7 EVERY FIVE YEARS lasting seeding machine depend, among other things, on the - To replace all the tubes of the hydraulic systems. - Page 73 ENGLISH USE AND MAINTENANCE PROBLEMS CAUSES SOLUTIONS Irregular seed drilling 1) Wear of furrow-opening coulter. 1) Replace (inaccurate distance 2) Over-tensioned tensioning spring of V 2) Slacken between seeds). seed-covering wheels. 3) Unsuitable rear seed-covering wheels. 3) Replace 4) Deformed or worn seed disc (over 1/3 of 4) Replace the seed disc.
- Page 74 ENGLISH USE AND MAINTENANCE PROBLEMS CAUSES SOLUTIONS Seeds on surface. 1) Wrong seeding depth setting. 1) Correct the depth setting. 2) Obstructed seed delivery tube. 2) Cleaning 3) Insufficient pressure of the rear seed- 3) Increase the pressure of the rear wheels covering wheels.
-
Page 75: Demolition And Disposal
ENGLISH USE AND MAINTENANCE 6.0 DEMOLITION AND DISPOSAL This operation is to be carried out by the customer. Before demolishing the machine, you are advised to carefully check its physical condition and ascertain whether there are any parts of the structure that may be susceptible to structural collapse or breakage during demolition. The customer should operate in compliance with the environment protection laws in force in his/her country. - Page 76 cod. G19502562...
-
Page 77: Vorwort
1.0 VORWORT 1.2 BESCHREIBUNG DER SÄMASCHINE Dieses landwirtschaftliche Gerät mit der Bezeichnung "Pneumatische Sämaschine MONICA kann nur über die Dieses Heft bescheibt die Betriebs- und Wartungsanleitungen. Kardanwelle betrieben werden, die mit der Zapfwelle eines mit Das vorliegende Handbuch ist ein integrierender Teil des Hubaggregat aus-gerüsteten Landwirtschaftschleppers mit... -
Page 78: Technische Daten
DEUTSCH GEBRAUCH UND WARTUNG 1.3 TECHNISCHE DATEN U.M. MONICA 250 Reihenanzahl [nr.] Reihenabstand [cm] 45-50 - 70-75 Rahmenbreite 4,00 Rahmenbreite (geschlossen) 2,55 Inhalt des Saatgutbehälters Inhalt des Düngerbehälters 650x2 Zapfwelle [g.p.m.] Gewicht (*) [kg] 1620 Bereifung [Typ] 20x8.00-10 Reifenfülldruck [bar-(Psi)]... -
Page 79: Transport
DEUTSCH GEBRAUCH UND WARTUNG 1.5 FORTBEWEGUNG ACHTUNG Der Kunde muss für die Risiken, denen die mit dem Auf- und Abladen betrauten Arbeiter beim Handling der Maschine ausgesetzt sind, die Vorschriften aus den Richtlinien der Europäischen Gemeinschaft EWG 391/89 und 269/90 und nachfolgende Änderungen anwenden. Beim Handling der Maschine die entsprechende persönliche Schutzausrüstung benutzen: Arbeitsanzug Handschuhe Schuhwerk Schutzhelm Falls die Maschine transportiert werden muss, muss sie an den dazu bestimmten Anschlusspunkten durch geeigneten Aufzug oder... -
Page 80: Gesamtzeichnung
DEUTSCH GEBRAUCH UND WARTUNG 1.6 GESAMTZEICHNUNG (Abb. 3) 12 Kardanwelle für Sämaschinenantrieb; Saatgutstreuer; 13 Tiefenräder; Tiefenräder; Vakuumpumpe; 14 Tragender Rahmen; 15 Identifikationsschild; Unterdruckmesser; 16 Düngerstreuerregler (Minimax); Luftverteiler; Düngerstreubehälter; 17 Spurreissersteuerung; 18 Zapfwelle; Sätieferegler; Komprimierungsräder; 19 Kardanwellenhalterung; Antriebsrad Säapparat; 20 Schollenabweiser; 21 Spurmarkierer. -
Page 81: Warnsignale
DEUTSCH GEBRAUCH UND WARTUNG 1.7 WARNSIGNALE Die auf Abb. 4 beschriebenen Signale sind an der Maschine angebracht Sauber halten und auswechseln, falls sie abfallen 6) Einfanggefahr. Von laufenden Teilen Abstand halten. oder unleserlich werden. Die Beschreibung aufmerksam lesen 7) Quetschgefahr bei Verschliessen. Den nötigen Abstand von und sich die Bedeutung der Signale gut in das Gedächtnis der Maschine halten. -
Page 82: Sicherheits Und Unfallverhütungsvorschriften
DEUTSCH GEBRAUCH UND WARTUNG 2.0 SICHERHEITS UND UNFALLVERHÜTUNG- 15) Vor dem Verlassen des Schlep-pers das an die Hubvorrichtung angekuppelte Gerät absenken, den Motor SVOR SCHRIFTEN abstellen, die Fest-tellbremse ziehen und den Zündschlüssel aus der Steuer-tafel ziehen. Sicherstellen, daß sich niemand Das Gefahrsignal in diesem Hand-buch beachten. - Page 83 DEUTSCH GEBRAUCH UND WARTUNG Teilnahme am Straßenverkehr Gelenkwelle 29) Bei der Teilnahme am Straßenverkehr sind die 38) Die angeschlossene Ausrüstung kann nur gesteuert werden, Bestimmungen der Straßenverkehrsordnung zu beachten, wenn ihre Kardanwelle mit Überbelastungssicherheits- und die in dem jeweiligen Land gelten. Schutzvorrichtungen versehen ist und wenn diese mit der 30) Eventuelle Zubehörteile für den Transport müssen geeignet speziellen Kette befestigt sind.
- Page 84 DEUTSCH GEBRAUCH UND WARTUNG Sicherheitsmaßnahmen bezüglich des Hydrauliksystems Sichere Wartung 53)Beim Anschließen der Hydraulikschläuche an die Bei der Arbeit und der Wartung sind geeignete individuelle Schutzmittel anzuwenden: Hydraulikanlage des Schleppers ist darauf zu achten, dass die Hydraulikanlagen der Ausrüstung und des Schleppers nicht unter Druck stehen.
-
Page 85: Betribsanleitungen
DEUTSCH GEBRAUCH UND WARTUNG 3.0 BETRIBSANLEITUNGEN Um eine optimale Leistung des Geräts zu erhalten, sind immer die folgenden Anleitungen zu beachten. ACHTUNG Alle Wartungs, Einstellungs, und Rüstarbeiten dürfen nur bei aus-geschalteter Schlepperzapfwelle, Sämaschine mit auf dem Boden stehenden Stützfüssen, abgestelltem und gut gesichertem Schlepper und gezogenem Zündschlüssel durchgeführt wer-den. -
Page 86: Abkuppeln Der Säemaschine Vom Schlepper
DEUTSCH GEBRAUCH UND WARTUNG 3.1.2 ABKUPPELN DER SÄEMASCHINE VOM SCHLEPPER 3.2 ANPASSUNG DER GELENKWELLE Die mit der Maschine gelieferte Kardanwelle hat Standardlänge, weshalb es erforderlich sein kann, diese anzupassen. In diesem Fall wendet man sich vor der Ausführung dieses Eingriffes an den GEFAHR Hersteller der Gelenkwelle, damit die Anpassung durchgeführt wird. -
Page 87: Stabilität Von Sämaschine Schlepper Beim Transport
DEUTSCH GEBRAUCH UND WARTUNG 3.3 STABILITÄT VON SÄMASCHINE-SCHLEPPER BEIM TRANSPORT Wenn eine Sämaschine an den Schlepper angekuppelt wird, und somit gemäß Straßenverkehrsordnung zu einem Teil des Schleppers wird, kann die Stabilität der Einheit Schlepper- Sämaschine schwanken und zu Schwierigkeiten beim Fahren oder bei der Arbeit führen (Aufbäumen oder Schleudern des Schleppers). -
Page 88: Teleskoprahmen
DEUTSCH GEBRAUCH UND WARTUNG 3.4 TELESKOPRAHMEN 3.4.1 BETRIEBSBESCHREIBUNG Der Maschinenrahmen erlaubt die Längsverschiebung der Die Sämaschine ist ausschließlich für den angeführten Betrieb Tragrohre, an denen die seitlichen Säaggregate angebracht zu verwenden. Jeder andere Gebrauch, der von den hier werden (Abb. 14). Die durch ein öldynamisches System beschriebenen Anleitungen abweicht, kann die Maschine angetriebenen Zylinder öffnen und schließen den Rahmen. -
Page 89: Einstellen Des Reihenabstands
3.5.1 EINSTELLEN DES REIHENABSTANDS Die Einstellung der Saatzwischenreihen erfolgt bei der Die Sämaschine MONICA erlaubt das Einstellen des Sämaschine Modell MONICA durch Ändern der Position der Bolzen Saatreihenabstands auf 40-50-70-75 cm. an den Hubendestangen A und B (Abb. 15): A - Hubendestange des Teleskoprahmens;... - Page 90 DEUTSCH GEBRAUCH UND WARTUNG cod. G19502562...
- Page 91 DEUTSCH GEBRAUCH UND WARTUNG cod. G19502562...
-
Page 92: Saatzucht
DEUTSCH GEBRAUCH UND WARTUNG 3.6 SAATZUCHT 3.6.1 SÄAPPARAT In die Säapparate (Abb. 16) wird eine Scheibe montiert (1 Abb. 16), die je nach Samengröße (der Samen darf nicht in das Loch eintreten) gewählt wird. Die Samen, die durch Ansaugung die Scheibenlöcher ver-stopfen, werden dann auf dem Acker verteilt. -
Page 93: Vakuumpumpe
DEUTSCH GEBRAUCH UND WARTUNG fig. 21 fig. 20 EINSTELLUNG DES WÄHLERS fig. 22 Durch Verstellen des Zeigers (1 Abb. 20) wird ein Läufer (2 Abb. 20) gesteuert, der die Scheibe in der Nähe der Löcher berührt und das Fallen der überschüssigen Samen verursacht. Der Wähler muß... -
Page 94: Einstellung Des Aussaat
DEUTSCH GEBRAUCH UND WARTUNG 3.6.3 EINSTELLUNG DES AUSSAAT Tabelle 3 SAATGUTBEDARF TABELLE cod. G19502562... - Page 95 Für andere Samenarten fragen Sie bitte bei uns nach. Die in der Tabelle angegebenen Werte dienen nur als Anhaltspunkt. Die Auswahl der richtigen Sä-scheibe obliegt dem Anwender. Das Unternehmen Gaspardo übernimmt keine Haftung für Aussaaten, die mit den falschen Säscheiben durchgeführt wurden.
- Page 96 DEUTSCH GEBRAUCH UND WARTUNG fig. 26 3) Aus der Tabelle Aussaatlängsabstände (Tabelle 5): - Die Tabelle suchen, die das gleiche Ritzelpaar, wie auf der Sämaschine wiedergibt. - Den oben berechneten Wert des Aussaatlängsabstandes suchen. Wenn zwei oder mehrere Säscheiben den gleichen Längsabstand ermöglichen, die Scheibe mit der größeren Lochzahl bevorzugen.
- Page 97 DEUTSCH GEBRAUCH UND WARTUNG TABELLE AUSSAATLÄNGSABSTAND Tabell6 5 4 - 4 4 - 3 4 - 2 4 - 1 3 - 4 3 - 3 3 - 2 3 - 1 2 - 4 2 - 3 2 - 2 2 - 1 1 - 4 1 - 3...
-
Page 98: Positionierungsaat
DEUTSCH GEBRAUCH UND WARTUNG 3.7 POSITIONIERUNGSAAT 3.7.1 SÄHREIHE Für eine korrekte gleichmäßige Aussaat des Saatguts müssen einige einfache Einstellungen an den Säelementen vorgenommen werden. Die Aussaattiefe einstellen, indem die Höhe der beiden seitlichen Räder (1 Abb. 28) mittels der Kurbel (2 Abb. 28) verändert wird. Ein nummerierter Zeiger (3 Abb. -
Page 99: Ausschluss Des Säelements
DEUTSCH GEBRAUCH UND WARTUNG 3.7.4 AUSSCHLUSS DES SÄELEMENTS Den Schlepper ausschalten und den Zündschlüssel ziehen. Das einzelne Säelement folgen-dermaßen vom Boden abheben: - Den Flügel (1 Abb. 32) des Ankup-pelhebels gegen den Uhrzei- gersinn drehen. fig. 32 - Das Säelement mit dem Hebel anheben (2, Abb. 33). - Die Muffe (1 Abb. -
Page 100: Spurmarkierer
DEUTSCH GEBRAUCH UND WARTUNG 3.8 SPURMARKIERER Der Spurmarkierer ist eine Vorrichtung, die eine parallel zum Schlepperlauf liegende Bezugslinie auf dem Boden zieht. Wenn der Traktor den Lauf beendet und gewendet hat, fährt man mit einem der Vorderräder (L1, Abb. 36) oder mit der Traktormitte (L2, Abb. -
Page 101: Einstellung Der Spurmarkiererscheiben
DEUTSCH GEBRAUCH UND WARTUNG 3.8.1 EINSTELLUNG DER SPURMARKIERERSCHEIBEN n° file nr.rows Reihen. Spurreißer mit Spur unter dem Schlepperrad Nr. Rangs Aus der nebenstehenden Tabelle 6 den Abstand (L1, Abb. 36) nr. Hileras 1575 entnehmen, in dem die Scheibe die Bezugslinie ziehen soll. Die 1150 1100 1050 1000 1750 Scheibe auf den korrekten Abstand einstellen, sie leicht... -
Page 102: Verteilung Der Chemischen Produkte
DEUTSCH GEBRAUCH UND WARTUNG 3.9 VERTEILUNG DER CHEMISCHEN PRODUKTE Die Verteilung von Düngemitteln und Schädlingsbekämpf-ungsmitteln erfolgt mittels der dafür bestimmten Dosierer (Abb. 42), die unter den entsprechenden Behältern angebracht sind. Die Dosierer werden durch das Drehen der Ringmutter (1 Abb. 42) eingestellt. Anhand der Dosierereinstellung kann man den nachstehenden Tabellen die für die Behandlung eines Hektars erforderliche Düngeroder Schädlings- bekämpfungsmittelmenge entnehmen. -
Page 103: Seedy Set
DEUTSCH GEBRAUCH UND WARTUNG 3.9.2 SPEEDY SET fig. 46 Der Düngerstreuerbehälter kann mit dem SPEEDY SET (Fig. 46) ausgerüstet werden, der das Einstellen der volumetrischen Dosierungsvorrichtungen MINIMAX (angemessen umgebaut) mit einem einzigen Eingriff auf jedem einzelnen Behälter ermöglicht. Regelmäßig kontrollieren, dass die Schiebeklappen korrekt ausgerichtet sind. -
Page 104: Seedy Set - Tabelle Kg/Ha
DEUTSCH GEBRAUCH UND WARTUNG 3.9.3 SPEEDY SET - Tabelle kg/ha cod. G19502562... -
Page 105: Mikrogranulatstreuer-Tabelle Kg/Ha
DEUTSCH GEBRAUCH UND WARTUNG 3.9.4 MIKROGRANULATSTREUER - Tabelle kg/ha cod. G19502562... -
Page 106: Inbetriebsetzung Der Maschine
DEUTSCH GEBRAUCH UND WARTUNG 4.0 INBETRIEBSETZUNG DER MASCHINE VORBEREITUNGEN FÜR DIE AUSSAAT - Auf der Basis der jeweiligen Zwischenreihe der Aussaattabelle den Längsabstand zwischen den einzelnen Samen entnehmen. 4.1 A NEUE MASCHINE - Der Längsabstandeinstelltabelle der Samen die Kombination der - Etwaige zu Transportzwecken von dem Gerät abgebaute Teile Zahnräder am Getriebe und am Antriebsrad entnehmen, um den anbringen (die in den diesen Teilen beigestellten Montageplänen... -
Page 107: Während Der Aussaat
DEUTSCH GEBRAUCH UND WARTUNG 4.6 WÄHREND DER AUSSAAT 4.7 AM ENDE DER AUSSAAT - Am Ende jedes Laufes während der Rückfahrt die Zapfwelle - Die Zapfwelle abschalten. immer auf einer Drehzahl halten, die ausreicht, damit die - Die Spurreißerarme und den Rahmen mit den entsprechenden Samen an den Streuerscheiben hängenbleiben. -
Page 108: Wartung
DEUTSCH GEBRAUCH UND WARTUNG 5.0 WARTUNG 5.0.5 ALLE 6 MONATE - Die Schraube der Höhenregler und der hinteren schrägstehenden Räder (2-3, Abb. 52) ölen. Nachstehend sind verschiedenen, regelmäßig - Die Pendellager der Antriebsräder schmieren. auszuführenden Wartungseingriffe aufgeführt. Geringe - Die Antriebsübersetzung der Kardanwellen schmieren (4, Abb. 52). Betriebskosten und die lange Lebensdauer des Geräts hängen unter anderem von der ständigen Beachtung dieser Vorschriften 5.0.6 REGELMÄSSIGE KONTROLLEN... - Page 109 DEUTSCH GEBRAUCH UND WARTUNG STÖRUNGEN URSACHEN ABHILFEN U n r e g e l m ä ß i g e 1) Abgenutzter Klutenräumersäschar. 1) Auswechseln. Aussaat 2) Spannfeder V-förmigen 2) Lockern. (ungenauer Abstand Saatgutzustreichrads zu stark gespannt. zwischen 3) Ungeeignete hintere Saatgutzustreichräder. 3) Auswechseln.
- Page 110 DEUTSCH GEBRAUCH UND WARTUNG STÖRUNGEN URSACHEN ABHILFEN Samenkörner auf der 1) Falsche Einstellung der Sätiefe. 1) Die Tiefeneinstellung korrigieren. Oberfläche. 2) Samensenkrohr verstopft. 2) Reinigung. 3) Geringe Präzision hinteren 3) Den Druck der hinteren Räder auf den Saatgutzustreichräder. Boden erhöhen. 4) Nicht für den Bodentyp geeignete hintere 4) Auswechseln.
-
Page 111: Zerlegen Und Entsorgen Der Maschine
DEUTSCH GEBRAUCH UND WARTUNG 6.0 ZERLEGEN UND ENTSORGEN DER MASCHINE Für das Zerlegen und Entsorgen der Maschine hat der Kunde zu sorgen. Vor dem Verschrotten der Maschine ist der Zustand der Maschine genau zu überprüfen und sicherzustellen, dass keine Gerüstteile vorhanden sind, die beim Zerlegen auseinanderbrechen oder nachgeben könnten. - Page 112 cod. G19502562...
-
Page 113: Introduction
élévateur, avec un attelage universel à trois points. législation du pays de destination des machines. Dans tous les Le semoir série "MONICA" est actuellement réalisé en plusieurs cas, la machine doit être exclusivement utilisée par des versions, en partant d'un châssis de base auquel sont appliqués opérateurs... -
Page 114: Donnees Techniques
FRANÇAIS EMPLOI ET ENTRETIEN 1.3 DONNEES TECHNIQUES U.M. MONICA 250 Nombre de rangs [nr.] Ecartement [cm] 45-50 - 70-75 Largeur de châssis 4,00 Largeur de châssis (fermé) 2,55 Capacité de la tremie semence Capacité de engrais 650x2 Tour prise de force (tr/mn) [g.p.m.]... -
Page 115: Manutention
FRANÇAIS EMPLOI ET ENTRETIEN 1.5 MANUTENTION ATTENTION Le Client doit appliquer les mesures prévues par les Directives Communautaires CEE 391/89 et 269/90 et modifications successives, en ce qui concerne le risque de déplacement manuel des charges pour les préposés aux opérations de chargement et déchargement. Pendant les opérations de déplacement, utiliser les équipements de protection individuelle adaptés: Combinaison Gants... -
Page 116: Dessin Global
FRANÇAIS EMPLOI ET ENTRETIEN 1.6 DESSIN GLOBAL (Fig. 3) Distributeur de graines; 12 Cardan pour mouvement semoir; Réservoir épandeur d’engrais; 13 Roues de profondeur; Dépresseur; 14 Châssis portant; Vacuomètre; 15 Plaque d’identification; Distributeur d'air; 16 Régulateur distribution engrais (Minimax); Réservoir de graines; 17 Commande traceur;... -
Page 117: Signaux De Recommandation
FRANÇAIS EMPLOI ET ENTRETIEN 1.7 SIGNAUX DE SECURITE 6) Ne vous approchez pas des organes en mouvement: vous risquez d’y être pris. Les signaux décrits dans la Figure 4 sont indiqués sur la machine. 7) Risque d’écrasement en phase de fermeture. Maintenir une Nettoyer et remplacer ces signaux s'ils sont détachés ou illisibles. -
Page 118: Normes De Securité Et De Prevention Des Accidents
FRANÇAIS EMPLOI ET ENTRETIEN 2.0 NORMES DE SECURITE ET DE PREVENTION 17) Avant la mise en marche de l'équipement, contrôler que les pieds de support ne se trouvent pas sous la machine et DES ACCIDENTS vérifier l'assemblage et le réglage correct de celleci. Contrôler que la machine soit en parfait état et que tous les organes Faire attention au signal de danger quand il apparaît dans ce soumis à... - Page 119 FRANÇAIS EMPLOI ET ENTRETIEN Circulation sur route Arbre a cardans 29) Pour la circulation routière, il faut respecter les normes du 38) L'équipement attelé ne peut être commandé que par un arbre code de la route en vigueur dans le pays en question. à...
- Page 120 FRANÇAIS EMPLOI ET ENTRETIEN Mesures de sécurité concernant la commande hydraulique Entretien en conditions de securité 53) Au moment du raccordement des tubes hydrauliques à Bei der Arbeit und der Wartung sind geeignete individuelle Schutzmittel anzuwenden: l'installation hydraulique du tracteur, s'assurer que les installations hydrauliques de la machine agricole et du tracteur ne sont pas sous pression.
-
Page 121: Instructions Pour L'utilisation
FRANÇAIS EMPLOI ET ENTRETIEN 3.0 INSTRUCTIONS POUR L'UTILISATION Pour obtenir les meilleures performances de l'équipement, respecter soigneusement les instructions suivantes. ATTENTION Toutes les opèrations d'entretien, de règlage et de prèparation au travail ne doivent être effectuèes que si la prise de force du tracteur est dèbrayèe, la machine posèe par terre sur les pieds de support, le tracteur arrÍtè... -
Page 122: Decrochage De Element Semeur
FRANÇAIS EMPLOI ET ENTRETIEN 3.1.2 DECROCHAGE DE L’ELEMENT SEMEUR DU TRACTEUR 3.2 ADAPTATION ARBRE A CARDANS L'arbre à cardans, fourni avec la machine, a une longueur standard. L'adaptation de l'arbre à cardans pourrait donc s'avérer nécessaire. Dans ce cas, avant toute opération, contacter son DANGER Constructeur pour l'adaptation éventuelle. -
Page 123: Stabilite Pendant Le Transport
FRANÇAIS EMPLOI ET ENTRETIEN 3.3 STABILITE PENDANT LE TRANSPORT SEMOIR- TRACTEUR Lorsqu'un semoir est attelé à un tracteur, devenant pour la circulation routière partie intégrante de ce dernier, la stabilité de l'ensemble tracteur-semoir peut varier entraînant des difficultés de conduite ou de travail (cabrage ou embardée du tracteur). La condition d'équilibre peut être rétablie en mettant dans la partie antérieure du tracteur un nombre suffisant de contrepoids, afin de distribuer les poids que supportent les deux essieux du... -
Page 124: Chassis Telescopique
FRANÇAIS EMPLOI ET ENTRETIEN 3.4 CHASSIS TELESCOPIQUE 3.4.1 DESCRIPTION DU FUNCTIONNEMENT Le châssis de la machine permet de faire glisser, dans le sens Le semoir n'est prévu que pour l'usage indiqué. Un emploi de la longueur, les tubulaires sur lesquels sont placés les autre que celui qui est décrit dans ces instructions peut éléments d'ensemencement latéraux (Fig. -
Page 125: Determination De L'ecartement
3.5.1 DETERMINATION DE L'ECARTEMENT Pour programmer l'écartement entre les lignes du semis sur le Le semoir MONICA permet de modifier la distance entre les lignes semoir modèle MONICA, changer les pivots de position sur les de semis de 40-50-70-75 cm. - Page 126 FRANÇAIS EMPLOI ET ENTRETIEN cod. G19502562...
- Page 127 FRANÇAIS EMPLOI ET ENTRETIEN cod. G19502562...
-
Page 128: Selection De Graines
FRANÇAIS EMPLOI ET ENTRETIEN 3.6 SELECTION DE GRAINES 3.6.1 DISTRIBUTEUR DE GRAINES Dans les distributeurs (Fig. 16) il faut installer un disque (1, Fig. 16) choisi selon la dimension de la graine (qui ne doit pas entrer dans le trou). Les graines qui bouchent les trous du disque par remous seront ensuite laissées sur le sol. -
Page 129: Depresseur
FRANÇAIS EMPLOI ET ENTRETIEN fig. 21 fig. 20 REGLAGE DU SELECTEUR fig. 22 Le déplacement de l'aiguille (1 Fig. 20) commande un curseur (2 Fig. 20) qui frôle le disque à la hauteur des trous et provoque la chute des graines excédentaires. Le sélecteur est réglé à chaque changement de graine et de disque vers les numéros inférieurs pour les petites graines (A, Fig. - Page 130 FRANÇAIS EMPLOI ET ENTRETIEN 3.6.3 REGLAGE POUR LA DISTRIBUTION TABLEAU INVESTIMENT GRAINES Tableau 3 cod. G19502562...
-
Page 131: Reglage Pour La Distribution
FRANÇAIS EMPLOI ET ENTRETIEN REGLAGE POUR LA DISTRIBUTION 1) Du tableau Investissements des Graines: Les réglages pour la distribution peuvent être faits en se basant sur: Selon l'écartement du semoir et l'investissement des graines par - type de graine à distribuer; hectare désiré, déduire la distance longitudinale de semis au - distance longitudinale entre les graines. - Page 132 FRANÇAIS EMPLOI ET ENTRETIEN fig. 26 3) Du Tableau des Distances Longitudinales de Semis (Tableau - Chercher le tableau qui reporte le couple de pignons égaux à celui du semoir; - Rechercher la valeur de la distance longitudinale de semis précédemment trouvé.
- Page 133 FRANÇAIS EMPLOI ET ENTRETIEN TABLEAU DISTANCE LONGITUDINALE D'ENSEMENCEMENT Tableau 5 4 - 4 4 - 3 4 - 2 4 - 1 3 - 4 3 - 3 3 - 2 3 - 1 2 - 4 2 - 3 2 - 2 2 - 1 1 - 4...
-
Page 134: Positinnement De Graines
FRANÇAIS EMPLOI ET ENTRETIEN 3.7 POSITINNEMENT DE GRAINES 3.7.1 ELÉMENT SEMEUR Afin d’obtenir une profondeur homogène d’enfouissement des graines, il faut effectuer un certain nombre de réglage sur les éléments semeurs. Régler la profondeur d’ense-mencement en variant la hauteur des roues latérales (1 Fig. 28); pour ce faire, agir sur la manivelle (2 Fig. -
Page 135: Exclusion Du Semoir
FRANÇAIS EMPLOI ET ENTRETIEN 3.7.4 EXCLUSION DU SEMOIR Eteindre le tracteur et enlever la clé de démarrage du moteur. Soulever chaque semoir du sol de la façon suivante: - tourner le papillon (1 Fig. 32) du levier d’attelage dans le sens contraire des aiguilles d’une montre. -
Page 136: Disque A Tracer
FRANÇAIS EMPLOI ET ENTRETIEN 3.8 DISQUES À TRACER Le disque à tracer est un dispositif qui trace une ligne de repère sur le sol parallèlement au trajet du tracteur. Quand le tracteur aura terminé la course et invertit la marche, on procèdera en courant sur la ligne de référence avec une des roues avant (L1, Fig. -
Page 137: Réglage Des Disques A Tracer
FRANÇAIS EMPLOI ET ENTRETIEN 3.8.1 REGLAGE DES DISQUES A TRACER n° file nr.rows Reihen. Traceur avec trace sur la roue du tracteur Nr. Rangs Trouver la distance à laquelle le disque doit tracer la ligne de nr. Hileras 1575 référence sur le Tableau 6 cicontre (L1, Fig. 36). Positionner le 1150 1100 1050 1000 1750 disque à... -
Page 138: Distribution Des Produits Chimiques
FRANÇAIS EMPLOI ET ENTRETIEN 3.9 DISTRIBUTION DES PRODUITS CHIMIQUES La distribution des produits fertilisants et des insecticides a lieu par les doseurs spéciaux (Fig. 42) montés sous les réservoirs correspondants. Les doseurs sont réglés par la rotation de la bague (1 Fig. 42). Selon le réglage des doseurs, à partir des tableaux suivants, on peut calculer la quantité... -
Page 139: Speedy Set
FRANÇAIS EMPLOI ET ENTRETIEN 3.16.2 SPEEDY SET fig. 46 Le réservoir épandeur d'engrais peut être équipé d'un SPEEDY SET (Fig. 46) permettant de régler les doseurs volumétriques MINIMAX (modifiés de conséquence) sur chaque réservoir avec une seule manœuvre. Contrôler périodiquement que les portes de glissement soient alignées. -
Page 140: Speedy Set - Tableau Kg/Ha
FRANÇAIS EMPLOI ET ENTRETIEN 3.9.3 SPEEDY SET - Tableau dedistribution (kg/ha) cod. G19502562... -
Page 141: Microgranulateur - Tableau Kg/Ha
FRANÇAIS EMPLOI ET ENTRETIEN 3.9.4 DISTRIBUTEUR DE MICROGRANULES - Tableau 9distribution (kg/ha) cod. G19502562... -
Page 142: Opérations Pour La Mise En
FRANÇAIS EMPLOI ET ENTRETIEN 4.0 OPÉRATIONS POUR LA MISE EN SERVICE DE 4.4 PREPARATIFS POUR L’ENSEMENCEMENT - DRechercher la distance qui sépare les graines dans le tableau LA MACHINE de densité du semis. Cette dernière varie en fonction de 6.1 QUAND LA MACHINE EST NEUVE l'écartement. -
Page 143: Endant L'ensemencement
FRANÇAIS EMPLOI ET ENTRETIEN 4.6 ENDANT L’ENSEMENCEMENT 4.7 FIN DE TRAVAIL - Débrancher la prise de force. - A la fin de chaque course, pendant la manoeuvre de demi tour, - Bloquer les bras traceurs et le châssis en position de transport actionner toujours la prise de force à... -
Page 144: Quand La Machine Est Neuve
FRANÇAIS EMPLOI ET ENTRETIEN 5.0 MANUTENZIONE 5.0.6 RÉGULIÈREMENT - Contrôler la pression des pneus du semoir (voir «1.3 Donnes Techniques»). Nous décrivons cidessous les différentes opérations d’entretien à effectuer périodiquement. Le coût d’emploi réduit et une 5.0.7 TOUS LES CINQ ANS durabilité... - Page 145 FRANÇAIS EMPLOI ET ENTRETIEN INCONVÉNIENTS CAUSES REMÈDES Semis irrégulier 1) Usure du soc. 1) Remplacer. (distance imprécise 2) Ressort tension roues recouvreur de 2) Desserrer. entre les graines). graines en "V" trop tendu. 3) Roues arrière recouvreur de graines pas 3) Remplacer.
- Page 146 FRANÇAIS EMPLOI ET ENTRETIEN INCONVÉNIENTS CAUSES REMÈDES Graines en surface. 1) Mauvais réglage de la profondeur de semis. 1) Corriger le réglage de la profondeur. 2) Tuyau descente graine colmaté. 2) Nettoyer. 3) Faible pression des roues arrière 3) Augmenter la pression sur le terrain des recouvreur de graines.
-
Page 147: Demantelement Et Elimination
FRANÇAIS EMPLOI ET ENTRETIEN 6.0 DEMANTELEMENT ET ELIMINATION Opération que doit effectuer le Client. Avant d'effectuer le démantèlement de la machine, il est recommandé de vérifier attentivement l'état physique de celle-ci, en vérifiant l'absence de parties de la structure éventuellement sujettes à de possibles déformations structurales ou ruptures en phase de démantèlement. - Page 148 cod. G19502562...
-
Page 149: Premisa
ESPAÑOL 1.0 PREMISA 1.2 DESCRIPCIÓN DE LA SEMBRADORA La sembradora de precisión MONICA es una máquina adecuada para siembras de precisión, para empleos polivalentes y con Este manual describe las normas de utilización, de cualquier tipo de semillas sobre terrenos labrados, preparados mantenimiento de la sembradora. -
Page 150: Datos Técnicos
ESPAÑOL EMPLEO Y MANTENIMIENTO 1.3 DATOS TECNICOS U.M. MONICA 250 Numero de lineas [nr.] Distancia entre la líneas [cm] 45-50 - 70-75 Largo del bastidor 4,00 Largo del bastidor (cerrado) 2,55 Capacidad del deposito semilla Capacidad del deposito de abono... -
Page 151: Desplazamiento
ESPAÑOL EMPLEO Y MANTENIMIENTO 1.5 DESPLAZAMIENTO CUIDADO El Cliente debe respetar las Directivas Europeas CEE 391/89 y 269/90 y sus actualizaciones siguientes, en materia de riesgo de desplazamiento manual de las cargas para los encargados de las operaciones de carga y descarga. Durante las operaciones de desplazamiento, utilice los elementos de protección individual adecuados: Mono Guantes... -
Page 152: Diseño General
ESPAÑOL EMPLEO Y MANTENIMIENTO 1.6 DISENO GENERAL (Fig. 2) 12 Cardán para la transmisión del sembrador; Distribuitor de semillas; Tanque abonadora; 13 Ruedas de profundidad; Bomba de vacío; 14 Chasis portante; Vacuómetro; 15 Placa de identificaciòn; Distribuidor de aire; 16 Regulador de la distribución del fertilizante (Minimax); Tanque de las semillas;... -
Page 153: Señales De Advertencia
ESPAÑOL EMPLEO Y MANTENIMIENTO 1.7 SEÑALE DE SEGURIDAD Las señales descritas en la Fig. 4 están colocadas en la 6) Peligro de captura, permanecer lejos de los órganos en máquina. Mantenerlas limpias y reemplazarlas si se desprenden movimiento. o se vuelven ilegibles. Leer cuidadosamente lo descrito y 7) Peligro de aplastamiento en fase de cierre. -
Page 154: Normas De Seguridad Y
ESPAÑOL EMPLEO Y MANTENIMIENTO 2.0 NORMAS DE SEGURIDAD SEGURIDAD Y 15) Antes de dejar el tractor, bajar el equipo enganchado al grupo elevador, parar el motor, activar el freno de mano y sacar la PREVENCIÓN CONTRAACCIDENTES llave de encendido del tablero de man-dos, cerciorarse de que nadie pueda acercarse a las substancias químicas. - Page 155 ESPAÑOL EMPLEO Y MANTENIMIENTO Circulación por carretera Árbol Cardán 29) Para la circulación por carretera, será necesario atenerse a 38) El equipo aplicado, puede ser controlado sólo a través del las normas del código de circulación en vigor en el país árbol cardán completo con los diversos dispositivos de correspondiente.
- Page 156 ESPAÑOL EMPLEO Y MANTENIMIENTO Seguridad relativa al sistema hidráulico Mantenimiento en seguridad 53) Cuando conecte los tubos hidráulicos a la instalación Durante los trabajos de mantenimiento, utilice los elementos hidráulica del tractor, procure que las instalaciones de protección personal adecuados: hidráulicas de la máquina y del tractor no estén bajo presión.
-
Page 157: Norme D'uso
ESPAÑOL EMPLEO Y MANTENIMIENTO 3.0 NORMAS DE MANEJO Para obtener las mejores presta ciones del equipo, seguir minuciosa mente las siguientes indicaciones: CUIDADO Todas las operaciones de mantenimiento, de ajuste y de preparación para la elaboración deberán efectuarse solamen- te con la toma de fuerza del tractor desconectada, con la sembradora en el suelo sobre las patas de soporte, con el tractor apagado y bien parado, y con la llave desconectada. -
Page 158: Desganche De La Sembradora Del Tractor
ESPAÑOL EMPLEO Y MANTENIMIENTO 3.1.2 DESGANCHE DE LA SEMBRADORA DEL TRACTOR 3.2 ADAPTACIÓN DEL ÁRBOL CARDÁN El árbol cardán, provisto junto con la máquina, tiene una longitud estándar; por lo tanto, es posible que haya que adaptarlo. En este caso, antes de intervenir sobre el árbol cardán, consul- PELIGRO tar el Fabricante del mismo sobre la eventual adaptación. -
Page 159: Estabilidad Durante El Transporte De La Sembradora-Tractor
ESPAÑOL EMPLEO Y MANTENIMIENTO 3.3 ESTABILIDAD DURANTE EL TRANSPORTE DE LA SEMBRADORA -TRACTOR Cuando una sembradora se acopla a un tractor, convirtiéndose así en parte integrante del mismo para la circulación por la vía pública, la estabilidad del grupo tractor-sembradora puede variar causando dificultad durante la conducción o el trabajo (empenaje o derrapaje del tractor). -
Page 160: Bastidor Telescópico
ESPAÑOL EMPLEO Y MANTENIMIENTO 3.4 BASTIDOR TELESCÓPICO 3.4.1 DESCRIPCIÓN DEL FUNCIONAMIENTO El bastidor de la máquina permite hacer desplazar La sembradora es idónea sólo para el empleo arriba indicado. longitudinalmente los travesaños sobre los cuales se colocan Cualquier otro uso diferente del descrito en estas instrucciones los elementos de siembra laterales (Fig. -
Page 161: Determinación De La Distancia Entre Hileras
3.5.1 DETERMINACIÓN DE LA DISTANCIA ENTRE HILERAS La configuración de la distancia entre los surcos de siembra en La sembradora MONICA permite modificar la distancia entre los la sembradora modelo MONICA se obtiene cambiando la surcos de siembra de 40-50-70-75 cm. - Page 162 ESPAÑOL EMPLEO Y MANTENIMIENTO cod. G19502562...
- Page 163 ESPAÑOL EMPLEO Y MANTENIMIENTO cod. G19502562...
-
Page 164: Selección De La Semilla
ESPAÑOL EMPLEO Y MANTENIMIENTO 3.6 SELECCIÓN DE LA SEMILLA 3.6.1 DISTRIBUIDOR DE SEMILLAS En el interior de los distribuidores (Fig. 16) se monta un disco (1 Fig. 16) seleccionado en función del tamaño de la semilla (la semilla no deberá poder pasar por el agujero). Las semillas que por succión obturarán los agujeros del disco serán lanzadas en el terreno. -
Page 165: Bomba De Vacío
ESPAÑOL EMPLEO Y MANTENIMIENTO fig. 21 fig. 20 REGULACIÓN DEL SELECTOR fig. 22 Desplazando el indicador (1 Fig. 20) se controla un cursor (2 Fig. 20) que roza el disco en proximidad de los agujeros, provocando la caída de las semillas en exceso. El selector se regula tras cada cambio de semilla y disco, hacia los números bajos para las semillas pequeñas (A, Fig. -
Page 166: Regulaciónes Para La Distribución
ESPAÑOL EMPLEO Y MANTENIMIENTO 3.6.3 REGULACIÓNES PARA LA DISTRIBUCIÓN TABLA INVERSIÓN SEMILLAS Tabla 3 cod. G19502562... - Page 167 ESPAÑOL EMPLEO Y MANTENIMIENTO REGULACIÓNES PARA LA DISTRIBUCIÓN 1) De la Tabla Colocación Semillas: Las regulaciones para la distribución deben ser hechas en base a: En base a las entrefilas de la sembradora y a la colocación de - tipo de semilla a distribuir; semillas por hectárea deseada, buscar la distancia longitudinal de - distancia longitudinal entre semilla y semilla.
- Page 168 ESPAÑOL EMPLEO Y MANTENIMIENTO fig. 26 3) De la Tabla Distancias Longitudinales de Sembrado (Tabla - Buscar la tabla donde se relacione la pareja de piñones iguales a los de origen en la sembradora; - Buscar el valor de la distancia longitudinal de sembrado ante- riormente encontrado.
- Page 169 ESPAÑOL EMPLEO Y MANTENIMIENTO TABLA DISTANCIA LONGITUDINAL DE SIEMBRA Tabla 5 4 - 4 4 - 3 4 - 2 4 - 1 3 - 4 3 - 3 3 - 2 3 - 1 2 - 4 2 - 3 2 - 2 2 - 1 1 - 4...
-
Page 170: Deposición De La Semilla
ESPAÑOL EMPLEO Y MANTENIMIENTO 3.7 DEPOSICIÓN DE LA SEMILLA 3.7.1 ELEMENTO SEMBRADOR Para obtener una correcta y homogénea profundidad de entierro de las semillas, es necesario cumplir algunas simples graduaciones sobre los elementos sembradores. Graduar la profundidad de sembrado variando la altura de las ruedas laterales (1 Fig. -
Page 171: Exclusión Sembrador
ESPAÑOL EMPLEO Y MANTENIMIENTO 3.7.4 EXCLUSIÓN SEMBRADOR Apagar el tractor y sacar la llave de arranque del motor. Levantar de tierra el solo sembrador de la siguiente forma: - girar la llave, (1 Fig. 32) de la palanca de enganche en sentido antihorario. -
Page 172: Marcadores De Hileras
ESPAÑOL EMPLEO Y MANTENIMIENTO 3.8 MARCADORES DE HILERAS El marcador de hileras es un dispositvo que traza una línea de referencia en el terreno, paralela al recorrido del tractor. Cuando el tractor haya terminado la carrera e invertido la marcha, se procederá... -
Page 173: Regulación De Los Discos Marcadores De Hileras
ESPAÑOL EMPLEO Y MANTENIMIENTO 3.8.1 REGULACION DE LOS DISCOS MARCADORES DE HILERAS n° file nr.rows Reihen. Marcador de surcos con borrahuellas en la rueda del tractor Nr. Rangs Utilizando la siguiente Tabla 6, calcular la distancia (L1, Fig. 36) nr. Hileras 1575 a la cual el disco debe trazar la línea de referencia. -
Page 174: Distribución De Los Productos Químicos
ESPAÑOL EMPLEO Y MANTENIMIENTO 3.9 DISTRIBUCIÓN DE LOS PRODUCTOS QUIMICOS La distribución de los productos fertilizantes e insecticidas, se realiza mediante especiales distribuidores (Fig. 42) montados debajo de los respectivos depósitos. La regulación de los dosificadores se efectúa girando la brida (1 Fig. 42). En base a la regulación de los dosificadores, se puede remontar a la cantidad de abono e insecticida necesarios para cubrir una hectárea de terreno, a través de las tablas que a continuación ilustraremos. -
Page 175: Speedy Set
ESPAÑOL EMPLEO Y MANTENIMIENTO 3.9.2 SPEEDY SET fig. 46 El depósito de la abonadora se puede equipar con el SPEEDY SET (Fig. 49), que permite regular los dosificadores volumétricos MINIMAX (modificados de manera adecuada) en cada depósito con una sola maniobra. Periódicamente, controle que las tapas de deslizamiento estén alineadas. -
Page 176: Speedy Set - Tabla Kg/Ha
ESPAÑOL EMPLEO Y MANTENIMIENTO 3.9.3 SPEEDY SET Cuadro de distribución (kg/ha) cod. G19502562... -
Page 177: Microgranuladore - Tabla Kg/Ha
ESPAÑOL EMPLEO Y MANTENIMIENTO 3.9.4 MICROGRANULADOR Cuadro de distribución (kg/ha) cod. G19502562... -
Page 178: Operaciones Para La Puesta En Servicio De La Máquina
ESPAÑOL EMPLEO Y MANTENIMIENTO 4.0 OPERACIONES PARA LA PUESTA EN SERVICIO 4.4 PREPARACIONES PARA LA SIEMBRA - Utilizando la tabla de densidad de semillas, obtener la distancia DE LA MÁQUINA longitudinal entre una semilla y otra de acuerdo a la distancia 4.1 A CUANDO LA MÁQUINA ESTÁ... -
Page 179: Durante La Siembra
ESPAÑOL EMPLEO Y MANTENIMIENTO 4.6 DURANTE LA SIEMBRA 4.7 FINAL DEL TRABAJO - Al final de cada carrera, durante la maniobra de inversión de - Desconectar la toma de fuerza. marca, tener siempre accionada la toma de fuerza a un régimen - Bloquear los brazos marcadores de hileras y el bastidor en re revoluciones suficiente como para mantener las semillas posición de transporte utilizando los pasadores de seguridad... -
Page 180: Mantenimiento
ESPAÑOL EMPLEO Y MANTENIMIENTO 5.0 MANTENIMIENTO 5.0.5 CADA 6 MESES - Lubricar el tornillo de los reguladores de altura y de las ruedas posteriores inclinadas (2-3, Fig. 52). A continuación se indican las distintas operaciones de - Engrasar los cojinetes oscilantes de las ruedas motrices. mantenimiento que deben efectuarse periódicamente. - Page 181 ESPAÑOL EMPLEO Y MANTENIMIENTO PROBLEMAS CAUSAS SOLUCIONES Siembra irregular 1) Desgaste del surcador. 1) Sustituir. (distancia imprecisa 2) Muelle tensor ruedas 2) Aflojar. entre las semillas). cubresemillas en "V" demasiado tensado. 3) Ruedas cubresemillas traseras no adecuadas. 3) Sustituir. 4) Disco de siembra deformado o desgastado 4) Sustituir el disco de siembra.
- Page 182 ESPAÑOL EMPLEO Y MANTENIMIENTO PROBLEMAS CAUSAS SOLUCIONES Semillas en la superfi- 1) Regulación incorrecta de la profundidad 1) Corregir la regulación de la profundidad. de siembra. cie. 2) Tubo de bajada de semillas atascado. 2) Limpiar. 3) Presión escasa ruedas 3) Aumentar la presión sobre el terreno de cubresemillas traseras.
-
Page 183: Desguace Y Eliminación
ESPAÑOL EMPLEO Y MANTENIMIENTO 6.0 DESGUACE Y ELIMINACIÓN Trabajos que deben ser llevados a cabo por el cliente. Antes de desguazar la máquina, se recomienda controlar con atención sus condiciones, evaluando que no haya partes de la estructura que puedan ceder o romperse durante el desguace. El Cliente deberá... - Page 184 cod. G19502562...
-
Page 185: Dichiarazione Di Conformità
MASCHIO GASPARDO S.p.A. Via Marcello, 73 - 35011 Campodarsego (Padova) - Italy Tel. +39 049 9289810 - Fax +39 049 9289900 Email: info@maschio.com http://www.maschionet.com Capitale Sociale • 7.876.625,00 i.v - C.F. R.I PD 03272800289 P.IVA IT03272800289 - R.E.A. PD 297673 Comm. - Page 186 404126 Волжский 315100 Chisineu-Cris (Arad) - România GASPARDO BIELORUSSIA MASCHIO-GASPARDO CINA Волгоградская область Tel. +40 257 307030 Тел. +7 8443 525065 MASCHIO MIDDLE EAST MASCHIO-GASPARDO KOREA Fax +40 257 307040 факс. +7 8443 525064 e-mail: maschio@maschio.ro Ufficio Tecnico MASCHIO GASPARDO S.p.A.
Need help?
Do you have a question about the MONICA and is the answer not in the manual?
Questions and answers