
Related Manuals for Qudo Typhoon Bathurst JBBATHDK10


Summary of Contents for Qudo Typhoon Bathurst JBBATHDK10
- Page 1 ASSEMBLY INSTRUCTIONS BATHURST GAMING DESK 1000MM JBBATHDK10 This design and instruction booklet is subject to copyright. 1 Carton www.officeworks.com.au For spare parts or hardware call (03) 9310 3011 or email hardware@kyvas.com.au 1/16...
- Page 2 Estimated Assemble Time: 40min To view an assembly video, go to https://www.officeworks.com.au/ Search the product by item code or name: Click on the icon to watch the video. Customer Service People Required General Advice Contact Details More Than One Person Is Required Spare Parts &...
- Page 3 Part Overview FLASH STROBE FADE SMOOTH 3/16...
-
Page 4: Part List
Part List Parts located in Carton - JBBATHDK10 X 1 pc X 2 pcs X 1 pc X 1 pc X 1 pc X 2 pcs FLASH STROBE FADE SMOOTH X 2 pcs X 1 pc 4/16... - Page 5 Hardware List Hardware Pack located in Carton - JBBATHDK10 ( 6 x 30 mm) ( 6 x 15 mm) ( 6 x 50 mm) X 4pcs X 10pcs X 4pcs Allen Key Washer ( 6 x 15 mm) M6-size X 2pcs X 1pc X 2pcs ( 4 x 14 mm)
- Page 6 Assembly Step 1 4 pcs Step 2 *Note: Do not tighten the screw A fully until you have completed Step 7. 2 pcs 1 pc 6/16...
- Page 7 Step 3 *Note: Do not tighten the screw A fully until you have completed Step 7. 2 pcs 1 pc Step 4 *Note: Do not tighten the screw B fully until you have completed Step 7. 2 pcs 1 pc 7/16...
- Page 8 Step 5 *Note: Do not tighten the screw B fully until you have completed Step 7. 1 pc 1 pc Step 6 *Note: Do not tighten the screw B fully unti you have completed Step 7. 3 pcs 1 pc 8/16...
- Page 9 Step 7 *Note: Tighten all screws fully. *Note: Now fully tighten all screws A and B from Step 2 to 6. 4 pcs 4 pcs 1 pc Step 8 Cut to release cable 9/16...
- Page 10 Step 9 1 pc 1 p c Step 10 1 pc 1 pc 1 pc 1 pc 10/16...
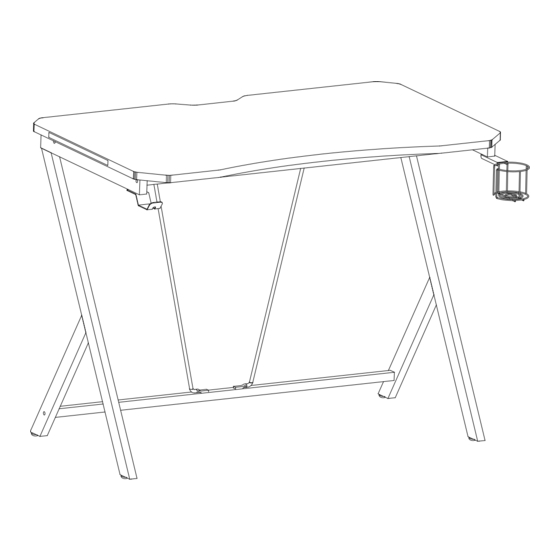
- Page 11 Step 11 1 pc 1 pc 1 pc 1 pc Maximum Load Capacity: Desk Top - 40 kg Headset Holder - 2 kg Cup Holder - 2 kg Your BATHURST GAMING DESK 1000MM is now complete and ready for use! 11/16...
- Page 12 Remote Control FLASH STROBE FADE SMOOTH Function description of remote control key: Symbol Key Name Functional description ON / OFF Turn on or turn off the LED remote Adjust static colour brightness. Press BRIGHT + to BRT+ / BRT- increase brightness and press BRIGHT- to decrease. Green Blue White...
- Page 13 How To Replace Batteries Press Please use the AAA batteries to replace! CAUT I ON 1. WARNING – KEEP BATTERIES OUT OF REACH OF CHILDREN. 2. Do not throw in fire! Not rechargeable! 3. Never allow children to replace batteries of any device If you suspect your child has swallowed or inserted a battery immediately call the 24-hour Poisons information centre on 13 11 26 for fast, expert advice.
-
Page 14: Disposal Considerations
Disposal Considerations The symbol on the battery indicates that this battery may not be treated as household waste. Instead it should be taken to the appropriate collection point for the recycling of electrical and electronic equipment. By ensuring this product is disposed of correctly, you will help prevent potential negative consequences for the environment and human health, which could otherwise be caused by inappropriate waste handling of this product. -
Page 15: Care Advice
Care Advice Care Instructions - Melamine Finish Desk Keep away and protect from direct sunlight and heat. Do not place sharp materials(knife, fork, etc) directly onto your furniture as sharp material may scrape and damage the finish. Clean up spills quickly. Water left over a prolonged period of time may cause damage. - Page 16 Warranty 3 years Product Warranty – valid for Australian customers only Officeworks Ltd warrants that this product will be free from defects and work as intended for 3 years from the date of purchase by the original customer. If the product has any defects or does not work as intended during the Warranty Period, Officeworks will, at its election and at its expense, repair or replace the product.
Need help?
Do you have a question about the Typhoon Bathurst JBBATHDK10 and is the answer not in the manual?
Questions and answers