Table of Contents
Advertisement
Quick Links
Electric Kiln with Controller
DUB series
Please make sure to read the entire instruction
manual thoroughly before initial set-up,
operation, maintenance and inspection to
ensure proper use.
Please keep this instruction manual in a location that is
always available to the user.
INSTRUCTION MANUAL
391-23-037-1
MYC-5
Advertisement
Table of Contents

Related Manuals for Nidec DUB Series


Summary of Contents for Nidec DUB Series
- Page 1 391-23-037-1 MYC-5 Electric Kiln with Controller DUB series INSTRUCTION MANUAL Please make sure to read the entire instruction manual thoroughly before initial set-up, operation, maintenance and inspection to ensure proper use. Please keep this instruction manual in a location that is...
-
Page 2: Table Of Contents
Contents Instruction Manual for Electric Kiln with Controller (DUA series Safety Precautions Kiln Diagram/Specification/Attachment Troubleshooting 1 About controller 1 Kiln Diagram Error message 2 Specification / Attachments When you want to make sure the content of the program you set 3 Operation When you want to make sure if the firing mode is on or off Display panel does not light up. -
Page 3: Safety Precautions
Safety Precautions Please be sure to closely follow all safety precautions and warnings. Please be sure to read the entire instruction manual thoroughly before initial set-up, operation, maintenance and inspection and use. Please start using only after you have read the equipment’s function, safety information and precautions. This instruction manual provides three grades of safety warnings: "Danger", "Warning"... - Page 4 Danger ! Do not use the kiln other than for Stop using if you see smoke, smell firing pottery. fumes or hear unusual noises. Please do not use this product other than for Please switch the power (breaker) off and firing pottery.
- Page 5 Cautions ! Be careful not to touch the outside Do not place kiln near a TV, radio, surfaces of the kiln when opening or antenna wire. or closing the side door. This may cause disturbances to the TV image and audio signals. This may cause damage to the kiln or injury.
- Page 6 Installation These are safety precautions regarding the installation of the kiln. Danger ! Set up in a location which has Do not put flammable materials enough space. near the kiln. Please do not put flammable materials such as It may cause a fire or other accidents if an object curtains, paint, etc.
- Page 7 Firing These are safety precautions regarding with firing. Danger ! Do not touch kiln due to high Never let unattended children use temperature. kiln, or set kiln in a location which × children can reach. It may cause burn injury if you touch kiln due to high temperature of the It may cause burn injury, electrical shock or outside of kiln.
-
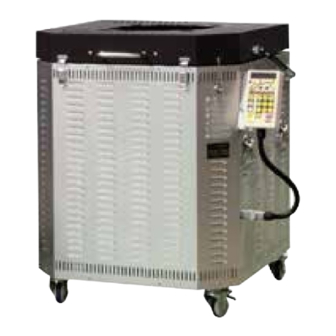
Page 8: Kiln Diagram/Specification/Attachment
1 Kiln Diagram 2 Specification Kiln Diagram/Specification/Attachments 3 Operation Gas venting tap Gas venting hole 1 Kiln Diagram Please put 「Gas venting tap」 on when closing hole. Control panel Cover handle Thermocouples Handle Power Caster 2 Specifications / Attachments Model DUB-05 DUB-07 DUB-10... -
Page 9: Installation / Electric Work
1 Electric works Installation/Electric works 2 Installation To Electricians 1 Electric works DANGER Please consider the specification of Ask professional kiln and circumstances of the set-up electrician to perform all location, and undertake construction electrical work. following all regulations. 1.Connection to power supply Please connect power cord into short circuit breaker or cord for wiring. -
Page 10: Set Up Of Timer
Installation/Electric work 2 Installation Installation of the Controller Install the controller on the right of kiln, and connect with the connector. Switch on the power (breaker). ① Fix the controller ② Insert it to the connector on the with two screws. right bottom side of the kiln. -
Page 11: Trial Operation
Installation/Electric work 3 Trial operation 3 Trial operation 《Time required: About 5 hours》 *When you do firing for the first time or haven't used for a long time, or in the rainy Please make sure in season, trial operation (dry operation) is necessary for moisture inside furnace. *Please cool the kiln off after trial operation once and use. -
Page 12: Before Firing
1 Precaution for loading / unloading Pottery out of Kiln Before firing 2 How to Remove Moisture Please check the following before firing DANGER *When you use the kiln for the first time or there is a lot of moisture inside the kiln furnace (brick), please do trial (dry) operation. -
Page 13: How To Remove Moisture
2 How to remove moisture Please remove all moisture inside furnace from the moisture venting hole. If you do firing without ventilation, the kiln will rust. Take the moisture venting tap off until the temperature becomes from 200 to 300℃ after firing and remove the moisture inside a work. -
Page 14: Functions Of Controller
1 Variations of programs Functions of controller 2 Convenient and safe functions 1 Variations of programs P.13 Basic program Basic program Installing 10 functions including Raku firing, bisque firing, glaze firing which are often used. Basic Easy operation only to put the 3 keys Prog. -
Page 15: Firing Of Controller
Firing by controller 1 Firing by “Basic programs” 1 Firing by “Basic programs” 1. Variations and contents of basic programs Step1 Step2 Step3 Step4 Glaze firing Basic Prog. 1220 ~ 1270℃ Self Prog. Overglaze / Raku firing 800℃ Start Bisque firing 700℃... -
Page 16: Firing By "Basic Programs
Firing by controller 1 Firing by “Basic programs” 2. Firing by “Basic programs” shows flashing. P.10 Operating procedure Display panel Please be sure to read It is showing the kiln temperature. 『Before Firing』 before Switch the power (breaker) on. firing. Push the “Basic program”... -
Page 17: Firing By "Self-Produced Programs
Firing by controller 2 Firing by “Self-produced” programs 2 Firing by “Self-produced” programs 1. About self-produced programs *Self-produced programs are not You can change a program into your own specification based on “Basic program” . It is registered with shipment. possible to memorize 20 variations. -
Page 18: Saving "Self-Produced Programs " Into Controller Memory
Firing by controller 2 Firing by “Self-produced programs” 3. Registration (Preservation) of “Self-produced programs” shows flashing. You can register 20 self- Operating procedure Display panel produced programs. Number the Push after making self-produced program number from 1 ~ 20. programs. -
Page 19: Firing By "Continuing Programs
Firing by controller 3 Firing by “Continuing programs” 3 Firing by “Continuing programs” 1. About continuing programs *Self-produced programs are not You can set the temperature in 16 stages at maximum by combining 4-stages firings registered with shipment. based on “Self-produced programs” . Self-produced Self-produced Self-produced... -
Page 20: Registration (Preservation) Of "Continuing Programs
Firing by controller 3 Firing by “Continuing programs” 3. Registration (Preservation) of “Continuing programs” shows flashing. Operating procedure Display panel You can register 20 self- produced programs. Number the Push after making continuing program number from 1 ~ 20. programs. Number the programs which you register P.28 (preserve). -
Page 21: Convenient Functions Of Controller
Convenient functions of controller 1 Timer 1 Timer You can set the timer in the following 2 ways. Setup of Timer 1 In how many minutes you start firing after pushing key. 2 What time you start firing 1. In how many minutes you start firing after pushing key. -
Page 22: Buzzer
Convenient functions of controller 2 Buzzer 2 Buzzer Note: You can set buzzers in the following 3 ways. Once you set the buzzer, the setting continues in the next Buzzer rings for 20 seconds. firing unless you change. If buzzers are unnecessary, please 1. -
Page 23: Lock
2 Buzzer Convenient functions of controller 3 Lock 3. Ring the buzzer after finishing the designated process. shows flashing. Operating procedure Display panel More than 5 seconds Enter into buzzer setting mode. + Enter into the buzzer setting mode“AL-2” . The indicator flashes. -
Page 24: Troubleshooting
Tighten the connection if and electrical conductors electrical conductors it is loose. Loosening of connection ・ Please consult Nidec DriveTechnology Detection of abnormal high ceramics department temperatures ・ Abnormal high temperature inside the kiln in the event that the display still shows F3... -
Page 25: Display Panel Does Not Light Up
DriveTechnology” ceramics department. (2) Confirm if the connection of hot wires is correct or not. Please be sure by Please consult “Nidec DriveTechnology” ceramics department when the above countermeasures are not 『 Electrik works』 effective. P.20... -
Page 26: Maintenance
Maintenance 1 How to exchage each 1 How to exchage each Parts of electric kiln burn out due to long periods of use, frequency in use, and how to use. Please contact our distributor when you have trouble in operation with the below contents Please be sure the model and and the condition of the kiln. -
Page 27: Replacement Of Heating Elements
Maintenance 1 How to exchage each 2. Replacement of Heating Elements Caution) Operating Procedure Please be careful not to broke the (1) Take the heating elements off. U p i n h o l d i n g t h e h e a t i n g elements inside the bricks. -
Page 28: Simplified Chart Of Controller Operation
Variation and content of basic programs 〈Simplified chart to operate controller〉 Appendix Basic program Trial operation basic → → Basic Prog. Glaze firing 1220-1270℃ Bisque firing → → Glazing/Raku Basic 800℃ Prog. Bisque firing 700℃ Trial operation → → Glazing/Raku 400℃... -
Page 29: Examples Of "Self-Produced Programs " By Controller
〈Example of “Self-produced programs” by controller〉 Appendix You can change a program into your own program based on “Basic program” . You can make your own program easily by changing the content based on “Basic program” which is similar with the one you prefer *When you want to set maximum temperature at 1240℃... -
Page 30: Temperature Chart Of "Basic Programs
Appendix “B ” 〈Temperature chart of asic program 〉 *Total time is to completion of 《Hold 2》 Process Temperature Time Temperature Time Hold Temperature Time Hold Temperature Time Temperature Timer Total time Program Drying Trial operation Bisque firing Glazing Raku 1220 Glaze firing 1230... -
Page 31: Warranty Provision
Warranty Provision *Nidec DriveTechnology warrants, to the original purchaser of new products only, that this product shall be free from defects in workmanship and materials under normal use following to the precautions of the instruction manual and label in the main body for one year from the date of original purchase. - Page 32 Please scan the QR code or access the URL below. Contact Us https://www.nidec.com/en/nidec-drivetechnology/inquiry/ Sales Offices https://www.nidec.com/en/nidec-drivetechnology/corporate/network/sales/ Copyright NIDEC DRIVE TECHNOLOGY Corporation. All Rights Reserved. Nidec Shimpo Corporation change its company name to Nidec Drive Technology Corporation on April 1, 2023.
Need help?
Do you have a question about the DUB Series and is the answer not in the manual?
Questions and answers
Hi - do you have a wiring diagram for the dub 07 (shampoo- Nidec) kiln