
Related Manuals for Baumatic BMEO6E10M


Summary of Contents for Baumatic BMEO6E10M
- Page 1 Model: BMEO6E10M INSTRUCTION MANUAL BUILT-IN ELECTRIC OVEN IO-CBI-0563 / 8071093 (06.2018 / v1)
- Page 2 You can find your local distributor on our website at www.baumatic-mea.com and click on ‘where to buy’ from the menu. For customers within the U.A.E, your Baumatic appliance is covered by a 2 year parts and labour warranty. Baumatic Middle East General Trading LLC P.O BOX 393720 Dubai, United Arab Emirates Tel: +971 (0) 4551 3780 –...
-
Page 3: Table Of Contents
TABLE OF CONTENTS Safety instructions ......................4 Description of the appliance ..................... 8 Installation ........................10 Operation .......................... 12 Baking in the oven – practical hints ................24 Test dishes ......................... 25 Cleaning and maintenance ....................27 Troubleshooting ........................ 31 Technical data ........................ -
Page 4: Safety Instructions
SAFETY INSTRUCTIONS Warning: The appliance and its accessible parts become hot during use. Care should be taken to avoid touching heating elements. Children less than 8 years of age shall be kept away unless continuously supervised. This appliance can be used by children aged from 8 years and above and persons with reduced physical, sensory or mental capabilities or lack of experience and knowledge if they have been given supervision or instruction concerning... - Page 5 SAFETY INSTRUCTIONS Danger of burns! Hot steam may escape when you open the oven door. Be careful when you open the oven door during or after cooking. Do NOT lean over the door when you open it. Please note that depending on the temperature the steam can be invisible.
- Page 6 HOW TO SAVE ENERGY Using energy in a respon- sible way not only saves money but also helps the environment. So let’s save energy! And this is how you can do it: l Do not uncover the pan too often (a watched pot never boils!).
- Page 7 DISPOSAL OF THE APPLIANCE UNPACKING Old appliances should not sim- During transportation, protec- ply be disposed of with normal tive packaging was used to household waste, but should protect the appliance against be delivered to a collection and any damage. After unpack- recycling centre for electric and ing, please dispose of all electronic equipment.
-
Page 8: Description Of The Appliance
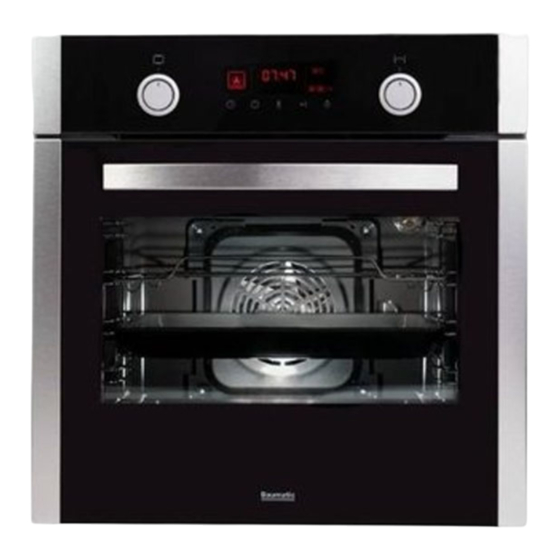
DESCRIPTION OF THE APPLIANCE Control panel Oven function selector knob Setting selection knob Oven door handle Oven functions Time and function Temperature indication Touch controls... - Page 9 SPECIFICATIONS OF THE APPLIANCE Cooker fittings: Grill grate Baking tray* (drying rack) Roasting tray* Side racks *optional...
-
Page 10: Installation
INSTALLATION Installing the oven l The kitchen area should be dry and aired and equipped with efficient ventillation. When installing the oven, easy access to all control elements should be ensured. l This is a Y–type design built–in oven, which means that its back wall and one side wall can be placed next to a high piece of furniture or a wall. - Page 11 INSTALLATION Electrical connection Connection diagram Caution! Voltage of heating elements 230V. Caution! In the event of any connection the safety Warning! wire must be connected to the PE terminal. All electrical work should be carried out by a suitably qualified and authorised electrician. No alterations or wilful changes in the electric- ity supply should be carried out.
-
Page 12: Operation
OPERATION Before using the appliance for Important! the first time The oven features touch control panel and display. To activate each touch sensor, touch the glass above the l Remove packaging, clean the interior of sensor (indicated by a pictogram). the oven, An acoustic signal will be heard. - Page 13 OPERATION Using the control panel Touch controls The control panel features 5 touch sensors (no backlight), marked as shown above. Each time you touch a sensor a beep is emitted (except as indicated in detailed operating instruc- tions). Which touch sensor are enabled depends on the setting of the function selector knob (described in detain in section on oven functions).
- Page 14 OPERATION Oven functions Oven functions are indicated as follows: Time and function indication Temperature The clock — 24-hour or AM / Oven cavity temperature and heating indi- The displayed functions and symbols. cator ECO mode Kitchen timer Meat probe and activation indicator (unavail- able) Door lock (Oven with pyrolytic cleaning)
- Page 15 OPERATION Oven function knob Setting selection knob Each position is another oven function. Every Turn left / right to set the temperature or time. function is indicated by a different pictogram Turn right toward the "+" to increase. Turn left displayed on the screen.
- Page 16 OPERATION Turn on the oven and set the time. In standby mode, the display intensity set to low. The following are displayed: l clock, l symbols of the active functions: oven cavity residual temperature, child lock, kitchen timer, door lock. When you use any controls the appliance enters the operating mode.
- Page 17 OPERATION function Child Lock Child lock is designed to prevent children from When ECO function is active the appliance switching on the oven. Once the child lock is turns off heaters 5 minutes before the End activated the oven stops responding to any Time and uses residual heat to continue controls except the unlocking combination.
- Page 18 OPERATION Light The light turns on: l The function selector knob is set to any cooking function (other than 0). l Over door is open. l You touch — [confirmation] beep is heard. The light turns off: l Automatically after 30 seconds or after 10 minutes when oven door is open.
- Page 19 OPERATION Heating functions thermostat turns on any of the heaters. Open the door during operation. If you open the oven door, if any of the heating function is activated, the fan and heaters will turn off until the door is closed. If the door is open longer than 30 seconds, you will hear a 15-second [error] beep.
- Page 20 OPERATION Table Oven functions Knob Display indica- Oven functions Options Default setting setting tion 170˚C FAN HEATER Level 3 FAN HEATER 220˚C BOTTOM HEATER Level 2 BOTTOM HEATER 200˚C (CRISPING) BOTTOM HEATER 180˚C + TOP HEATER Level 3 BOTTOM HEATER 170˚C + TOP HEATER Level 3...
- Page 21 OPERATION pending on the oven operating mode (when Timer. Kitchen Timer. Duration. Delay DURATION and DELAY START functions start. are active). 1. Duration. When active, the symbol is displayed. Additional timer display shows the time that has elapsed since the oven was turned on.
- Page 22 OPERATION Follow the same procedure to adjust DURA- Follow the same procedure to adjust KITCH- TION time. EN TIMER time. duration function Duration. When duration has elapsed the oven turns off You can program the appliance to turn off as if you set function selector knob to 0. You after 00:01h to 10:00h (with an accuracy of will hear [end time] beep for about 1 minute.
- Page 23 OPERATION Using the roaster. The roasting process occurs as a result of the infrared rays emitted by incandescent radia- tor, which are absorbed by the food. In order to switch on the roaster you need to: l Choose one of the heating functions Set function selector knob to 0 to cancel l Heat the oven for approx.
-
Page 24: Baking In The Oven - Practical Hints
BAKING IN THE OVEN – PRACTICAL HINTS Baking l we recommend using the baking trays which were provided with your cooker; l it is also possible to bake in cake tins and trays bought elsewhere which should be put on the drying rack; for baking it is better to use black trays which conduct heat better and shorten the baking time;... -
Page 25: Test Dishes
TEST DISHES. According to standard EN 60350-1. Baking Type of dish Accessory Level Type Temperature Baking of heating time (min.) Baking tray 160 - 170 25 - 40 Baking tray 155 - 170 25 - 40 Baking tray 155 - 170 25 - 40 Small cakes 2 + 4... - Page 26 TEST DISHES. According to standard EN 60350-1. Grilling Type of dish Accessory Level Type Temperature Time of heating (min.) Wire rack 1,5 - 2,5 White bread toast Wire rack 2 - 3 Wire rack + 4 - wire rack 1st side 10 - 15 roasting tray Beef burgers 3 - roasting...
-
Page 27: Cleaning And Maintenance
CLEANING AND MAINTENANCE Replacement of the oven light bulb Proper routine maintenance and cleaning of the oven can significantly extend its trouble- In order to avoid the possibility of an free operation. electric shock ensure that the appliance Turn off the oven before cleaning. is switched off before replacing the bulb. - Page 28 CLEANING AND MAINTENANCE l Ovens in cookers marked with the letter l Ovens in cookers marked with the letters D are equipped with easily removable Dp have stainless steel sliding telescopic wire shelf supports. To remove them for runners attached to the wire shelf sup- washing, pull the front catch, then tilt the ports.
- Page 29 CLEANING AND MAINTENANCE Removing the inner panel Door removal 1. Using a flat screwdriver unhook the up- per door slat, prying it gently on the sides In order to obtain easier access to the oven (fig. B). chamber for cleaning, it is possible to remove 2.
- Page 30 CLEANING AND MAINTENANCE 3. Pull the inner glass panel from its seat Regular inspections (in the lower section of the door). Re- move the inner panel (fig. D). Besides keeping the oven clean, you 4. Clean the panel with warm water with should: some cleaning agent added.
-
Page 31: Troubleshooting
TROUBLESHOOTING In the event of any fault: l turn off the appliance, l disconnect the power supply, l based on the instructions given in the table below, some minor issues can be corrected by the user. Please check the consecutive points in the table before you refer the repair to customer service. -
Page 32: Technical Data
TECHNICAL DATA Voltage rating 220-240V~50/60 Hz Power rating max. 3,1 kW Oven dimensions H/W/D 59,5 / 59,5 / 57,5 cm Basic Information: The product meets the requirements of European standards EN 60335- 1; EN60335-2-6. The data on the energy labels of electric ovens is given according to standard EN 60350-1 / IEC 60350-1. - Page 37 : ز ا ر ط ﻟ ا BMEO6E10M ت ﺎ ﻣ ﯾ ﻠ ﻌ ﺗ ﻟ ا ل ﯾ ﻟ د ﺞ ﻣ د ﻣ ﻲ ﺋ ﺎ ﺑ ر ﮭ ﻛ ن ر ﻓ IO-CBI-0563 / 8071093 ر ا د...
- Page 38 ﻣ ﻌ ﻠ ﻟ ﺔ ﺑ ﺳ ﻧ ﻟ ﺎ ﺑ ق و ﻓ ر ﻘ ﻧ ﻟ ا و ، baumatic mea.com ب ﯾ و ﻟ ا ﻊ ﻗ و ﻣ ﻰ ﻟ إ ل و ﺧ د ﻟ...
- Page 39 ت ﺎ ﯾ و ﺗ ﺣ ﻣ ﻟ ا ل و د ﺟ ......
- Page 40 ﺔ ﻣ ﻼ ﺳ ﻟ ا ت ﺎ ﻣ ﯾ ﻠ ﻌ ﺗ م ﺛ ن ﻣ و . م ا د ﺧ ﺗ ﺳ ﻻ ا ء ﺎ ﻧ ﺛ أ ﺔ ﻧ ﺧ ﺎ ﺳ ل و ﺻ و...
- Page 41 ﺔ ﻣ ﻼ ﺳ ﻟ ا ت ﺎ ﻣ ﯾ ﻠ ﻌ ﺗ ن ﻛ ، ا ذ . ﻟ ن ر ﻔ ﻟ ا ب ﺎ ﺑ ﺢ ﺗ ﻓ د ﻧ ﻋ ن ﺧ ﺎ ﺳ ﻟ ا ر...
- Page 42 ﺔ ﻗ ﺎ ط ﻟ ا ر ﯾ ﻓ و ﺗ ﺔ ﯾ ﻔ ﯾ ﻛ ﻻ ﺔ ﻟ و ؤ ﺳ ﻣ ﺔ ﻘ ﯾ ر ط ﺑ ﺔ ﻗ ﺎ ط ﻟ ا م ا د ﺧ ﺗ ﺳ ا د...
- Page 43 ز ﺎ ﮭ ﺟ ﻟ ا ن ﻣ ص ﻠ ﺧ ﺗ ﻟ ا ة و ﺑ ﻌ ﻟ ا ت ﺎ ﯾ و ﺗ ﺣ ﻣ ﻎ ﯾ ر ﻔ ﺗ ﺔ ط ﺎ ﺳ ﺑ ﺑ ﺔ ﻣ ﯾ د...
- Page 44 ز ﺎ ﮭ ﺟ ﻟ ا ف ﺻ و م ﻛ ﺣ ﺗ ﻟ ا ﺔ ﺣ و ﻟ م ﻛ ﺣ ﺗ ﻟ ا ض ﺑ ﻘ ﻣ د ﯾ د ﺣ ﺗ ض ﺑ ﻘ ﻣ ن ر ﻔ...
- Page 45 ز ﺎ ﮭ ﺟ ﻟ ا ت ﺎ ﻔ ﺻ ا و ﻣ د ﻗ و ﻣ ﻟ ا ت ا ز ﯾ ﮭ ﺟ ﺗ ت ا ز و ﺑ ﺧ ﻣ ﻟ ا ﺔ ﯾ ﻧ ﯾ ﺻ ﺔ...
- Page 46 ب ﯾ ﻛ ر ﺗ ﻟ ا ن ر ﻔ ﻟ ا ب ﯾ ﻛ ر ﺗ ﺔ ﺿ ر ﻌ ﻣ و ، ﺔ ﻓ ﺎ ﺟ ﺦ ﺑ ط ﻣ ﻟ ا ﺔ ﻘ ط ﻧ ﻣ ن و ﻛ...
- Page 47 ب ﯾ ﻛ ر ﺗ ﻟ ا ﻲ ﺋ ﺎ ﺑ ر ﮭ ﻛ ﻟ ا ل ﯾ ﺻ و ﺗ ﻟ ا ل ﯾ ﺻ و ﺗ ﻟ ا ط ط ﺧ ﻣ ! ﮫ ﯾ ﺑ ﻧ ﺗ .
- Page 48 ل ﯾ ﻐ ﺷ ﺗ ﻟ ا ! م ﺎ ھ ة ر ﻣ ل و ﻷ ز ﺎ ﮭ ﺟ ﻟ ا م ا د ﺧ ﺗ ﺳ ا ل ﺑ ﻗ ﺔ ﺷ ﺎ ﺷ و ﺔ ﯾ ﺳ ﻣ...
- Page 49 ل ﯾ ﻐ ﺷ ﺗ ﻟ ا م ﻛ ﺣ ﺗ ﻟ ا ﺔ ﺣ و ﻟ م ا د ﺧ ﺗ ﺳ ا ﺔ ﯾ ﺳ ﻣ ﻠ ﻟ ا م ﻛ ﺣ ﺗ ﻟ ا ر ا ر ز...
- Page 50 ل ﯾ ﻐ ﺷ ﺗ ﻟ ا ن ر ﻔ ﻟ ا ف ﺋ ﺎ ظ و ﻲ ﻟ ﺎ ﺗ ﻟ ا و ﺣ ﻧ ﻟ ا ﻰ ﻠ ﻋ ن ر ﻔ ﻟ ا ف ﺋ ﺎ ظ و ﻰ...
- Page 51 ل ﯾ ﻐ ﺷ ﺗ ﻟ ا ت ا د ا د ﻋ ﻹ ا د ﯾ د ﺣ ﺗ ض ﺑ ﻘ ﻣ ن ر ﻔ ﻟ ا ف ﺋ ﺎ ظ و ض ﺑ ﻘ ﻣ و أ ة...
- Page 52 ل ﯾ ﻐ ﺷ ﺗ ﻟ ا . ت ﻗ و ﻟ ا ط ﺑ ﺿ و ن ر ﻔ ﻟ ا ل ﯾ ﻐ ﺷ ﺗ ﻊ ﺿ و ﻟ ا ﻰ ﻠ ﻋ ﺔ ﺷ ﺎ ﺷ ﻟ ا ة د...
- Page 53 ل ﯾ ﻐ ﺷ ﺗ ﻟ ا ﺔ ﻔ ﯾ ظ و ل ﺎ ﻔ ط ﻷ ا ل ﻔ ﻗ ، ﺔ ط ﺷ ﻧ ( ي د ﺎ ﺻ ﺗ ﻗ ﻻ ا ﻊ ﺿ و ) ﻟ ا ﺔ...
- Page 54 ل ﯾ ﻐ ﺷ ﺗ ﻟ ا ة ء ﺎ ﺿ ﻹ ا ة ء ﺎ ﺿ ﻹ ا ل ﯾ ﻐ ﺷ ﺗ م ﺗ ﯾ ﺔ ﻔ ﯾ ظ و ي أ ﻰ ﻠ ﻋ ف ﺋ ﺎ ظ و...
- Page 55 ل ﯾ ﻐ ﺷ ﺗ ﻟ ا . ﺔ ﻠ ﻌ ﺷ ي أ ل ﯾ ﻐ ﺷ ﺗ ﺑ ة ر ا ر ﺣ ﻟ ا م ظ ﻧ ﻣ م و ﻘ ﯾ ن ﯾ ﺧ ﺳ ﺗ ﻟ ا ف...
- Page 56 ل ﯾ ﻐ ﺷ ﺗ ﻟ ا ن ر ﻔ ﻟ ا ف ﺋ ﺎ ظ و ل و د ﺟ ت ا د ا د ﻋ ﻹ ا ﺔ ﺷ ﺎ ﺷ ر ﺷ ؤ ﻣ د ا د ﻋ...
- Page 57 ل ﯾ ﻐ ﺷ ﺗ ﻟ ا ً ﺎ ﺎ ﺗ ﻔ ﯾ ظ و ن و ﻛ ﺗ ﺎ ﻣ د ﻧ ) ﻋ ن ر ﻔ ﻟ ا ل ﯾ ﻐ ﺷ ﺗ ﻊ ﺿ و ﻟ ﻘ ﻓ و ء...
- Page 58 ل ﯾ ﻐ ﺷ ﺗ ﻟ ا ة د ﻣ ) ﻟ ا DURATION ت ﯾ ﻗ و ﺗ ط ﺑ ﺿ ﻟ ء ا ر ﺟ ﻹ ا س ﻔ ﻧ ﻊ ﺑ ﺗ ا KITCHEN TIMER ت ﯾ ﻗ...
- Page 59 ل ﯾ ﻐ ﺷ ﺗ ﻟ ا . ﺔ ﺻ ﻣ ﺣ ﻣ ﻟ ا م ا د ﺧ ﺗ ﺳ ا ﺔ ﺛ ﻌ ﺑ ﻧ ﻣ ﻟ ا ء ا ر ﻣ ﺣ ﻟ ا ت ﺣ ﺗ ﺔ ﻌ...
- Page 60 ﺔ ﯾ ﻠ ﻣ ﻋ ت ﺎ ﮭ ﯾ ﺟ و ﺗ – ن ر ﻔ ﻟ ا ﻲ ﻓ ت ا ز و ﺑ ﺧ ﻣ ﻟ ا ر ﯾ ﺿ ﺣ ﺗ ت ا ز و ﺑ ﺧ ﻣ...
- Page 61 ﺎ ً ﻘ ﻓ EN 60350-1 ر ﺎ ﯾ ﻌ ﻣ ﻠ ﻟ . و ﺔ ﻣ ﻌ ط ﻷ ا ر ﺎ ﺑ ﺗ ﺧ ا ت ا ز و ﺑ ﺧ ﻣ ﻟ ا د ا د ﻋ ﻹ...
- Page 62 ﺎ ً ﻘ ﻓ EN 60350-1 ر ﺎ ﯾ ﻌ ﻣ ﻠ ﻟ . و ﺔ ﻣ ﻌ ط ﻷ ا ر ﺎ ﺑ ﺗ ﺧ ا ء ا و ﺷ ﻟ ا ة ر ا ر ﺣ ﻟ ا ﺔ...
- Page 63 ﺔ ﻧ ﺎ ﯾ ﺻ ﻟ ا و ف ﯾ ظ ﻧ ﺗ ﻟ ا ن ر ﻔ ﻟ ا ة ء ﺎ ﺿ إ ح ﺎ ﺑ ﺻ ﻣ ل ا د ﺑ ﺗ ﺳ ا ن أ ن ر ﻔ...
- Page 64 ﺔ ﻧ ﺎ ﯾ ﺻ ﻟ ا و ف ﯾ ظ ﻧ ﺗ ﻟ ا ل ﻣ ﺣ ﺗ ﻲ ﺗ ﻟ ا ﻲ ﮭ ط ﻟ ا ة ز ﮭ ﺟ أ ﻲ ﻓ ة د و ﺟ و ﻣ ﻟ ا...
- Page 65 ﺔ ﻧ ﺎ ﯾ ﺻ ﻟ ا و ف ﯾ ظ ﻧ ﺗ ﻟ ا ب ﺎ ﺑ ﻟ ا ﺔ ﻟ ا ز إ ﺔ ﯾ ﻠ ﺧ ا د ﻟ ا ﺔ ﺣ و ﻠ ﻟ ا ﺔ ﻟ ا...
- Page 66 ﺔ ﻧ ﺎ ﯾ ﺻ ﻟ ا و ف ﯾ ظ ﻧ ﺗ ﻟ ا ﺔ ﻣ ظ ﺗ ﻧ ﻣ ﻟ ا ت ﺎ ﺻ و ﺣ ﻔ ﻟ ا ﻲ ) ﻓ ﺎ ﮭ ﺗ ﯾ ﺑ ﻣ ن...
- Page 67 ﺎ ﮭ ﺣ ﻼ ﺻ إ و ل ﺎ ط ﻋ ﻷ ا ف ﺎ ﺷ ﺗ ﻛ ا : ل ط ﻋ ي أ ث و د ﺣ ﺔ ﻟ ﺎ ﺣ ﻲ ﻓ ، ز ﺎ ﮭ ﺟ ﻟ ا...
- Page 68 ﺔ ﯾ ﻧ ﻔ ﻟ ا ت ﺎ ﻔ ﺻ ا و ﻣ ﻟ ا ز ﺗ ر ھ ت ﻟ و ﻓ ﺔ ﯾ ﺗ ﻟ و ﻔ ﻟ ا ف ﯾ ﻧ ﺻ ﺗ ﻰ ﺻ ﻗ أ ٍ د ﺣ...
Need help?
Do you have a question about the BMEO6E10M and is the answer not in the manual?
Questions and answers