Table of Contents
Advertisement
Quick Links
Advertisement
Table of Contents

Related Manuals for Brother 885-V94


Summary of Contents for Brother 885-V94
- Page 1 Computerized Embroidery and Sewing Machine Operation Manual Product Code 885-V94/V95/V96/V97/V98 GETTING READY SEWING BASICS UTILITY STITCHES EMBROIDERY APPENDIX Be sure to read this document before using the machine. We recommend that you keep this document nearby for future reference.
-
Page 3: Introduction
— — — — — — — — — — — — — — — — — — — — — — — — — — — — — — — — — — — — — — — — — — — — — — — — — — — — Introduction Thank you for purchasing this embroidery and sewing machine. - Page 4 • In the event a malfunction occurs or adjustment is required, first follow the troubleshooting table in the back of the operation manual to inspect and adjust the machine yourself. If the problem persists, please consult your local authorized Brother dealer.
- Page 5 Use accessories recommended by the manufacturer as contained in this manual. The contents of this manual and specifications of this product are subject to change without notice. For additional product information and updates, visit our web site at www.brother.com SAVE THESE INSTRUCTIONS This machine is intended for household use.
-
Page 6: Table Of Contents
— — — — — — — — — — — — — — — — — — — — — — — — — — — — — — — — — — — — — — — — — — — — — — — — — — — Contents Introduction ........................ - Page 7 — — — — — — — — — — — — — — — — — — — — — — — — — — — — — — — — — — — — — — — — — — — — — — — — — — — — Useful Functions ........................64 Automatic sewing reverse/reinforcement stitches ....................
- Page 8 — — — — — — — — — — — — — — — — — — — — — — — — — — — — — — — — — — — — — — — — — — — — — — — — — — — Adjusting the character spacing ........................
- Page 9 — — — — — — — — — — — — — — — — — — — — — — — — — — — — — — — — — — — — — — — — — — — — — — — — — — — — Incorrect thread tension ..........................
-
Page 10: Machine Features
— — — — — — — — — — — — — — — — — — — — — — — — — — — — — — — — — — — — — — — — — — — — — — — — — — — Machine Features a Automatic thread cutting The thread can be cut automatically after sewing (page 59, 65). -
Page 11: Accessories
Note Foot controller: Model T This foot controller can be used on the machine with product code 885-V94/V95/V96/V97/V98. The product code is mentioned on the machine rating plate. The securing screw on the side of the presser foot holder is available through your authorized dealer. -
Page 12: Optional Accessories
” center or visit the website at http://www.brother.com/ All specifications are correct at the time of printing. The part codes are subject to change without notice. Visit your nearest authorized dealer for a complete listing of optional accessories available for your... -
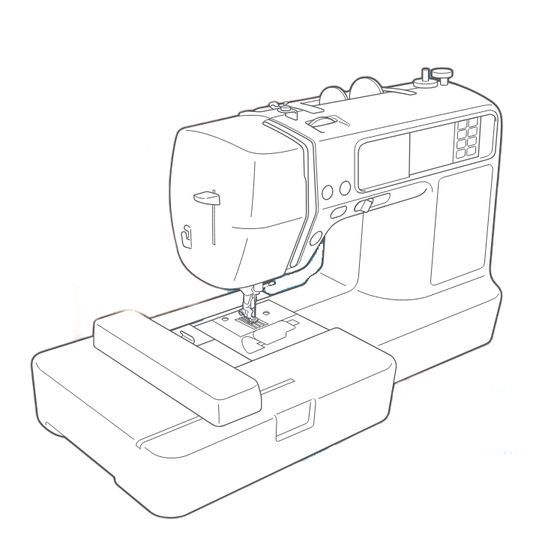
Page 13: Names Of Machine Parts And Their Functions
— — — — — — — — — — — — — — — — — — — — — — — — — — — — — — — — — — — — — — — — — — — — — — — — — — — — Names of Machine Parts and Their Functions The names of the various parts of the sewing machine and their functions are described below. -
Page 14: Needle And Presser Foot Section
— — — — — — — — — — — — — — — — — — — — — — — — — — — — — — — — — — — — — — — — — — — — — — — — — — — Needle and presser foot Right-side/rear view section... -
Page 15: Operation Buttons
— — — — — — — — — — — — — — — — — — — — — — — — — — — — — — — — — — — — — — — — — — — — — — — — — — — — Operation buttons The operation buttons help you to easily perform various basic sewing machine operations. -
Page 16: Operation Panel
— — — — — — — — — — — — — — — — — — — — — — — — — — — — — — — — — — — — — — — — — — — — — — — — — — — Operation panel The front operation panel has an LCD (liquid crystal display) and operation keys. -
Page 17: Getting Ready
GETTING READY The various preparations required before starting to sew are described in this chapter. Turning the Machine On/Off ..................16 LCD (Liquid Crystal Display) Operation..............18 Winding/Installing the Bobbin.................22 Upper Threading .....................31 Replacing the Needle ....................39 Replacing the Presser Foot ..................43 Sewing Cylindrical Pieces and Large Pieces.............46... -
Page 18: Turning The Machine On/Off
— — — — — — — — — — — — — — — — — — — — — — — — — — — — — — — — — — — — — — — — — — — — GETTING READY Turning the Machine On/Off This section explains how to turn the sewing machine on and off. -
Page 19: Turning On The Machine
— — — — — — — — — — — — — — — — — — — — — — — — — — — — — — — — — — — — — — — — — — — — — — — — — — — — Turning on the machine Turning off the machine Prepare the included power cord. -
Page 20: Lcd (Liquid Crystal Display) Operation
— — — — — — — — — — — — — — — — — — — — — — — — — — — — — — — — — — — — — — — — — — — — GETTING READY LCD (Liquid Crystal Display) Operation Selected stitch, pattern settings and messages are displayed on the LCD (liquid crystal display) on the front... - Page 21 — — — — — — — — — — — — — — — — — — — — — — — — — — — — — — — — — — — — — — — — — — — — — — — — — — — — Attribute Icon Details...
- Page 22 — — — — — — — — — — — — — — — — — — — — — — — — — — — — — — — — — — — — — — — — — — — — GETTING READY Turn on the sewing machine.
-
Page 23: Checking Machine Operating Procedures
— — — — — — — — — — — — — — — — — — — — — — — — — — — — — — — — — — — — — — — — — — — — — — — — — — — — Press (Next page key) to switch to the Checking machine operating... -
Page 24: Winding/Installing The Bobbin
— — — — — — — — — — — — — — — — — — — — — — — — — — — — — — — — — — — — — — — — — — — — GETTING READY Winding/Installing the Bobbin This section describes how to wind the thread onto the bobbin, and then insert the bobbin thread. - Page 25 — — — — — — — — — — — — — — — — — — — — — — — — — — — — — — — — — — — — — — — — — — — — — — — — — — — — Turn on the sewing machine.
- Page 26 — — — — — — — — — — — — — — — — — — — — — — — — — — — — — — — — — — — — — — — — — — — — GETTING READY Pass the thread behind the thread guide cover Note...
- Page 27 — — — — — — — — — — — — — — — — — — — — — — — — — — — — — — — — — — — — — — — — — — — — — — — — — — — — Wind the end of the thread clockwise around Slide the sewing speed controller to the right.
- Page 28 — — — — — — — — — — — — — — — — — — — — — — — — — — — — — — — — — — — — — — — — — — — — GETTING READY ■...
-
Page 29: Installing The Bobbin
— — — — — — — — — — — — — — — — — — — — — — — — — — — — — — — — — — — — — — — — — — — — — — — — — — — — Cut the thread with scissors beside the bobbin- Installing the bobbin winding thread guide. - Page 30 — — — — — — — — — — — — — — — — — — — — — — — — — — — — — — — — — — — — — — — — — — — — GETTING READY Press (Needle position button) once or...
- Page 31 — — — — — — — — — — — — — — — — — — — — — — — — — — — — — — — — — — — — — — — — — — — — — — — — — — — — ■...
- Page 32 — — — — — — — — — — — — — — — — — — — — — — — — — — — — — — — — — — — — — — — — — — — — GETTING READY Carefully pull the upper thread upward to pull out the end of the bobbin thread.
-
Page 33: Upper Threading
— — — — — — — — — — — — — — — — — — — — — — — — — — — — — — — — — — — — — — — — — — — — — — — — — — — — Upper Threading This section describes how to position the spool for the upper thread, and then thread the needle. -
Page 34: Threading The Upper Thread
— — — — — — — — — — — — — — — — — — — — — — — — — — — — — — — — — — — — — — — — — — — — GETTING READY Press (Needle position button) once or... - Page 35 — — — — — — — — — — — — — — — — — — — — — — — — — — — — — — — — — — — — — — — — — — — — — — — — — — — — Slide the spool cap onto the spool pin and Pass the thread behind the thread guide cover return the spool pin to its original position.
- Page 36 — — — — — — — — — — — — — — — — — — — — — — — — — — — — — — — — — — — — — — — — — — — — GETTING READY Make sure that the thread is passed into the Turn off the machine.
- Page 37 — — — — — — — — — — — — — — — — — — — — — — — — — — — — — — — — — — — — — — — — — — — — — — — — — — — — Lower the needle threader lever on the left Raise the needle threader lever slowly.
-
Page 38: Using The Twin Needle
— — — — — — — — — — — — — — — — — — — — — — — — — — — — — — — — — — — — — — — — — — — — GETTING READY ■... - Page 39 — — — — — — — — — — — — — — — — — — — — — — — — — — — — — — — — — — — — — — — — — — — — — — — — — — — — Insert the extra spool pin into the end of the Without passing the thread through the needle bobbin winder shaft, and install the thread...
- Page 40 — — — — — — — — — — — — — — — — — — — — — — — — — — — — — — — — — — — — — — — — — — — — GETTING READY Press Start sewing.
-
Page 41: Replacing The Needle
— — — — — — — — — — — — — — — — — — — — — — — — — — — — — — — — — — — — — — — — — — — — — — — — — — — — Replacing the Needle This section describes how to replace the needle. -
Page 42: Checking The Needle
— — — — — — — — — — — — — — — — — — — — — — — — — — — — — — — — — — — — — — — — — — — — GETTING READY Memo Checking the needle... -
Page 43: Replacing The Needle 41
— — — — — — — — — — — — — — — — — — — — — — — — — — — — — — — — — — — — — — — — — — — — — — — — — — — — Lower the presser foot lever. - Page 44 — — — — — — — — — — — — — — — — — — — — — — — — — — — — — — — — — — — — — — — — — — — — GETTING READY While holding the needle with your left hand, use the screwdriver to tighten the needle...
-
Page 45: Replacing The Presser Foot
— — — — — — — — — — — — — — — — — — — — — — — — — — — — — — — — — — — — — — — — — — — — — — — — — — — — Replacing the Presser Foot This section describes how to replace the presser foot. - Page 46 — — — — — — — — — — — — — — — — — — — — — — — — — — — — — — — — — — — — — — — — — — — — GETTING READY Place a different presser foot below the holder Note...
-
Page 47: Removing And Attaching The Presser Foot Holder
— — — — — — — — — — — — — — — — — — — — — — — — — — — — — — — — — — — — — — — — — — — — — — — — — — — — ■... -
Page 48: Sewing Cylindrical Pieces And Large Pieces
— — — — — — — — — — — — — — — — — — — — — — — — — — — — — — — — — — — — — — — — — — — — GETTING READY Sewing Cylindrical Pieces and Large Pieces Free-arm sewing and using an extension table make sewing cylindrical pieces or large pieces easy. - Page 49 — — — — — — — — — — — — — — — — — — — — — — — — — — — — — — — — — — — — — — — — — — — — — — — — — — — — Raise up the two legs on the reverse side of the Turn back the extension table, and then store extension table until they click.
- Page 50 — — — — — — — — — — — — — — — — — — — — — — — — — — — — — — — — — — — — — — — — — — — — GETTING READY...
-
Page 51: Sewing Basics
SEWING BASICS The necessary preparations for sewing are described in this chapter. Sewing........................50 Setting the Stitch .....................61 Useful Functions......................64 Useful Sewing Tips ....................68... -
Page 52: Sewing
— — — — — — — — — — — — — — — — — — — — — — — — — — — — — — — — — — — — — — — — — — — — SEWING BASICS Sewing Basic sewing operations are described below. -
Page 53: Stitch Types
— — — — — — — — — — — — — — — — — — — — — — — — — — — — — — — — — — — — — — — — — — — — — — — — — — — — k Patterns saved in the machine's memory You can retrieve a saved pattern. - Page 54 — — — — — — — — — — — — — — — — — — — — — — — — — — — — — — — — — — — — — — — — — — — — SEWING BASICS Select the stitch type.
- Page 55 — — — — — — — — — — — — — — — — — — — — — — — — — — — — — — — — — — — — — — — — — — — — — — — — — — — — ■...
-
Page 56: Positioning The Fabric
— — — — — — — — — — — — — — — — — — — — — — — — — — — — — — — — — — — — — — — — — — — — SEWING BASICS While holding the end of the thread and the Positioning the fabric... -
Page 57: Starting To Sew
— — — — — — — — — — — — — — — — — — — — — — — — — — — — — — — — — — — — — — — — — — — — — — — — — — — — Starting to sew Once you are ready to start sewing, you can start the sewing machine. - Page 58 — — — — — — — — — — — — — — — — — — — — — — — — — — — — — — — — — — — — — — — — — — — — SEWING BASICS ■...
-
Page 59: Securing The Stitching
— — — — — — — — — — — — — — — — — — — — — — — — — — — — — — — — — — — — — — — — — — — — — — — — — — — — Memo Securing the stitching z When the foot controller is plugged in,... - Page 60 — — — — — — — — — — — — — — — — — — — — — — — — — — — — — — — — — — — — — — — — — — — — SEWING BASICS After sewing 3 to 5 stitches, press When the end of the stitching is reached, press...
-
Page 61: Cutting The Thread
— — — — — — — — — — — — — — — — — — — — — — — — — — — — — — — — — — — — — — — — — — — — — — — — — — — — ■... - Page 62 — — — — — — — — — — — — — — — — — — — — — — — — — — — — — — — — — — — — — — — — — — — — SEWING BASICS ■...
-
Page 63: Setting The Stitch
— — — — — — — — — — — — — — — — — — — — — — — — — — — — — — — — — — — — — — — — — — — — — — — — — — — — Setting the Stitch This machine is preset with the default settings for the stitch width and stitch length for each stitch. -
Page 64: Adjusting The Stitch Length
— — — — — — — — — — — — — — — — — — — — — — — — — — — — — — — — — — — — — — — — — — — — SEWING BASICS Adjusting the stitch length Adjusting the thread tension... - Page 65 — — — — — — — — — — — — — — — — — — — — — — — — — — — — — — — — — — — — — — — — — — — — — — — — — — — — Memo Memo z When you finish sewing, remove the bobbin...
-
Page 66: Useful Functions
— — — — — — — — — — — — — — — — — — — — — — — — — — — — — — — — — — — — — — — — — — — — SEWING BASICS Useful Functions Functions useful in improving sewing efficiency are described below. -
Page 67: Automatically Cutting The Thread
— — — — — — — — — — — — — — — — — — — — — — — — — — — — — — — — — — — — — — — — — — — — — — — — — — — — Press the stitch selection. -
Page 68: Mirroring Stitches
— — — — — — — — — — — — — — — — — — — — — — — — — — — — — — — — — — — — — — — — — — — — SEWING BASICS After reaching the end of the stitching, press Mirroring stitches... -
Page 69: Saving Stitch Settings
— — — — — — — — — — — — — — — — — — — — — — — — — — — — — — — — — — — — — — — — — — — — — — — — — — — — Saving stitch settings Note z All stitch settings (stitch width (zigzag... -
Page 70: Useful Sewing Tips
— — — — — — — — — — — — — — — — — — — — — — — — — — — — — — — — — — — — — — — — — — — — SEWING BASICS Useful Sewing Tips Various ways to achieve better results for your sewing projects are described below. -
Page 71: Sewing Hook-And-Loop Fastener
— — — — — — — — — — — — — — — — — — — — — — — — — — — — — — — — — — — — — — — — — — — — — — — — — — — — ■... -
Page 72: Sewing Thin Fabrics
— — — — — — — — — — — — — — — — — — — — — — — — — — — — — — — — — — — — — — — — — — — — SEWING BASICS Sewing thin fabrics When sewing thin fabrics, the stitching may become... -
Page 73: Utility Stitches
UTILITY STITCHES The various stitches and their applications are described in this chapter. Stitch Setting Chart ....................72 Overcasting Stitches....................78 Basic Stitching ......................82 Blind Hem Stitching ....................84 Buttonhole Stitching/Button Sewing................87 Zipper Insertion.......................94 Sewing Stretch Fabrics and Elastic Tape ..............99 Appliqué, Patchwork and Quilt Stitching ..............101 Reinforcement Stitching ..................108 Eyelet Stitching......................113 Decorative Stitching....................114... -
Page 74: Stitch Setting Chart
— — — — — — — — — — — — — — — — — — — — — — — — — — — — — — — — — — — — — — — — — — — UTILITY STITCHES Stitch Setting Chart Applications, stitch lengths and widths and whether the twin needle can be used are listed for utility... - Page 75 — — — — — — — — — — — — — — — — — — — — — — — — — — — — — — — — — — — — — — — — — — — — — — — — — — — — Stitch Width Stitch Length Reverse/...
- Page 76 — — — — — — — — — — — — — — — — — — — — — — — — — — — — — — — — — — — — — — — — — — — UTILITY STITCHES Stitch Width Stitch Length...
- Page 77 — — — — — — — — — — — — — — — — — — — — — — — — — — — — — — — — — — — — — — — — — — — — — — — — — — — — Stitch Width Stitch Length Reverse/...
-
Page 78: Other Stitches
— — — — — — — — — — — — — — — — — — — — — — — — — — — — — — — — — — — — — — — — — — — UTILITY STITCHES Other stitches Stitch Type... - Page 79 — — — — — — — — — — — — — — — — — — — — — — — — — — — — — — — — — — — — — — — — — — — — — — — — — — — — Stitch Type Pattern Character...
-
Page 80: Overcasting Stitches
— — — — — — — — — — — — — — — — — — — — — — — — — — — — — — — — — — — — — — — — — — — UTILITY STITCHES Overcasting Stitches Sew overcasting stitches along the edges of cut fabric to prevent them from fraying. -
Page 81: Sewing Overcasting Stitches Using Zigzag Foot "J
— — — — — — — — — — — — — — — — — — — — — — — — — — — — — — — — — — — — — — — — — — — — — — — — — — — — Sewing overcasting stitches using zigzag foot "J"... -
Page 82: Sewing Overcasting Stitches Using The Optional Side Cutter
— — — — — — — — — — — — — — — — — — — — — — — — — — — — — — — — — — — — — — — — — — — UTILITY STITCHES Sewing overcasting stitches using the optional side cutter Using the optional side cutter, seam allowances can be finished while the edge of the fabric is cut off. - Page 83 — — — — — — — — — — — — — — — — — — — — — — — — — — — — — — — — — — — — — — — — — — — — — — — — — — — — Raise the presser foot lever to check that the Position the fabric in the side cutter.
-
Page 84: Basic Stitching
— — — — — — — — — — — — — — — — — — — — — — — — — — — — — — — — — — — — — — — — — — — UTILITY STITCHES Basic Stitching Straight stitches are used for sewing plain seams. - Page 85 — — — — — — — — — — — — — — — — — — — — — — — — — — — — — — — — — — — — — — — — — — — — — — — — — — — — ■...
-
Page 86: Blind Hem Stitching
— — — — — — — — — — — — — — — — — — — — — — — — — — — — — — — — — — — — — — — — — — — UTILITY STITCHES Blind Hem Stitching Secure the bottoms of skirts and pants with a blind hem. - Page 87 — — — — — — — — — — — — — — — — — — — — — — — — — — — — — — — — — — — — — — — — — — — — — — — — — — — — Fold back the fabric inside along the basting.
- Page 88 — — — — — — — — — — — — — — — — — — — — — — — — — — — — — — — — — — — — — — — — — — — UTILITY STITCHES ■...
-
Page 89: Buttonhole Stitching/Button Sewing
— — — — — — — — — — — — — — — — — — — — — — — — — — — — — — — — — — — — — — — — — — — — — — — — — — — — Buttonhole Stitching/Button Sewing Buttonholes can be sewn and buttons can be sewn on. -
Page 90: Buttonhole Sewing
— — — — — — — — — — — — — — — — — — — — — — — — — — — — — — — — — — — — — — — — — — — UTILITY STITCHES Buttonhole sewing The maximum buttonhole length is about 28 mm (1-1/8 inches) (diameter + thickness of the button). - Page 91 — — — — — — — — — — — — — — — — — — — — — — — — — — — — — — — — — — — — — — — — — — — — — — — — — — — — Pull out the button guide plate of buttonhole Select a stitch.
- Page 92 — — — — — — — — — — — — — — — — — — — — — — — — — — — — — — — — — — — — — — — — — — — UTILITY STITCHES Press (Thread cutter button) once.
- Page 93 — — — — — — — — — — — — — — — — — — — — — — — — — — — — — — — — — — — — — — — — — — — — — — — — — — — — ■...
-
Page 94: Button Sewing
— — — — — — — — — — — — — — — — — — — — — — — — — — — — — — — — — — — — — — — — — — — UTILITY STITCHES ■... - Page 95 — — — — — — — — — — — — — — — — — — — — — — — — — — — — — — — — — — — — — — — — — — — — — — — — — — — — Adjust the stitch width so that it is the same as Start sewing.
-
Page 96: Zipper Insertion
— — — — — — — — — — — — — — — — — — — — — — — — — — — — — — — — — — — — — — — — — — — UTILITY STITCHES Zipper Insertion A zipper can be inserted. - Page 97 — — — — — — — — — — — — — — — — — — — — — — — — — — — — — — — — — — — — — — — — — — — — — — — — — — — — Align the seam with the center of the zipper, Select stitch and then baste the zipper in place.
-
Page 98: Inserting A Side Zipper
— — — — — — — — — — — — — — — — — — — — — — — — — — — — — — — — — — — — — — — — — — — UTILITY STITCHES Press open the seam allowance from the Inserting a side zipper... - Page 99 — — — — — — — — — — — — — — — — — — — — — — — — — — — — — — — — — — — — — — — — — — — — — — — — — — — — Select stitch When you are about 5 cm (2 inches) from the end of the zipper, stop the sewing machine...
- Page 100 — — — — — — — — — — — — — — — — — — — — — — — — — — — — — — — — — — — — — — — — — — — UTILITY STITCHES Topstitch around the zipper.
-
Page 101: Sewing Stretch Fabrics And Elastic Tape
— — — — — — — — — — — — — — — — — — — — — — — — — — — — — — — — — — — — — — — — — — — — — — — — — — — — Sewing Stretch Fabrics and Elastic Tape Stretch fabrics can be sewn and elastic tape can be attached. -
Page 102: Elastic Attaching
— — — — — — — — — — — — — — — — — — — — — — — — — — — — — — — — — — — — — — — — — — — UTILITY STITCHES Sew the elastic tape to the fabric while Elastic attaching... -
Page 103: Appliqué, Patchwork And Quilt Stitching
— — — — — — — — — — — — — — — — — — — — — — — — — — — — — — — — — — — — — — — — — — — — — — — — — — — — Appliqué, Patchwork and Quilt Stitching é... -
Page 104: Appliqué Stitching
— — — — — — — — — — — — — — — — — — — — — — — — — — — — — — — — — — — — — — — — — — — UTILITY STITCHES Select a stitch. -
Page 105: Patchwork (Crazy Quilt) Stitching
— — — — — — — — — — — — — — — — — — — — — — — — — — — — — — — — — — — — — — — — — — — — — — — — — — — — Select stitch Patchwork (crazy quilt) •... -
Page 106: Quilting
— — — — — — — — — — — — — — — — — — — — — — — — — — — — — — — — — — — — — — — — — — — UTILITY STITCHES Lower the presser foot lever, insert the presser Quilting... - Page 107 — — — — — — — — — — — — — — — — — — — — — — — — — — — — — — — — — — — — — — — — — — — — — — — — — — — — ■...
-
Page 108: Free-Motion Quilting
— — — — — — — — — — — — — — — — — — — — — — — — — — — — — — — — — — — — — — — — — — — UTILITY STITCHES Hold the quilting foot "O"... -
Page 109: Satin Stitching Using The Sewing Speed Controller
— — — — — — — — — — — — — — — — — — — — — — — — — — — — — — — — — — — — — — — — — — — — — — — — — — — — Press (Back key). -
Page 110: Reinforcement Stitching
— — — — — — — — — — — — — — — — — — — — — — — — — — — — — — — — — — — — — — — — — — — UTILITY STITCHES Reinforcement Stitching Reinforce points that will be subject to strain, such as sleeve holes, inseams and pocket corners. - Page 111 — — — — — — — — — — — — — — — — — — — — — — — — — — — — — — — — — — — — — — — — — — — — — — — — — — — — Determine the desired length of the bar tack.
- Page 112 — — — — — — — — — — — — — — — — — — — — — — — — — — — — — — — — — — — — — — — — — — — UTILITY STITCHES Gently hold the end of the upper thread in your left hand, and then start sewing.
-
Page 113: Darning
— — — — — — — — — — — — — — — — — — — — — — — — — — — — — — — — — — — — — — — — — — — — — — — — — — — — Darning Fabric that has been torn can be darned. - Page 114 — — — — — — — — — — — — — — — — — — — — — — — — — — — — — — — — — — — — — — — — — — — UTILITY STITCHES Gently hold the end of the upper thread in Memo...
-
Page 115: Eyelet Stitching
— — — — — — — — — — — — — — — — — — — — — — — — — — — — — — — — — — — — — — — — — — — — — — — — — — — — Eyelet Stitching Eyelets, such as those on belts, can be sewn. -
Page 116: Decorative Stitching
— — — — — — — — — — — — — — — — — — — — — — — — — — — — — — — — — — — — — — — — — — — UTILITY STITCHES Decorative Stitching The utility stitches contain the following decorative stitches. -
Page 117: Fagoting
— — — — — — — — — — — — — — — — — — — — — — — — — — — — — — — — — — — — — — — — — — — — — — — — — — — — Stitch Width Stitch Length Presser... -
Page 118: Scallop Stitching
— — — — — — — — — — — — — — — — — — — — — — — — — — — — — — — — — — — — — — — — — — — UTILITY STITCHES Sew with the center of the presser foot aligned Scallop stitching... -
Page 119: Smocking
— — — — — — — — — — — — — — — — — — — — — — — — — — — — — — — — — — — — — — — — — — — — — — — — — — — — Select stitch , or Smocking... -
Page 120: Shell Tuck Stitching
— — — — — — — — — — — — — — — — — — — — — — — — — — — — — — — — — — — — — — — — — — — UTILITY STITCHES Unfold the fabric, and then iron the tucks Shell tuck stitching... -
Page 121: Joining
— — — — — — — — — — — — — — — — — — — — — — — — — — — — — — — — — — — — — — — — — — — — — — — — — — — — Joining Heirloom stitching Decorative bridging stitches can be sewn over the... - Page 122 — — — — — — — — — — — — — — — — — — — — — — — — — — — — — — — — — — — — — — — — — — — UTILITY STITCHES Select a stitch.
- Page 123 — — — — — — — — — — — — — — — — — — — — — — — — — — — — — — — — — — — — — — — — — — — — — — — — — — — — ■...
-
Page 124: Sewing The Various Built-In Decorative Patterns
— — — — — — — — — — — — — — — — — — — — — — — — — — — — — — — — — — — — — — — — — — — UTILITY STITCHES Sewing the Various Built-in Decorative Patterns Besides utility stitches, you can sew decorative stitches, satin stitches and cross stitches. -
Page 125: Changing The Stitch Density
— — — — — — — — — — — — — — — — — — — — — — — — — — — — — — — — — — — — — — — — — — — — — — — — — — — — Changing the stitch density Changing the pattern size If a decorative satin stitch has been selected, the... -
Page 126: Changing The Length For Satin Stitches
— — — — — — — — — — — — — — — — — — — — — — — — — — — — — — — — — — — — — — — — — — — UTILITY STITCHES Adjusting the character spacing Changing the length for satin... -
Page 127: Realigning The Pattern
— — — — — — — — — — — — — — — — — — — — — — — — — — — — — — — — — — — — — — — — — — — — — — — — — — — — Check the sewn pattern. -
Page 128: Combining Patterns
— — — — — — — — — — — — — — — — — — — — — — — — — — — — — — — — — — — — — — — — — — — UTILITY STITCHES Combining patterns You can sew with combinations of stitches from the... - Page 129 — — — — — — — — — — — — — — — — — — — — — — — — — — — — — — — — — — — — — — — — — — — — — — — — — — — — ■...
- Page 130 — — — — — — — — — — — — — — — — — — — — — — — — — — — — — — — — — — — — — — — — — — — UTILITY STITCHES ■...
-
Page 131: Saving Patterns
— — — — — — — — — — — — — — — — — — — — — — — — — — — — — — — — — — — — — — — — — — — — — — — — — — — — Select the pocket where the combined pattern Saving patterns you wish to retrieve is saved. - Page 132 — — — — — — — — — — — — — — — — — — — — — — — — — — — — — — — — — — — — — — — — — — — UTILITY STITCHES ■...
-
Page 133: Designing A Pattern (My Custom Stitch)
— — — — — — — — — — — — — — — — — — — — — — — — — — — — — — — — — — — — — — — — — — — — — — — — — — — — Designing a Pattern (My Custom Stitch) With the My Custom Stitch function, you can sew stitch patterns that you design yourself. -
Page 134: Entering The Pattern Data
— — — — — — — — — — — — — — — — — — — — — — — — — — — — — — — — — — — — — — — — — — — UTILITY STITCHES Repeat steps through... -
Page 135: Editing The Pattern Data
— — — — — — — — — — — — — — — — — — — — — — — — — — — — — — — — — — — — — — — — — — — — — — — — — — — — Press Editing the pattern data A new point is inserted halfway between the... -
Page 136: Examples Of Designs
— — — — — — — — — — — — — — — — — — — — — — — — — — — — — — — — — — — — — — — — — — — UTILITY STITCHES Examples of designs Enter each of the points indicated in the table to sew the sample stitch. -
Page 137: Embroidery
EMBROIDERY The steps for embroidering are described in this chapter. Embroidering Neatly .....................136 Attaching the Embroidery Foot................138 Attaching the Embroidery Unit................141 Preparing the Fabric ....................144 Attaching the Embroidery Frame................148 Selecting Embroidery Patterns................150 Embroidering......................157 Editing and Saving Patterns ...................162 Using the Memory Function ..................169... -
Page 138: Embroidering Neatly
— — — — — — — — — — — — — — — — — — — — — — — — — — — — — — — — — — — — — — — — — — — — — EMBROIDERY Embroidering Neatly This section describes the preparations and basic procedures for embroidering. -
Page 139: Embroidery Step By Step
— — — — — — — — — — — — — — — — — — — — — — — — — — — — — — — — — — — — — — — — — — — — — — — — — — — — Embroidery step by step The basic steps for embroidery are as follows. -
Page 140: Attaching The Embroidery Foot
— — — — — — — — — — — — — — — — — — — — — — — — — — — — — — — — — — — — — — — — — — — — — EMBROIDERY Attaching the Embroidery Foot This section describes how to attach the embroidery foot "Q". - Page 141 — — — — — — — — — — — — — — — — — — — — — — — — — — — — — — — — — — — — — — — — — — — — — — — — — — — — Loosen the presser foot holder screw and Secure the embroidery foot with the presser remove the presser foot holder.
-
Page 142: Removing The Embroidery Foot
— — — — — — — — — — — — — — — — — — — — — — — — — — — — — — — — — — — — — — — — — — — — — EMBROIDERY While pressing in the lever at the back of the Removing the embroidery foot... -
Page 143: Attaching The Embroidery Unit
— — — — — — — — — — — — — — — — — — — — — — — — — — — — — — — — — — — — — — — — — — — — — — — — — — — — Attaching the Embroidery Unit This section describes how to attach the embroidery unit. - Page 144 — — — — — — — — — — — — — — — — — — — — — — — — — — — — — — — — — — — — — — — — — — — — — EMBROIDERY Slide the embroidery unit onto the sewing machine arm.
-
Page 145: Removing The Embroidery Unit
— — — — — — — — — — — — — — — — — — — — — — — — — — — — — — — — — — — — — — — — — — — — — — — — — — — — Hold the release button on the bottom left of Removing the embroidery unit the embroidery unit, and slowly pull the... -
Page 146: Preparing The Fabric
To obtain optional accessories or parts, visit against the wrong side of the fabric, and iron it “ http://www.brother.com/ ”, or with a steam iron. “ http://www.brothermall.com ” (in USA). CAUTION ●... -
Page 147: Setting The Fabric In The Embroidery Frame
— — — — — — — — — — — — — — — — — — — — — — — — — — — — — — — — — — — — — — — — — — — — — — — — — — — — Loosen the embroidery frame adjustment Setting the fabric in the screw and remove the inner and outer frames,... - Page 148 — — — — — — — — — — — — — — — — — — — — — — — — — — — — — — — — — — — — — — — — — — — — — EMBROIDERY Gently remove the fabric from the frame Tighten the adjustment screw while removing...
- Page 149 — — — — — — — — — — — — — — — — — — — — — — — — — — — — — — — — — — — — — — — — — — — — — — — — — — — — ■...
-
Page 150: Attaching The Embroidery Frame
— — — — — — — — — — — — — — — — — — — — — — — — — — — — — — — — — — — — — — — — — — — — — EMBROIDERY Attaching the Embroidery Frame This section describes how to attach the embroidery frame. -
Page 151: Removing The Embroidery Frame
— — — — — — — — — — — — — — — — — — — — — — — — — — — — — — — — — — — — — — — — — — — — — — — — — — — — Pass the embroidery frame under the presser Removing the embroidery foot while raising the presser foot lever even... -
Page 152: Selecting Embroidery Patterns
— — — — — — — — — — — — — — — — — — — — — — — — — — — — — — — — — — — — — — — — — — — — — EMBROIDERY Selecting Embroidery Patterns This section provides details on the various types of embroidery patterns available and the procedure for... -
Page 153: Lcd (Liquid Crystal Display) Operation
— — — — — — — — — — — — — — — — — — — — — — — — — — — — — — — — — — — — — — — — — — — — — — — — — — — — †... - Page 154 — — — — — — — — — — — — — — — — — — — — — — — — — — — — — — — — — — — — — — — — — — — — — EMBROIDERY NEEDLE COUNT: Needle progress number DISPLAY UNIT...
- Page 155 — — — — — — — — — — — — — — — — — — — — — — — — — — — — — — — — — — — — — — — — — — — — — — — — — — — — Press this key to change the thread settings.
-
Page 156: Selecting Alphanumeric Characters
— — — — — — — — — — — — — — — — — — — — — — — — — — — — — — — — — — — — — — — — — — — — — EMBROIDERY Selecting alphanumeric characters... -
Page 157: Selecting An Embroidery Pattern
— — — — — — — — — — — — — — — — — — — — — — — — — — — — — — — — — — — — — — — — — — — — — — — — — — — — Selecting an embroidery pattern There are 70 embroidery patterns, such as flowers... -
Page 158: Using An Embroidery Card
— — — — — — — — — — — — — — — — — — — — — — — — — — — — — — — — — — — — — — — — — — — — — EMBROIDERY Select the stitch. -
Page 159: Embroidering
— — — — — — — — — — — — — — — — — — — — — — — — — — — — — — — — — — — — — — — — — — — — — — — — — — — — Embroidering After the preparations are done, you can try embroidering. -
Page 160: Embroidering A Pattern
— — — — — — — — — — — — — — — — — — — — — — — — — — — — — — — — — — — — — — — — — — — — — EMBROIDERY „... - Page 161 — — — — — — — — — — — — — — — — — — — — — — — — — — — — — — — — — — — — — — — — — — — — — — — — — — — — Lower the presser foot lever.
-
Page 162: Appliquéing
— — — — — — — — — — — — — — — — — — — — — — — — — — — — — — — — — — — — — — — — — — — — — EMBROIDERY Remove the fabric from the embroidery frame, Appliquéing... - Page 163 — — — — — — — — — — — — — — — — — — — — — — — — — — — — — — — — — — — — — — — — — — — — — — — — — — — — Apply a thin layer of fabric glue or spray adhesive to the back of the appliqué...
-
Page 164: Editing And Saving Patterns
— — — — — — — — — — — — — — — — — — — — — — — — — — — — — — — — — — — — — — — — — — — — — EMBROIDERY Editing and Saving Patterns This section describes ways to edit, adjust, reposition and memorize patterns. - Page 165 — — — — — — — — — — — — — — — — — — — — — — — — — — — — — — — — — — — — — — — — — — — — — — — — — — — — Size key Rotates the pattern 90 degrees to the Increases/decreases the size of...
-
Page 166: Adjusting The Thread Tension
— — — — — — — — — — — — — — — — — — — — — — — — — — — — — — — — — — — — — — — — — — — — — EMBROIDERY Memo CAUTION... -
Page 167: Connecting Character Patterns
— — — — — — — — — — — — — — — — — — — — — — — — — — — — — — — — — — — — — — — — — — — — — — — — — — — — Press to turn it to Connecting character patterns... -
Page 168: Resewing
— — — — — — — — — — — — — — — — — — — — — — — — — — — — — — — — — — — — — — — — — — — — — EMBROIDERY Resewing (change position keys) to move... -
Page 169: Thread Runs Out Partway Through A Design
— — — — — — — — — — — — — — — — — — — — — — — — — — — — — — — — — — — — — — — — — — — — — — — — — — — — Stopping while embroidering Thread runs out partway through a design... - Page 170 — — — — — — — — — — — — — — — — — — — — — — — — — — — — — — — — — — — — — — — — — — — — — EMBROIDERY Press Press...
-
Page 171: Using The Memory Function
— — — — — — — — — — — — — — — — — — — — — — — — — — — — — — — — — — — — — — — — — — — — — — — — — — — — Using the Memory Function Embroidery data precautions Observe the following precautions when using embroidery data other than that created and saved in this machine. - Page 172 — — — — — — — — — — — — — — — — — — — — — — — — — — — — — — — — — — — — — — — — — — — — — EMBROIDERY •...
-
Page 173: Transferring Embroidery Patterns From The Computer To Machine
— — — — — — — — — — — — — — — — — — — — — — — — — — — — — — — — — — — — — — — — — — — — — — — — — — — — Copy the embroidery data (folders and/or Transferring embroidery patterns pattern files). - Page 174 — — — — — — — — — — — — — — — — — — — — — — — — — — — — — — — — — — — — — — — — — — — — — EMBROIDERY Insert the USB media into the USB port on the Memo...
- Page 175 — — — — — — — — — — — — — — — — — — — — — — — — — — — — — — — — — — — — — — — — — — — — — — — — — — — — Select the desired folder or the pattern you Select the pattern you wish to retrieve.
-
Page 176: Saving Patterns
— — — — — — — — — — — — — — — — — — — — — — — — — — — — — — — — — — — — — — — — — — — — — EMBROIDERY Select the pattern you wish to retrieve. -
Page 177: Appendix
APPENDIX The various maintenance and troubleshooting procedures are described in this chapter. Care and Maintenance ..................176 Troubleshooting ....................178 Upgrading Your Machine’s Software Using USB Media ........198 Index............................ 199... -
Page 178: Care And Maintenance
— — — — — — — — — — — — — — — — — — — — — — — — — — — — — — — — — — — — — — — — — — — — — — APPENDIX Care and Maintenance Simple sewing machine maintenance operations are described below. - Page 179 — — — — — — — — — — — — — — — — — — — — — — — — — — — — — — — — — — — — — — — — — — — — — — — — — — — — Grasp both sides of the needle plate cover, and then slide it toward you.
-
Page 180: Troubleshooting
If the machine stops operating correctly, check the following possible problems before requesting service. You can solve most problems by yourself. If you need additional help, the Brother Solutions Center offers the latest FAQs and troubleshooting tips. Visit us at “ http://support.brother.com/ ”. -
Page 181: Tangled Thread On Wrong Side Of Fabric
— — — — — — — — — — — — — — — — — — — — — — — — — — — — — — — — — — — — — — — — — — — — — — — — — — — — While holding the bobbin in place with your Tangled thread on wrong finger, pass the thread through the slit in the... - Page 182 — — — — — — — — — — — — — — — — — — — — — — — — — — — — — — — — — — — — — — — — — — — — — — APPENDIX Raise the presser foot using the presser foot Pass the thread behind the thread guide cover...
- Page 183 — — — — — — — — — — — — — — — — — — — — — — — — — — — — — — — — — — — — — — — — — — — — — — — — — — — — Make sure that the thread is passed into the thread take-up lever as shown below.
-
Page 184: Incorrect Thread Tension
— — — — — — — — — — — — — — — — — — — — — — — — — — — — — — — — — — — — — — — — — — — — — — APPENDIX Incorrect thread tension ■... -
Page 185: Fabric Is Caught In The Machine And Cannot Be Removed
— — — — — — — — — — — — — — — — — — — — — — — — — — — — — — — — — — — — — — — — — — — — — — — — — — — — Cut out the tangled threads, and then remove Fabric is caught in the the bobbin. - Page 186 — — — — — — — — — — — — — — — — — — — — — — — — — — — — — — — — — — — — — — — — — — — — — — APPENDIX Use the enclosed disc-shaped screwdriver to Turn the handwheel to check that the feed dogs...
- Page 187 — — — — — — — — — — — — — — — — — — — — — — — — — — — — — — — — — — — — — — — — — — — — — — — — — — — — Turn on the machine.
-
Page 188: When The Thread Became Tangled Under The Bobbin Winder Seat
— — — — — — — — — — — — — — — — — — — — — — — — — — — — — — — — — — — — — — — — — — — — — — APPENDIX Correctly thread the machine. - Page 189 — — — — — — — — — — — — — — — — — — — — — — — — — — — — — — — — — — — — — — — — — — — — — — — — — — — — Slide the bobbin winder shaft to the left, and then remove the bobbin from the shaft.
-
Page 190: List Of Symptoms
— — — — — — — — — — — — — — — — — — — — — — — — — — — — — — — — — — — — — — — — — — — — — — APPENDIX List of symptoms Symptom... - Page 191 — — — — — — — — — — — — — — — — — — — — — — — — — — — — — — — — — — — — — — — — — — — — — — — — — — — — Symptom Probable Cause Remedy...
- Page 192 — — — — — — — — — — — — — — — — — — — — — — — — — — — — — — — — — — — — — — — — — — — — — — APPENDIX Symptom Probable Cause...
- Page 193 — — — — — — — — — — — — — — — — — — — — — — — — — — — — — — — — — — — — — — — — — — — — — — — — — — — — Symptom Probable Cause Remedy...
- Page 194 — — — — — — — — — — — — — — — — — — — — — — — — — — — — — — — — — — — — — — — — — — — — — — APPENDIX Symptom Probable Cause...
-
Page 195: Error Messages
— — — — — — — — — — — — — — — — — — — — — — — — — — — — — — — — — — — — — — — — — — — — — — — — — — — — Error messages When erroneous operations are performed messages and advice on operation will be displayed on the LCD. - Page 196 — — — — — — — — — — — — — — — — — — — — — — — — — — — — — — — — — — — — — — — — — — — — — — APPENDIX Error Message Probable Cause...
- Page 197 — — — — — — — — — — — — — — — — — — — — — — — — — — — — — — — — — — — — — — — — — — — — — — — — — — — — Error Message Probable Cause You changed the stitch pattern settings, and then tried to save them by...
- Page 198 — — — — — — — — — — — — — — — — — — — — — — — — — — — — — — — — — — — — — — — — — — — — — — APPENDIX Error Message Probable Cause...
-
Page 199: Adjusting The Lcd
— — — — — — — — — — — — — — — — — — — — — — — — — — — — — — — — — — — — — — — — — — — — — — — — — — — — ■... -
Page 200: Upgrading Your Machine's Software Using Usb Media
You can use USB media and a computer to download software upgrades for your sewing machine. When an upgrade program is available on our website at “ http://support.brother.com/ ”, please download the file(s) following the instructions on the website and steps listed below. -
Page 201: Index
— — — — — — — — — — — — — — — — — — — — — — — — — — — — — — — — — — — — — — — — — — — — — — — — — — — — Index cutting thread ..............59 cutting thread automatically ..........65... - Page 202 — — — — — — — — — — — — — — — — — — — — — — — — — — — — — — — — — — — — — — — — — — — — — — APPENDIX free-motion quilting ............106 operation keys ..............14...
- Page 203 — — — — — — — — — — — — — — — — — — — — — — — — — — — — — — — — — — — — — — — — — — — — — — — — — — — — turning machine on/off ..........16 twin needle ..............
- Page 204 Please visit us at http://support.brother.com/ where you can get product support and answers to frequently asked questions (FAQs). English 885-V94/V95/V96/V97/V98 Printed in China XE7929-201②...
Need help?
Do you have a question about the 885-V94 and is the answer not in the manual?
Questions and answers