Table of Contents
Advertisement
Quick Links
Advertisement
Table of Contents

Related Manuals for National Instruments PXIe-8861


Summary of Contents for National Instruments PXIe-8861
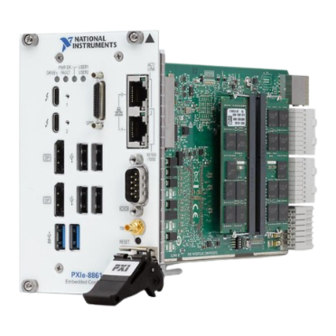
- Page 1 PXIe-8861 Getting Started Guide 2023-08-02...
-
Page 2: Table Of Contents
Unpacking............. 3 Installing the PXIe-8861 into a PXI Express Chassis......3 Data Storage. -
Page 3: Getting Started With The Pxie-8861
Unpacking The PXIe-8861 ships in an antistatic package to prevent electrostatic discharge from damaging device components. To prevent such damage when handling the device, ground yourself using a grounding strap or by holding a grounded object, such as your computer chassis, and complete the following steps: 1. - Page 4 PXIe-8861 Getting Started Guide Installing the PXIe-8861 into a PXI Express Chassis To install the PXIe-8861 into a PXI Express chassis, complete the following steps. 1. Plug in your chassis before installing the PXIe-8861. The power cord grounds the chassis and protects it from electrical damage while you install the module.
- Page 5 PXIe-8861 Getting Started Guide 5. Make sure the injector/ejector handle is in its downward position. Align the PXIe-8861 with the card guides on the top and bottom of the system controller slot. Caution Do not raise the injector/ejector handle as you insert the PXIe-8861.
-
Page 6: Data Storage
PXIe-8861 Getting Started Guide Figure 2. PXIe-8861 Installed in a PXI Express Chassis a. PXI Express Chassis b. PXI Express Controller c. Injector/Ejector Rail Data Storage The PXIe-8861 has the following data storage features: M.2 NVMe internal solid state drive (500 GB or larger), or ■... - Page 7 9. DisplayPort 1.2 10. Thunderbolt 11. LEDs 12. Removable Hard Drive Shuttle (Removable Hard Drive Variant Only) Front Panel Connectors The following table lists various peripherals and their corresponding PXIe-8861 external connectors, bus interfaces, and functions. Peripheral External Connector Description Video (DisplayPort 1.1 and 1.2) DisplayPort...
- Page 8 General-Purpose Interface Bus, IEEE 488.2 Front Panel Features The PXIe-8861 has two front panel LEDs that show PC status: DRIVE LED— Indicates when an access to the internal drive is occurring. ■ PWR OK/FAULT LED—Indicates the controller status. The LED indicates one ■...
-
Page 9: Removing The Pxie-8861 From A Pxi Express Chassis
LabVIEW application. Removing the PXIe-8861 from a PXI Express Chassis To remove the PXIe-8861 from a PXI Express chassis, complete the following steps. 1. Power off the chassis. 2. Remove any cables that may be attached to the controller front panel. -
Page 10: Removing The Removable Hard Drive (Removable Hard Drive Variant Only)
4. Tighten the thumb screws. If the thumb screws do not thread, the removable hard drive may not be fully inserted. Try removing and completely inserting the removable hard drive. Figure 4. Installing the Removable Hard Drive in a PXIe-8861 Controller 1. Removable Hard Drive 2. Thumb Screws (2x) -
Page 11: Common Configuration Questions
Can I use the internal storage drive and an external storage drive at the same time? Yes. What devices can I boot from? The PXIe-8861 can boot from the following devices: The internal drive. ■ A network PXE or iSCSI server on the same subnet. -
Page 12: Cables And Connections
How do I plug both a PS/2 mouse and PS/2 keyboard into the controller? The PXIe-8861 has no PS/2 connector, and you need to use a USB Y-splitter cable as shown below, or a similar device, to connect both a PS/2 mouse and PS/2 keyboard. -
Page 13: Upgrade Information
Controller?, at ni.com/support. How do I install software from a CD? The compact size of the PXIe-8861 does not allow for an integrated USB CD/DVD- ROM drive. You have the following options: • USB CD/DVD-ROM—You can install from a USB CD/DVD-ROM using a bootable installation CD. -
Page 14: Troubleshooting
PXIe-8861 Getting Started Guide Note NI has tested and verified that the DDR4 SO-DIMMs listed above work with the PXIe-8861 controller. We recommend you purchase your SO- DIMM modules from NI. Other off-the-shelf modules are not guaranteed to work properly. -
Page 15: What If The Controller Does Not Boot
PXIe-8861 Getting Started Guide What if the controller does not boot? Several problems can cause a controller not to boot. Here are some things to look for and possible solutions. Things to Notice: Which LEDs come on? The PWROK/FAULT LED should stay lit green. The ■... -
Page 16: What If I Can't See The Video
PXIe-8861 Getting Started Guide What if I can’t see the video? If you can see the BIOS screen at boot time but do not see video from the OS, the video card output may be set past the monitor limits. To resolve the problem, start Windows in Safe Mode by booting the controller from your recovery media and verifying that Windows troubleshooting options are available. -
Page 17: And Configure My Pxi System
MAX. You can install PXI Platform Services from the software CD included with your controller or from ni.com/downloads. PXI Platform Services version 21.5 or later supports the PXIe-8861. My CMOS is corrupted. How do I set it back to default? There are two methods that you can use to reset the CMOS. -
Page 18: Ni Services
PXIe-8861 Getting Started Guide Figure 7. Clearing the CMOS Contents 1. Push-Button Switch SW1 NI Services Visit ni.com/support to find support resources including documentation, downloads, and troubleshooting and application development self-help such as tutorials and examples. Visit ni.com/services to learn about NI service offerings such as calibration options, repair, and replacement.
Need help?
Do you have a question about the PXIe-8861 and is the answer not in the manual?
Questions and answers