Table of Contents
Advertisement
Available languages
Available languages
Quick Links
Advertisement
Table of Contents

Related Manuals for arcelik TKM 9961 B


Summary of Contents for arcelik TKM 9961 B
- Page 1 Türk Kahvesi Makinesi Kullanma Kılavuzu TKM 9961 B TKM 9961 S...
- Page 2 İÇİNDEKİLER TÜRKÇE 6-31 ENGLISH 32-57 01M-7489470101-2419-03 01M-7489470102-2419-03...
- Page 4 Lütfen önce bu kılavuzu Sembollerin anlamları okuyun! Bu kullanma kılavuzunun çeşitli kı- sımlarında aşağıdaki semboller kul- Değerli Müşterimiz, lanılmıştır: Arçelik ürününü tercih ettiğiniz için teşekkür ederiz. Yüksek kalite ve tek- Cihazın kullanımıyla ilgili noloji ile üretilmiş olan ürününüzün önemli bilgiler ve faydalı size en iyi verimi sunmasını...
-
Page 5: Teknik Veriler
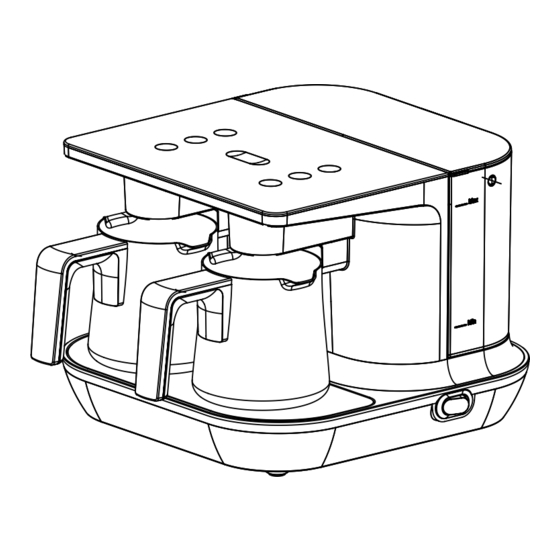
1. Kontrol paneli 9. Küçük-Orta-Büyük fincan boyutu ayar butonları 2. Sol göz 3 kişilik kahve pişirme başlatma butonu 10. Su deposu (1,5 lt) 3. Sol göz 2 kişilik kahve pişirme 11. Şebeke kablosu başlatma butonu 12. On/Off butonu 4. Sol göz 1 kişilik kahve pişirme 13. -
Page 6: Önemli Güvenlik Ve Çevre Talimatları
1 Önemli güvenlik ve çevre talimatları Bu bölümde, yaralanma ya da maddi hasar tehlikele- rini önlemeye yardımcı olacak güvenlik talimatları yer almaktadır Bu talimatlara uyulmaması halinde her türlü ga- ranti geçersiz hale gelir. 1.1 Genel güvenlik • Bu cihaz, uluslararası güvenlik standartlarına uygundur. - Page 7 1 Önemli güvenlik ve çevre talimatları • Cihazı daima dengeli, düz, temiz, kuru ve kay- mayan bir yüzey üzerinde kullanın. • Pişirme haznesinin içerisine kahve ve şeker- den başka hiçbir madde koymayın. • Pişirdiğiniz Türk kahvesini pişirme haznesi ile içmeyin. •...
- Page 8 1 Önemli güvenlik ve çevre talimatları • Pişirme haznesi ve ısıtıcı yüzeyi kullanım sıra- sında ısın maktadır. Bu sebeple kullanım sıra- sında ve sonra sında (soğuyana kadar) ısıtıcı yüzeyine ve pişirme haznesine temas etmeyin. • UYARI: Kahve pişirme işlemi esnasında pişirme haznesi üzerinde bir miktar sıcak buhar oluşa- bilir, sıcak buhardan etkilenme riskine karşı...
- Page 9 1 Önemli güvenlik ve çevre talimatları • Cihazı topraklı prizde kullanın. • Besleme kablosu hasarlanırsa tehlikeli bir duruma engel olmak için kullanmayı bırakın, imalatçısı veya servis acentesi ya da aynı de- recede nitelikli bir personel tarafından değişti- rilmesini sağlayın. • Cihaz veya cihazın herhangi bir parçası hasar- lıysa kullanmayın.
- Page 10 1 Önemli güvenlik ve çevre talimatları • Elektrik kablosunun hasar görmesini önlemek için sıkışmasını, kıvrılmasını veya keskin ke- narlara sürtünmesini engelleyin. Elektrik kab- losunu sıcak yüzeylerden ve çıplak alevden uzak tutun. • Cihazın kullanımı esnasında elektrik kablosu- nun yanlışlıkla çekilmesi veya birinin kabloya takılma tehlikesinin olmadığından emin olun.
- Page 11 1 Önemli güvenlik ve çevre talimatları • Cihazı buhar kaynaklarından uzak tutun ve aşırı buharlı ortamlarda kullanmamaya özen gösterin. • Pişirme haznesini cihaz dışında hiçbir ısıtıcıda kullanmayın (ocak vb.). • Cihazın üzerine herhangi bir malzeme (fincan, pişirme haznesi vs.) koymayınız. •...
- Page 12 1 Önemli güvenlik ve çevre talimatları • Cihaz çocukların ve sınırlı fiziksel, duyusal ya da zihinsel kapasiteye sahip insanların yakı- nında kullanıldığında son derece dikkatli olun- ması tavsiye edilir. • Cihaz, 8 yaş ve üzeri çocuklar ve fiziksel, algı- sal ve zihinsel yetenekleri azalmış veya tecrübe ve bilgi eksikliği olan kişiler tarafından gözetim altında veya cihazın güvenli bir şekilde kullanı- mına ve karşılaşılan ilgili tehlikelerin anlaşılma-...
- Page 13 1 Önemli güvenlik ve çevre talimatları • Bu ürün yanlızca fonksiyonel amaçlı toprak bağlantısı içerir. • Kalp pili kullanıyorsanız cihazı kullanmadan önce üreticiye danışın. • Temizlik ve bakım işlemlerini bu kılavuzun “Te- mizlik ve Bakım” bölümünde belirtilen talimat- lara uygun olarak yapın. •...
- Page 14 1 Önemli güvenlik ve çevre talimatları • Mutfak takımları, bıçaklar vb. gibi metal cisim- leri ısınacakları için pişirme bölgeleri içindeki sıcak yüzeylere bırakmayın. • Cihazları harici bir zamanlayıcı veya ayrı bir uzaktan kumanda sistemiyle çalıştırmayın. • Bu cihaz ankastre şekilde kullanılamaz ve dolap içinde kullanılmak üzere tasarlanmamış- tır.
-
Page 15: Ambalaj Bilgisi
1 Önemli güvenlik ve çevre talimatları 1.2 AEEE yönetmeliğine uyum ve atık ürünün elden çıkarılması Bu ürün, T.C. Çevre ve Şehircilik Bakanlığı tarafından yayımlanan “Atık Elektrikli ve Elektronik Eşyaların Kontrolü Yönetmeliği”nde belir- tilen zararlı ve yasaklı maddeleri içermez. AEEE Yönetmeliğine uygun- dur. -
Page 16: İlk Kullanım
2 Kullanım 2.1 İlk kullanım Kullanma kılavuzunu tamamen okumadan ürününüzü kullan mayın. Cihazın dik konumda ve dengeli, düz, temiz, kuru ve kaymayan bir yüzeyde durduğundan emin olun. Cihazı dik konumda, düz, te- Pişirme haznesini (15), pişir- Su deposunu (10) ve pişir- miz ve kuru bir zemine yer- me haznesi yuvasından ha- me haznesini (15) elde yıka-... - Page 17 2 Kullanım Fişi (11) prize takın. On/off Cihazın su deposu kapağını Su deposuna (10) min- butonunu (12) açık (I) konu- açın. Ardından tutma sapın- maks. çizgileri arasında su muna getirin. dan hafifçe yukarı doğru çe- doldurun. Kapağını kapatın - Kontrol panelindeki (1) tüm kerek çıkarın.
- Page 18 2 Kullanım Bu sayede cihazınız içinde bulunan pom panın doğru şekilde çalışmasını sağlamış olursunuz. UYARI: Bu işlemi su deposunu yerinden çıkartıp yerine tak- tıktan sonra, kahve pişirmeden önce de tekrarlayın. Fincan boyutunuza göre su miktarı ayarının yapılması için; Tek kişilik küçük fincan Ortalama 60 ml.
- Page 19 2 Kullanım Fincan boyutu ledi, ürünün ayarlı olduğu su kademesini gösterecektir. Su miktarı ayarla masını fincan boyutu değişikliği yaptığınız zaman tekrarlayın. 2.2 Pişirme 3 kişiye kadar istediğiniz Pişirme haznesini (15) yerine Pişirme işlemi tamamlandık- miktar kahveyi ve şekeri pi- yerleştirin. Pişirme haznesi- tan sonra cihaz sesli uyarı...
- Page 20 2 Kullanım UYARI: Pişirme haznesini (15) yerine tam yerleştirmezseniz ci- haz çalışmayacaktır. UYARI: Hazneyi yuvasına, arkaya tam değecek şekilde ve dik olarak yerleş tirin. Aksi takdirde ürününüz çalışmaya caktır. Pişirme süresi 1 kişilik kahve için 1-1.5 dk. , 2 kişilik kahve için 1.5-2.5 dk.
- Page 21 2 Kullanım 2.3 Miktarlar Cihaz, türk kahvesi yapmak için tasarlanmış pratik bir cihazdır. Tabloda belirtilen ölçüler kullanılarak damak tadınıza uygun, köpüklü türk kahvesi yapabilirsiniz. Aşağıda belirtilen ölçüler sadece rehberdir. Bu ölçüleri kişisel tercihlerinize göre ayarlayabilirsiniz. • Tek, çift, veya üç kişilik kahveyi ölçü kaşığını kullanarak, şekeri isteğinize göre ve suyu fincan boyutunuza göre (tavsiye edilen fincan boyutu 65ml) pişirme haznesine ekleyin.
- Page 22 2 Kullanım 2.5 Bildirimler Ürün pişirmeye hazır Seçim yapılan fincan boyutu ledi sabit ya- nan beyaz ışık. Pişirme başlatma butonu ledleri sönük beyaz ışık. Pişiriyor Bekleyin Seçim yapılan pişirme Pişirme haznesini yerin- başlatma buton ledi sa- den almayın. bit yanan beyaz ışık. Pişirdi Pişirme haznesini yerin- den alın, kahvenizi finca-...
- Page 23 2 Kullanım Zaman aşım hatası Ürünü kapatın. Pişirme haznesini yuvasından Seçim yapılan başlatma alın. Pişirme haznesi butonu ledi sabit yanan tabanını, ısıtıcı yüzeyini kırmızı ışık (ısıtıcı yüzeyinin soğuk olduğundan emin olun) ve sensör camını nemli bir bez ile temizleyin. Ürünü tekrar açarak yeni bir pişirme işlemini başlatabilirsiniz.
- Page 24 2 Kullanım Pişirme hatası 2 Ürünü kapatın. Pişirme haznesini yuvasından Tüm pişirme başlatma alın. Pişirme haznesi buton ledleri sabit yanan tabanını, ısıtıcı yüzeyini kırmızı ışık (ısıtıcı yüzeyinin soğuk olduğundan emin olun) ve sensör camını nemli bir bez ile temizleyin. Ürünü tekrar açarak yeni bir pişirme işlemini başlatabilirsiniz.
- Page 25 3 Temizlik ve bakım 3.1 Temizlik UYARI: Pişirme es nasında cihaz ısına cağından, pişirme sonra- sı temizlik ya pılmak istenildiğinde soğumasını bekleyin. UYARI: Cihazı temizlemek için benzin, solvent, aşındırıcı te- mizleyiciler, metal nesneler veya sert fırçalar kullanmayın. UYARI: Cihazı ya da şebeke kablosunu suya ya da diğer sıvılara batırmayın.
-
Page 26: Temizlik Ve Bakım
3 Temizlik ve bakım Pişirme haznesini elde yı- Ardından kurulayın. Pişirme haznesini kuruladık- kayın. tan sonra yerine yerleştirin. 3.1.2 Kireç çözme Kullanımlar sonucu zamanla pişirme haznesinde oluşabilecek izleri (tor- tuları) pişirme haznesinin iç taban yüzeyine zarar vermeden temizlemek için bir tatlı kaşığı limon tuzunu pişirme haznesine boşaltınız ve kaynama sıcaklığındaki suyu pişirme haznesinin 1/ 3 ‘ünü... - Page 27 3 Temizlik ve bakım 3.2 Saklama • Cihazı uzun süre kullanmayı düşünmüyorsanız, dikkatli bir şekilde saklayın. • Cihaz fişinin çekildiğinden, cihazın soğuduğundan ve tamamen kuru olduğundan emin olun. • Cihazı serin ve kuru bir yerde saklayın. • Cihazı ve kablosunu, çocukların ulaşamayacağı bir yerde muhafaza edin.
-
Page 28: Cihazın Teknolojik Üstünlükleri
4 Cihazın teknolojik üstünlükleri Bol köpük ve en uygun kıvamda olmasını sağlayan otomatik karıştırma sistemi Kahvenin en ideal kıvamında pişmesini sağlayan teknoloji Kahve pişirilirken başında bekleme zorunluluğu kaldıran ek güvenlik sistemi 5 Servis çağırmadan önce yapılması gerekenler Cihazın Teknolojik üstünlükleri Öncelikle ürününüzü... -
Page 29: Tüketici Hizmetleri
Merkezimize başvurunuz. telefonlarından tarafından sizin için tanımlanan tarifeye göre 4. Hizmet için gelen teknisyene “teknisyen alan kodu ücretlendirilir. kimlik kartı”nı sorunuz. Çağrı Merkezimize ayrıca www.arcelik.com.tr çevirmeden) 5. İşiniz bittiğinde servis teknisyeninden adresindeki “Tüketici Hizmetleri” bölümünde “Hizmet Fişi” istemeyi unutmayınız. bulunan formu doldurarak veya 0 216 423 23 alacağınız “Hizmet Fişi”... - Page 30 Kullanım Hataları ve Garanti ile İlgili Dikkat Edilmesi Gereken Hususlar Aşağıda belirtilen sorunların giderilmesi ücret karşılığında yapılır. Bu durumlar için garanti şartları uygulanmaz; 1) Kullanım hatalarından kaynaklanan hasar ve arızalar, 2) Malın tüketiciye tesliminden sonraki yükleme, boşaltma, taşıma vb. sırasında oluşan hasar ve arızalar, 3) Malın kullanıldığı...
- Page 31 Arçelik A.Ş. Cinsi : Türk Kahvesi Makinesi Adresi : Arçelik A.Ş. Karaağaç Caddesi No: 2-6, 34445 Modeli : TKM 9961 B / TKM 9961 S Sütlüce / İSTANBUL Seri No : Telefon : (0-216) 585 8 888 Garanti Süresi :...
- Page 32 Please read this manual first! Meanings of the Symbols Dear Valued Customer, Following symbols are used in vario- Thank you for preferring this Arçelik us sections of this manual: appliance. We hope that you get the Important information best results from your appliance and useful hints about which has been manufactured with usage.
-
Page 33: Technical Data
1. Control panel 11. Mains cable 2. Left compartment, button to 12. On/off button start making 3 servings of coffee 13. Right compartment heating sur- 3. Left compartment, button to face start making 2 servings of coffee 14. Left compartment heating sur- 4. -
Page 34: Important Safety And Environmental Instructions
1 Important safety and environmental instructions This section contains safety instructions that will help protect from risk of personal injury or property damage. Failure to follow these instructions will void all types of warranty. 1.1 General safety •This appliance complies with the international safety standards. - Page 35 1 Important safety and environmental instructions •Do not put any substances apart from coffee and sugar into the coffee-making pot. •Do not drink the cooked Turkish coffee using the coffee-making pot. •Turkish Coffee Machine is designed to operate at 4-37°C 80% relative humidity. •Due to the manufacturing technology, steam and odour may arise in the heating element of the appliance during the initial use.
- Page 36 1 Important safety and environmental instructions •WARNING: When making coffee, there might be some hot steam over the pot. Avoid contac- ting these areas to prevent the effects of the hot steam. •Avoid contacting hot surfaces and hold the pot only by handle.
- Page 37 1 Important safety and environmental instructions •Do not use the appliance if the appliance itself or any part of it is damaged. Contact the authorised service. •Do not use the appliance with an extension cord. •Do not immerse the appliance, power cord, or power plug in water or any other liquids.
- Page 38 1 Important safety and environmental instructions •Do not pull the power cable of the appliance to unplug the appliance from the outlet and do not wrap its power cable around the appliance. •Your mains power supply should comply with the information supplied on the rating plate of the appliance.
- Page 39 1 Important safety and environmental instructions •This appliance is not suitable for commercial use. It is intended to be used for household pur- poses in places such as: -Shops, offices and personnel kitchens in other working environments, -Farmhouses, -By customers in hotels, motels and other resi- dential places, -Places for sleep and breakfast.
- Page 40 1 Important safety and environmental instructions •This appliance may be used by children who are at the age of 8 or over and the people whose physical, perceptive or mental skills are impa- ired or who are inexperienced or not knowled- geable about the appliance as long as they are supervised or informed and made understood the safe use of the appliance and the encoun-...
- Page 41 1 Important safety and environmental instructions •If you are using a pace maker, consult the ma- nufacturer before using the appliance. •Perform cleaning and care procedures in comp- liance with the “Cleaning and Care” section in this manual. •WARNING: If there is damage (crack, breakage etc.) on the coffee-making surface, immediately disconnect the product from the mains and do not use it to prevent electric shock, and contact...
- Page 42 1 Important safety and environmental instructions •Do not use the devices with an external timer or a remote control system. •This appliance cannot be used for built-in applications and it is not intended to be used inside cabinets. Do not put the coffee machine in a cabinet while it is running.
-
Page 43: Package Information
1 Important safety and environmental instructions 1.2 Compliance with 1.3 Package information the WEEE Directive and Package of the product is disposal of the waste made of recyclable mate- product rials in accordance with our national legislation. This product does not contain Do not dispose of the packaging harmful or prohibited materials materials together with the domes-... -
Page 44: Initial Use
2 Use 2.1 Initial use Read the whole user manual before using the product. Make sure that the device is straight and balanced on a flat, clean, dry and non-slip surface. Place the product vertically Slightly pull the coffee-ma- Wash the water tank (10) on a flat, clean and dry sur- king pot (15) out of its slot. - Page 45 2 Use Insert the plug (11) in the Open the cover of the wa- Fill the water tank (10) up wall-socket. Switch the On/ ter tank. Holding the handle, to a level between min. and Off button (12) to On (I) po- slightly pull it up to remove.
- Page 46 2 Use To fill the pump and water system with water and bleed the air out of the system: Place the coffee-making pot Once the water pumping Take the coffee-making pot into the left compartment process is over, press and (15) and drain the water in heating surface (14).
- Page 47 2 Use Place the coffee-making pot Once the water pumping If the water you have poured (15) into the left compart- process is over, press and into your cup is too little or ment heating surface (14). hold the same button for 3 too much, press the cup size Press the left compartment seconds to end the coffee-...
- Page 48 2 Use 2.2 Coffee making Put the desired amount of Place the coffee-making pot Once the coffee-making pro- coffee and sugar (up to 3 (15) in its slot. Slightly press cess is complete, an audio servings) into the coffee-ma- the button that is found on warning will be heard and king pot (15).
- Page 49 2 Use WARNING: Fully insert the pot back into its seat in upright po- sition. Otherwise your product will not run. Coffee-making time is 1-1.5 min. for 1 person., 1.5-2.5 min. for 2 persons and 2-3.5 min. for 3 persons. For a tasty coffee, take the coffee-making pot (15) from the seat without waiting! Pour coffee swiftly in order to prevent the foam and grounds...
-
Page 50: Sleep Mode
2 Use Recommended quantities of ingredients to prepare coffee With medium With little Sugar-free amount of Sweet sugar sugar Coffee 1 measure 1 measure 1 measure 1 measure 1/2 cube of 1 cube of 2 cubes of sugar / 1/2 tea sugar / 1 tea sugar / 2 tea Sugar... - Page 51 2 Use 2.5 Notifications Product is ready to make coffee LED of the selected cup size is constantly on in white. LEDs of the coffee-making starting button are in dull white. Making coffee Please wait LED of the selected Do not remove the cof- coffee-making starting fee-making pot.
- Page 52 2 Use Time out error Switch off the product. Take out the coffee- The selected button’s making pot from its LED for coffee-making seat. Use a damp cloth start is continuously on to clean the base of the in red coffee-making pot, hea- ting surface (make sure that the heating surface...
- Page 53 2 Use Coffee-making Switch off the product. error 2 Take out the coffee- making pot from its LEDs of all coffee-ma- seat. Use a damp cloth king starting buttons are to clean the base of the constantly on in red coffee-making pot, hea- ting surface (make sure that the heating surface...
- Page 54 3 Cleaning and care 3.1 Cleaning WARNING: Since the appliance will be hot during coffee-ma- king, please wait until it is cold if you would like to clean it afterwards. WARNING: Never use gasoline, solvent, abrasive cleaning agents, metal objects or hard brushes to clean the appliance. WARNING: Never immerse the appliance or its power cable in water or any other liquid.
-
Page 55: Cleaning And Care
3 Cleaning and care Switch the On/Off button (12) Use a damp cloth and a small Remove the water tank (10) of of the appliance to Off (0) po- amount of washing liquid to the appliance. Wash it under sition. Unplug the appliance. clean the outer surface of the running water with little was- Allow it to cool down. -
Page 56: Handling And Transportation
3 Cleaning and care 3.1.2 Descaling To clean the stains (deposits) that might appear in the coffee-making pot in time without harming the inner base surface, pour one dessert spoon of citric acid crystals to the coffee-making pot and pour boiling water on it, so that water fills 1/3 of the pot. - Page 57 4 Technological features of the appliance Automatic stirring system that ensures that the coffee is fo- amy and ideally consistent The technology that allows making coffee at the best con- sistency. Additional safety system eliminating the necessity of watc- hing the coffee while it is being prepared 5 Before calling the authorised service agent Technological features of the appliance...
Need help?
Do you have a question about the TKM 9961 B and is the answer not in the manual?
Questions and answers