
Related Manuals for Extech Instruments IRT25


Summary of Contents for Extech Instruments IRT25
- Page 1 User Manual Mini InfraRed Thermometer With Laser Pointer and High‐Low Alarms Model IRT25 Additional User Manual Translations available at www.extech.com ...
-
Page 2: International Safety Symbols
EXTECH INSTRUMENTS Introduction Congratulations on your purchase of the IRT25 IR Thermometer. This thermometer makes non‐ contact (infrared) temperature measurements at the touch of a button. The built‐in laser pointer increases target accuracy while the backlit LCD and handy push buttons combine for convenient, ergonomic operation. This device is shipped fully tested and calibrated and, with proper use, will provide years of reliable service. Please visit our website (www.extech.com) to check for the latest version of this User Guide, Product Updates, and Customer Support. Features Measures non‐contact surface temperature up to 371°C (400°F) 12:1 Distance to Spot Ratio (Field of View) Single‐point laser targeting Automatic Data Hold when trigger is released Display Backlight Maximum‐Minimum temperature function Selectable temperature units (°F / °C) Dynamic battery status indication Adjustable emissivity Audible and visible alarm indication for High and Low Temperature Alarm Safety International Safety Symbols This symbol, adjacent to another symbol or terminal, indicates the user must refer to the manual for further information Warnings Do not directly or indirectly point the laser at the eyes of a person or an animal Inspect for damage or for any shortage of parts or accessories before use Replace the batteries immediately after the battery indicator flashes Do not use the thermometer near explosive gases, steam, or dust Note that an object with high reflectivity will normally cause the ... -
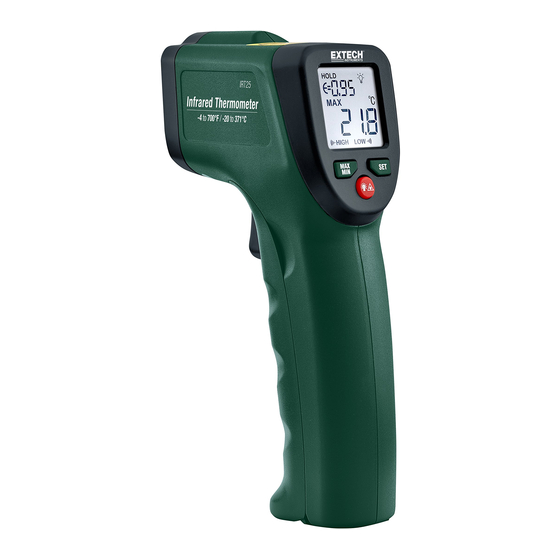
Page 3: Meter Description
Description Meter Description 1. LCD Display 2. MAX‐MIN / Down Button 3. Backlight‐Laser Pointer / Up Button 4. Laser pointer lens 5. IR Thermometer lens 6. SET Button 7. Measurement Scan Trigger 8. Battery Compartment Display Description Emissivity value indication Laser pointer active icon Scan mode (active while the trigger is pulled; displayed temperature tracks the temperature of the scanned surfaces) Hold mode (displayed temperature freezes with trigger release) Maximum/Minimum temperature icons Battery capacity indicator (flashes when battery voltage is critical) Display Backlight icon Temperature units (°F /°C) Temperature Alarm icons and audible alarm disable icon IRT25‐en‐GB_V1.0 2/17 ... -
Page 4: Operation
MAX‐MIN Mode Press the trigger and release. Press the MAX‐MIN button to view the maximum temperature reading (MAX), press again to view the lowest reading (MIN). Press and hold the MAX‐MIN button to switch the MAX‐MIN mode off. Display Backlight Press the trigger and release. Press the backlight button momentarily to switch the backlight ON or OFF. Over‐range Indicators (OL and ‐OL) If the temperature measurement exceeds 779°F (415°C), the thermometer will display OL in place of a temperature reading. If the temperature measurement is below ‐25°C (‐13°F), the thermometer will display ‐OL in place of a temperature reading. IRT25‐en‐GB_V1.0 2/17 ... -
Page 5: Setting Mode
Temperature Limit (in 0.1 steps for °C or 0.2 steps for °F). Holding down the up or down button will rapidly increase or decrease the LOW limit value. A beep will sound if the LOW temperature value reaches the HIGH temperature value while programming. Press the SET button to confirm and to step to the next option. IRT25‐en‐GB_V1.0 2/17 ... - Page 6 EXTECH INSTRUMENTS Locating Hot or Cold Spots To detect a hot or cold spot, aim the thermometer at a region beyond the target and then scan the entire region in a slow, up/down motion. Distance to Spot Ratio (Field of View) The meter’s field of view is 12:1 (distance to spot ratio). For example, if the meter is 24 inches from the target (spot), the diameter of the target must be at least 2 inches. Other distances are shown below in the field of view diagram. Note that measurements should normally be made closer than 2 feet from the target. The meter can measure from further distances but the measurement may be affected by external sources of light. In addition, the spot size may be so large that it encompasses surface areas not intended to be measured. It is necessary to ensure that the size of the target is larger than the spot size. The smaller the target, the closer the distance should be. See the accompanying diagram. Emissivity Emissivity represents the energy reflectivity of a material. Most organic materials and painted or oxidized surfaces have an emissivity of approximately 0.95. If possible, masking tape or flat black paint should be applied to cover the measured surface. Wait a period of time to allow the tape or paint to reach thermal equilibrium with the surface of the covered object. Measure the temperature of the surface covered with tape or paint only after equilibrium has been achieved. IRT25‐en‐GB_V1.0 2/17 ...
-
Page 7: Measurement Notes
2. If the surface of the object under test is covered with frost, oil, grime, etc., clean before taking measurements. 3. If an object's surface is highly reflective apply masking tape or flat black paint to the surface before measuring. 4. The meter may not make accurate measurements through transparent surfaces such as glass. 5. Steam, dust, smoke, etc. can obscure measurements. 6. The meter compensates for deviations in ambient temperature. It can, however, take up to 30 minutes for the meter to adjust to extremely wide ambient temperature changes. 7. To find a hot spot, aim the meter outside the area of interest then scan across (in an up and down motion) until the hot spot is located. Maintenance Cleaning To clean the lenses use compressed air to clear dust and other particles, then carefully clean with a wet cotton swab. The cotton swab should be moistened with clean water. To clean the meter housing, wipe with a damp, soft cloth. Do not use solvents or abrasives. Do not immerse the IRT25 in water or other liquid. Troubleshooting Symptom Problem Action OL display Target temperature exceeds range Select a target within range ‐OL display Target temperature under‐range Select a target within range Battery icon flashes Low Battery power Replace Batteries Blank display screen Low battery power Check and/or replace batteries ... -
Page 8: Replacing Batteries
EXTECH INSTRUMENTS Replacing Batteries When the battery icon flashes, or when the meter doesn’t switch ON, replace the batteries. The battery compartment is located in the handle grip. The battery compartment lid is located just below the trigger. Pry the compartment lid off to reach the compartment. Replace the 1.5V AA batteries following correct polarity and then close the battery compartment lid. Battery Safety Notes: Please dispose of batteries responsibly; never dispose of batteries in a fire, batteries may explode or leak. If the meter is not to be used for 60 days or more, remove the battery and store separately. Do not mix battery types or freshness levels; please use batteries of the same type and of the same freshness level. Never dispose of used batteries or rechargeable batteries in household waste. As consumers, users are legally required to take used batteries to appropriate collection sites, the retail store where the batteries were purchased, or wherever batteries are sold. Disposal: Do not dispose of this instrument in household waste. The user is obligated to take end‐of‐life devices to a designated collection point for the disposal of electrical and electronic equipment. IRT25‐en‐GB_V1.0 2/17 ... -
Page 9: General Specifications
Accuracy ‐20~0 C (‐4~32 F): ±5°C (9°F) 0~371 C (32~700 F) ±2°C (3.6°F) or 2% of reading (whichever is greater) Note: Accuracy is specified for the following ambient temperature range: 21 to 25°C (70 to 77°F) Emissivity Adjustable from 0.10 to 1.00 Field of View 12:1 Distance to Spot ratio Laser power Less than 1mW, 630 to 670 nm (wavelength) Spectral response 8 to 14 µm (wavelength) General Specifications Display Backlit LCD display with function indicators Display rate 500ms approx. Operating Temperature 0°C to 40°C (32°F to 104°F) Operating Humidity Max. 75% RH Power Supply Two 1.5V AA Alkaline batteries Automatic Power Off Meter shuts off automatically after 9 seconds Weight 226g (8.0 oz.) Dimensions 172 x 97 x 46mm (6.8 x 3.8 x 1.8”) Copyright © 2017 FLIR Systems, Inc. All rights reserved including the right of reproduction in whole or in part in any form ISO‐9001 Certified www.extech.com IRT25‐en‐GB_V1.0 2/17 ...
Need help?
Do you have a question about the IRT25 and is the answer not in the manual?
Questions and answers