
Related Manuals for Pichler LG 100 DE


Summary of Contents for Pichler LG 100 DE
- Page 1 OPERATING AND INSTALLATION MANUAL CEILING UNIT LG 100 DE COMFORT VENTILATION Systematic ventilation.
-
Page 2: Table Of Contents
OPERATING AND INSTALLATION MANUAL CEILING UNIT LG 100 DE PAGE 2 Contens General 1. Introduciton Page 4 2. General Page 4 User 2.1. UNIT IN CEILING DESIGN PAGE 5 2.2. OVERVIEW OF COMPONENTS PAGE 5 3. Functionality of the ventilation system Page 6 4. - Page 3 OPERATING AND INSTALLATION MANUAL CEILING UNIT LG 100 DE PAGE 3 Specialist personnel - assembly/installation 12. Transport, storage and disposal Page 18 12.1. TRANSPORT, STORAGE AND PACKAGING PAGE 18 2. DISPOSAL PAGE 18 13. Technische Daten Page 18 13.1. UNIT SET-UP AND DIMENSIONS PAGE 18 2.
-
Page 4: General
Dear customer Dear customer, Thank you for choosing the decentralised compact ventilation unit LG 100 from PICHLER. To operate your compact ventilation unit safely, properly and economically, please read this manual carefully and follow the instructions provided. Keep this operating manual in a safe place and readily available. These units are subject to ongoing improvement and further development. -
Page 5: Unit In Ceiling Design
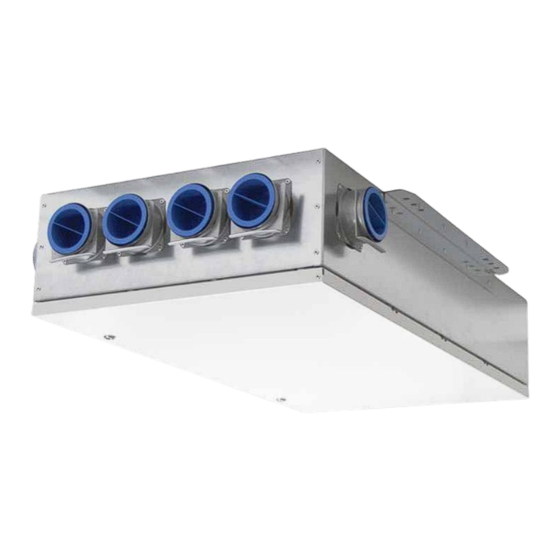
OPERATING AND INSTALLATION MANUAL CEILING UNIT LG 100 DE PAGE 5 2.1. Unit in ceiling design The compact ventilation unit LG 100 in ceiling design comprises a ceiling unit (1) and two variably mountable connections for outdoor air and exhaust air (2). -
Page 6: Functionality Of The Ventilation System
The decentralised compact ventilation unit LG 100 is operated easily and intuitively by means of a pushbutton directly on the unit or via the PICHLER APP. Therefore the unit comes with a WLAN connection as a standard feature. Optionally you can additionally connect an external control unit via cable connection. -
Page 7: Stipulations For Operation With Fireplaces
OPERATING AND INSTALLATION MANUAL CEILING UNIT LG 100 DE PAGE 7 4.1.1. STIPULATIONS FOR OPERATION WITH FIREPLACES Local requirements must be taken into consideration by compliance with corresponding standards, laws and directives. The decentralised compact ventilation unit LG 100 may only be installed in rooms, flats or utilisation units of a comparable size in which fireplaces dependent on room air are installed, if: •... -
Page 8: Safety
OPERATING AND INSTALLATION MANUAL CEILING UNIT LG 100 DE PAGE 8 5. Safety Read this operating and installation manual carefully and observe the safety instructions while you carry out installation, commissioning, servicing or general work on the ventilation unit. Keep the operating and installation manual near the unit for its entire service life. -
Page 9: Setting Up The Unit
OPERATING AND INSTALLATION MANUAL CEILING UNIT LG 100 DE PAGE 9 5.3. Setting up the unit The national and local regulations must be heeded when installing and setting up the unit. The unit may only be installed in compliance with national installation regulations. -
Page 10: Plant Operation
- when the time interval is reached • standard operation via pushbutton on the unit, WLAN interface for controlling the PICHLER-APP and for providing remote access via PICHLER Connect, and optionally with the “MINI” control unit for setting the basic functions. -
Page 11: Mini Control Unit
OPERATING AND INSTALLATION MANUAL CEILING UNIT LG 100 DE PAGE 11 8. MINI control unit 8.1. Functions The unit is operated via the “MINI” control unit. The following compact ventilation unit functions can be indicated and configured by means of the “MINI” control unit: •... -
Page 12: Operation Via Pichler App And Pichler Connect
Operational safety: Remote access allows the PICHLER customer service to respond quickly and easily in the event of faults. connect. 9.3. Data protection When you have installed the PICHLER APP and establish a connection to the device, we assume that you accept our current data privacy statement (see: www.pichlerluft.at/datenschutz.at). Changes reserved... -
Page 13: Creating An Account
OPERATING AND INSTALLATION MANUAL CEILING UNIT LG 100 DE PAGE 13 9.4. Creating an account When the Access Point mode is active, the ventilation unit is visible via the WLAN settings of the smartphone. Select the network of the name “LG100AHU” and enter the password “Pichler1234”. When a connection with the ventilation unit has been established success- fully, open the PICHLER APP. - Page 14 OPERATING AND INSTALLATION MANUAL CEILING UNIT LG 100 DE PAGE 14 In order to connect the ventilation unit to the Internet router, you Connect your smartphone to the Internet router and must enter the network name (WIFI-SSID), the WIFI password and select “Connect via Internet”...
-
Page 15: Error & Warning Messages
OPERATING AND INSTALLATION MANUAL CEILING UNIT LG 100 DE PAGE 15 10. Error & warning messages 10.1. LED on the ventilation unit The error messages of the compact ventilation unit are indicated in red by flashing patterns on the LED on the lower end of the ventilation unit. -
Page 16: Filter Service
OPERATING AND INSTALLATION MANUAL CEILING UNIT LG 100 DE PAGE 16 11. Filter service At every filter maintenance always all 3 filters must be replaced. 11.1. MINI control unit filter message When the filter service life has elapsed (factory setting 6 months) the control unit reports the necessity of a filter check. -
Page 17: Procedure For The Filter Change
When inserting the new filters, observe the mounting position (direction of air). 11.5. Procedure for the filter change 1. Filter message on the MINI control unit or via the Pichler APP. 2. Set the unit to Standby. 3. Open the rotary closures. -
Page 18: Specialist Personnel - Assembly/Installation
OPERATING AND INSTALLATION MANUAL CEILING UNIT LG 100 DE PAGE 18 Specialist personnel - assembly/installation 12. Transport, storage and disposal Any transport damage and/or missing parts must be reported immediately in writing to the forwarder or supplier. 12.1. Transport, storage and packaging The compact ventilation unit is delivered in a transport packaging. -
Page 19: System Diagram
The ventilation unit is regulated in a demand-oriented fashion via the VOC/eCO2 sensor system integrated into the ventilation unit. 8. Controller The ventilation unit can be controlled optionally by using the pushbutton on the unit, via Pichler APP or via the “MINI” control unit. 9. Outdoor air flap Closes the outdoor air connection of the unit when the unit is switched off. -
Page 20: Safety Devices
OPERATING AND INSTALLATION MANUAL CEILING UNIT LG 100 DE PAGE 20 13.3. Safety devices To ensure safe operation of the system, safety devices and covers must by no means be rendered inoperative; nor may measures be taken to bypass or dismantle them. -
Page 21: Sound Data
OPERATING AND INSTALLATION MANUAL CEILING UNIT LG 100 DE PAGE 21 Air connections Outdoor / exhaust air 100 mm Multi-room connection supply air 3 x KOMFLEX 75 Multi-room connection extract air 3 x KOMFLEX 75 Certifications TÜV-tested Building inspection approval III 57 1.51.3-7/20... -
Page 22: Frost Protection Without A Pre-Heating Battery
OPERATING AND INSTALLATION MANUAL CEILING UNIT LG 100 DE PAGE 22 14.3. Frost protection without a pre-heating battery For ventilation units without a pre-heating battery there is the risk that the heat exchanger freezes when outdoor temperatures are very cold. Since the ventilation unit is not provided with a condensate connection, the formation of condensate is to be avoided by all means. -
Page 23: Mounting
OPERATING AND INSTALLATION MANUAL CEILING UNIT LG 100 DE PAGE 23 15. Mounting 15.1. Preparatory work 15.1.1. Assembling the outdoor air and exhaust air connecting piece Two possible positions are provided in each case for the assembly of the outdoor air and exhaust air connections, especially from or in a 90°... -
Page 24: Pipework
OPERATING AND INSTALLATION MANUAL CEILING UNIT LG 100 DE PAGE 24 When the connecting piece has been mounted in the desired position, the unit can be installed on the ceiling. For this purpose, position the unit on the ceiling and install it by means of the mounting brackets on the right and left using screws and washers. -
Page 25: Electrical Connection
OPERATING AND INSTALLATION MANUAL CEILING UNIT LG 100 DE PAGE 25 15.4. Electrical connection Electrical connection and work on electrical components may only be carried out by authorised electricians. Before working on the control board, the unit must be isolated from the mains (all poles) and protected from being switched back on. - Page 26 OPERATING AND INSTALLATION MANUAL CEILING UNIT LG 100 DE PAGE 26 Optionally, the ventilation unit can be controlled via the MINI control unit or via modbus RTU (GLT connection). A digital input is provided as “External off” (contact: NC or NO contact) or at “External ventilation level 3” (contact as NO contact), depending on the configuration.
-
Page 27: Specialist Personnel - Commissioning
OPERATING AND INSTALLATION MANUAL CEILING UNIT LG 100 DE PAGE 27 Specialist personnel - commissioning 16. Maintenance and cleaning 16.1. Safety instructions For all cleaning or servicing work on the ventilation unit, always pull the mains plug or fully disconnect the unit from the mains (all poles)! Further installation and system components must be maintained and cleaned in compliance with specifications and instructions. - Page 28 OPERATING AND INSTALLATION MANUAL CEILING UNIT LG 100 DE PAGE 28 Loosen the screws of the sealing plate Remove the sealing plate Changes reserved...
-
Page 29: Cleaning The Equipment Housing Inside
OPERATING AND INSTALLATION MANUAL CEILING UNIT LG 100 DE PAGE 29 2.) Removing the heat exchanger: Ceiling unit without sealing plate Pull out the heat exchanger 16.4. Cleaning the equipment housing inside We recommend cleaning at least once a year, depending on the level of soiling. Handle the device surface with care when cleaning it. -
Page 30: Service Table
OPERATING AND INSTALLATION MANUAL CEILING UNIT LG 100 DE PAGE 30 16.5. Service table In order to document maintenance work, this table must be completed after carrying out work on the unit: System commissioned by: Date Maintenance work (e.g. filter change) - Page 31 OPERATING AND INSTALLATION MANUAL CEILING UNIT LG 100 DE PAGE 31 Changes reserved...
-
Page 32: Commissioning
OPERATING AND INSTALLATION MANUAL CEILING UNIT LG 100 DE PAGE 32 17. Commissioning The ventilation system must be complete, connected and ready for operation before it is put into operation for the first time. The unit can be put into operation and system settings can be configured only when all work on the system is complete. -
Page 33: Error Description
OPERATING AND INSTALLATION MANUAL CEILING UNIT LG 100 DE PAGE 33 18. Error description 18.1. Error description for the MINI control unit Error descriptions are provided for the corresponding light patterns in the following table. Errors can be located precisely using the service software (available to specialist personnel only). -
Page 34: Error Description For The Unit
OPERATING AND INSTALLATION MANUAL CEILING UNIT LG 100 DE PAGE 34 18.2. Error description for the unit Error descriptions are provided for the corresponding light patterns in the following table. Errors can be located precisely using the service software (available to specialist personnel only). -
Page 35: Spare Parts And Accessories
OPERATING AND INSTALLATION MANUAL CEILING UNIT LG 100 DE PAGE 35 20. Spare parts and accessories Only original spare parts may be installed or used for replacements and repairs. Dependable operation is ensured only if original spare parts are used! 20.1. -
Page 36: Ec Declaration Of Conformity
Für den Inhalt verantwortlich: J. Pichler Gesellschaft m.b.H. Responsible for the content J. PICHLER Gesellschaft m.b.H. Fotos: Ferdinand Neumüller, Archiv J. Pichler Gesellschaft m.b.H. | Text: J. Pichler Gesellschaft m.b.H. Photos: Ferdinand Neumüller, archive J. PICHLER Gesellschaft m.b.H. | Text: J. PICHLER Gesellschaft m.b.H.
Need help?
Do you have a question about the LG 100 DE and is the answer not in the manual?
Questions and answers