ThermoWorks Signals - Thermometer Operating Manual
- Operating instructions (2 pages)
Advertisement
Getting Started
Turn Signals on by pressing the power button located on the back. Please note that Bluetooth is always on. Signals will automatically attempt to connect to Wi-Fi after each power on once the Wi-Fi settings have been entered.
To connect Signals to your smart device, download ThermoWorks BBQ app from the Apple App Store or Google Play Store. Make sure your smart device's Bluetooth is turned on. Upon opening the app for the first time, you will be prompted to connect a new device. This will take you to the Devices menu. Select Signals from the list and follow the on-screen instructions. Signals will first connect via Bluetooth then ask you to set Wi-Fi settings. After a successful connection, Signals will appear in My Devices. You are now ready to use Signals with the app.
The Bluetooth and Wi-Fi signal strength is 95-feet line-of-sight. However, if Signals is close to other devices that also use radio frequencies (such as microwave ovens, cordless phones, remote controls, etc.), those devices may create interference. The transmission can also be interrupted by the walls and building material of your home. Signals will easily communicate through glass, but tinting on windows can interfere with the transmission. ThermoWorks BBQ app will notify you if the connection is lost and will automatically try to reconnect with Signals.
You can use Signals in three different modes:
Standalone – Does not require Bluetooth or Wi-Fi; simply use the built-in screen and buttons to operate.
Bluetooth – Bluetooth can be used if there is no Wi-Fi (Internet) available. For constant tracking, the smart device connected to Signals must remain within 95-feet line-of-sight.
Wi-Fi/Bluetooth – Once a Wi-Fi connection is setup, Signals communicates via the internet. If the Wi-Fi connection is lost or interrupted, Signals automatically uses Bluetooth as a backup connection until the Wi-Fi connection is re-established.
AC Adapter – Only use the 12V Signals adapter that comes with the unit to power and charge the battery.
What's Included
Signals, 3x Pro-Series High Temp Cooking Probes, Pro-Series High Temp Air Probe, Grate clip, USB-C cable, 12V USB power adapter, Instruction card with Chef-Recommended Temperature Chart.
Tips for Use
- Your Signals' body should not be affixed directly to a smoker or grill's lid or left in the smoker or oven. The high heat will melt the plastic housing.
- Insert the probe so that the tip rests at the thickest part of the meat or food. Avoid gristle or bone.
- Set your desired alarm temperature. Chef-recommended doneness temperatures are on the reverse side of this card. If cooking meat, set the alarm somewhat lower to allow for carryover cooking during resting.
- The cable may be closed in an oven door or under a BBQ hood with the following precautions:
Cautions for Pro-Series Probes
- Use hot pads or gloves when removing the probe from meat. It will be hot!
- Do not pull on the cable. Use the molded mini-handle.
- The cable will withstand 700°F (370°C) and the transition/handle 644°F (340°C).
- Probe tip itself is rated to 572°F (300°C). Do NOT expose probe tip to flames or coals.
- Construction is moisture-resistant, but we do not recommend full immersion of the cable.
- Clean probe by wiping with damp cloth and kitchen cleaner.
- Keep the probe cable away from oven elements, flames, coals, grill or oven racks—all of which can reach temperatures far higher than 700°F (even if an oven is set lower). The probe cable can be damaged at higher temperatures. The inner insulation will melt and the probe will short (displaying "NO PROBE" on the alarm display).
- When using in outdoor BBQ grills or smokers, avoid pinching the cable between hot surfaces such as a cast metal grill hood without some insulating protection. Use an access hole if available.
- Avoid repeated kinking or twisting of the probe cable which can break wires.
- With care, the probe should last a long time. Eventually, you may need to replace it. If the probe becomes damaged, the base unit will flash "NO PROBE" below the temperature display. Affordable replacements are available. Use only ThermoWorks Pro-Series Probes.
Optional Pro-Series® Probes
High Temp Straight Penetration Probe, 4.5-inch
The durable High Temp Straight Penetration Probe delivers better accuracy, faster readings, and a wider temperature range than probes sold with "low-cost" houseware temperature alarms.
Model #TX-1004X-SP

Waterproof Needle Probe
Excellent choice for cooking thick or thin portions. Also, ideal for monitoring the internal temperature of food during Sous Vide cooking. Needle probe delivers Super-Fast® 2-second response. Fully submersible.
Model #TX-1002X-NP

High Temp 12-inch Probe
Great for larger cuts of meat or deep insertion into soup urns or hot holding tanks. Durable, fast, and accurate.
Model #TX-1005X-12

High Temp 2.5-Inch Probe
This shorter High Temp Straight Penetration Probe is perfect for thinner or smaller cuts of meat where the extra probe length can get in the way. Insert into briskets or loins to continuously monitor them as they cook.
Model #TX-1009X-ST

Cable Extension
Extend your Pro-Series probes' cable an extra meter with this durable cable designed to keep your readings accurate.
Model #TX-1008X-PX


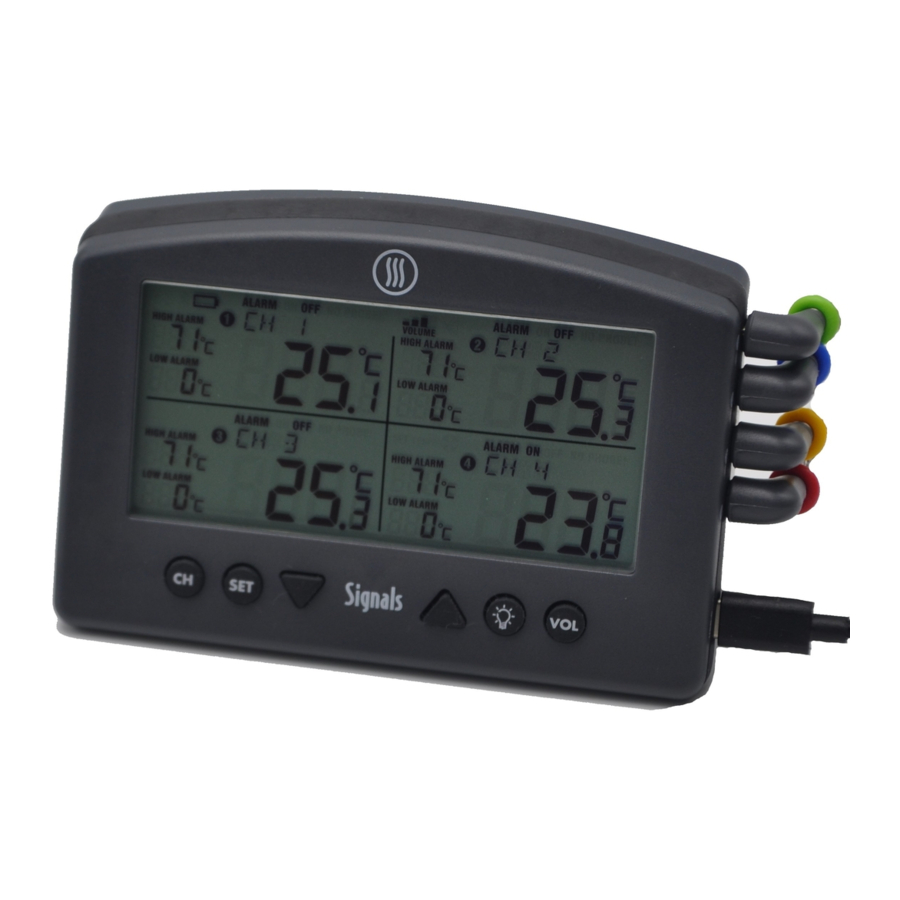
- Make sure "On" is displayed next to each channel if you want to use the alarm function. Use the "CH" and "SET" buttons to select and change settings. Alarm will remain on until muted.
- Battery level indicator. Solid battery indicates full battery life. Check the ThermoWorks BBQ app for battery percentage. An empty battery indicates a low battery condition, connect the power adapter to recharge. Flashing battery indicates the battery is charging.
- Indicates the connection type. The icon will flash with the set interval rate.
- The first four letters from the probe name within ThermoWorks BBQ app will be displayed. These can be changed in the app.
- When 'NO PROBE!' flashes, probe is not connected or has failed. Make sure plug is fully inserted.
- Both Low and High alarm settings are always visible. Use the "CH" and "SET" buttons to select and change settings. When alarm temp is triggered, "LOW ALARM" or "HIGH ALARM" will flash even if sound is muted or silenced. ANY KEY SILENCES ALARM.
- Press to select a probe channel to adjust settings. If no settings are changed after 10 seconds, the display will return to normal.
- Press to select and adjust the following settings on the probe channel selected with the "CH" button. ALARM ON/OFF, HIGH ALARM, and LOW ALARM. The selected setting will flash. Use the up and down arrows to make any adjustments. Press "SET" again to save and move to the next setting.
- Turns backlight on for 20 seconds. Light shuts off to preserve battery. Press again when needed.
- Changes alarm volume setting or mutes alarm.

- Press to turn Signals on.
- To switch between Celsius and Fahrenheit, hold down button 6 seconds while powering on.
- Press and hold 3 seconds to turn Signals off.
Meat Temperatures
Chef & USDA Recommended
BEEF

PORK

POULTRY

SEAFOOD

*PULL MEAT • LET IT REST – Remember to remove meat from the heat prior to reaching your ideal internal temperature. During the rest, the internal temperature may rise anywhere from a few to several degrees depending on cooking temperature and the size and thickness of the meat.
CABLE SHOULD AVOID:

Damage from the above voids probe warranty.
Pro-Series Probes work with Signals™, Smoke™, ChefAlarm®, and DOT® available at www.thermoworks.com/signals
Go to www.thermoworks.com/signals for additional product information and more tips for use.
For service or warranty:
1-800-393-6434
1-801-756-7705
techsupport@thermoworks.com
www.thermoworks.com
741 E. Utah Valley Dr.
American Fork, UT 84003

Documents / Resources
References
Signals BBQ Alarm Thermometer with Wi-Fi and Bluetooth® Wireless Technology | ThermoWorks
Professional Thermometers from the Temperature Experts | ThermoWorks
Download manual
Here you can download full pdf version of manual, it may contain additional safety instructions, warranty information, FCC rules, etc.
Advertisement


Need help?
Do you have a question about the Signals and is the answer not in the manual?
Questions and answers