Table of Contents

Related Manuals for SPORTS AFIELD ELEVATION SA1639E-THD


Summary of Contents for SPORTS AFIELD ELEVATION SA1639E-THD
- Page 1 ELEVATION SERIES INSTRUCTION MANUAL STYLES: SA1639E-THD, SA2185E-THD, SA3005E-THD IMPORTANT: Please read this information and follow all safety rules carefully before operating your gun safe. Failure to do so will void your warranty. 090122...
-
Page 2: Table Of Contents
TABLE OF CONTENTS IMPORTANT INFORMATION ....................2 1. REGISTRATION ........................ 3 2. UNDERSTANDING YOUR SAFE ..................4 3. UNBOXING ........................4 4. INSPECTION ........................4 5. INITIAL ENTRY........................5 6. PROPER PLACEMENT AND MOVING OF SAFE ..............6 7. KEEPING YOUR SAFE DRY ....................6 8. -
Page 3: Important Information
DISCLAIMER - READ BEFORE SAFE SETUP PLEASE READ THIS INFORMATION CAREFULLY BEFORE OPERATING YOUR SAFE. DO NOT LOCK THIS MANUAL OR THE OVERRIDE KEYS IN YOUR SAFE. Thank you for choosing a Sports Afield Safe to protect your valuables. We are committed to securing, organizing and protecting your most important documents, valuables and keepsakes. -
Page 4: Registration
1. REGISTRATION Register your safe at www.saproducts.com By registering your Sports Afield Safe we will be able to expedite and address any problems or challenges you may have which would otherwise require a notary letter and proof of payment. REGISTRATION INFORMATION The information you record onto this page will be required in the event you cannot access the contents of your safe. -
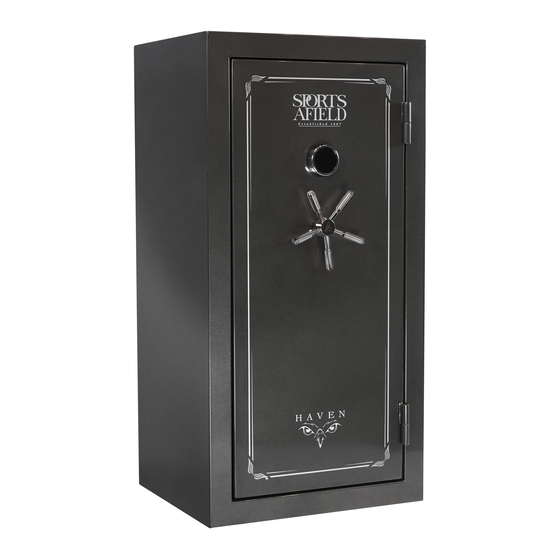
Page 5: Understanding Your Safe
2. UNDERSTANDING YOUR SAFE UL Approved Programmable 9v Battery Electrical Outlet E-Lock Compartment Top Shelf Adjustable Shelf Rails Override Key Entry (Underneath keypad) Reset Button Deluxe Door 3 Spoke Organizer Handle (SA3005E-THD will have a 5-spoke handle) Active External Bolt Down Locking Hinges Fully Wrapped... -
Page 6: Initial Entry
5. INITIAL ENTRY CONTENTS: USERS MANUAL, OVERRIDE KEY AND HANDLE SPOKE Locate the override keys and single handle spoke inside the plastic bag hanging on the front of the safe. Install the single handle spoke handle by inserting into one of the threaded openings and twisting clockwise until you feel the spoke fully lock... -
Page 7: Proper Placement And Moving Of Safe
6. PROPER PLACEMENT AND MOVING OF SAFE WARNING: SAFES ARE VERY HEAVY AND AWKWARD TO HANDLE. PLEASE USE THE UTMOST CARE IN MOVING THE SAFE. UTILIZING A TRAINED PROFESSIONAL WITH PROPER MOVING EQUIPMENT IS HIGHLY RECOMMENDED. The location of the gun safe is very important and the utmost care should be taken during this consideration. -
Page 8: Shipping Skid Removal
8. SHIPPING SKID REMOVAL WARNING: WHILE REMOVING THE BOLTS FROM THE SKIDS, BE SURE TO HAVE A PERSON HOLD AND STABILIZE THE SAFE TO KEEP IT FROM TIPPING, CAUSING INJURY, AND/OR DAMAGE TO THE SAFE AND SURROUNDING STRUCTURES. WARNING: BEFORE REMOVING THE SHIPPING SKIDS, MAKE SURE THE DOOR IS CLOSED AND LOCKED. -
Page 9: Securing Your Safe
9. SECURING YOUR SAFE WARNING: YOUR SAFE IS DESIGNED TO SUPPORT ITSELF WHEN THE DOOR IS OPENED. HOWEVER, CAUTION SHOULD BE USED TO AVOID TIPPING. WHILE SECURING YOUR SAFE BE SURE TO HAVE A SECOND PERSON HOLD AND STABILIZE THE SAFE TO KEEP IT FROM TIPPING, CAUSING INJURY, AND/OR DAMAGE TO THE SAFE AND SURROUNDING STRUCTURES. -
Page 10: E-Lock Installation
10. ELECTRONIC LOCK INSTALLATION 1. Remove E-Lock from box located inside of safe. Note: Keep door open during installation with keys in hand. The E-Lock requires 1x9V alkaline battery. Locate the battery compartment on BACK OF E-LOCK the back of the E-Lock. Insert the battery in the proper orientation. -
Page 11: Security Code Setup For Non Illuminated E-Locks
11. SECURITY CODE SETUP FOR NON ILLUMINATED E-LOCKS Important: It is necessary to re-program your safe with a new security code you have personally selected to provide maximum household security. Be careful, in choosing your new security code, you’ll want to be sure that you can operate the unit quickly without making an error. -
Page 12: Low Battery Warning
12. LOW BATTERY WARNING This E-Lock is equipped to alert you when the battery Red = Low Battery is low by illuminating the red light (center) when any button is pressed on the keypad. Please replace the battery immediately when receiving this warning. Always test the battery when installing or replacing. -
Page 13: Loading Your Safe
15. LOADING YOUR SAFE Store documents or heat sensitive items in the bottom of the safe for greatest protection against fire damage. Store ammunition separately from valuables. Do not put anything in your safe that will put pressure against the door when it is closed. -
Page 14: Lifetime Warranty
LIFETIME WARRANTY SA Consumer Products, Inc. will repair or replace, at their sole discretion, any Sports Afield Gun Safe damaged by fire, forced entry, forced attack or natural flood for the lifetime of the original owner. SA Consumer Products, Inc. will repair or replace, at their sole discretion, any Sports Afield Gun Safe with defective parts, paint or lock for the lifetime or the original owner.
Need help?
Do you have a question about the ELEVATION SA1639E-THD and is the answer not in the manual?
Questions and answers