
Related Manuals for Sangean HDR-1


Summary of Contents for Sangean HDR-1
- Page 1 HD Radio/FM-RDS/AM Digital Stereo Receiver User Manual 381QB0SB-A 2007/5/18, ¤U¤È 03:40 20070518_HDR-1_381QB0SB-A_GB_«Ê-±.p65...
- Page 2 HD Radio™ Technology Manufactured Under License From iBiquity Digital Corporation. iBiquity Digital and the HD Radio and HD logos are registered trademarks of iBiquity Digital Corporation. HD Radio is a trademark of iBiquity Digital Corporation. U.S. and Foreign Patents. 2007/5/24, ¤U¤È 03:19...
-
Page 3: Important Safety Instructions
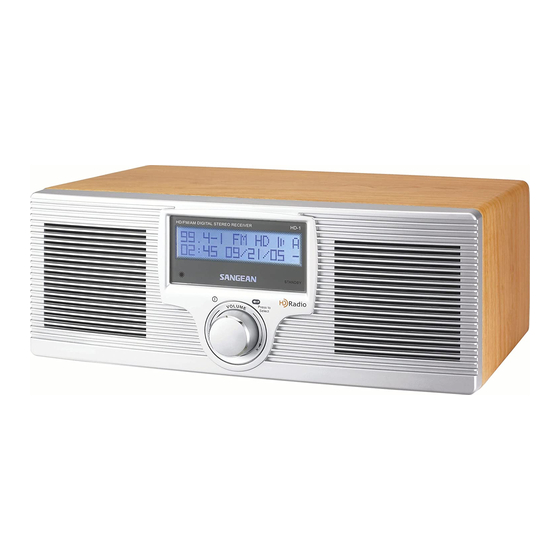
Important Safety Instructions 1. Read these instructions. 2. Keep these instructions. 3. Heed all warnings 4. Follow all instructions. 5. Do not use this apparatus near water. 6. Clean only with dry cloth. 7. Do not block any ventilation openings. Install in accordance with the manufacturer’s instructions. - Page 4 Unit Controls (Front) LCD display Standby LED indicator 20070524_HDR-1_381QB0SB-A_GB.p65 Remote Control Sensor Power and Control knob 2007/5/24, ¤U¤È 03:19...
-
Page 5: Unit Controls
Unit Controls (Rear) FM Telescopic Antenna AC power cord socket Music and News selection switch 20070524_HDR-1_381QB0SB-A_GB.p65 Headphone socket Aux In socket External AM Loop antenna socket 2007/5/24, ¤U¤È 03:20... -
Page 6: Remote Control
Remote Control Power Information button ATS and Setup button Band selection Mute button Number buttons 20070524_HDR-1_381QB0SB-A_GB.p65 Audio Equalizer selection Last station recall HD Radio Seek button Tuning Control Volume Control Execution button 2007/5/24, ¤U¤È 03:20... - Page 7 Accessories Detachable power Cord x 1 FM Dipole Antenna x 1 AM Loop antenna x 1 Remote control unit x 1 Instruction manual x 1 Warranty card x 1 2007/5/24, ¤U¤È 03:20 20070524_HDR-1_381QB0SB-A_GB.p65...
-
Page 8: Getting Started
“POP” when power is connected. Do not be alarmed.) Important: 1. The AM loop antenna should be located at least 50 cm away from the receiver to avoid possible interference. 2. Do not touch Power/Control knob on the radio while plug in AC power. 2007/5/24, ¤U¤È 03:20... -
Page 9: Radio Controls
Radio Controls 1. To turn the radio on press the “Power” button on the remote control or hold “Power /Control knob” on the unit for 2 seconds. 2. To turn the radio off press the “Power” button on the remote control or hold “Power /Control knob”... - Page 10 1. Rotate the “Power/Control knob” unit desired volume is reached. Mute Using the Remote: 1. Press MUTE button on the remote control to mute the radio. Press the MUTE button again to turn on the volume. Using the Unit: 1. Rotate “Power/Control knob” until volume is muted.
-
Page 11: Listening To Hd Radio
When HD Radio station is found, display will show, 1. Station call sign. 2. The number of the multicasting program (1= main program). 3. The total number of HD Radio program services and HD Radio mark. 4. The preset number of this program. 5. The radio band. - Page 12 Display Modes (INFO) There are several display modes. Please refer to the HDR-1 Menu Structure Table for a complete listing and description of these display modes. Using the Remote: 1. Press “Info” button. 2. Continually press “Info” button or press “Tune” Up/Down button to navigate through available display modes.
-
Page 13: Advanced Information
Advanced Information There are several Advanced Display modes. Please refer to the HDR-1 Menu Structure Table for a complete listing and description of these display modes. Using the Remote: 1. Press and hold “Info” button. 2. Continually press “Info” button to navigate through available display modes. - Page 14 Hybrid Seek Using the Remote: 1. Press the “SEEK” Up/Down button to seek the next frequency broadcasting in a usable radio signal. Using the Unit: 1. Press “Power/Control knob” and cycle through the menu options by rotating the “Power/Control knob” until you are at “SEEK”...
-
Page 15: Ats - Auto Tuning System
1. Press and hold “ATS” button to activate menu. 2. Press “Enter” button to activate frequency scanning. 3. Allow radio to finish scanning. Once completed you can navigate through the available stations using the “Tune” Up/Down buttons. To navigate to the multicast stations using ATS function press the “Enter”... - Page 16 Setting and Recalling Memory Presets Preset stations There are 10 preset stations each for AM and FM. Setting Memory Presets Using the Remote: 1. Press “Band” button to select desired band. 2. Hold corresponding numbered button for 2 seconds to store. i.e. to store 93.1 into memory position 2 press and hold the “#2”...
-
Page 17: Setting Sleep Timer
Last Recall Station Using Remote: 1. Press LAST RECALL button on the remote control to recall last listening station. Using the Unit: 1. Press “Power/Control knob” and cycle through the menu options by rotating the “Power/Control knob” until you are at “RECALL” menu option. - Page 18 Before you set the Auto clock function, please make sure the FM station you tune to providing auto clock time setting service. The Auto clock function can be set only when radio Power is on. 1. Press ATS/SET UP button for more than 2 seconds until display appears SET UP and flashing ATS.
- Page 19 Turning Alarms On/Off & Setting This unit features a dual alarm system that can sound either to a beeping tone or AM/FM or Auxiliary Audio. The easiest way to set the alarms is when the unit is off, and these instructions are designed using this option.
- Page 20 Once – wake up only once at set alarm time. Note: Make sure to set correct clock time and date before setting alarm timer. The radio can judge which dates are weekends and weekdays only when the clock and dates are set correctly before alarm setting. Note: If you select alarm timer via “Beep”...
-
Page 21: Snooze Function
Snooze function The alarm will sound at the selected alarm time. Press any button except Power (Standby) button can be silence for 5 minutes interval until alarm is on again (Snooze). This sequence can be repeated during the alarm period. Display will appear Snooze and remaining time to next alarm on. -
Page 22: System Reset
2. Repeatedly press and release ATS/SET UP button to get System Reset. 3. Press Execution button to execute system reset. 4. After the reset, the radio will clean all the memory/time/alarm etc. presets and back to initial factory setting status. 20070524_HDR-1_381QB0SB-A_GB.p65... -
Page 23: Reset The Radio
CPU power down. After RESET the radio, radio will be back to Standby mode (Power off) Headphone socket A 3.5 mm Headphone Socket located on the rear of the radio is provided for use with either headphones or an earpiece. Inserting a plug automatically mutes the internal speaker. - Page 24 Brief User Interface: Button action status any keys click Alarm ON click Standby / Standby Power ON Power OFF click Alarm ON / Snooze ON click Standby Rotary Knob click Power ON long 2s Power ON Rotary Knob left Power ON right Power ON Band...
- Page 25 1. Long 2s(.5s) = press key and hold up to 2 (0.5) seconds. 2. Long hold = just press key and hold. 3. BER = Error Bit Rate. 4. SSI = Signal Strength Indicator. 5. RT = Radio Text. 6. PTY = Program Type. 7. ATS = Auto Tuning System. 20070524_HDR-1_381QB0SB-A_GB.p65...