
Related Manuals for Zehnder Rittling ComfoAir Q


Summary of Contents for Zehnder Rittling ComfoAir Q
- Page 1 Decorative radiators Comfortable indoor ventilation Heating and cooling ceiling systems Clean air solutions Zehnder ComfoAir Q Ventilation System Installer manual...
- Page 2 All rights reserved. This documentation has been made with the utmost care. The publisher cannot be held liable for any damage caused as a result of missing or incorrect information in this document. 2 - EN...
-
Page 3: Table Of Contents
Table of Contents Foreword ..................................4 Safety instructions ................................ 5 Installation conditions ..............................6 Transport and unpacking ............................... 6 Technical specifications ..............................7 4.1 Unit configuration ..............................8 4.2 Dimension sketch ..............................9 4.3 Wiring diagram main board ........................... 10 Installation procedures .............................. -
Page 4: Foreword
Q in a safe and optimal manner. In this document How to clean the valves and/or grilles in the ventilation system. the ComfoAir Q will be referred to as “the unit”. How to use the display on the unit. The unit is subject to continuous development and improvement. -
Page 5: Safety Instructions
1 Safety instructions Do not modify the unit or the ■ Always obey the safety regulations, ■ specifications given in this document. warnings, comments and instructions A modification can cause personal given in this document. When injury or damage the performance of the safety regulations, warnings, the ventilation system. -
Page 6: Installation Conditions
2 Installation conditions 3 Transport and unpacking Always install the equipment according to the You can find the permitted transport and ■ latest regulations for installation of your country. storage temperature in the chapter “Technical Install the unit on a 230V~ 50Hz mains connection. specifications”. -
Page 7: Technical Specifications
4 Technical specifications Q 350 Q 450 Q 600 Performance 75 m 3 /h 75 m 3 /h 75 m 3 /h Minimal airflow when pre-heater is off 100 m 3 /h 100 m 3 /h 100 m 3 /h Minimal airflow when pre-heater is on 350 m 3 /h 450 m 3 /h... -
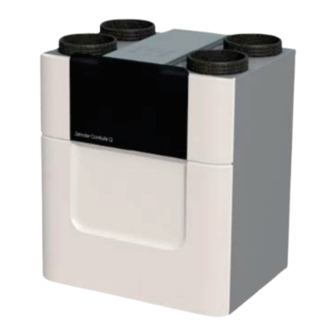
Page 8: Unit Configuration
4.1 Unit configuration Position Part Semi-transparent visor for access to the display and the filter caps. Engraving of the air connections on the cable tray cover. 2 level adjusters. Cable tray cover for cover and protection of the connected cables. Mains power connection and identification plate detailing information on the unit (not visible). -
Page 9: Dimension Sketch
4.2 Dimension sketch ComfoAir Q 350 ComfoAir Q 450 / ComfoAir Q 600 EN - 9... -
Page 10: Wiring Diagram Main Board
4.3 Wiring diagram main board If the power supply cord is damaged, it must be replaced with the original cord by the manufacturer, its service agent or similarly qualified persons in order to prevent accidents. Legend Meaning Code Meaning Code Orientation: Right Orientation: Left Green / Yellow... -
Page 11: Installation Procedures
Unplug the unit from the wall outlet to disconnect it from the power supply.If the unit does not have a plug, use a switch according to EN 60335-1 (with switch-off of all poles and 3 mm overvoltage category III). 5 Installation procedures Be aware of electromagnetic interference (EMC) during installation. -
Page 12: Installation On The Wall
5.1 Installation on the wall 640mm ≥1050mm ≥250mm Attach the mounting bracket to the Hang the unit on the mounting bracket Install the unit against a wall wall. fixed to the wall. with a minimum mass of 200 ■ Make sure the openings on the ■... -
Page 13: Installation On The Floor
5.2 Installation on the floor Example of instruction 1100 Use a Zehnder mounting frame on the Install the mounting frame as Place the unit on the mounting frame. ■ Make sure the unit is locked in floor (available as an optional extra) instructed in its installation for walls with a mass of less than instructions. -
Page 14: Installation Of The Air Ducts
1. Connect the supplied condensate drain sealing 5.4 Installation of the air ducts cap on the Zehnder bayonet connection to the supply / extract air side of the unit. Air duct systems (Left orientation = left side; Right orientation = right side). 2. - Page 15 Legend Code Meaning Outdoor air Supply air Extract air Exhaust air Supply and extract air on the right side Supply and extract air on the left side The distance (E) between the opening of the ■ outdoor air duct (A) and the opening of the exhaust air duct (B) must be at least 1.5 m.
-
Page 16: Installation Of The Valves And/Or Grilles
5.5 Installation of the valves and/or grilles Do not obstruct these openings. For instance with furniture, draught excluders or deep pile carpet, as the airflow in the house will stagnate. For the best comfort it is recommended that you install the ventilation system with supply and extract valves made by Zehnder. -
Page 17: Available Operating Devices
6 Available operating devices Appearance Name Remark Example Unit display For manual and automatic control of the unit. The automatic control is based on the unit settings and adjustable scheduler. Zehnder ComfoSense C 67 You can connect the ComfoSence C directly to the unit via a ComfoNet connection. Zehnder ComfoSwitch C 67 You can connect the ComfoSwitch C directly to the unit via a ComfoNet connection. -
Page 18: Optional Ancillaries
Zehnder ComfoFond-L Q A connected option box is necessary to control the ComfoFond-L Q. You do need a separate power supply for the option box. Zehnder ComfoAir Q You can install the pre-heater on site into the unit. pre-heater Post-heater A connected option box is necessary to control the post-heater. - Page 20 Zehnder Group UK Limited Concept House, Watchmoor Point Camberley, Surrey • GU15 3AD T +44 (0) 1276 605800 ventilation@zehnder.co.uk • www.zehnder.co.uk...
Need help?
Do you have a question about the ComfoAir Q and is the answer not in the manual?
Questions and answers