Table of Contents
Advertisement
Quick Links
Reference Manual
An overview of the GM-800 . . . . . . . . . . . . . . . . . . . . . . . . . . . . . 2
Sound structure of the GM-800 . . . . . . . . . . . . . . . . . . . . . . . . . . . . . . .2
Panel descriptions . . . . . . . . . . . . . . . . . . . . . . . . . . . . . . . . . . . . . . 3
Front panel . . . . . . . . . . . . . . . . . . . . . . . . . . . . . . . . . . . . . . . . . . . . . . . . .3
Rear panel (connecting your equipment) . . . . . . . . . . . . . . . . . . . . . .4
Getting ready . . . . . . . . . . . . . . . . . . . . . . . . . . . . . . . . . . . . . . . . . . 6
Getting your guitar/bass ready . . . . . . . . . . . . . . . . . . . . . . . . . . . . . . .6
Connecting the equipment . . . . . . . . . . . . . . . . . . . . . . . . . . . . . . . . . .6
Turning the power on . . . . . . . . . . . . . . . . . . . . . . . . . . . . . . . . . . . . . . .6
SELECT) . . . . . . . . . . . . . . . . . . . . . . . . . . . . . . . . . . . . . . . . . . . . . . . . . . . .6
Configuring the pickup settings (GK SETTINGS) . . . . . . . . . . . . . . . .7
Adjusting the volume . . . . . . . . . . . . . . . . . . . . . . . . . . . . . . . . . . . . . . .8
Using the tuner . . . . . . . . . . . . . . . . . . . . . . . . . . . . . . . . . . . . . . . . . . . . .8
Playing . . . . . . . . . . . . . . . . . . . . . . . . . . . . . . . . . . . . . . . . . . . . . . . . 9
Select a scene . . . . . . . . . . . . . . . . . . . . . . . . . . . . . . . . . . . . . . . . . . . . . .9
About the play screen . . . . . . . . . . . . . . . . . . . . . . . . . . . . . . . . . . . . . .9
Editing the parts . . . . . . . . . . . . . . . . . . . . . . . . . . . . . . . . . . . . . . 10
Basic operations for editing a part . . . . . . . . . . . . . . . . . . . . . . . . . . 10
Switching the parts on/off . . . . . . . . . . . . . . . . . . . . . . . . . . . . . . . . 10
Selecting a tone for a part (TONE SELECT) . . . . . . . . . . . . . . . . . . . 10
Adjusting the volume of a part (TONE SELECT) . . . . . . . . . . . . . . 10
Adjusting the tone of a part (TONE MODIFY) . . . . . . . . . . . . . . . . 10
Changing the effect for a part (MFX) . . . . . . . . . . . . . . . . . . . . . . . . 10
Editing a part's settings for each string (STRING) . . . . . . . . . . . . . 11
Copying the settings of another part (PART COPY) . . . . . . . . . . . 11
Before using this unit, carefully read "USING THE UNIT SAFELY" and "IMPORTANT NOTES" (leaflet "USING THE UNIT SAFELY" and Quick Start). After
reading, keep the document(s) where it will be available for immediate reference.
© 2023 Roland Corporation
Editing the scenes . . . . . . . . . . . . . . . . . . . . . . . . . . . . . . . . . . . . . 12
Configuring the scene parameters (SCENE EDIT) . . . . . . . . . . . . . 12
Configuring the control assignments (CONTROL ASSIGN) . . . . . 12
Setting the functions (CONTROL FUNCTION) . . . . . . . . . . . . . . . . 12
Configuring the functions (ASSIGN SETTINGS) . . . . . . . . . . . . . . . 13
Saving a scene (WRITE) . . . . . . . . . . . . . . . . . . . . . . . . . . . . . . . . . . . 13
Editing the system settings . . . . . . . . . . . . . . . . . . . . . . . . . . . . . 14
Basic MENU operations . . . . . . . . . . . . . . . . . . . . . . . . . . . . . . . . . . . . 14
SETTINGS) . . . . . . . . . . . . . . . . . . . . . . . . . . . . . . . . . . . . . . . . . . . . . . . . 14
Adjusting the contrast (brightness) of the display . . . . . . . . . . . . 14
Restoring the factory settings (factory reset) . . . . . . . . . . . . . . . . 15
Turning off the auto off function . . . . . . . . . . . . . . . . . . . . . . . . . . . 15
Connecting external devices . . . . . . . . . . . . . . . . . . . . . . . . . . . 16
Connecting a computer (USB COMPUTER port) . . . . . . . . . . . . . . 16
Installing the dedicated driver . . . . . . . . . . . . . . . . . . . . . . . . . . . . . 16
Using this unit as an audio interface . . . . . . . . . . . . . . . . . . . . . . . . 16
Using the GM-800's dedicated software . . . . . . . . . . . . . . . . . . . . . 16
Connecting a USB flash drive (USB MEMORY port) . . . . . . . . . . . 16
Formatting a USB flash drive (FORMAT USB MEMORY) . . . . . . . . 16
Backing up data to a USB flash drive (BACKUP) . . . . . . . . . . . . . . . 17
Restoring backed-up data (RESTORE) . . . . . . . . . . . . . . . . . . . . . . . 17
Importing a tone (IMPORT) . . . . . . . . . . . . . . . . . . . . . . . . . . . . . . . . 18
Installing a WAVE EXPANSION (EXPANSION) . . . . . . . . . . . . . . . . . 18
Connecting with an external MIDI device . . . . . . . . . . . . . . . . 20
Operations from the GM-800 . . . . . . . . . . . . . . . . . . . . . . . . . . . . . . . 20
Operations from an external MIDI device . . . . . . . . . . . . . . . . . . . . 20
Main specifications . . . . . . . . . . . . . . . . . . . . . . . . . . . . . . . . . . . . 21
01
Advertisement
Table of Contents

Related Manuals for Boss GM-800


Summary of Contents for Boss GM-800
-
Page 1: Table Of Contents
Using the GM-800’s dedicated software . . . . . . . . . . . . . . . . . . -
Page 2: An Overview Of The Gm-800
An overview of the GM-800 The GM-800 is a guitar synthesizer sound generator that’s compatible with serial GK-type divided pickups (GK-5/GK-5B, sold separately). Sound structure of the GM-800 SCENE SYSTEM Part 1 TONE ALT TUNE PAN/EQ SCENE EFFECT SYSTEM EFFECT... -
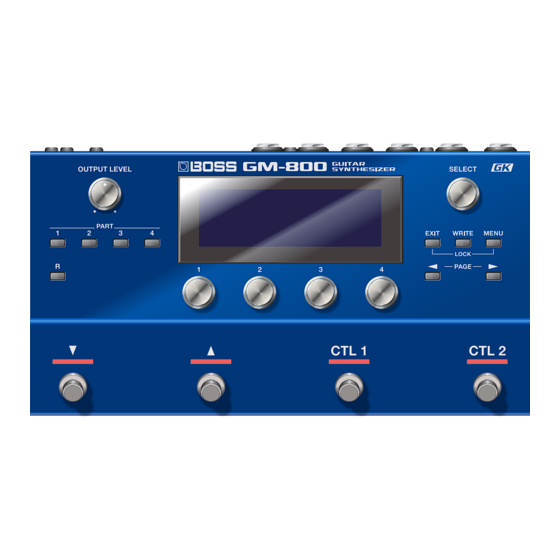
Page 3: Panel Descriptions
(*) on/off. (*) When this is ON, knob operations are disabled on the play Display screen. Shows various information for the GM-800. PAGE [ Í ] [ Ë ] buttons [1]–[4] buttons, [SELECT] knob Switches between pages. -
Page 4: Rear Panel (Connecting Your Equipment)
Panel descriptions Rear panel (connecting your equipment) * To prevent malfunction and equipment failure, always turn down the volume, and turn off all the units before making any connections. GK IN jack GK OUT jack OUTPUT jacks MIDI (OUT/IN) jacks Devices compatible with MIDI keyboard controller Guitar amplifier... - Page 5 Panel descriptions GK IN jack USB (COMPUTER) port Connect a guitar or bass guitar that has a BOSS divided pickup Use a commercially available USB 2.0 cable to connect this port to such as a GK-5 or GK-5B. your computer.
-
Page 6: Getting Ready
Selecting devices to connect to the output jacks (OUTPUT SELECT) ¹ To use the GM-800, you must connect a guitar or bass guitar that uses a divided pickup (GK pickup) capable of outputting separate signals from each string, such as the BOSS GK-5 or GK-5B. -
Page 7: Configuring The Pickup Settings (Gk Settings)
Explanation GK-5 Select this when you’re using the BOSS GK-5. Configure the divided pickup settings so that the GM-800 is always GK-3 Select this when you’re using the Roland GK-3. *1 in the optimum state when you play. You can save up to 20 of these Select this when you’re using the Roland GK-2A, or a... -
Page 8: Adjusting The Volume
You need to make these settings in situations such as when you’ve THRU outputting the sound of the newly installed a divided pickup on your guitar or bass guitar, or current scene. when you’ve changed the height of the divided pickup. For details, refer to “GM-800 Parameter Guide” (PDF). -
Page 9: Playing
Playing Icons shown in the play screen Select a scene A collection of all part settings, GUITAR TO MIDI settings, scene effect settings and control function/assign settings is called a “scene”. Areas which icons are displayed Use the [ É ] switch or [ Ç ] switch to select a scene. Scene name Display Explanation... -
Page 10: Editing The Parts
Editing the parts Adjusting the volume of a part (TONE SELECT) Basic operations for editing a part You can select tones for each part, make detailed adjustments and With the part edit screen shown, use the [SELECT] perform other edits from the part edit screen. knob to move the cursor to TONE SELECT. -
Page 11: Editing A Part's Settings For Each String (String)
Editing the parts Editing a part’s settings for each string (STRING) With the part edit screen shown, use the [SELECT] knob to move the cursor to STRING. Use knobs [1]–[4] to adjust the parameters that are shown at the bottom of the screen. If necessary, use the [ Í... -
Page 12: Editing The Scenes
Here’s how to set the scene parameters aside from those for parts. [CTL2] switches on the top panel, as well as to the expression pedals For details on the parameters, refer to the “GM-800 Parameter Guide” or footswitches that are connected to the CTL 3, 4/EXP 1 and CTL 5, (PDF). -
Page 13: Configuring The Functions (Assign Settings)
Editing the scenes Configuring the functions (ASSIGN SETTINGS) Saving a scene (WRITE) When you want to save a scene you have created, save it as a user Press the [MENU] button. scene by following the steps below. If you don’t save the scene, the edited settings are lost when you turn The MENU screen appears. -
Page 14: Editing The System Settings
Basic MENU operations Assigning the desired parameters to knobs [1]–[4] (KNOB SETTINGS) Here you can make settings that are common to the entire GM-800 (system parameters). You can assign the parameters to be controlled by knobs [1]–[4] * For details on the parameter, refer to the “GM-800 Parameter when the play screen is shown. -
Page 15: Restoring The Factory Settings (Factory Reset)
When the factory reset is complete, the message “Completed” appears. * Never turn off the power or disconnect the USB flash drive during a process, such as while the “Executing…” display is shown. Turn the power of the GM-800 off and then on again. -
Page 16: Connecting External Devices
Choose [MENU] Ó “USB MEMORY”. Using this unit as an audio interface You can record the sound of the GM-800 on your computer, or output the sound from your computer via the OUTPUT jacks of the GM-800. Press the [PAGE Í ] [PAGE Ë ] buttons to show * For details of the audio signal flow when connected via USB and on how to make settings, refer to “GM-800 Parameter Guide”... -
Page 17: Backing Up Data To A Usb Flash Drive (Backup)
¹ System settings (including system effects) Here’s how user data that you backed up on a USB flash drive can be Choose [MENU] Ó “USB MEMORY”. returned to the GM-800. This operation is called “restore”. NOTE All user data are rewritten when you execute the restore operation. -
Page 18: Importing A Tone (Import)
A selection screen to select the tone(s) to import appears. Press the [4] knob. A list of WAVE EXPANSIONs installed on the GM-800 is shown. Use the [1] [2] knobs to select the import destination (TARGET), and press the [1] [2] knobs to * If nothing is installed, “EMPTY”... - Page 19 Connecting external devices Press the [4] knob. USB flash drive folder architecture A screen appears for selecting the file to install. Copy the WAVE EXPANSION files (.exz) to the root directory. ROLAND SOUND Copy the SOUND PACK files Use the [1] knob to select the file to install. (.sdz) to the ROLAND/SOUND folder.
-
Page 20: Connecting With An External Midi Device
Operation Explanation When you select a scene on the GM-800, either the program change message that’s set in SCENE MIDI or the program change message that corresponds to the scene number you selected is transmitted at the same time. Outputting program change messages This lets you switch the external MIDI device that receives this program change message to the corresponding settings. -
Page 21: Main Specifications
Main specifications 246 (W) x 134 (D) x 63 (H) mm (without rubber foot) 9-11/16 (W) x 5-5/16 (D) x 2-1/2 (H) inches (without rubber foot) Dimensions 246 (W) x 134 (D) x 65 (H) mm (including rubber foot) 9-11/16 (W) x 5-5/16 (D) x 2-9/16 (H) inches (including rubber foot) Weight 1.2 kg (excluding AC adaptor)
Need help?
Do you have a question about the GM-800 and is the answer not in the manual?
Questions and answers