
Related Manuals for Samsung MAX-L65


Summary of Contents for Samsung MAX-L65
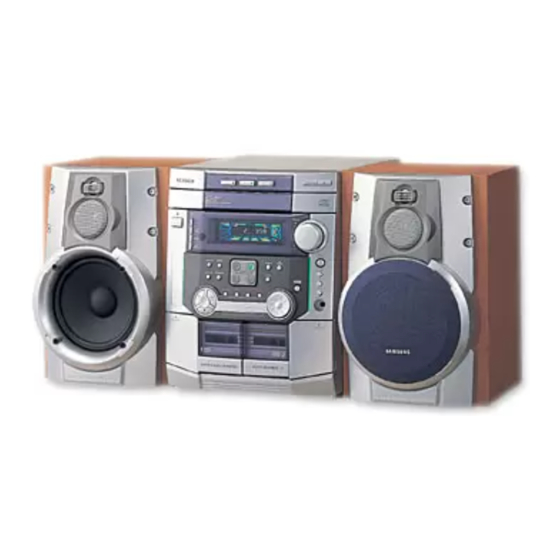
- Page 1 THREE-CD CHANGER MINI-COMPACT SYSTEM CD-R/RW PLAYBACK MAX-L65/L68 Instruction Manual...
-
Page 2: Safety Warnings
Safety Warnings CLASS 1 LASER PRODUCT KLASSE 1 LASER PRODUKT LUOKAN 1 LASER LAITE KLASS 1 LASER APPARAT PRODUCTO LASER CLASE 1 CAUTION RISK OF ELECTRIC SHOCK. DO NOT OPEN CAUTION: TO REDUCE THE RISK OF ELECTRIC SHOCK, DO NOT REMOVE REAR COVER. -
Page 3: Table Of Contents
Before Contacting the After-Sales Service ... 24 Technical Specifications ... 25 Press Thank you for buying this SAMSUNG mini-compact system. Please take time to read these instructions. They will allow you to operate your system with ease and take full advantage of its features. -
Page 4: Front Panel View
Front Panel View On/Standby Disc Selection buttons Compact Disc Compartment Demo On/Standby PTY (RDS) Display (RDS) Timer/Clock Preset/Memory Mono/ST 10. Deck 1/2 11. REV.Mode 12. Search Function buttons 13. Tuning Mode or Stop button 14. REC/Pause 15. CD Synchro Recording 16. -
Page 5: Remote Control
Remote Control 1. On/Standby 2. Disc Number Skip 3. EQ 4. AI off/Sleep 5. Deck 1/2 6. TAPE Fast-Forward 7. TAPE Rewind 8. CD Stop 9. CD Track or Radio Station Search 10. Volume Decrease 11. Tuning Mode Timer On/Standby On/Off Mute Program... -
Page 6: Rear Panel View
Rear Panel View DIGITAL OUT (OPTICAL) 1. CD Digital out Jack 2. FM Aerial Connector Terminal 3. AM Aerial Connector Terminal 4. Loudspeaker Connector Terminals 5. AUX-Input FM (75 ) ANT. SPEAKER (6 ) -
Page 7: Where To Install Your Mini-Compact System
Where to Install Your Mini-Compact System To take full advantage of your new mini-compact system, follow these installation instructions before connecting the unit. Install the system on a flat, stable surface. Never place this unit on carpeting. Never place this unit in an outdoor area. Maintain an open space of approximately 6 inches (15 cm) on the sides and rear of the system, for ventilation purposes. -
Page 8: Connecting To An External Source
Connecting to an External Source The auxiliary input can be used to take advantage of the sound quality of your mini-compact system when listening to other sources. Examples: A television A video disc player A Hi-Fi stereo video cassette recorder To connect the external source, the source must have an audio output. -
Page 9: Connecting The Am (Mw)/Lw Aerial
Connecting the AM (MW)/LW Aerial The AM aerial (for long and medium waves) can be: Placed on a stable surface Fixed to the wall (you must first remove the base) The AM aerial connector terminals are located on the rear of the system and are marked AM . -
Page 10: Viewing The Various Functions On Your System
Viewing the Various Functions on Your System You can view the various functions available on your system. Press the Demo button. Result: The various functions available are listed in turn on the display. All these functions are described in detail in this booklet. For instructions on how to use them, refer to the appropriate sections. -
Page 11: Loading And Changing Compact Discs
Loading and Changing Compact Discs The CD disc changer can contain up to three 12 cm or 8 cm compact discs without using an adapter. Never force the compact disc carrousel when opening and closing the compartment. Never press down or place objects on the carrousel. Always treat your compact discs with care;... -
Page 12: Selecting A Disc In The Cd Changer
Selecting a CD in the Disc changer The CD function is automatically selected when Disc Skip is pushed. To select a specific disc, press the corresponding Disc (1, 2, 3) button on the front panel or Disc Skip on the remote control, until the required disc indicator flashes. -
Page 13: Repeating One Or All Tracks On The Compact Discs
Repeating One or All Tracks on the Compact Discs You can repeat indefinitely: A specific track on a compact disc. All tracks on the compact disc selected. All discs loaded in the carrousel To repeat... Press CD Repeat on the Front Panel one or more times until... -
Page 14: Checking Or Changing Programmed Tracks
Checking or Changing Programmed Tracks You can check or change your selection of tracks at any time. Press once if you have started listening to the selection. Press Program. Result: The following indications are displayed: (CH = Check, 01=Program No, DI = Disc No, – – = Track No on the disc) If you have already programmed 24 tracks, CH is displayed instead of PR when you press Program. -
Page 15: Selecting A Stored Station
Searching for and Storing the Radio Stations (continued) If you do not want to store the radio station found, revert to Step 4 and search for another station. Otherwise: a Press Preset/Memory. Result: The PRGM is displayed for a few seconds. b Press Tuning Down and Up to assign a program number between 1 and 15. -
Page 16: About Rds Broadcasting
About RDS broadcasting This unit has the RDS (Radio Data System) function, which enables for the various information such as broadcasting station, radio text, time and 30 types of programs (News, Rock, Classic, etc.) to be received from the FM RDS station together with normal radio signal. -
Page 17: Pty (Program Type) Indication And Pty-Search Function
PTY (Program Type) indication and PTY-SEARCH function The PTY information is composed of an identification symbol, which helps the FM radio to recognize the program type of each FM station. The 30 PTY modes are shown in the display by pressing the PTY button. -
Page 18: Tape Deck
Listening to a Cassette Always treat your cassettes with care; refer, if necessary, to the section entitled “Precautions When Using Audio Cassettes” on page 24. Switch the system on by pressing the On/Standby button. Select the TAPE function by pressing TAPE on the front panel. Open either cassette deck 1 or 2 by pushing and releasing the deck cover where PUSH EJECT ( ) is written. -
Page 19: Recording A Radio Program
Recording a Radio Program You can record a radio program of your choice. You can only record on cassettes in Deck 2. You do not need to adjust the volume, as it has no effect on the recording. Switch the system on by pressing On/Standby. Insert a blank cassette in Deck 2. -
Page 20: Timer Function
Timer Function The timer enables you to switch the system on or off at specific times. Example: You wish to wake up to music every morning. If you no longer want the system to be switched on or off automatically, you must cancel the timer. Before setting the timer, check that the current time is correct. -
Page 21: Mute Function
Mute Function You can turn the sound off temporarily on your system. Example: You wish to answer a telephone call. Press Mute. To switch the sound back on (at the same volume as before), press Mute again or the Volume buttons. Timer On/Standby On/Off... -
Page 22: Setting The System To Switch Off Automatically
Setting the System to Switch off Automatically While listening to a compact disc or a cassette, you can set the system to switch off automatically Example: You wish to go to sleep to music. Press AI Off/Sleep. Result: playback starts and the following indications are displayed: 90 MIN Press AI Off/Sleep one or more times to indicate how long the system should continue playing before it switches off:... -
Page 23: Safety Precautions
Safety Precautions The following diagrams illustrate the precautions to be taken when using or moving your mini-compact system. -- Disc Selection / Direct Play -- Disc 1 Disc 2 Disc 3 Disc Change Volume On/Standby Demo Display Timer /Clock Power Surround Preset/ Mono/ST... -
Page 24: Precautions When Using Compact Discs
If the above guidelines do not allow you to solve the problem, take a note of: Then contact your local dealer or SAMSUNG after-sales service. Problem Checks/Explanation • The main lead is not correctly plugged into a wall socket or the wall socket is not switched on. -
Page 25: Technical Specifications
Technical Specifications SAMSUNG strives to improve its products at all times. Both the design specifications and these user instructions are thus subject to change without notice. RADIO Usable sensitivity AM (MW) Signal/noise ratio Usable sensitivity Total harmonic distortion Signal/noise ratio... - Page 26 THIS APPLIANCE IS MANUFACTURED BY: ELECTRONICS AH68-00766B...
Need help?
Do you have a question about the MAX-L65 and is the answer not in the manual?
Questions and answers