Advertisement
Before start-up
Note the following:
The pump must be connected to a GFCI protected plug which has been installed according to regulations. The plug must have a supply voltage of 120 VAC at 60 Hz.

This pump has been evaluated for use with water only.


For your own safety – before starting to run the pump, please have the following items checked by an expert:
![shock hazard]() Risk of electric shock – This pump is supplied with a grounding conductor and grounding-type attachment plug. To reduce the risk of electric shock, be certain that it is connected only to a properly grounded, grounding-type receptacle.
Risk of electric shock – This pump is supplied with a grounding conductor and grounding-type attachment plug. To reduce the risk of electric shock, be certain that it is connected only to a properly grounded, grounding-type receptacle.![shock hazard]() Risk of electric shock – This pump has not been investigated for use in swimming pool areas.
Risk of electric shock – This pump has not been investigated for use in swimming pool areas.- The electrical connections must be protected from moisture.
- If there is danger of flooding, the electrical connections must be taken to higher ground.
- Circulation of caustic fluids, as well as the circulation of abrasive materials, must be avoided at all costs.
- The pump must be protected from frost.
- The pump must be protected from running dry.
- Access by children should also be prevented with appropriate measures.
![shock hazard]() To prevent death from electric shock, pump must be connected only to a GFCI protected outlet.
To prevent death from electric shock, pump must be connected only to a GFCI protected outlet. ![]()
Do not pump flammable materials. Motor brushes may spark and cause explosions.- Do not use an extension cord on either the pump or the charger.
- People with pacemakers should consult their physician(s) before use. Electromagnetic fields in close proximity to heart pacemaker could cause pacemaker interference or pacemaker failure.
- Maintain labels and nameplates on the tool. These carry important safety information. If unreadable or missing, contact Harbor Freight Tools for a replacement.
- Do not leave the tool unattended when it is plugged into an electrical outlet or the Battery Pack is connected. Turn off the tool, and unplug it from its electrical outlet or remove the Battery Pack before leaving.
![]()
The battery Charger gets hot during use. The Charger's heat can build up to unsafe levels and create a fire hazard if it does not receive adequate ventilation, due to an electrical fault, or if it is used in a hot environment. Do not place the Charger on a flammable surface. Do not obstruct any vents on the Charger.
Especially avoid placing the Charger on carpets and rugs; they are not only flammable, but they also obstruct vents under the Charger.
Place the Charger on a stable, solid, nonflammable surface (such as a stable metal workbench or concrete floor) at least 1 foot away from all flammable objects, such as drapes or walls. Keep a fire extinguisher and a smoke detector in the area. Frequently monitor the Charger and Battery Pack while charging.- The warnings, precautions, and instructions discussed in this instruction manual cannot cover all possible conditions and situations that may occur. It must be understood by the operator that common sense and caution are factors which cannot be built into this product, but must be supplied by the operator.
 Risk of electric shock – This pump is supplied with a grounding conductor and grounding-type attachment plug. To reduce the risk of electric shock, be certain that it is connected only to a properly grounded, grounding-type receptacle.

Battery tool use and care
![burn hazard]() Recharge only with the charger specified by the manufacturer. A charger that is suitable for one type of battery pack may create a risk of fire when used with another battery pack.
Recharge only with the charger specified by the manufacturer. A charger that is suitable for one type of battery pack may create a risk of fire when used with another battery pack.![burn hazard]() Use power tools only with specifically designated battery packs. Use of any other battery packs may create a risk of injury and fire.
Use power tools only with specifically designated battery packs. Use of any other battery packs may create a risk of injury and fire.![]()
When battery pack is not in use, keep it away from other metal objects, like paper clips, coins, keys, nails, screws or other small metal objects, that can make a connection from one terminal to another. Shorting the battery terminals together may cause burns or a fire.![]()
Under abusive conditions, liquid may be ejected from the battery; avoid contact. If contact accidentally occurs, flush with water. If liquid contacts eyes, additionally seek medical help. Liquid ejected from the battery may cause irritation or burns
Lithium Battery Safety Warnings
 LITHIUM BATTERIES STORE A LARGE AMOUNT OF ENERGY AND WILL VENT FIRE OR EXPLODE IF MISTREATED:

- Keep Battery Pack dry.
- DO NOT DO ANY OF THE FOLLOWING TO THE BATTERY PACK:
- Open,
- Drop,
- Short-circuit,
- Puncture,
- Incinerate, or
- Expose to temperatures greater than 140°F.
- Charge Battery Pack only according to its Charger's instructions.
- Inspect Battery Pack before every use; do not use or charge if damaged.
Fluid Type
The Pump is designed for use with water with a maximum temperature of 95°F (35°C). Do not use the pump for other fluids, especially not fuels, cleaning fluids, or other chemical products.
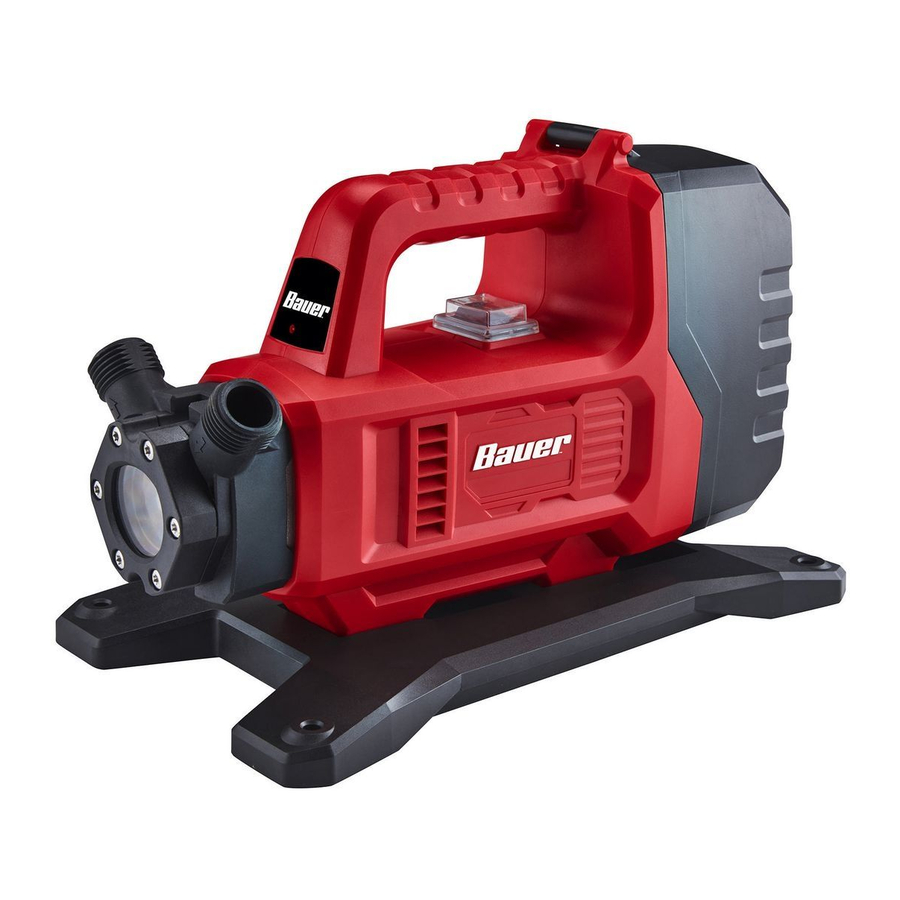
Specifications
| Battery Rating | Bauer 20V Li-ion (sold separately) |
| Adapter Electrical Rating | Input: 120VAC / 50/60Hz / 3.5A Output: 18VDC / 8.3A |
| Maximum Flow @ 0' | 325 GPH |
| Maximum Head lift @ 0 Flow | 45' |
| Discharge Port | 3/4' Garden Hose Thread |
Functions

Installation
The pump must be installed in a stationary position with either:
- A fixed pipeline or
- A flexible hose pipe.
Please note!
- Do not install the pump by suspending it unsupported from its delivery pipe or power cord. The pump must be suspended from the handle or be placed on the bottom of the basin. To ensure that the pump works properly, keep the bottom free from sludge and dirt of all kinds.
- If the water level sinks too low, any sludge in the basin will dry out and stop the pump from starting. To help ensure the pump will start as required, check the pump regularly with start-up tests.
120VAC Power Adapter
- The pump is equipped with a shock-proof plug according to regulations. The pump is designed to be connected to a 120 VAC, 60 Hz GFCI protected socket.
- Make sure that the socket is sufficiently secured and is in excellent condition.
- Depending on application, a separate flow switch (not included) may be needed between the plug and the outlet.
![]()
To prevent death from electric shock, pump must be connected only to a GFCI protected outlet.

If the power adapter or plug is damaged, do not use the pump. The power adapter or plug may only be repaired by a certified electrician.
- Lift Back Cover of Transfer Pump.
- Connect the Power Adapter to the 120VAC Input on back of Transfer Pump.
- Plug the other end of the adapter into a grounded 120VAC outlet.
Battery Pack
- Lift Back Cover of Transfer Pump.
- Insert fully charged Battery Pack into back of pump, making sure it clicks into place securely.
Tool Set Up
Battery Charging
Charge battery before using this pump. Follow instructions included with battery charger (sold separately).
LED Indicator Modes
Pump has a red LED Indicator light that displays the following modes:
- ON = Pump is ready to operate.
- FLASHING = Voltage is low. Check all connections. OR pump has run dry. Turn pump off and relocate intake filter to deeper water.
- DIMLY LIT = Pump is overheating. Turn pump off and allow to cool. Inspect impeller for any possible obstructions.
- PULSING = Pump is overloading. Turn pump off. Inspect impeller for any possible obstructions.
Areas of use
- This pump is designed to pump water only.
- This pump is designed to be used for:
General purpose removal or transfer of clear water. - This pump should NOT be used for:
Continuous run, fountain/pond water features. Removing water from swimming pools or spas. Septic or sewage systems. - This pump can also be used to transfer water (e.g. household, farming, plumbing).
Installation Instructions
- Attach non-collapsible hose to Pump intake port. Attach second hose to Pump discharge port.
- Position Pump on solid surface so that both hoses are free from kinks.
- Flip Power Switch to off position.
- Plug Power Adapter directly into GFCI protected outlet or attach a fully charged Bauer 20V Li-ion Battery Pack.
![]()
GFCI Outlet - Place unconnected end of intake hose in water to be transferred. Place unconnected end of discharge hose as needed to direct the water discharge at least 3 feet away from the source.

Operating Instructions
After reading these instructions, consider the following points before starting the pump:
- Place 2 drops of priming oil into the Intake Port. Failing to do so will reduce impeller life, which depends on lubrication.
- Verify that the discharge pipe is properly connected.
- Verify that the electrical connection is 120 VAC, 50/60 Hz.
- Verify that the electrical socket is GFCI protected and in good condition. Test GFCI protected outlet before use.
- Verify that water and moisture cannot get near the power supply socket.
NOTE: Using the included attachment, the Pump will remove water down to 1/8'. Unplug the Pump once 1/4' water level is reached.
Maintenance
TO PREVENT SERIOUS INJURY FROM ACCIDENTAL OPERATION: Unplug the Pump from its electrical outlet before performing any inspection, maintenance, or cleaning procedures.
If the pump is moved during operation, flush it out with clean water after every use.
Quarterly Maintenance
The below maintenance must be performed at least once every 3 months under optimal conditions. For frequent use, or dirty areas, more frequent maintenance is required.
- Clean sludge and debris from the bottom of the basin.
- Clean sludge/debris from inlet screen.
- Make sure discharge pipe is free from leaks.
- Make sure check valve is functioning properly.
- Manually operate any flow switch (not included) to determine that pump turns on/off as intended.
Troubleshooting
| Problem | Possible Causes | Possible Solutions |
Unit runs, but will not deliver any water |
|
|
Unit won't start or run |
|
|
Excessive noise or vibration |
|
|
Unit starts and stops too frequently |
|
|
 Follow all safety precautions whenever diagnosing or servicing the tool. Disconnect power supply before service. Follow all safety precautions whenever diagnosing or servicing the tool. Disconnect power supply before service. | ||
For technical questions, please call 1-888-866-5797.
Visit our website at: http://www.harborfreight.com
Email our technical support at: productsupport@harborfreight.com
Copyright © 2019 by Harbor Freight Tools ®. All rights reserved. No portion of this manual or any artwork contained herein may be reproduced in any shape or form without the express written consent of Harbor Freight Tools. Diagrams within this manual may not be drawn proportionally. Due to continuing improvements, actual product may differ slightly from the product described herein. Tools required for assembly and service may not be included.

Documents / Resources
References
Download manual
Here you can download full pdf version of manual, it may contain additional safety instructions, warranty information, FCC rules, etc.
Download Bauer 191101H-B, 56733 - Dual-Power Cordless Transfer Pump Manual
Advertisement


Need help?
Do you have a question about the 191101H-B and is the answer not in the manual?
Questions and answers