Table of Contents

Related Manuals for Porter-Cable 3807


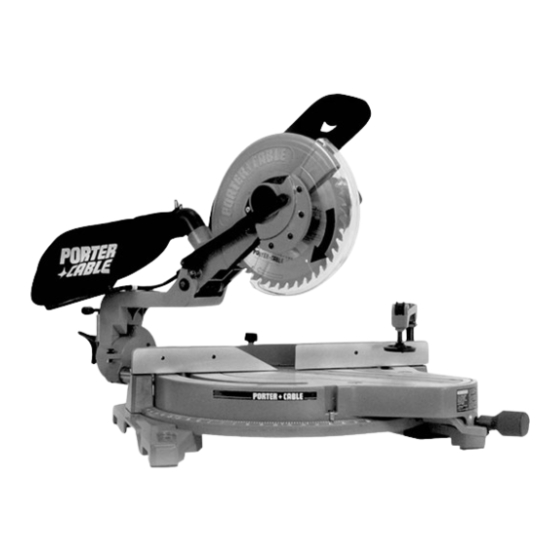
Summary of Contents for Porter-Cable 3807
- Page 1 10" Compound Slide Instruction Miter Saw Manual MODEL 3807 IMPORTANT Please make certain that the person who is to use this equipment carefully reads and understands these instructions before starting operations. Part No. 902386 - 05-13-05...
-
Page 2: Table Of Contents
TABLE OF CONTENTS IMPORTANT SAFETY INSTRUCTIONS ............2 SAFETY GUIDELINES . -
Page 3: Safety Guidelines
SAFETY GUIDELINES - DEFINITIONS It is important for you to read and understand this manual. The information it contains relates to protecting YOUR SAFETY and PREVENTING PROBLEMS. The symbols below are used to help you recognize this information. Indicates an imminently hazardous situation which, if not avoided, will result in death or serious injury. Indicates a potentially hazardous situation which, if not avoided, could result in death or serious injury. -
Page 4: General Safety Rules
16. USE RECOMMENDED ACCESSORIES. The use of 2. KEEP GUARDS IN PLACE and in working order. accessories and attachments not recommended by Porter-Cable may cause hazards or risk of injury to 3. ALWAYS WEAR EYE PROTECTION. Wear safety persons. glasses. Everyday eyeglasses only have impact resistant lenses;... -
Page 5: Additional Specific Safety Rules
ADDITIONAL SPECIFIC SAFETY RULES FAILURE TO FOLLOW THESE RULES MAY RESULT IN SERIOUS PERSONAL INJURY. 19. NEVER CUT FERROUS METALS or masonry. 1. DO NOT OPERATE THIS MACHINE UNTIL it is assembled and installed according to the 20. NEVER RECUT SMALL PIECES. instructions. - Page 6 POWER CONNECTIONS A separate electrical circuit should be used for your machines. This circuit should not be less than #12 wire and should be protected with a 20 Amp time lag fuse. If an extension cord is used, use only 3-wire extension cords which have 3- prong grounding type plugs and matching receptacle which will accept the machine’s plug.
-
Page 7: Functional Description
FOREWORD Porter-Cable Model 3807 is a high capacity 10" compound miter saw designed to cut wood and non-ferrous metals. It can crosscut 11-1/2" x 3-3/16" and 9" x 3-7/8", miter at 45° both left and right 8-1/8" x 3-3/16", and 6-3/8" x 3-7/8", bevel at 45°... -
Page 8: Assembly
ASSEMBLY ASSEMBLY TOOLS REQUIRED Arbor and Fence Wrench (supplied) 1/2" x 7/16" Open-End Wrench (supplied) 7/16" Wrench (supplied) Phillips Screwdriver ASSEMBLY TIME ESTIMATE - 30 minutes MOVING THE CUTTINGHEAD TO THE REAR POSITION Remove the cable tie (A) Fig. 3. Loosen the lock-knob (B) Fig. - Page 9 ATTACHING THE DUST BAG 1. Insert the smooth end of the dust elbow (A) Fig. 7 in the dust exhaust (B). 2. Depress the spring clips (C) Fig. 8 and position the dust bag on the end of the dust elbow (Fig. 8). Fig.
-
Page 10: Operation
OPERATION OPERATING CONTROLS AND ADJUSTMENTS FASTENING THE MACHINE TO THE SUPPORTING SURFACE Before operating your miter saw, firmly mount it to a workbench or other supporting surface. Four holes (A) Fig. 10 are provided for fastening the saw to a supporting surface. When frequently moving the saw from place to place, mount the saw on a 3/4”... - Page 11 ROTATING THE TABLE FOR MITER CUTTING This miter saw will cut any angle from 0° to 57° right and from 0° to 47°left. Turn the lock knob (A) Fig. 13 counter- clockwise, depress the lock lever (B), and rotate the table. The compound miter saw is equipped with positive stops at 0°, 15°, 22.5°, 31.62°, and 45°...
- Page 12 TABLE HAZARD ZONE The area inside the red lines (A) Fig. 17 on the table is designated as a HAZARD ZONE. Never place your hands inside this area while the tool is being operated. Always use a clamp to secure short workpieces. Fig.
- Page 13 To adjust, loosen the bevel lock handle. Loosen the locknut (B) Fig. 21 and turn the adjusting screw (C) with the provided wrenches until the blade is 90° to the table. Tighten the locknut (B) and the bevel lock handle.. When the blade is 90°...
- Page 14 ADJUSTING DOWNWARD TRAVEL OF SAW BLADE DISCONNECT THE MACHINE FROM THE POWER SOURCE. 1. The downward travel of the saw blade should be limited to prevent the saw blade from contacting any metal surfaces of the machine. Make this adjustment by loosening the wing nut (A) Fig.
- Page 15 MACHINE USE AUXILIARY WOOD FENCE When performing multiple repetitive operations that result in small cut-off pieces (one inch or less), the saw blade can catch the cut-off pieces and project them out of the machine or into the blade guard and housing, causing damage or injury.
- Page 16 CUTTING ALUMINUM Aluminum extrusions such as used for making aluminum screens and storm windows can easily be cut with your compound miter saw. When cutting aluminum extrusions, or other sections that can be cut with a saw blade and are within the capacity of the machine, position the material so the blade is cutting through the smallest cross-section (Fig.
- Page 17 CORRECT OPERATING PROCEDURE FOR SLIDE CUTTING Pulling the saw toward you while slide cutting can be dangerous, causing the saw to kick upward and back toward you. ALWAYS PUSH THE SAW FORWARD, AWAY FROM YOU and toward the fence. 1. Place the workpiece (A) on the table and against the fence (Fig. 33). Grasp the cuttinghead handle (B).
- Page 18 CUTTING CROWN MOULDING One of the many features of the saw is the ease of cutting crown moulding. The following is an example of cutting both inside and outside corners on 52°/38° wall angle crown moulding. 1. Move the table to the 31.62° right miter position and lock the table in position. NOTE: A positive stop is provided to find this angle quickly.
-
Page 19: Troubleshooting
MAINTENANCE CHANGING THE BLADE Use only cross-cutting saw blades. When using carbide-tipped blades, do not use blades with deep gullets as they can deflect and contact the guard. Use only 10" diameter saw blades that are rated for 5000 RPM or higher and have 5/8" diameter arbor holes. -
Page 20: Service
ONLY be performed by either an AUTHORIZED PORTER-CABLE SERVICE STATION or a PORTER-CABLE·DELTA FACTORY SERVICE CENTER. All repairs made by these agencies are fully guaranteed against defective material and workmanship. We cannot guarantee repairs made or attempted by anyone other than these agencies. -
Page 21: Accessories
ONE YEAR WARRANTY Porter-Cable warrants its Professional Power Tools for a period of one year from the date of original purchase. We will repair or replace at our option, any part or parts of the product and accessories covered under this warranty which, after examination, proves to be defective in workmanship or material during the warranty period.
Need help?
Do you have a question about the 3807 and is the answer not in the manual?
Questions and answers