Table of Contents
Advertisement
Advertisement
Table of Contents

Related Manuals for Cart-Tek 1500 V3


Summary of Contents for Cart-Tek 1500 V3
- Page 1 1500 V3 User Manual Version 1.1...
- Page 2 carttek.com...
- Page 3 Your Cart-Tek golf trolley was thoroughly quality control checked and ‘road tested’ before being shipped to your address. We do everything possible to assure that your trolley is in perfect working order upon arrival. Should you have any questions about the...
-
Page 4: Table Of Contents
COMPONENT IDENTIFICATION ………………………………… 6 SETUP ………………………………………………………………… 8 PRECAUTIONS & IMPORTANT CARE INFORMATION………… 10 BATTERY MAINTENANCE ………………………………………… 12 OPERATING YOUR 1500 V3 ………………………………………… 12 REMOTE TRANSMITTER …………………………………………… 14 REMOTE CONTROL MODE ………………………………………… 16 ALIGNMENT SYSTEM ……………………………………………… 17 PROGRAMMING YOUR CADDY ………………………………… 18 TROUBLESHOOTING GUIDE ………………………………………22... -
Page 5: Introduction
Introduction Thank you for purchasing the Cart-Tek 1500 V3 golf trolley. Please read this manual carefully before use. After unpacking, please keep the carton and all internal sections in safe storage. In the unlikely possibility that you need to return the whole unit due to a defective component, you will need to repack the unit in the original manner to ensure safe and secure transit. -
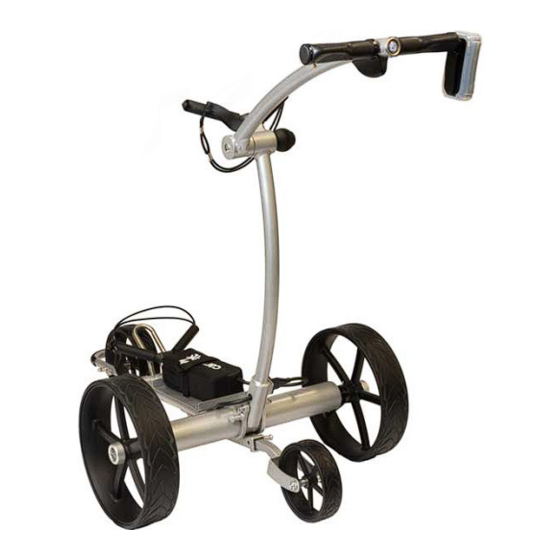
Page 6: Component Identification
COMPONENT IDENTIFICATION Upper Handle Upper Bag Rest Locking Knob Battery Port Drive Motor (inside) Lower Bag Rest Axle Tube Drive Wheel Front Wheel carttek.com... - Page 7 Umbrella Holder Speed Dial On/off button Scorecard & Ball Holder Receiver Remote Drive Wheel Lower Handle Battery Locking Pin Anti-Tip Wheel carttek.com...
-
Page 8: Setup
Setup To properly set up your golf caddy, follow these steps: Identify the left and right wheels by the “L” and “R” markings on the wheel hubs. Depress the knob on the inside wheel hub and slide the wheel onto the axle. - Page 9 Load your golf bag onto the caddy: Place the bottom of the golf bag into the lower bag rest first, then lay the bag into the upper bag rest. Use the pull tab on the bungee to wrap the cord around the bag and onto the bag rest hook.
-
Page 10: Precautions & Important Care Information
The front wheel must stay grounded during play, except on steep inclines. Your 1500 V3 should only tip onto the rear wheel when encountering extreme inclines (over 25° inclines). It is recommended to use the manual/trolley mode on steep inclines where the caddy will tip back, and the front wheel comes off the ground. - Page 11 IMPORTANT TIP. Your caddy is equipped with automatic downhill braking for your safety. If you need to stop your caddy on a steep incline, it is recommended to turn the caddy perpendicular (across) the hill and press the Park button. This action will engage the parking brake and keep the caddy securely in place.
-
Page 12: Battery Maintenance
1500 V3 Follow the steps listed earlier in this manual under Setup (page 8). There are two main modes for the 1500 V3. Trolley Mode: Identified by the specific light sequence: The Blue LED on the handle will be solid blue for 2 seconds, followed by a quick 1/2 second off. - Page 13 To power the wheels in trolley mode, follow these steps: - First, zero out your speed dial by spinning it counterclockwise until it reaches the lowest setting. - Next, roll the speed dial forward clockwise to increase the speed and power of the wheels. To stop the caddy, press and immediately release the main start/ stop button on the cart.
-
Page 14: Remote Transmitter
Remote Transmitter To turn the remote control on: • Press and release both the left and right turn buttons at the same time. This will power up the remote. You will see the LED flash blue 3 times. • Once the remote is powered on, you can give the cart any remote command, and it will respond. - Page 15 remote transmitter Forward Right Left Reverse STOP Preset Park Speeds USB Charge Port Magnetic Mount Clip Belt Clip carttek.com...
-
Page 16: Remote Control Mode
remote control mode • Push the directional buttons on the remote transmitter to move the caddy in the desired direction. • When the cart is stopped, you can press and hold either the right or left button to make the caddy turn on itself. •... -
Page 17: Alignment System
ALIGNMENT SYSTEM If you are experiencing issues with your trolley not going straight and drifting to one side, you can try adjusting the tracking to correct it. Here are the steps to follow: 1. Verify that both wheels are fully engaged in the drive collars. 2. -
Page 18: Programming Your Caddy
PROGRAMMING YOUR CADDY The caddy electronics may be customized for your personal preferences. All programing customization is done via the remote transmitter. Using “Program Mode” you can adjust the electronics to: • Tracking issues- If a caddy veers off to one side, read all tracking information under ‘Precautions’... - Page 19 For the instructions below that say “go into program mode”, follow these instructions: Press both speed 1 and speed 2(green buttons) until blue LED double flashes to get into programming mode. The cart will move forward at a slow speed at this time. If the cart does not move, repeat as your caddy is not yet in program mode.
- Page 20 • To save the setting, push the ‘Parking Brake’ button. • Test the caddy to see if you need further adjustment. Repeat as needed. Adjust turning force You can increase or decrease the speed at which the caddy turns. • Go into Program Mode. (two green buttons) •...
- Page 21 Matching a “New Remote Transmitter” to your caddy. Should you need to replace your remote transmitter, you will need to pair (match) it to your Yellowstone. (NO need to go into program mode.) • Plug battery into caddy, press and hold the on/off button for 3 seconds.
-
Page 22: Troubleshooting Guide
TROUBLESHOOTING GUIDE My caddy will not show any indicator LED on the handle. Ensure Caddy Battery is fully engaged in the battery port. 2. Have a full charge on the Caddy Battery. The battery should read 29.4 Volts +/- .2V My caddy is turned on (solid BLUE LED), but my remote will not work. - Page 23 My caddy Battery Charger isn’t switching over from Red to Green. 1. Ensure both the battery and wall charger are fully plugged in. 2. A fully depleted battery may take upwards of 6 hours to charge. My caddy will not make 18 holes. 1.
- Page 24 My caddy does not track in a straight line. 1. Ensure both wheels are fully engaged into the drive collars located on the axles. 2. Balance golf bag evenly on your caddy side to side. 3. Reset your caddy to factory settings by following the instructions in the manual or check out our video reprogram your Yellowstone remote.
- Page 25 Loosen both ends of the axle cap nuts (A) about a 1/2 of a turn. If the cart tracks to the left move the left side of the axle forward via the adjustment nuts (B) (spin both nuts counter clockwise). If your cart tracks to the right, spin both nuts (B) clockwise.
-
Page 26: Important Customer Care Information
IMPORTANT CUSTOMER CARE INFORMATION Here are the important tips regarding the use and maintenance of your golf caddy: 1. Avoid spraying the caddy with flowing water. Instead, use a damp cloth to wipe it down for cleaning. 2. Cart bags are preferred for optimal performance. If you use a carry bag or stand bag, you may need to add additional weight to achieve better balance. - Page 27 carttek.com...
- Page 28 FOR WARRANTY, SPARE PARTS AND ACCESSORIES For trolleys purchased in the USA Cart Tek Golf Carts 150 SE Logsden St. Bend, OR 97702 Email: Sales@CartTek.com Website: http://www.CartTek.com 1-541-633-4308 or toll free 1-866-356-2278 For trolleys purchased in Canada JPSMGolf 1064 Salk Road Units 15+16 Pickering, Ontario L1W 4B5...
Need help?
Do you have a question about the 1500 V3 and is the answer not in the manual?
Questions and answers