Advertisement
Quick Links
Advertisement

Related Manuals for Cart-Tek GRi-975Li


Summary of Contents for Cart-Tek GRi-975Li
- Page 1 GRi-975Li User Manual Version 1.0...
- Page 2 Your Cart-Tek golf trolley was thoroughly quality control checked and ‘road tested’ before being shipped to your address. We do everything possible to assure that your trolley is in perfect working order upon arrival. Should you have any questions about the...
- Page 3 Introduction Thank you for purchasing the Cart-Tek GRi-975Li golf trolley. INTRODUCTION ……………………………………………………… 5 Please read this manual carefully before use. After unpacking, please keep the carton and all internal sections COMPONENT IDENTIFICATION ………………………………… 6 in safe storage. In the unlikely possibility that you need to return the whole unit due to a defective component, you will need to BASIC SET-UP …………………………………………………………...
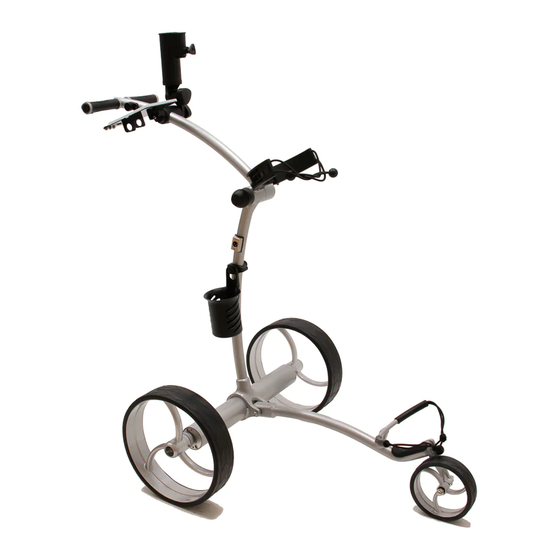
- Page 4 COMPONENT IDENTIFICATION On/Off Switch Umbrella Holder Scorecard & Ball Holder Upper Bag Rest Upper Handle Battery Port Drink Holder Drive Motor (inside) Lower Handle/ Axle Tube Main Frame Lower Bag Rest Drive Wheel Front Arm Front Wheel Front Fork carttek.com carttek.com...
- Page 5 Initial Set-Up OPERATING YOUR GRi-975Li Install the two large drive wheels on the correct side of the trolley. The arrow design on the tire should face forward, and each wheel hub has a side indicator on it. Depress the release Lift lower handle.
- Page 6 LED until it flashes rapidly (Approximately 2 seconds). Ensure the bag is balanced evenly side-to-side. Uneven weight When you release the button, the GRI-975Li will move forward for 8 distribution may lead to “tracking errors” i.e. too much weight seconds at the currently set speed.
- Page 7 BATTERY MAINTENANCE Assembly instruction on XLR connector Assembly instruction on XLR connector Assembly instruction on XLR connector Get to know the parts • To recharge battery, first connect the battery into the charger, Assembly instruction on XLR connector Get to know the parts Get to know the parts then the charger into the wall.
- Page 8 ALIGNMENT SYSTEM If you have issues with your trolley not going straight you may have If the cart is tracking to the left (from behind the cart): to adjust the tracking. Keep in mind that the cart will drift slightly Loosen the 17mm locking cap nut on the Fork side.
- Page 9 TROUBLESHOOTING My caddy will not show any indicator LED on the handle. My caddy will not move, what can I do? 1. Ensure both the battery and wall charger are fully plugged in. If your caddy experiences some kind of failure on the course and you cannot get it running, you can put the caddy in “free wheel”...
- Page 10 IMPORTANT CUSTOMER CARE INFORMATION 1. Mount wheels with arrow tread design pointing in direction of 4. Consider the all-around weight distribution of your golf bag. wheel spin. If pulled backwards in free wheel mode, reverse the Ensure the bag is balanced evenly side-to-side. Uneven weight wheels so that the tread arrows point in direction of rotation.
- Page 11 FOR WARRANTY, SPARE PARTS AND ACCESSORIES For trolleys purchased in the USA Cart Tek Golf Carts 150 SE Logsden St. Bend, OR 97702 Email: Sales@CartTek.com Website: http://www.carttek.com 1-541-633-4308 or toll free 1-866-356-2278...
Need help?
Do you have a question about the GRi-975Li and is the answer not in the manual?
Questions and answers