Advertisement
Table of Contents
- 1 Table of Contents
- 2 Important Safety Instructions
- 3 Installing Your Appliance
- 4 Product Description
- 5 Before First Use
- 6 Installing Your Oven Accessories
- 7 Using Your Oven
- 8 Cooking Guide
- 9 Grilling Guide
- 10 Dealing with Cooking Problems
- 11 Getting to Know the Oven
- 12 Care and Cleaning
- 13 Troubleshooting
- 14 Warranty
- Download this manual
USER MANUAL
Enjoy peace of mind.
Register your appliance today.
Stay updated on better living services, safety notices and
shop for accessories.
1. Open the camera app on your smartphone and
point at the QR code to scan
Product Registration QR code is located on the
front of your appliance or inside the door rim*.
2. Tap the notification or link to open the registration form
3. Complete your details and enjoy peace of mind
*Exact location of QR code may vary depending on oven model
ELECTRIC BUILT-IN OVEN
WVE6565
Advertisement
Table of Contents

Subscribe to Our Youtube Channel
Related Manuals for Westinghouse WVE6565SD


Summary of Contents for Westinghouse WVE6565SD
- Page 1 USER MANUAL Enjoy peace of mind. Register your appliance today. Stay updated on better living services, safety notices and shop for accessories. 1. Open the camera app on your smartphone and point at the QR code to scan Product Registration QR code is located on the front of your appliance or inside the door rim*.
-
Page 2: Table Of Contents
Failure to strictly adhere to the requirements in this manual may result in personal injury, property damage and affect your ability to make a claim under the Westinghouse manufacturer’s warranty provided with your product. Products must be used, installed and operated in accordance with this manual. -
Page 3: Important Safety Instructions
IMPORTANT SAFETY INSTRUCTIONS Please read the user manual carefully and store in a handy • Switch the appliance off before removing the oven place for later reference. light glass for globe replacement. • Always keep the appliance clean. Ensure fats and oils do not accumulate around elements, burners or fans. - Page 4 IMPORTANT SAFETY INSTRUCTIONS WARNING CAUTION Read the following carefully to avoid damage to the appliance. • The grill door must be left fully open whilst grilling in a separate grill wall oven and a separate grill underbench oven. • The grill tray must be fully inserted whilst grilling. •...
-
Page 5: Installing Your Appliance
INSTALLING YOUR APPLIANCE WARNING WARNING WARNING WARNING To avoid any potential hazard, you must follow our This appliance must be properly earthed. instructions when you install your appliance. Failure • Do not lift the appliance by the door handles. to install the appliance correctly could invalidate any •... - Page 6 INSTALLING YOUR APPLIANCE (CONTINUED) • If a powerpoint is fitted it must be accessible with the Cabinet construction for your appliance appliance installed, as the plug must be accessible For the best integration within a kitchen, install the after installation. appliance in a standard 600mm wide cupboard that gives •...
- Page 7 INSTALLING YOUR APPLIANCE (CONTINUED) Separate grill wall oven & duo oven WARNING CAUTION NOTE: Dimension “D”. A requirement for all separate grill wall ovens and all duo ovens – for proper ventilation there must be a gap at the bottom rear of the cabinet. This can be a full width opening 20mm deep. Flush fit 581min Proud fit...
-
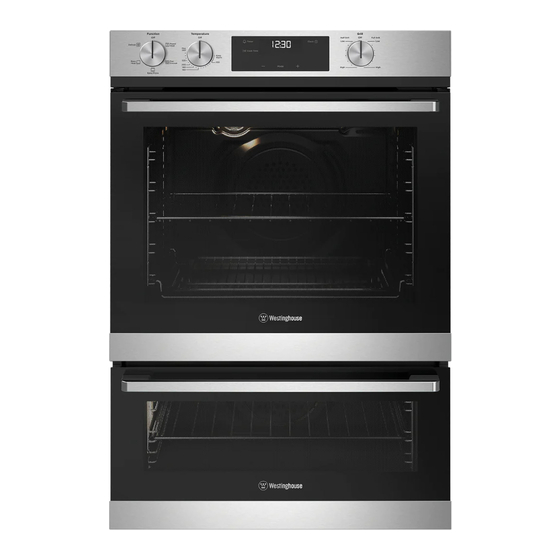
Page 8: Product Description
PRODUCT DESCRIPTION WVE6565 Oven function selector Oven temperature selector Oven/grill indicator light Electronic Clock Grill indicator light Grill function/temperature selector PRODUCT DeSCRIPTION... -
Page 9: Before First Use
BEFORE FIRST USE 5 seconds after the last change, the clock display will stop flashing, confirming that the time has been set. Preparing your appliance for the first time NOTE: The clock has a 24 hour display. • Please remove all internal boxes and bags from the oven before operation. -
Page 10: Installing Your Oven Accessories
INSTALLING YOUR OVEN ACCESSORIES Side racks • The side racks attach to each side of your oven. There is a left hand and right hand version (see image below for details). • Insert the rear peg into the rear access hole provided, ensuring that the peg is fully inserted. -
Page 11: Using Your Oven
USING YOUR OVEN Rapid Heat Base Heat Heat comes from the element surrounding the fan as well Heat comes from the element below the food. The as the smaller element above the food. This allows you to element is controlled by the thermostat and will turn on preheat your oven 30% quicker than with standard “Bake”. - Page 12 USING YOUR OVEN (CONTINUED) heated, it produces steam in the same way a boiling kettle Pre-heating with “Rapid Heat” does. When steam comes into contact with the oven door For electric multifunction appliances preheat your oven glass, it will condense and produce water droplets. To by selecting the “rapid heat”...
- Page 13 disappear, confirming the time has been set. Once the On completion of cooking time has been entered, the clock advances minute by When the set time has elapsed, the oven will turn off, the minute. timer will beep and the indicators will flash.
- Page 14 USING YOUR OVEN (CONTINUED) Ensure the oven is in the off state. Toggle and hold • When cooking things which require a high heat from the selector to until a beep sounds. The ‘DEMO’ below (e.g. tarts), place the cooking dish on a scone text will begin to flash.
- Page 15 ReCOmmeNDeD meAT mINUTeS PeR KG TemPeRATURe Chicken 45 - 50 Duck 180 - 200 60 - 70 40 - 45 (<10kg) Turkey 35 - 40 (>10kg) Fish Oven shelf location The oven has 5 positions for shelves (as shown in the diagram below).
-
Page 16: Cooking Guide
COOKING GUIDE Choosing the best oven settings The following table is intended as a guide and experience may show some variation in cooking times necessary to meet individual requirements. It may be necessary to change some cooking times and temperatures from your previous oven. -
Page 17: Grilling Guide
GRILLING GUIDE Grilling hints Guide to better grilling WARNING WARNING TIPS & INFORMATION IMPORTANT Always clean the grill/oven dish after every use. Excessive Definite times can not be given for grilling as it is fat build up may cause a fire. dependant on the size of the food and your own tastes. -
Page 18: Dealing With Cooking Problems
DEALING WITH COOKING PROBLEMS PROBLem CAUSeS RemeDy Uneven cooking • Incorrect shelf position • Select shelf suitable for cooking function. See cooking function tables in cooking guide • Oven tray too large • Experiment with other trays or dishes • Trays not centralised •... -
Page 19: Getting To Know The Oven
GETTING TO KNOW THE OVEN Get to know the oven with this ‘Simple Test Cake’ Although we strive for a perfect performing oven, it’s possible that there will be some variation in colour when baking. Therefore, we suggest this simple, easy and delicious to make Simple Test Cake, it can help you understand your new oven. -
Page 20: Care And Cleaning
CARE AND CLEANING WARNING WARNING WARNING WARNING Ensure the oven is electrically isolated before cleaning. The door glass on this appliance is made from a tough, This can be done by switching off the appliance via durable material that withstands heating and cooling the powerpoint or isolating switch (if available), or the without breaking. - Page 21 CARE AND CLEANING (CONTINUED) Releasing the grill element WARNING ARNING ARNING Removing the side racks Make sure the appliance is turned off before you remove or replace parts, to avoid the possibility of electric shock. Grasp the middle wire at the front. Retaining wire models - The upper grill element is secured Pull firmly inwards while pushing back.
- Page 22 Stirrup in the open position Door column Retaining clips models - The upper grill elements is secured with 2 clips which can be removed to help clean the oven cavity ceiling. To disengage the lcips, push the edge of the clips towards back of the oven •...
- Page 23 CARE AND CLEANING (CONTINUED) Removing oven door top trim • Take hold of the grid embossed sections of the door trim at each end and press inwards to release the clips. Remove the door trim by pulling it towards you. Cleaning the door glass panels Removing the door glass panels WARNING...
- Page 24 Fitting the oven door • Take hold of the oven door with a hand on each side and with the door at an angle of 45 , position the recesses at the bottom of the door onto the hinge arms of the oven. Let the door slide down the hinge arms as far as it will go.
-
Page 25: Troubleshooting
TROUBLESHOOTING Oven PROBLem POSSIBLe CAUSe Oven or grill • Time of day not set. not working • Power not turned on. • Controls are incorrectly set. • Oven is in ‘Demo’ mode, refer to Using your oven section. • Household fuse has blown or power supply is off. NOTE: If the household fuse continues to blow, call the Customer Care Centre. -
Page 26: Warranty
(c) ‘ASC’ means Electrolux’s authorised serviced centres; the Appliance; (d) ‘Westinghouse’ is the brand controlled by Electrolux Home Products In addition, Electrolux is not liable under this warranty if: Pty Ltd of 163 O’Riordan Street, Mascot NSW 2020, ABN 51 004... - Page 27 NOTES NOTES...
- Page 28 0800 225 088 westinghouse.co.nz email: customercare@electrolux.co.nz web: westinghouse.co.nz and WESTINGHOUSE are trademarks of Westinghouse Electric Corporation. Used under license by Electrolux Home Products Pty Ltd. All Rights Reserved. © 2023 Electrolux Home Products Pty Ltd. ABN 51 004 762 341 W_MAN_WVE6565SD_A26334201_Apr23...
Need help?
Do you have a question about the WVE6565SD and is the answer not in the manual?
Questions and answers
whao set time clock
To set the time clock on a Westinghouse WVE6565SD oven:
1. Press the button until the "Clock" indicator symbol begins flashing.
2. Use the "+" or "-" buttons to set the time of day while the "Clock" symbol is flashing.
3. After 5 seconds of no changes, the "Clock" symbol will disappear, confirming the time has been set.
This answer is automatically generated
whao download manuel