Dymo LabelManager 150 User Manual
Hide thumbs
Also See for LabelManager 150:
- Bedienungsanleitung (14 pages) ,
- User manual (13 pages) ,
- Brochure & specs (2 pages)
Table of Contents
Advertisement
Quick Links
Advertisement
Table of Contents

Related Manuals for Dymo LabelManager 150


Summary of Contents for Dymo LabelManager 150
- Page 1 LabelManager ® 150 User Guide www.dymo.com...
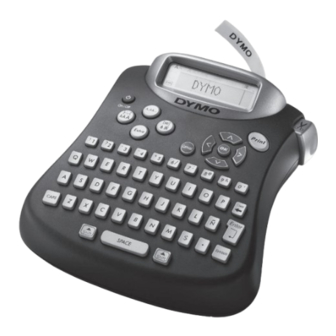
- Page 2 Print Button Style Key Frame/Align Key Arrow Keys Font/Fixed with OK button Length Key Extra Key Cancel Button Numeric Keys Backspace/ New Label Key Alpha Keys Return/OK Key Symbols Key CAPS Key Space Key Shift Keys Figure 1 LabelManager 150 Labelmaker...
-
Page 3: Getting Started
2. Insert the batteries following the polarity markings Additional tape cassettes can be purchased through (+ and –). the DYMO Web site at www.dymo.com or through your 3. Close the access door. local office supply retailer. Remove the batteries if the printer will not be To insert the tape cassette used for a long period of time. -
Page 4: Getting To Know Your Printer
You are now ready to print your first label! Remove Printing Your First Label Cardboard To print a label 1. Press the ON/OFF button. 2. Enter text to create a simple label. 3. Press the Print button to print the label. = 6 mm Cassette Switch = 9/12 mm... - Page 5 On/Off Cancel The On/Off button switches the power on and off. If The Cancel key allows you to exit from a menu no keys are pressed after two minutes, the power is without making a selection or to cancel an action. switched off automatically.
- Page 6 A label can be underlined or Adding Symbols enclosed in a box, but not both together. The styles The labelmaker supports the extended symbol set as available are show in Figure 7. shown in the following table. DYMO DYMO ¢ £ ¥ DYMO DYMO &...
-
Page 7: Printing Options
2. Use the arrow keys to move to the desired symbol. 3. Press the Down arrow key to begin decreasing the The left and right arrows move horizontally along a number of copies from 16. row of symbols. The up and down arrow keys scroll 4. -
Page 8: Customizing The Printer
3. Press the Down arrow to decrease the length. To select your language 4. Press OK to set the fixed length. 1. Press Extra. 5. After you print the label, press Clear to turn off the 2. Use the arrow keys to select Set Language and fixed label length setting;... - Page 9 Figure 8 3. Press and hold down the cutter lever to expose the cutter blade. 4. Use a cotton ball and alcohol to clean both sides of the blade. 5. Release the cutter lever. To clean the print head ♦ Wipe print head clean using the cleaning tool located inside the tape compartment lid.
-
Page 10: Troubleshooting
Tape Jam Remove jammed tape and replace tape cassette. Motor is stalled due to tape jam. If you still need assistance, contact DYMO Customer Service for your country. The Warranty booklet includes a list of contact numbers for each country. -
Page 11: Contacting Customer Support
Contacting Customer Support The following table provides a list of telephone numbers to reach DYMO Sales and Support departments. You can www.dymo.com also reach DYMO at Country Telephone Australia 1800/ 633 868 1800/ 817 558 Austria 01/ 599 14 20 12... - Page 12 Produced by/Produit par/Producido por: DYMO Corp., Stamford, CT 06902 ©2006 A Division of/Une Division de/Una División de Newell Rubbermaid Imported into Canada by/Importé au Canada par Sanford Canada LP, Oakville, ON L6H 5R6 En México importado y distribuido por: Berol, S. de R.L. de C.V.
Need help?
Do you have a question about the LabelManager 150 and is the answer not in the manual?
Questions and answers