Advertisement
Quick Links
Advertisement

Subscribe to Our Youtube Channel
Related Manuals for Aerpro APWCAG1


Summary of Contents for Aerpro APWCAG1
- Page 1 APWCAG1 WIRELESS CHARGING HOLDER KIT manual aerpro.com...
-
Page 2: Product Information
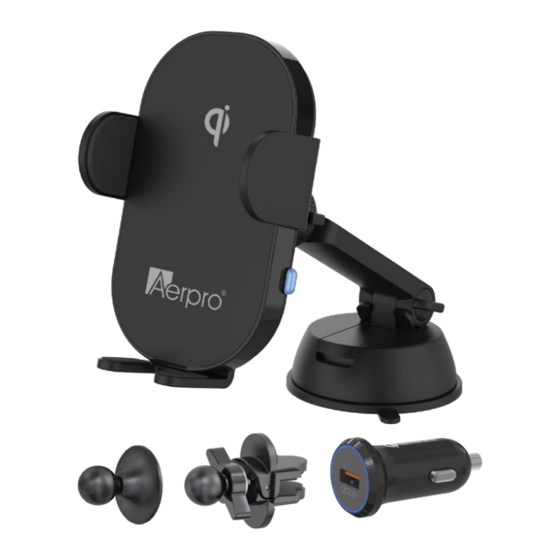
Product Information Charging Contact Grips Charging Indicator Magnetic Head Adjustable Foot NOTE: The Vent Mount is designed to be used only with FLAT air vent blades. - Page 3 Attaching the mount to the holder 1. Place the adjustable collar over the ball of the mount 2. Press the ball of the mount into the back of the magnetic wireless charging head 3. Move the wireless charging head to the desired position and tighten the adjustable collar.
- Page 4 Attaching the adhesive mount to a flat surface 1. Clean any oil, debris, or dust on the area where 3M base is to be placed. If possible use an alcohol wipe to help with adhesion 2. Peel off the protection sheet from the 3M base and stick to chosen area by strongly pressing the base for an extended period of time...
- Page 5 Attaching the vent mount to a vent 1. Unfasten the vent mount arms sufficiently by rotating the tightening lever 2. Insert the vent mount to the center of the vents 3. Rotate the tightening lever so that the fixing plate tightens against the vent blade to avoid the presence of any gap between fixing plate and vent 4.
- Page 6 Attaching the suction mount 1. Carefully choose where to install the suction mount considering the height and distance of the holder. For more stable installation, it is strongly recommended to use the provided suction plate 2. Do not install the suction base or plate on a curved surface or soft dashboard 3.
- Page 7 Attaching the suction mount 8. After adjusting to desired angle, tighten the angle fixer so that it does not shake when driving NOTE: The sticky gel pad can be cleaned with water to maintain stickiness. After washing, check the stickiness and ensure to check it has perfectly dried before installation Gel Pad Protective...
- Page 8 Adjusting stalk angle and length 1. To use at a low angle for a better driving view, reassemble the stalk as shown below 2. Pull out and adjust the stalk to your desired length 3. Adjust the holder to desired direction and angle, and tighten angle fixer High Angle Angle...
-
Page 9: Charging Your Device
Charging your device 1. Connect the supplied USB cable to the power input port of the wireless charging head 2. Connect opposite end of the supplied USB cable into the supplied USB car charger 3. The charging indicator LED will turn blue. The magnetic wireless charging holder is now ready for your smartphone or device 4. - Page 10 Charging your device Type C Cable USB Car Charger Press to open and close manually...
- Page 11 NOTE 1. Periodically check the tightness of the vent mount to prevent unexpected dropping of the smartphone 2. Do not install the holder where it will obstruct the drivers view. 3. Periodically check the strength of the 3M base. 4. Do not operate phone and holder while driving.
-
Page 12: Technical Assistance
Vent mount Adhesive mount USB car charger Type C USB charging cable Technical assistance If you need assistance with your Aerpro product call Aerpro Support Australia. TEL: 03 – 8587 8898 FAX: 03 – 8587 8866 Mon-Fri 9am – 5pm AEST This manual is considered correct at time of writing but is subject to change.
Need help?
Do you have a question about the APWCAG1 and is the answer not in the manual?
Questions and answers