
Related Manuals for Dantherm HCP 11


Summary of Contents for Dantherm HCP 11
- Page 1 Remote Control HCP 10/11 Installation and User Manual Rev. 1.0 en ● de ● fr ● es ● da...
- Page 3 This instruction provides the procedures for installing and using the wired Remote Control: HCP 10 (with visual alarm only) and • HCP 11 (with both visual and acoustic alarm) • Caution Before you start installing, make sure that the power to the unit is switched off.
- Page 4 Remote Control HCP 10/ 11 – Installation and User Manual, continued Parts This shows the parts that are included with the HCP 10/11 (wallbox is not included): RJ cable Wall box Metal frame Plastic frame Control panel Procedure Follow these steps to mount the Remote Control: Step Action Mount the wallbox in the wall, if not already done.
- Page 5 How to calibrate the Domestic Ventilation unit Introduction Before you can get full benefit of the Ventilation unit, you need to calibrate it. Calibration Follow the steps below to calibrate the airflows in the unit according to the values stated in the specific Service Manual for the unit: Step Action Result...
-
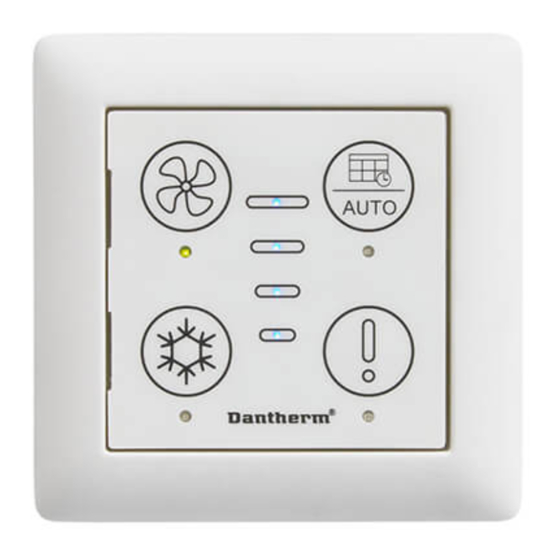
Page 6: Using The Control Panel
Using the control panel Introduction This part describes how to use the remote control (HCP 10/11). The functionality varies depending on if any accessory is mounted. Manual fan speed When pressing this button once, the fan speed will increase one step. When reaching step 4 it will switch to speed 0 and then again upwards Week program Press once to select week program operation. - Page 7 Using the control panel, continued Auto bypass Only available if mechanical bypass damper is mounted inside the unit, cooling and enabled in the PC tool or via remote control (HCP 10/11). mode Automatic bypass cooling is dependent on user settings. On remote control (HCP 10/11) and PC tool the following is possible: Setting the minimum outside temperature within the range 8-15°C.
- Page 8 (see error number in the Service manual of the ventilation unit). This visual LED alarm will be followed by a buzzer sound on the HCP11. Remote Control Error indicated by HCP 10 Flashing LED HCP 11 Flashing LED and buzzer sound...
- Page 9 Diese Anleitung enthält die Verfahren zur Installation und Benutzung der verkabelten Fernsteuerung: HCP 10 (mit visuellem Alarm) und • HCP 11 (mit sowohl visuellem als auch akustischem Alarm) • Vorsicht Sorgen Sie vor der Installation dafür, dass die Stromzufuhr zum Gerät abgeschaltet ist.
- Page 10 Fernsteuerung HCP 10/11 – Installations- und Benutzerhandbuch, Fortsetzung Teile Diese Abbildung zeigt die Teile, die in der HCP 10/11 enthalten sind (Unterputzdose nicht enthalten): RJ-Kabel Unterputzdose Metallrahmen Kunststoffrahmen Bedienblende Vorgehensweise Gehen Sie wie folgt vor, um die Fernsteuerung zu montieren: Schritt Handlung Montieren Sie die Unterputzdose in der Wand, sofern dies nicht bereits...
- Page 11 Kalibrieren der Raumlüftung Einführung Bevor Sie das Lüftungsgerät optimal nutzen können, müssen Sie es kalibrieren. Kalibrierung Gehen Sie wie nachfolgend beschrieben vor, um die Luftströme im Gerät entsprechend den im Wartungshandbuch des Geräts angegebenen Werten zu kalibrieren: Schritt Handlung Ergebnis gleichzeitig drücken und 5 Die beiden grünen Sekunden lang gedrückt halten, um den...
- Page 12 Verwendung der Bedienblende Einführung Dieser Abschnitt beschreibt die Verwendung der Fernsteuerung (HCP 10/11). Die Funktionen sind von dem gegebenenfalls installierten Zubehör abhängig. Manuelle Einstellung Durch einmalige Betätigung dieser Taste wird die Ventilatorgeschwindigkeit jeweils um eine Stufe erhöht. Wenn sie bei Stufe 4 angekommen ist, stellt der Ventilator auf Ventilatorgeschwind Geschwindigkeit 0 um und erhöht daraufhin erneut seine Geschwindigkeit.
- Page 13 Verwendung der Bedienblende, Fortsetzung Automatischer Dieser Betriebsmodus steht nur zur Verfügung, wenn in das Gerät eine Bypass mechanische Bypass-Klappe eingebaut ist und über das PC-Tool bzw. die Kühlbetrieb Fernsteuerung (HCP 10/11) aktiviert wurde. Die automatische Bypass-Kühlung ist abhängig von den Benutzereinstellungen.
- Page 14 Wenn am Gerät ein Alarm vorliegt, blinken die roten Alarm-Leuchtdioden so oft wie die Nummer des Alarms (siehe Fehlermeldung in der Service- und Montageanleitung des Entlüftungsgerätes). Der HCP 11 hat außer dem visuellen Alarm auch einen akustischen Alarm. Fernsteuerung Fehlermeldung angezeigt durch einer...
- Page 15 Ce mode d'emploi présente les procédures d'installation et d'utilisation de la commande à distance filaire: HCP 10 (avec alarme visuelle uniquement) et • HCP 11 (avec alarmes visuelle et sonore) • Attention Avant de commencer l'installation, assurez-vous que l'alimentation de l'appareil est coupée.
- Page 16 Commande à distance HCP 10/11 – Manuel d'installation et d'utilisation, suite Pièces La figure suivante présente les éléments associés au HCP 10/11 (boîtier mural non fourni) : Câble RJ Boîtier mural Cadre métallique Cadre en plastique Tableau de commande Procédure Suivez les étapes ci-dessous pour monter la commande à...
- Page 17 Étalonnage de l'unité de ventilation domestique Introduction Avant de pouvoir profiter pleinement de l'unité de ventilation, vous devez procéder à son étalonnage. Étalonnage Suivez les étapes ci-dessous pour étalonner les débits d'air de l'unité en fonction des valeurs indiquées dans le manuel d'entretien spécifique à l'unité : Étape Action Résultat...
-
Page 18: Utilisation Du Tableau De Commande
Utilisation du tableau de commande Introduction Cette section décrit l'utilisation de la commande à distance (HCP 10/11). Les fonctionnalités varient en fonction de la présence d'accessoires. Vitesse du Une pression sur ce bouton permet d'augmenter d'un cran la vitesse du ventilateur. Une ventilateur en mode fois le 4 cran atteint, une pression supplémentaire rétablit la vitesse à... - Page 19 Utilisation du tableau de commande, suite Mode de Uniquement disponible si le clapet by-pass mécanique est monté à refroidissement l'intérieur du système et activé dans le logiciel PC-Tool ou via la par dérivation commande à distance (HCP 10/11). automatique Le refroidissement par dérivation automatique dépend des paramètres de l'utilisateur.
- Page 20 En cas d'alarme sur l'unité, le voyant d'alarme clignote en rouge un certain nombre de fois correspondant au numéro d'alarme (voir le numéro d'alarme dans le manuel d'entretien de l'unité de ventilation). Cette alarme visuelle est suivie d'un avertisseur sonore sur le HCP 11. Commande à Erreur indiquée par...
- Page 21 En este manual de instrucciones se indican los procedimientos de instalación y uso del control remoto por cable: HCP 10 (solo con alarma visual) y • HCP 11 (con alarma visual y acústica) • Aviso Antes de iniciar la instalación, asegúrese de que la alimentación eléctrica de la unidad esté...
- Page 22 Control remoto HCP 10/11 – Instalación y manual del usuario, continuación Piezas Aquí se muestran los componentes suministrados con el HCP 10/11 (caja mural no incluida): Cable RJ Caja Bastidor Bastidor de Panel de Procedimiento Siga los siguientes pasos para montar el control remoto: Paso Acción Monte la caja mural en la pared, si no lo ha hecho ya.
- Page 23 Cómo calibrar la unidad de ventilación doméstica Introducción Para obtener todas las ventajas que ofrece la unidad de ventilación, tendrá que calibrarla. Calibración Siga los siguientes pasos para calibrar los flujos de aire de la unidad conforme a los valores indicados en su manual de mantenimiento específico: Paso Acción Resultado...
-
Page 24: Uso Del Panel De Control
Uso del panel de control Introducción En esta parte se describe el uso del control remoto (HCP 10/11). Las funciones variarán según los accesorios que se hayan instalado. Velocidad manual Al pulsar una vez este botón, la velocidad del ventilador subirá un nivel. Cuando alcance del ventilador el nivel 4, pasará... - Page 25 Uso del panel de control, continuación Derivación Solo estará disponible si se incluye una compuerta mecánica de derivación automática en el interior de la unidad, y se activa en la herramienta para PC o a través modo de del control remoto (HCP 10/11). refrigeración La refrigeración automática por derivación depende de la configuración del usuario.
- Page 26 (véase el número de error en el manual de mantenimiento de la unidad de ventilación). Esta alarma led visual irá seguida de un pitido en el HCP11. Control remoto Error señalado por HCP 10 Led parpadeante HCP 11 Led parpadeante y pitido...
- Page 27 Tryk én gang for at vælge driftstilstanden ugeprogram. Enheden bruger det seneste anvendte program. Kun med fjernbetjening (HRC 3) eller Dantherm PC tool (DPT 1) er det muligt at vælge mellem de 11 uge programmer som der findes i styringen på anlægget.
- Page 28 Kun tilgængelig, hvis det mekaniske bypass-spjæld er monteret indvendigt i via bypass enheden og aktiveret i Dantherm PC tool eller via fjernbetjening (HRC 3) Automatisk bypass-køling afhænger af brugerindstillingerne. Følgende kan udføres ved hjælp af fjernbetjening (HRC3) og Dantherm PC tool HPT 1pc-værktøjet:...
- Page 29 Når der er en fejl på enheden, blinker den røde fejllysdiode det samme antal gange som fejlnummeret (en oversigt over fejlnumre kan ses i Service Manualen for ventilationsanlægget). Den visuelle alarm via lysdioden vil blive fulgt af en akustisk alarm på HCP 11. Trådet betjening Fejl angivet ved...
-
Page 30: Installation
Dette afsnit indeholder procedurer for installation og kalibrering af den trådede betjening: HCP 10 (med visuel alarm alene) og • HCP 11 (med både visuell og akustisk alarm) • Forsigtig Før installation skal det sikres, at strømforsyningen til enheden er afbrudt. - Page 31 Installation, fortsat Dele Dette viser de dele, der er inkluderet sammen med HCP 10/11 (indmuringsdåse medfølger ikke): RJ-kabel Indmuringsdåse Metalramme Plastramme Kontrolpanel Fremgangsmåde Følg disse trin for at montere HCP 10/11: Trin Handling Monter indmuringsdåsen i væggen, hvis dette ikke allerede er gjort. HCP 10/11 passer til indmuringsdåser af typen GIRA EAN 4010337061038 eller enkelt LK Fuga EAN 5703302105002 (grøn).
- Page 32 Sådan kalibreres boligventilationsenheden Introduktion Før du kan få fuldt udbytte af ventilationsenheden, skal den kalibreres. Kalibrering Følg nedenstående trin for at kalibrere luftstrømmene i enheden i henhold til de angivne værdier i den specifikke servicemanual for enheden: Trin Handling Resultat Tryk på...
Need help?
Do you have a question about the HCP 11 and is the answer not in the manual?
Questions and answers