Chamberlain THE REPORTER RWA-300R - Security System Manual
- User manual (4 pages) ,
- User manual (2 pages)
Advertisement
- 1 Introduction
- 2 FCC STATEMENT
-
3
SETTING UP THE DEVICE
- 3.1 Assemble the Passive Infra-Red Sensor (PIR) Unit Mounting Plate
- 3.2 Install Batteries in the PIR Unit
- 3.3 Set-up the Base unit
- 3.4 Teach the Base Unit to respond to the PIR / Sensor Unit
- 3.5 Mounting the PIR / Sensor Unit
- 3.6 Using the Intercom Feature
- 3.7 Temporarily Muting the Base Unit
- 3.8 Using the Remote Button
- 3.9 Turning the Base Unit on/off
- 3.10 Adjusting the speaker volume
- 3.11 Mute and Tone switches
- 3.12 Low Battery Alarms
- 3.13 Connecting Accessory devices
- 4 Troubleshooting and Frequently Asked Questions
- 5 Warranty
- 6 Documents / Resources
Introduction
THE REPORTER with Voice additional PIR Sensor can be used to expand your REPORTER with Voice, to monitor motion in up to EIGHT locations up to 1000 feet from the base, while still allowing small animals to pass undetected. The wireless transmitter has a built-in microphone that lets you hear what is going on outside and speak with a person on the other end. You can also Remotely Control an electrical device near the transmitter, like Gate Openers, Lights, or Cameras.
Uses Include...
- Monitoring Gates
- Front Door / Back Door
- Driveways
- Deck & Patio
- Storefronts
- Barn or Shop
- RVs, while at home
- Pools or Area Security
- Home / Office Security
- Detecting Large Animals
FCC STATEMENT
This device complies with FCC part 15 rules. It may not cause harmful interference with other devices, and must accept interference from other devices.
FCC ID: JLFPIR2 and JLFTRX
NOTE: THE MANUFACTURER IS NOT RESPONSIBLE FOR ANY RADIO OR TV INTERFERENCE CAUSED BY UNAUTHORIZED MODIFICATIONS TO THIS EQUIPMENT.
SUCH MODIFICATIONS COULD VOID THE USER'S AUTHORITY TO OPERATE THE EQUIPMENT
SETTING UP THE DEVICE
Assemble the Passive Infra-Red Sensor (PIR) Unit Mounting Plate
Insert the 1" screw (The single larger screws provided in the kit) through the Swivel Bushing (supplied in the plastic bag), then through the Plate and the back of the PIR body. Tighten just enough to allow the plate to be adjusted, but it should not hang loosely.
Install Batteries in the PIR Unit
Pull the two halves of the PIR apart and remove the black battery pack from the back half of the PIR. Place four AA Alkaline batteries in the battery pack (Use only high quality batteries for longest performance), after five seconds, the test LED will illuminate for ten seconds when it detects motion. The batteries should last for over a year with average use.

With the batteries installed, set the battery pack in the PIR Unit back, as shown below.

Set the battery pack into the battery slot, so the batteries are facing away from the electronics.
Fit the PIR front on to the back and place the 2 screws provided into front holes and tighten securely.
- Mount the plate to the back using the swivel and long screw provided.
- Tighten enough to remove any slop in the assembly and yet allow for some movement of the plate when installed.
- After installing the batteries, insert the battery pack with the batteries facing the back.
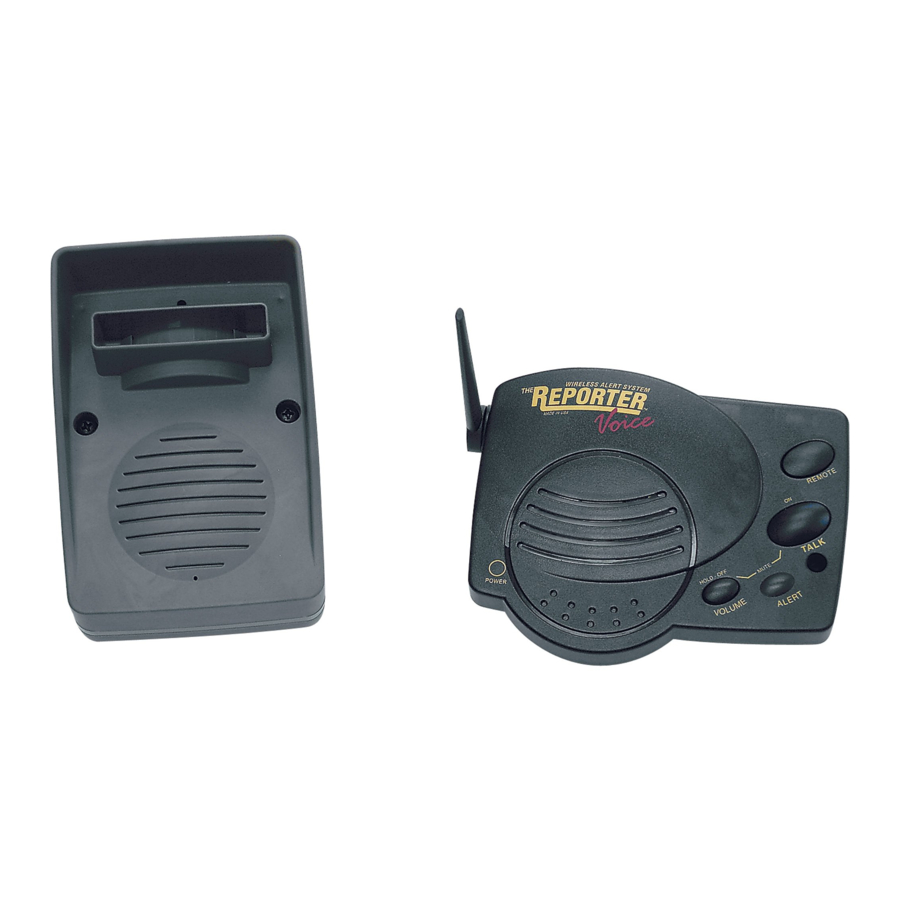
Set-up the Base unit
Plug the supplied 12VDC transformer into the power connection on the Base unit and a wall outlet (the POWER light will illuminate) and then If desired, 4 AA batteries may be installed in the Base unit, for uninterrupted operation in case of power failure or a remote location.
The Base Unit can operate for several months on battery power alone.
Before the Reporter will operate, you have to teach the PIR Unit to the Base Unit (Each PIR Unit has its own unique ID, for a Secure Radio Link). For best results, raise the Base Unit's antennal to stand strait up.
Teach the Base Unit to respond to the PIR / Sensor Unit
Press and release the LEARN button on the Base unit, causing the alert buzzer to sound. Then, Within 5 seconds, wave your hand in front of the detection window of the PIR, causing the test light to illuminate. The Base Unit will activate with static and feedback, due to the close proximity of the PIR. Move the PIR at least ten feet away for normal operation. If it does not, repeat the learning process. After learning the transmitter's code, the Base Unit should respond to motion detected by the sensor, by beeping, flashing it's ALERT light, and letting you hear through the PIR's microphone.
Each Base Unit can learn the codes of up to eight PIR transmitters, responding with multiple buzzes, depending on how many transmitters it has learned. Just teach each additional PIR Unit to the Base unit, as with the first one. If you need to clear the Base unit's memory, simply press and hold the LEARN button, for 10 seconds. The Base unit will give a triple beep, when it has cleared its memory.
Mounting the PIR / Sensor Unit
Mount the PIR Unit onto a solid surface (it should not move with wind) 3-5 feet above the ground so it can see the center of the expected target, moving past the sensor. Swivel the unit so it gets the best possible view across the path of movement, angled slightly downwards if necessary.

Using the Intercom Feature
When the PIR Sensor has detected motion, the Base Unit will allow you to listen through the wireless microphone that is built in to the PIR Unit, for 10 seconds. If you wish to talk with a person on the other end, hold down the TALK button and speak, releasing it to hear.

Temporarily Muting the Base Unit
The Base Unit can be muted temporarily, by holding the Volume and Talk buttons down for three seconds. The unit will reactivate automatically after one hour, or by pressing the Talk button.
Using the Remote Button
If there is an accessory device (like a gate opener, camera, or yard light) connected to the relay on the PIR unit, it can be activated by pressing the Remote button within 30 seconds of the signal of the alert buzzer.
Turning the Base Unit on/off
If you wish to turn the Base Unit off for a while, hold down the Volume button for three seconds, until a beep is heard and the power light goes out. The unit can be turned back on, by pressing the Talk button.
Adjusting the speaker volume
The volume of the Base Unit's speaker can be adjusted by pressing the Volume button. Pressing the button repeatedly will cycle through volume levels.
Mute and Tone switches
The alarm buzzer can be muted or set to an alternate buzz tone by changing the switch settings.
Switch #1 (closest to the LEARN button) will mute the built-in alert buzzer.
Switch #2 will set the buzzer to signal with an alternate tone.
Low Battery Alarms
A low battery warning will signal when it is time to change the batteries in the PIR or Base unit.
If PIR's batteries are low, the Base unit will emit three high-pitch beeps, every ten minutes. If the Base Unit's batteries are low, it will have two high-pitch beeps.
Battery Life: The AA batteries will last up to a year, depending on use.
Connecting Accessory devices
Both the PIR and Base units have relays, which can activate other electrical devices. The relays are switches that can handle up to 120 volts at 10 amps. Accessory devices will need their own power supply, since the relay is just a switch and has no power of its own.
The Base Unit's relay automatically closes when the alarm buzzer sounds and can be used to activate louder alarm bells, lights, cameras, or other accessories.
The two stainless steel screws on the back of the PIR connect to its relay, which will only activate when the Remote button is pressed (on the base unit). If you wish, you can flush mount the unit so that the access to these connections by visitors is prevented.

Troubleshooting and Frequently Asked Questions
Nothing Happens. The units Do Not Function
Check battery in PIR. Moving in front of it should cause the window to dimly blink.
Make sure you have followed the steps to TEACH the units to each other. Otherwise the will ignore each other.
Make sure the base unit has the power LED ON or blinking (Blinking if battery powered).
The system is not getting the expected transmission range
To assure best range; keep base unit antenna VERTICAL. Keep the PIR Unit at least a foot away from trees and metal objects. It can also help to locate the Base unit near a window with the clearest possible sight of the PIR Unit. The less number of objects between the devices, the longer the range.
I cannot hear the Base Unit when it signals
The VOLUME button can be used to increase the volume of speaker, though the motion alert buzzer is not made to be overly loud. If you need to have a louder alarm, the receiver has a relay that can activate other electrical devices, such as bells, buzzers, or lights. The relay is a switch that has no power of its own, but can handle up to 120 volts at 10 amps.
The PIR Unit is picking up people, but not cars
The PIR sensor is not seeing the car's hot motor or exhaust. To detect cars, it is best to set the transmitter at an angle to the road, between ten and twenty feet from the road, and it also helps to have the sensor mounted at the height of the car's motor.
The unit is signaling constantly, when there is nothing there
Check for tree branches or other objects that might be moving in a breeze or insects in the sensor window. The sensor can also be fooled by light shining directly into the window, such as reflected sunlight, or motion in front of a light source.
There is a short beep every ten minutes
The Base unit is indicating that the Battery is LOW. If PIR's batteries are low, the Base unit will emit three high-pitch beeps, every ten minutes. If the Base Unit's batteries are low, it will have two high-pitch beeps.
How do I clear the Base Unit's memory
Press and hold the Learn button, on the Base unit, for ten seconds. It will give a triplebeep when it has cleared its memory and you can re-teach PIR Units to it. If a PIR Unit signals, while the Learn button is depressed, the procedure will have to be repeated.
I hear Static and Feedback through the Base Unit
The PIR is probably to close to the Base unit. Once the PIR is installed in the desired location, it will operate normally.
If you have installation or operation questions, please see above, or check out the expanded FAQ at the manufacturer's web page at www.internationalelect.com. You can receive free technical assistance or warranty service, by email at techsupp@nwlink.com or call 888.679.7994 Tuesday-Friday 8-5 pst
Warranty
This product is warranted to be free of defects for the period of One Year from the date of purchase. The warranty covers parts, labor, and return shipping to you, but not all accessories. IEI will repair or replace any defective product at our discretion. Warranty does not cover misuse or damage other then due to normal operating conditions. If you need to send the system to IEI for repair, contact IEI for a Return Authorization number via email: techsupp@nwlink.com. Packages without a Return Authorization number will be rejected.
Documents / Resources
References

Download manual
Here you can download full pdf version of manual, it may contain additional safety instructions, warranty information, FCC rules, etc.
Download Chamberlain THE REPORTER RWA-300R - Security System Manual
Advertisement


Need help?
Do you have a question about the THE REPORTER RWA-300R and is the answer not in the manual?
Questions and answers