Takara Belmont CARE DRY G Operating Instructions Manual
Far-infrared hair processor
Hide thumbs
Also See for CARE DRY G:
- Assembly instructions manual (8 pages) ,
- Quick operation manual (9 pages)
Table of Contents
Advertisement
Quick Links
Takara Belmont Far-Infrared Hair Processor
CARE DRY G
Operating Instructions
Thank you for purchasing Takara Belmont product.
Please read through this manual carefully before
installing or using. These instructions provide
important information for correct usage of the
product to avoid personal injuries or property
damages against you or your customer.
AK-DRYS*
Model
This product is intended for the exclusive use in
hairdressing salons for their salon services, and
must be operated or handled by the hair stylists or
by their staff under supervision.
2023.07
1st Version
Request No.1E07PRA0
Advertisement
Table of Contents

Related Manuals for Takara Belmont CARE DRY G


Summary of Contents for Takara Belmont CARE DRY G
- Page 1 CARE DRY G AK-DRYS* Model Operating Instructions Thank you for purchasing Takara Belmont product. This product is intended for the exclusive use in Please read through this manual carefully before hairdressing salons for their salon services, and installing or using. These instructions provide...
-
Page 2: Table Of Contents
Table of Contents Introduction Safety Precautions ....................... Restrictions on Use ......................Warning Label Locations...................... Accessories.......................... Part Names .......................... Control Panel ........................Buttons and Indicators ......................Mode Overview ........................Error Codes.......................... Using the product Getting the Customer Ready ....................Setting Up the Product ......................Heater Unit Movement Patterns ................... -
Page 3: Safety Precautions
Please follow all of the precautions shown here, as they contain important information related to safety. TAKARA BELMONT bears no responsibility for personal injury or harm caused to the user or third parties in the event that the “Safety Precautions” have not been observed and an accident has occurred. If this is the case, the persons who use the product without observing the safety precautions will bear responsible for the injuries and damages. - Page 4 Safety Precautions (To be strictly observed) WARNING Power cord and plug Do not place any object on the power cord. The power cord may become damaged, and disconnection or a short circuit may cause electric shock or fire. Do not plug or unplug the product with wet hands. Touching the power plug or outlet with wet hands may cause electric shock.
- Page 5 Safety Precautions (To be strictly observed) WARNING Usage and cleaning Do not climb on, lean on, or hang from this product. Since the four-legged stand has casters, the product may fall over, causing electric shock, fire, property damage, or injury. Do not hang from the heater unit or upper shaft of the product, or climb on the four-legged stand.
- Page 6 Safety Precautions (To be strictly observed) CAUTION Installation and relocation Do not carry or pull the product by the heater unit. When relocating this product, do not carry or pull it by the heater unit. The product may fall, deform, or break, causing injury. When relocating the product, hold the upper shaft to carry it. Secure the power cord inlet in place.
-
Page 7: Restrictions On Use
Safety Precautions (To be strictly observed) CAUTION Usage and cleaning Do not manually rotate the heater unit. Do not manually rotate the heater unit regardless of whether it is in operation or at rest. Malfunction or breakdown of the product may result. For example, the heater unit may become unable to rotate properly. -
Page 8: Warning Label Locations
Warning Label Locations Burn hazard • Do not touch the heater guard. • Do not place the heater unit too close to the customer’s head. Heater breakage hazard Do not apply impact to the heater unit. Do not manually rotate the heater NOTICE unit. -
Page 9: Part Names
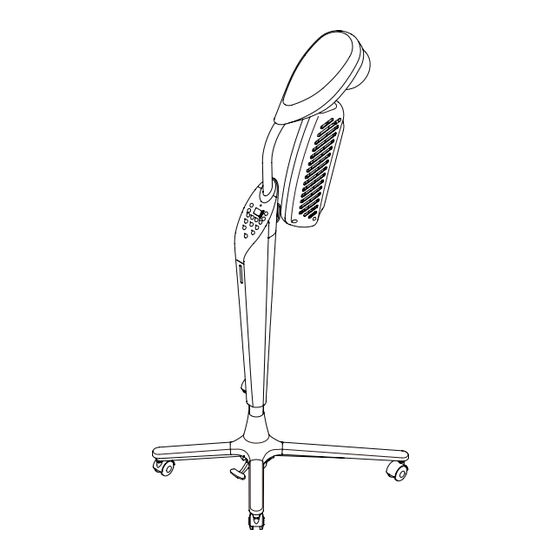
Part Names Head cover Upper shaft Control panel Head Pilot lamp Setting Manual (status indicator) Heater unit Heater Mesh Heater guard Setting gauge Cord hook Reflector Current fuse Power switch Pedal Upper main unit Off Fixing part of the upper Inlet main unit and Power cord stopper... -
Page 10: Control Panel
Control Panel Temperature level Display panel lamps Time setting buttons Temperature level setting buttons Cool mode Dry mode selection selection button buttons Heat mode selection buttons MUTE button FAN button START/STOP button RESET button Buttons and Indicators Display panel Time setting buttons Use these buttons to modify the set time Displays the set operation time Displays the time to go... - Page 11 Buttons and Indicators Dry mode selection buttons with lamps To select a mode, press the button that corresponds to the mode. Lamps The lamp next to the selected mode button will light up. To save a modified setting as a default, hold down the button of the currently selected mode for at least one second.
- Page 12 Buttons and Indicators MUTE button with a lamp You can mute or unmute the sound of button operations and the alarm that notifies the end of a process. Lamp * Once you mute or unmute using the MUTE button, that sound status will be maintained until you press the button again.
-
Page 13: Mode Overview
Mode Overview Mode description Mode Mode overview For customers with short hair exposing the ears and nape of the neck (The heater will turn off when it comes near the ears or nape.) Dries hair on the sides and nape evenly Mainly designed to dry long hair Heats the hair while measuring the temperature of the head For short to medium hair... -
Page 14: Error Codes
The customer’s hair is not Turn off the power switch, disconnect the power plug, and warmed up at all because the immediately contact the nearest dealer or Takara Belmont. heater control is not working properly. The hair temperature cannot be... - Page 15 Takara Belmont. The customer’s hair is quite hot Bring the product to the right position, and then turn off the The code “...
-
Page 16: Getting The Customer Ready
If you use non-polyethylene wrap, select the 360° or 120° heat mode. Setting Up the Product For the maximum performance of your Care Dry G and comfort for your customers, please follow the instructions on the use of the product. - Page 17 Setting Up Your Care Dry G Heater unit positioning Home position: Before positioning the heater unit using the setting gauge, The figure on the right return the heater unit to the home position. shows the heater unit in the “home position.”...
- Page 18 Then press the START/STOP button again to resume the operation of the product. If the error code remains on display even after the head is returned to the right position, turn off the power switch, disconnect the power plug, and contact the nearest dealer or Takara Belmont.
-
Page 19: Heater Unit Movement Patterns
Heater Unit Movement Patterns Swings 180° Swings 120° In S or M dry mode or in cool mode In L dry mode and 120°heat mode Swings 540° Rotates 360° In 540° heat mode In 360° heat mode Counterclockwise Clockwise The heater unit’s safety clutch function If a body part or clothing becomes caught between the main unit and the heater unit during operation, the safety clutch mechanism of the heater unit will be activated. -
Page 20: Operation Steps
Operation Steps Set the product in the right position. Please note that if the product is not set in the Time setting buttons right position, it will not operate properly. (See “Heater unit positioning” on page 17.) Turn on the power switch. When you flip the power switch, all the lamps on the control panel will light up for one second, and then only those next to the... - Page 21 Operation Steps During operation How to finish the operation halfway During operation, the lamp next to the and return the heater unit to the START/STOP button and the one next to the home position selected mode button are on, and the display panel shows the remaining time with the dot To return the heater unit to the home position for light blinking (every second).
- Page 22 Operation Steps End of cooling When the cooling time has finished and the remaining time on display reaches “0,” an alarm will sound to indicate the end of cooling. The heater and fan will turn off, and the pilot lamp will go out. The heater unit will rotate counterclockwise as viewed from the control panel side, to return to the home position and come to a halt.
-
Page 23: Modifying Set Values For A Mode And Saving The Modifications
Modifying Set Values for a Mode and Saving the Modifications 1. How to modify set values for a mode and save the modifications You can modify the set values for a mode, which are displayed when you press the button to select that mode. -
Page 24: Lamp Behavior And Buttons Enabled/Disabled While The Power Is On
Lamp Behavior and Buttons Enabled/Disabled While the Power Is On SHORT MEDIUM Time on LONG Operating HEAT Pilot lamp the display status 540° panel 360° 120° COOL Steady for Steady for Steady for “ ” displayed Steady for Steady for Steady for for one sec. -
Page 25: In The Event Of A Power Outage
In the Event of a Power Outage In the event of a power outage, please do the following to prevent unexpected behavior of the product when the power is restored: Turn off the power switch and disconnect the power plug from the outlet. Cleaning Precautions Clean the product after use so that it is always clean when you use it. -
Page 26: Troubleshooting
If any of the following problems occur, please check the product before calling for repair. If taking the corrective actions does not bring the product back to normal operation, immediately stop using it, turn off the power switch, disconnect the power plug, and contact the nearest dealer or Takara Belmont. Problem... -
Page 27: Daily Inspection Procedure
Check while the product is in operation disconnect the power plug, and immediately (this is limited to the case that contact the nearest dealer or Takara Belmont there is no deformation breakage directly. or deterioration on the power plug or the power cord) □... -
Page 28: Standard Period Of Use
If a part has been worn significantly or deteriorated, or if it is broken, the parts must be inspected or replaced. Immediately stop using the product, turn off the power switch, disconnect the power plug, and immediately contact the nearest dealer or Takara Belmont directly. Consumable Parts (The following parts must be purchased since they are excluded from the warranty.) -
Page 30: Specifications
Specifications AK-DRYS* Model (A color code is shown in place of the asterisk “*”.) 17.6 kg Weight 220V 230V 240V Rated Voltage Rated Current 3.1 A 3.4 A 3.5 A Frequency 50/60 Hz Safety devices Tilt sensors, safety clutch mechanism, overheating safety device, current and mechanisms fuse Operating ambient temperature... -
Page 32: Importer Information
TAKARA BELMONT CORPORATION 1-1, 2-Chome, Higashi-shinsaibashi, Chuo-ku, Osaka, Japan TEL : +81-6-6213-5945 FAX : +81-6-6212-3680 Printed in Japan...
Need help?
Do you have a question about the CARE DRY G and is the answer not in the manual?
Questions and answers