Sage the Kitchen Wizz Pro BFP800 / SFP800 - Food Processor 2000 Wt Manual
- Quick manual (48 pages) ,
- Quick manual (128 pages)
Advertisement
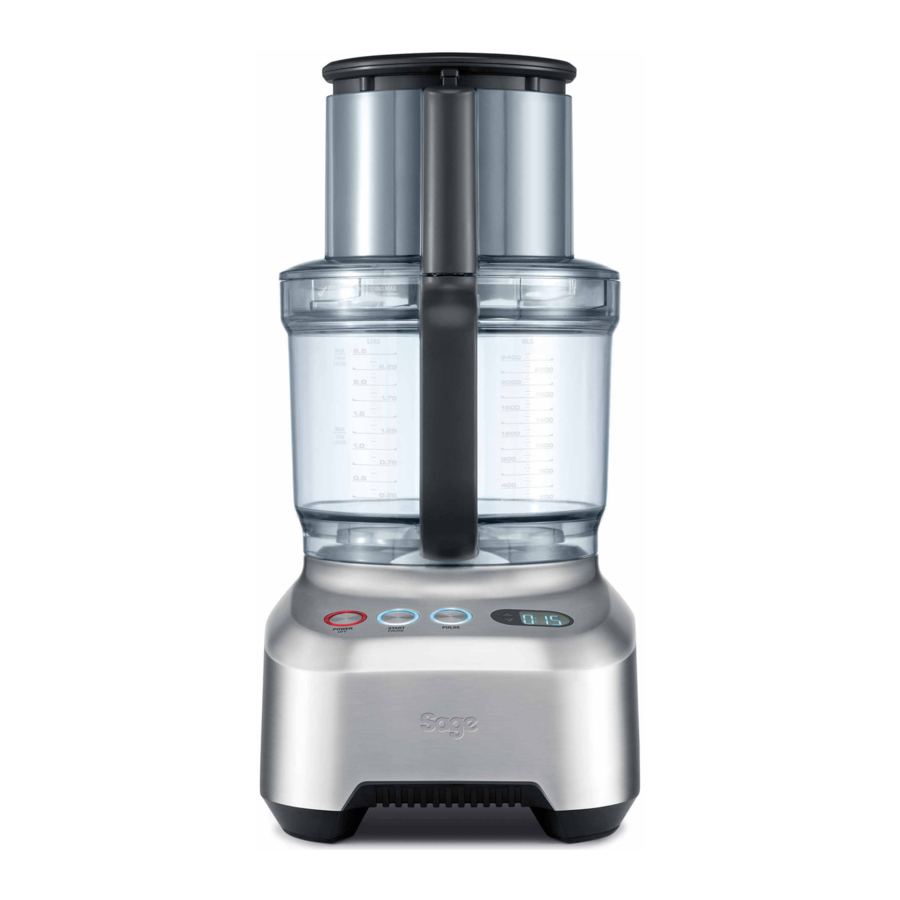
Components


- Small Food Pusher
- Large Food Pusher
- Extra Wide Feed Chute
- Processing Lid
- PULSE Button
- POWER / OFF Button
- Feed Chute Safety System
- Silicone Seal
- Processing Bowl With Handle
- Count Up & Count Down Timer
- LCD Display
- Direct Drive Motor Base
- Non-skid Rubber Feet
- Julienne Disc
- Chip Cutter
- Reversible Shredder
- Adjustable Slicer
- Whisk / Emulsifying Disc
- 4 Blade Processor
- Dough Blade
- Mini Processing Blade
- Disc Spindle
- Storage Container with Lid
NOT SHOWN
Cleaning Brush
Plastic Spatula
Mini Processing bowl
Cord Storage
Sage Assist Plug
Rating Information
220–240V ~ 50Hz 2000W
Assembly
BEFORE FIRST USE
Before using your Sage food processor, become familiar with all the parts. Remove all packaging materials and promotional labels, being careful when handling the processing blades and discs as they are very sharp. Wash the processing bowl, processing lid and other attachments in warm, soapy water. Rinse and dry thoroughly. (Refer to cleaning, care and storage section).
- Place the motor base on a dry, level work surface. Place the processing bowl on to the motor base with the handle in line with the ALIGN HANDLE graphic on the motor base.

- Turn the processing bowl clockwise until the handle aligns with the TURN TO LOCK graphic. The processing bowl should be securely locked into position.

- If using a disc, first assemble the disc spindle onto the bowl drive coupling. Orientate the disc so that the side you wish to use is facing upwards. Hold the disc by the centre plastic moulding and position the central hole above the attachment spindle. Push down firmly until fitted correctly.
(Please note that these discs only fit the larger processing bowl).

- For using the processing blades, carefully grasp either the 4 blade processor, dough blade or mini processing blade using the central plastic support and position it over the bowl drive coupling and push down until inserted correctly. If using the mini processing blade, ensure the mini processing bowl is assembled into the main bowl first.

- Place the processing lid onto the processing bowl so the feed chute is slightly right of the bowl handle and the arrow graphics are aligned
![]() .
.
Holding the feed chute and pressing down firmly at the same time, turn the lid clockwise (as indicated by the graphic) so the 'Locking Tab' on the lid slots into the 'Interlocking Safety Catch' on the handle. The lid should be securely locked into position.


 .
.
NOTE
The food processor will not operate unless both the processing bowl and lid are correctly locked into position.

The processing blade (including the mini bowl blade) and discs are extremely sharp, handle with care at all times.
- Insert the power plug into a 220–240 volt power outlet and switch the power outlet on.
- At the end of processing, always wait until the blades or discs have stopped spinning before unlocking and removing the lid. To remove the processing lid, ensure the POWER / OFF button has been pressed, the power is switched off at the power outlet and the cord is unplugged from the power outlet. Holding the feed chute and pressing down firmly at the same time, turn the lid anticlockwise so that the arrow graphics are no longer aligned.
- Remove the processing bowl (before removing blade or discs) by turning it anti-clockwise until the handle is in line with the ALIGN HANDLE. Lift the bowl off the motor shaft. When removing the discs – carefully remove by gripping the plastic hub on the centre of the disc and lifting the disc up and away from the pin on the spindle.
OVERLOAD PROTECTION SYSTEM
If the motor overloads, the food processor will go to STANDBY mode and OVERLOAD icon in the LCD starts to flash. The food processor can still be switched off by pressing the POWER / OFF button. To operate the food processor again, allow the machine to cool for approx 30 minutes.
Some stiff mixtures, such as dough, may cause the dough blade to rotate more slowly than normal. If this happens, do not process for longer than 1 minute.
FOOD PROCESSING GUIDE
 NOTE
NOTE
The food processor is very powerful and recommended using PULSE function where possible as to avoid over chopping or whipping.
| FOOD | BLADE TYPE (DOUGH/4 BLADE PROCESSOR/MINI) | ADJUSTABLE SLICING BLADE THICKNESS | RECOMMENDED DISC TYPE (CHIP/SHRED/JULIENNE/WHISK) |
| Avocado | 4 blade processor or mini Use: Guacamole | 2–5 | |
| Asparagus (cooked) | 4 blade processor or mini Use: Asparagus Dip | ||
| Beetroot | 2–5 | Shredding Use: Salad | |
| Broccoli (cooked) | 4 blade processor Use: Broccoli Soup | ||
| Cabbage | Thin 1–2 and med 2–3 Use: Accompaniment | Shredding Use: Salad | |
| Carrot | 4 blade processor or mini Use: Vegetable Soup | 0–5 | Shredding Use: Salad |
| Cauliflower (cooked) | 4 blade processor or mini Use: Cauliflower Soup | ||
| Celery | 4 blade processor or mini Use: Vegetable Soup | Thin 1–2 med 2–3 Use: Salad | |
| Chilli | 4 blade processor or mini Use: Seasoning | ||
| Aubergine | 4 blade processor or mini Use: Accompaniment, soups | 2–5 Use: Grilled aubergine | Shred or Julienne Use: Accompaniment to dishes |
| Garlic | 4 blade processor or mini Use: Seasoning | ||
| Ginger | 4 blade processor or mini Use: Seasoning | ||
| Herbs | 4 blade processor or mini Use: Seasoning pesto | ||
| Leeks | 4 blade processor or mini Use: Cooked for soups | 2–5 Use: Vegetable Soup | |
| Lettuce | 2–4 Use: Salad | ||
| Mushrooms (raw) | 4 blade processor or mini Use: Vegetable Soup | 4–6 Use: Salad, vegetable soup, mushroom sauce, mushroom soup" | |
| Mushrooms (cooked) | 4 blade processor Use: Mushroom Soup | 4–6 Use: Salad, vegetable soup, mushroom sauce, mushroom soup | |
| Onion | 4 blade processor or mini Use: Soups, Sauces | 0–5 Use: Salad | |
| Parsnip | 4 blade processor or mini Use: Vegetable soup | 2–5 Use: Vegetable lasagna | |
| Parsnip (cooked) | 4 blade processor Use: Accompaniment | ||
| Peas (cooked) | 4 blade processor or mini Use: Accompaniment, baby food | ||
| Potatoes | 0.5–6 Use: Potato bake | Chip / Julienne / Shredder Use: Chips | |
| Potatoes (cooked) | 4 blade processor or mini Use: Mash potato, Skordallia | ||
| Spinach | 4 blade processor or mini Use: Accompaniment | ||
| Spinach (cooked) | 4 blade processor or mini Use: Creamed spinach | ||
| Swede | 4 blade processor or mini Use: Vegetable Soup, creamed swede | ||
| Tomatoes | 4 blade processor or mini Use: Salsa | 2–5 Use: sandwich filling, Tomato Bocconcini Salad, tomato relish | |
| Courgette | 3–6 Use: Accompaniment, courgette slice, gratin | Shredder – Coarse or fine Use: Salad, Frittata | |
| Apple | 4 blade processor or mini Use: Apple sauce | 2–5 Use: Apple galette | |
| Apple (cooked) | 4 blade processor or mini Use: Baby food | 4–6 Use: Fruit Salad | |
| Banana | 4 blade processor or mini Use: Dessert sauces | ||
| Berries | 4 blade processor or mini Use: Fruit salad | ||
| Citrus Fruit | 4 blade processor or mini Use: Fruit mince | ||
| Citrus Peel | 4 blade processor or mini Use: Fruit mince | ||
| Dried Fruit | 4 blade processor or mini Use: Fruit salad, dessert sauce | ||
| Kiwi fruit | 4 blade processor or mini Use: Fruit salad, dessert sauce | 4–6 Use: Dessert decoration | |
| Mango | 4 blade processor or mini Use: Fruit salad, dessert sauce | ||
| Melon (Honeydew / rockmelon) | 4 blade processor or mini Use: Fruit salad | ||
| Pear | 4 blade processor or mini Use: Fruit salad | 4–6 Use: Pear pie | |
| Pear (cooked) | 4 blade processor or mini Use: Baby food | ||
| Pineapple | 4 blade processor or mini Use: Fruit salad | ||
| Stone Fruit (Apricot, nectarine, peach, plum) | 4 blade processor or mini Use: Fruit salad, dessert sauce | ||
| Strawberries | 4 blade processor or mini Use: Fruit salad, dessert sauce | ||
| Batters | Dough Use: Cakes, crepes | Whisk Use: cakes, muffins, crepes | |
| Breadcrumbs | 4 blade processor or mini Use: Coatings, breadcrumb stuffing | ||
| Cheese | Shredder - Coarse or Fine Use: Grated Cheese | ||
| Chocolate | 4 blade processor or mini Use: Chocolate Ganache | Shredder – Coarse or Fine Use: Dessert decoration | |
| Cream Cheese | 4 blade processor or mini Use: Dips, cheese cake | ||
| Doughs | Dough Use: Pastry, scones, bread | ||
| Egg Whites use PULSE function | Whisk Use: Egg foams (not recommended for meringue, pavlova) | ||
| Eggs (hard boiled) | 4 blade processor or mini Use: Sandwich filling | 2–5 Use: sandwich filling | |
| Eggs (whole or yolks) use PULSE function | Whisk Use: Mayonnaise | ||
| Cream use PULSE function | Whisk Use: recommended PULSE function to avoid over whipping | ||
| Milkshakes and smoothies | 4 blade processor Use: recommend using PULSE function | ||
| Meat (raw) use PULSE function | 4 blade processor Use: Mince meatloaf, burgers | ||
| Meat (cooked) use PULSE function | 4 blade processor Use: Sandwich fillings, pate, baby food | ||
| Meat (deli) | 1–6 Use: Sandwiches, antipasto, pizza toppings |
Care & Cleaning
When finished processing, switch the food processor off at the power outlet and unplug the power cord.
Motor base
Wipe the motor base with a clean, damp cloth after each use. Dry thoroughly with a soft, clean cloth.
Processing bowl, lid and food pusher
Hand wash in hot, soapy water using a mild detergent. Do not use a scourer or abrasive cleaners as they will scratch the plastic surface. The plastic parts may occasionally be washed in the dishwasher (top shelf only). It is not recommended on a regular basis, as prolonged exposure to hot water temperatures and harsh detergents will damage and shorten the life of the plastic.
NOTE
Do not place food pusher in the dishwasher as the heat may deform it.
Processing 4 blade processor, dough blade and discs
Hand wash the bowl and lid. Use the cleaning brush accessory to scrub stubborn foods off the blades and discs. The handle end of the brush is designed for scraping.
To avoid accidental cuts, do not leave 4 blade processor or discs to soak in sudsy water. The 4 blade processor, dough blade, discs and spindle can also be washed in the dishwasher (top shelf only).
NOTE
The 4 blade processor cover can be assembled onto the 4 blade processor while it is placed in the dishwasher for added safety.

The 4 blade processor, mini and adjustable processing blades and discs are extremely sharp, handle with care at all times.
Never immerse the motor base, power cord or power plug in water or any other liquid.
Never store your food processor with the bowl fixed and lid locked into position. Doing so will cause unnecessary strain on the auto operating switch on the handle of the processing bowl and the automatic safety switch on the motor base.
Do not put any part of the food processor in the microwave oven.
Troubleshooting
| PROBLEM | EASY SOLUTION |
| Food is unevenly processed |
|
| Slices are slanted or uneven |
|
| Food falls over in the feed chute |
|
| Chipper disk |
|
| Some food remains on the disc after processing |
|
| Motor slows down when mixing dough |
|
| Motor slow to start with the 4 blade processor |
|
| The motor does not start |
|
| The food processor shuts off during operation |
|
| The motor slowed down during operation |
|
| The food processor vibrates/moves during processing |
|
| Dough doesn't fully incorporate ingredients |
|
| Dough feels tough after kneading |
|
| Dough is too dry |
|
| Dough is too wet |
|

Documents / ResourcesDownload manual
Here you can download full pdf version of manual, it may contain additional safety instructions, warranty information, FCC rules, etc.
Download Sage the Kitchen Wizz Pro BFP800 / SFP800 - Food Processor 2000 Wt Manual
Advertisement


Need help?
Do you have a question about the the Kitchen Wizz Pro BFP800 and is the answer not in the manual?
Questions and answers