Cuisinart Custom Classic TOB-40 - Toaster Oven Broiler Manual
- Instruction and recipe booklet (25 pages) ,
- Instruction and recipe booklet (25 pages)
Advertisement
IMPORTANT SAFEGUARDS
When using an electrical appliance, basic safety precautions should always be followed, including the following:
- Read all instructions.
- UNPLUG FROM OUTLET WHEN NOT IN USE AND BEFORE CLEANING. Allow to cool before cleaning or handling.
- Do not touch hot surfaces Use handles or knobs.
- To protect against electrical shock, do not place any part of the toaster oven broiler in water or other liquids See instructions for cleaning.
- Close supervision is necessary when any appliance is used by or near children.
- Do not operate any appliance with a damaged cord or plug or after the appliance has malfunctioned or has been dropped or damaged in any way or is not operating properly. Return the toaster oven broiler to the nearest Cuisinart Repair Center for examination, repair or mechanical or electrical adjustment.
- The use of accessory attachments not recommended by Cuisinart ® may cause injury.
- Do not use outdoors.
- Do not let cord hang over the edge of the table or countertop where it could be pulled on inadvertently by children or pets, or touch hot surfaces, which could damage the cord.
- Do not place toaster oven broiler on or near a hot gas or electric burner or in a heated oven.
- Do not use this toaster oven broiler for anything other than its intended purpose.
- Extreme caution should be exercised when using containers constructed of materials other than metal or glass in the toaster oven broiler.
- To avoid burns, use extreme caution when removing tray or disposing of hot grease.
- When not in use, always unplug the unit. Do not store any materials other than manufacturer's recommended accessories in this oven.
- Do not place any of the following materials in the oven: paper, cardboard, plastic and similar products.
- Do not cover crumb tray or any part of the oven with metal foil. This will cause overheating of the oven.
- Oversize foods, metal foil packages and utensils must not be inserted in the toaster oven broiler, as they may involve a risk of fire or electric shock.
- A fire may occur if the toaster oven broiler is covered or touching flammable materials such as curtains, draperies, and walls, when in operation. Do not store any items on top of the appliance when in operation Do not operate under wall cabinets.
- Do not clean with metal scouring pads. Pieces can break off the pad and touch electrical parts, involving a risk of electric shock.
- Do not attempt to dislodge food when the toaster oven broiler is plugged into electrical outlet.
![]()
To avoid possibility of fire, NEVER leave toaster oven broiler unattended during use.- Do not rest cooking utensils or baking dishes on glass door.
- Turn the function dial to the OFF position to turn off toaster oven broiler.
- Where applicable, always attach plug to appliance and check that the function dial is off before plugging cord into wall outlet. To disconnect, turn the function dial to off, then remove plug from wall outlet.
- Do not operate your appliance in an appliance garage or under a wall cabinet When storing in an appliance garage always unplug the unit from the electrical outlet. Not doing so could create a risk of fire, especially if the appliance touches the walls of the garage or the door touches the unit as it closes.
SPECIAL CORDSET INSTRUCTIONS
A short power supply cord is provided to reduce the risks resulting from becoming entangled in or tripping over a longer cord.
Extension cords may be used if care is exercised in their use If an extension cord is used, the marked electrical rating of the extension cord must be at least as great as the electrical rating of the appliance, and the longer cord should be arranged so that it will not drape over the countertop or tabletop where it can be tripped over or pulled on by children.
NOTICE
This appliance has a polarized plug (one blade is wider than the other) As a safety feature, this plug will fit in a polarized outlet only one way If the plug does not fit fully in the outlet, reverse the plug If it still does not fit, contact a qualified electrician Do not attempt to defeat this safety feature.
FOR HOUSEHOLD USE ONLY
NOT INTENDED FOR COMMERCIAL USE
SAVE THESE INSTRUCTIONS
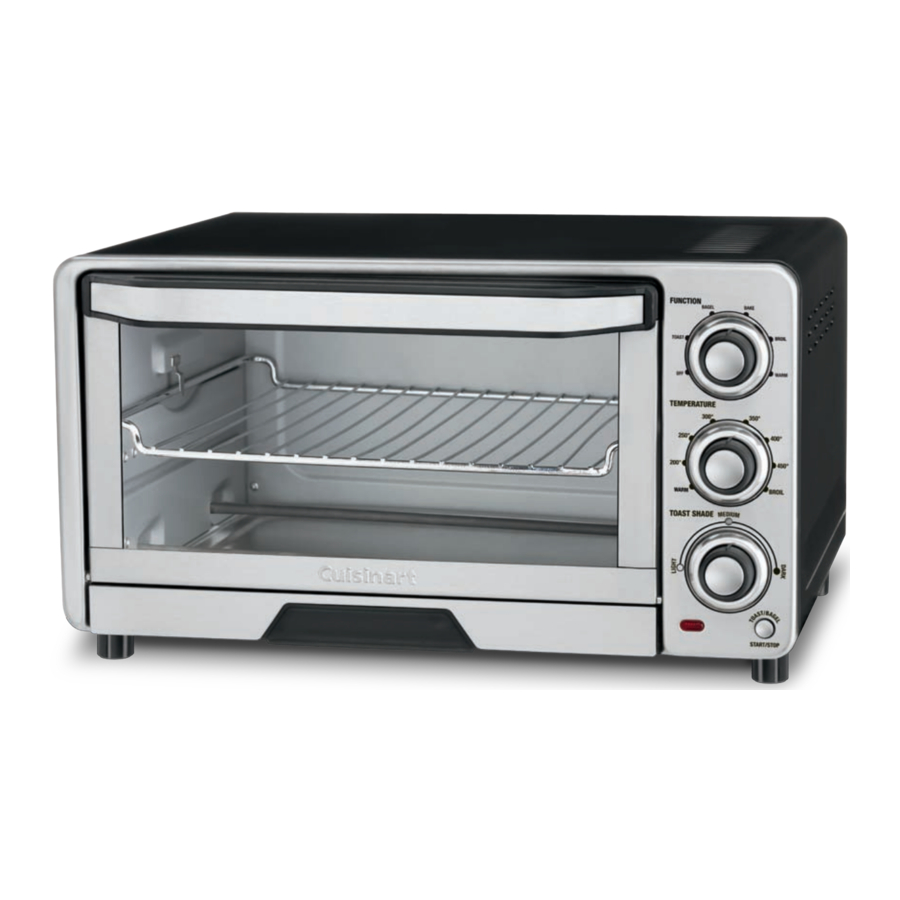
FEATURES AND BENEFITS

- Function Dial
Select cooking method – TOAST, BAGEL, BAKE, WARM or BROIL. - Temperature Dial
Select desired temperature for the Baking, Warm or Broiling functions. - Toast Shade Dial
Select the desired toast shade for the Toast and Bagel functions – Light, Medium or Dark - Toasting Start/Stop Button
Push the Start/Stop button to start the Toast or Bagel function.
Push the Start/Stop button to stop toasting in mid cycle and shut off oven. - Oven ON Indicator
Indicator light will remain lit when oven is in use. - Oven Rack
Oven rack slides out automatically when the door is opened. - Slide-out Crumb Tray
The slide-out crumb tray comes already positioned in your oven. The crumb tray slides out from the bottom front of the toaster oven broiler for easy cleaning. - Easy-Clean Interior
The sides of the oven are coated, providing an easy-to-clean surface. - Broiling Rack
Abroiling rack fits into the baking pan/drip pan to use when broiling. - Baking Pan/Drip Pan
Abaking pan/drip pan is included for your convenience Use with the broiling rack when broiling Use alone when baking or roasting. - Cord Storage (not shown)
Takes up excess cord and keeps countertop neat. - BPA-Free (not shown)
All parts that come in contact with food are BPA-free.
BEFORE THE FIRST USE
Place your oven on a flat surface. Remove any packaging and promotional labels in or on the oven. Unwind the power cord. Check that the crumb tray is in place and that there is nothing inside or on top of the oven. Plug power cord into wall outlet.
Before first use, thoroughly wash the baking pan, broiling rack and oven rack with soap and water, and dry them thoroughly.
Before using your oven, make sure it is two to four inches away from the wall or from any objects on the countertop. Do not use on heat-sensitive surfaces. DO NOT STORE OBJECTS ON THE TOP OF THE OVENIF YOU DO, REMOVE ALL OBJECTS BEFORE YOU TURN ON YOUR OVENTHE EXTERIOR WALLS GET VERY HOT WHEN IN USEKEEP OUT OF REACH OF CHILDREN.
GENERAL GUIDELINES
Toast/Bagel: Always have the rack in rack position C, as indicated in the diagram below, for even toasting Always center your item/items in the middle of the rack.
Bake: Baking function can be used as you would normally use your large kitchen oven for roasting meats including chicken, or baking cakes, cookies and more.
Broil: Broiling function can be used for beef, chicken, pork, fish and more.
It also can be used to top brown casseroles and gratins

Aluminum foil is not recommended for covering the drip pan Foil is extremely dangerous when broiling fatty foods Grease will accumulate and may catch fire If foil is used to cover drip pan, be sure foil is tucked neatly around the pan and does not touch the walls or heating rods. Never cover the crumb tray.
Turning off the toaster oven broiler: Turn the function dial to OFF.
The indicator light will turn off.
OPERATION
Toast
To toast, make sure the oven rack is in rack position C, as indicated in the diagram below If toasting two items, center them in the middle of the rack Four items should be evenly spaced – two in front, two in back. Six items should be evenly spaced – three in front, three in back Close the glass door Set function dial to TOAST.
Shade Selection
Turn toast shade dial to desired browning setting Press Start/Stop button to begin toasting.
Stop Toasting
When the toasting cycle is finished, the oven will beep 5 times and turn off. If you wish to stop the toasting cycle before it is finished, simply press the Start/Stop button The toaster oven broiler will cancel your toast cycle.
Bagel
To toast a bagel, make sure the oven rack is in rack position C as indicated in the diagram below If toasting two items, center them in the middle of the rack. Four items should be evenly spaced – two in front, two in back. Six items should be evenly spaced – three in front, three in back. Close the glass door Set function dial to BAGEL.
Shade Selection
Turn toast shade dial to desired browning setting Press Start/Stop button to begin toasting.
Stop Toasting
When the toasting cycle is finished, the oven will beep 5 times and turn off. If you wish to stop the toasting cycle before it is finished, simply press the Start/Stop button. The toaster oven broiler will cancel your toast cycle.
Bake
To bake, turn the temperature dial to the desired temperature and turn function dial to BAKE The oven indicator light will turn on. Allow the oven to preheat for at least five minutes before putting food in the oven to bake.
Warm
Turn the temperature dial to Warm and then turn the function dial to Warm.
The oven indicator light will turn on.
Broil
To broil, turn the temperature dial to BROIL and turn function dial to BROIL. The oven indicator light will turn on Allow the oven to preheat for at least five minutes before putting food in the oven to broil.
Note: When broiling place the broiling rack in the drip pan In most cases the oven rack should be in the higher position (position C, but for thicker items use position B; see diagram below).
Note: Never use glass oven dishes to broil To stop broil operation, turn function dial to OFF position.
CLEANING AND MAINTENANCE
Always allow the oven to cool completely before cleaning.
- Always unplug the oven from the electrical outlet.
- Do not use abrasive cleansers, as they will damage the finish Simply wipe the exterior with a clean damp cloth and dry thoroughly. Apply the cleansing agent to a cloth, not to the toaster oven, before cleaning.
- To clean interior walls, use a damp cloth and a mild liquid soap solution or a spray solution on a sponge. Never use harsh abrasives or corrosive products. These could damage the oven surface Never use Brillo pads, etc on interior of oven.
- To remove crumbs, slide out the crumb tray and discard crumbs. Wipe clean and replace. To remove baked-on grease, soak the tray in hot sudsy water or use nonabrasive cleaners. Never operate the oven without the crumb tray in place.
- Wire rack, baking pan and crumb tray should be hand washed in hot sudsy water or use a nylon scouring pad or nylon brush.
- Never wrap the cord around the outside of the oven Use the cord storage cleats on the back of the oven.
- Any other servicing should be performed by an authorized service representative.

After cooking greasy foods and after your oven has cooled, always clean top interior of oven If this is done on a regular basis, your oven will perform like new Removing the grease will help to keep toasting consistent, cycle after cycle.
All of our recipes have been tested in our kitchen and specially developed to work in the Cuisinart® Custom Classic™ Toaster Oven Broiler These mouthwatering recipes are just a sampling of what the Cuisinart® Custom Classic™ Toaster Oven Broiler can do.
OVEN RACK POSITION DIAGRAMS
Each recipe gives you step-by-step directions and will even tell you where the oven rack should be positioned for best results. Please refer to the diagram below for oven rack positions. Each position is described with a letter that is referred to in the recipe.


Placing the rack in the bottom position or in the top position with the rack upwards while toasting may result in a fire. Refer to rack position diagram for proper use.

Documents / ResourcesDownload manual
Here you can download full pdf version of manual, it may contain additional safety instructions, warranty information, FCC rules, etc.
Download Cuisinart Custom Classic TOB-40 - Toaster Oven Broiler Manual
Advertisement


Need help?
Do you have a question about the Custom Classic TOB-40 and is the answer not in the manual?
Questions and answers