Advertisement
IMPORTANT SAFEGUARDS
When using electrical appliances, basic safety precautions should always be followed including the following:
- Read all instructions before using the appliance.
- Do not touch hot surfaces. Use handles.
- To protect against electrical shock, do not place any part of the Cuisinart™ Brick Oven & Rotisserie in water or other liquid. See instructions for cleaning.
- This appliance should not be used by or near children, or individuals with certain disabilities.
- Unplug from outlet when not in use and before cleaning. Allow to cool before cleaning or handling.
- Do not operate any appliance with a damaged cord or plug or after the appliance has malfunctioned or has been dropped or damaged in any way or is not operating properly. Return the brick oven to the store or retailer where purchased for examination or repair.
- T he use of accessory attachments not recommended by Cuisinart may cause injury.
- Do not use outdoors.
- Do not let cord hang over the edge of the table or countertop where it could be pulled on inadvertently by children or pets, or touch hot surfaces, which could damage the cord.
- Do not place brick oven on or near a hot gas or electric burner or in a heated oven.
- Do not use this brick oven for anything other than its intended purpose.
- Extreme caution should be exercised when using containers constructed of materials other than metal or glass in the brick oven.
- To avoid burns, use extreme caution when removing the tray or disposing of hot grease.
- When not in use, always unplug the unit. Do not store any materials other than manufacturer's recommended accessories in this oven.
- Do not place any of the following materials in the oven: paper, cardboard, plastic or similar products.
- Do not cover crumb tray or any part of the oven with metal foil. This will cause overheating of the oven. You can line the baking pan with foil and place it in the bottom back position to catch drips. Be sure to monitor it carefully.
- Oversize foods, metal foil packages and utensils must not be inserted in the brick oven as they may involve a risk of fire or electric shock.
- A fire may occur if the brick oven is covered or touching flammable materials such as curtains, draperies and walls when in operation. Do not store any items on top of the appliance when in operation. Do not operate under wall cabinets.
- Do not clean with metal scouring pads. Pieces can break off the pad and touch electrical parts, involving a risk of electric shock.
- Do not attempt to dislodge food when the brick oven is plugged into an electrical outlet.
![]()
To avoid possibility of fire, NEVER leave the brick oven unattended during use.- Use recommended temperature settings for baking and roasting.
- Do not rest cooking utensils or baking dishes on glass door.
- Turn the function dial to the off position to turn off brick oven.
SAVE THESE INSTRUCTIONS
FOR HOUSEHOLD USE ONLY
SPECIAL CORD SET INSTRUCTIONS
A short power supply cord is provided to reduce the risks resulting from becoming entangled in or tripping over a longer cord.
Longer extension cords are available and may be used if care is exercised in their use.
If a long extension cord is used, the marked electrical rating of the extension cord must be at least as great as the electrical rating of the appliance, and the longer cord should be arranged so that it will not drape over the counter top or tabletop where it can be tripped over or pulled on by children.
NOTICE
This appliance has a polarized plug (one blade is wider than the other). As a safety feature, this plug will fit in a polarized outlet only one way. If the plug does not fit fully in the outlet, reverse the plug. If it still does not fit, contact a qualified electrician. Do not attempt to defeat this safety feature.
INTRODUCTION
Get ready to enjoy all the benefits of a real brick oven right at home! Bread and pizza crusts will be lighter and crispier, chickens will roast to a perfect golden brown, and your pies will be the talk of the town! Cuisinart lets you decide which method to use in cooking family favorites or company cuisine. We've even included some of our favorite brick oven recipes in case you run out of your own. Have fun savoring even more of the good life, with Cuisinart!
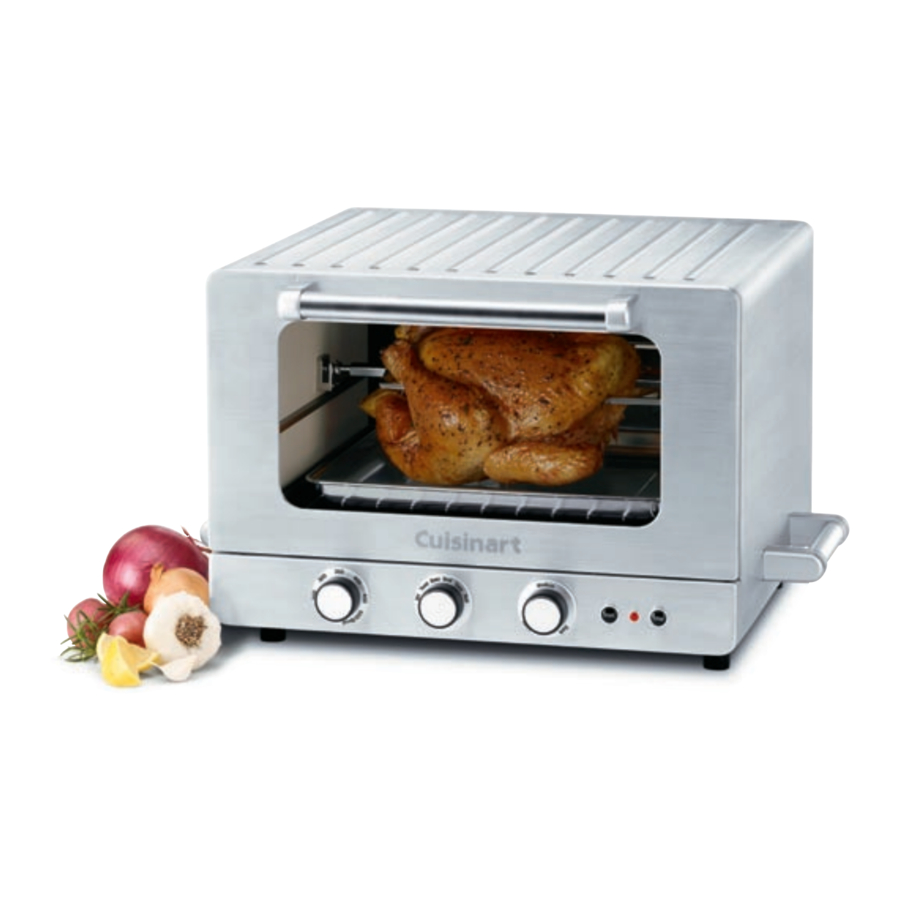
PARTS AND FEATURES

- Temperature Dial
Select desired temperature for the baking, broiling, convection bake or rotisserie. - Function Dial
Select cooking method – Toast, Bake, Broil, Convection Bake or Rotisserie. - Toast Shade Dial
Select the desired toast shade – light, medium or dark. - Toasting Start Button
Push button to start toasting. - Toasting Stop Button
Push button to stop toasting in midcycle and shut off oven. - Oven On Indicator
Indicator light will remain lit when oven is in use. - Oven Racks (only one is shown)
There are two oven racks and two different levels for each rack. Select the best position for the food in relation to the heating element. The top rack has a 50% stop feature so the rack stops halfway out of the oven. It can be removed by lifting the front of the rack and sliding it out.
- Rotisserie Skewers and Rotisserie Fork
The rotisserie skewers are used to secure the food and to place the food into position in the oven to rotate freely for the rotisserie function. - Rotisserie Sockets (not shown)
The rotisserie sockets are located on the left and right wall in the center of the oven and hold the skewers. - Rotisserie Lift Handle
Makes removing the hot rotisserie skewers and cooked food safe and easy. Slips into skewer to remove it from sockets and lift it out of oven. - Slide-out Crumb Tray (not shown)
Slides out from back of the brick oven for easy cleaning. - Cord Storage (not shown)
Takes up excess cord and keeps countertop neat. - Easy-Clean Interior (not shown)
To clean the bricks lining the sides of the oven, use a clean, damp cloth. Over time the stone will darken, which is part of its natural seasoning process. It will not affect cooking performance nor taste of food. Where there are no bricks, the walls are coated with a nonstick interior. - Baking Tray/Drip Tray with Broiling Pan
A baking tray/drip tray is included for your convenience. A broiling pan is also included for use when broiling. The broiling pan has two positions to accommodate a variety of meats, poultry and fish (see Oven Rack Positions). - Baking Stone
To achieve best results when baking bread, pizza and pie crusts, a baking stone is included. The stone absorbs excess moisture and distributes heat
BEFORE THE FIRST USE
Place your oven on a flat surface.
Before using your oven, move it two to four inches away from the wall and from any objects on the countertop. Do not use on heat-sensitive surface.
OBJECTS SHOULD NOT BE STORED ON THE TOP OF THE OVEN. IF THEY ARE, REMOVE ALL OBJECTS BEFOREYOU TURN ON YOUR OVEN. THE EXTERIOR WALLS GET VERY HOT WHEN IN USE. KEEP OUT OF REACH OF CHILDREN.
Unwind the power cord. Check that the crumb tray is in place and that there is nothing in the oven. Plug power cord into the wall outlet.
OVEN RACK POSITIONS

GENERAL GUIDELINES
BAKING
The baking function can be used as you would normally use your kitchen oven for roasting meats, including chicken, or baking cakes, cookies and more.
Your brick oven is equipped with two oven racks and rack positions. The racks can be easily removed and arranged at various levels. For best results with conventional baking, do not use more than one rack at a time.
To bake, turn the temperature dial to the desired temperature and turn function dial to bake position. Make sure oven rack is in position B – see rack position diagram above. The oven indicator light will turn on. Preheat oven for five to ten minutes (time will vary depending upon desired temperature); then begin to bake.
Baking Stone
To bake with the baking stone, preheat the oven with the stone for 30 minutes. Use the baking stone when baking bread, pizza dough, pies and tarts; use whenever you want a firm, crispy bottom on your baked goods.
CONVECTION BAKING
Convection baking/roasting uses a fan to circulate heated air around food as it cooks.
The convection/bake function can be used for all the same functions as conventional bake or roast, but will cook faster and more efficiently. With convection baking the key is the airflow, so it is important to use the right cooking pan and place it in the oven as directed in the rack position diagram.
For best results use cookie sheets with no sides and baking dishes, baking stones and roasting pans with very low sides to let maximum airflow reach food. For the same reason, do not cover foods while cooking.
Most baking recipes recommend reducing temperatures by 25 degrees when using the convection feature. Always check for doneness 10 minutes before suggested cooking time.
For roasting larger items such as poultry or roasts, use the recommended temperature but reduced cooking time. Start checking progress 20 to 30 minutes before end-cook time.
To convection bake: Turn the temperature dial to desired temperature and turn function dial to convection/bake position. If food might drip, place the baking tray on the rack below the rack that the food is on. Tray will catch drips and more airflow will reach food.
When using the baking tray in the bottom rack position, center it so air flows in back, as well as front of oven.
BROILING
The broiling function can be used for beef, chicken, pork, fish and more. It also can be used to top-brown casseroles and gratins. Use caution while broiling: Aluminum foil is not recommended for covering the broiling pan when broiling, because it will cover the holes in the drip tray. When broiling fatty foods, grease will accumulate and may cause a fire.
There are two positions for the broiling pan and drip tray to accommodate a variety of thicknesses of foods to be broiled (positions A and B). Also, the oven rack can be turned up or down (position C) depending on the thickness of the food being broiled. In most cases the oven rack should be in the higher position.
To broil, set temperature and function dials to broil. Preheat oven for five minutes with door closed. After the five minute preheat period, place the broiling pan in the oven. Always leave the door ajar when broiling.
To stop broil operation: turn function dial to off position.
NOTE: Never use glass oven dishes to broil.
TOASTING
For even toasting, always have the rack in rack position B, indicated in the rack position diagram above. Always center your item/items in the middle of the rack. To toast, make sure the oven rack is in position B as indicated in the diagram. If toasting two items center them in the middle of the rack. Four items should be evenly spaced – two in front, two in back. Six items – three in front, three in back. Door should be closed.
Browning Selection
Set function dial to toast. Turn toast shade dial to desired browning setting.
Press start button to begin toasting.
Stop Toasting
When the toasting cycle is finished, the oven will beep and turn off. If you wish to stop the toasting cycle before it is finished, simply press the stop button. The toaster oven broiler will cancel your toast cycle.
Important Notes on Toasting
The oven rack must be in position B as indicated in the rack position diagram.

Placing the rack in the bottom position or in the top position with the rack upward while toasting may result in a fire. Refer to rack position diagram for proper use.
ROTISSERIE
When using the rotisserie function, it is helpful to line the baking tray with foil and place it in the bottom back position to catch drips. Start the rotisserie in a cold oven.
When using the rotisserie function, items should not exceed 4 lbs.
To ensure even cooking, firmly tie meat and poultry with butcher's twine or string before securing to rotisserie skewers.
For crispy skin, leave door ajar for the last 15 minutes of cooking time.
To use the rotisserie function properly, please follow the diagrams below:
Trussing a Chicken/Using the Rotisserie
- Use a string that is about 4 to 5 times the length of the chicken.
- Place the middle of the string under the tail. Wrap the string around the tail.
![]()
- Wrap each of the strings around the end of each drumstick.
![]()
- Pull to draw the legs together, crossing strings over each other again.
![]()
- Turn the chicken over and tie the string across the wings to hold the wings 6 in place. Trim ends of string if necessary.
![]()
- Place the rotisserie skewer through the center of the roast or chicken.
![]()
- Insert the rotisserie forks on either side of the roast or chicken and secure with the rotisserie screws to hold the roast or chicken firmly in place.
![]()
- Place the assembled rotisserie in the cold oven. Secure the skewered roast or chicken into the rotisserie sockets.
![]()
- Set the function to Rotisserie.
- Set the temperature as specified in recipe.
- Cook according to instructions.
- To remove cooked food: Using the rotisserie lift handle, hook the grips on the skewer and carefully lift food out of the oven. Always use a potholder or oven mitt when removing hot food from oven.
![]()


Note: The ends of the rotisserie skewers are marked with L for left side and R for right side of oven. Use this as a guide for inserting the assembled rotisserie into the sockets.
TURNING OFF THE BRICK OVEN
Turn the function dial to off. The indicator light will turn off.
CLEANING AND MAINTENANCE
- Always allow the oven to cool completely before cleaning.
- Always unplug the oven from the electrical outlet before cleaning.
- Do not use abrasive cleansers, as they will damage the finish. Simply wipe the exterior with a clean damp cloth and dry thoroughly. Apply the cleansing agent to a cloth, not to the toaster oven, before cleaning.
- Where there are no bricks, the walls are coated with a nonstick interior. To clean interior walls, use a damp cloth and a mild liquid soap solution or a spray solution on a sponge. Never use harsh abrasives or corrosive products. These could damage the oven surface. Never use metal scouring pads, etc. on interior of oven. DO NOT USE A SOAP SOLUTION TO CLEAN THE BRICKS ATTACHED TO THE SIDES.
- To remove crumbs, slide out the crumb tray and discard crumbs. Wipe clean and replace. Crumb tray is dishwasher-safe. To remove baked- on grease, soak the tray in hot sudsy water or use nonabrasive cleaners. Never operate the oven without the crumb tray in place.
- Wire rack, broiling pan and baking/drip tray are dishwasher-safe. If heavily soiled, soak in hot sudsy water or use a nylon scouring pad or nylon brush.
Never wrap the cord around the outside of the oven. Use the cord storage cleats on the back of the oven.
To clean the baking stone
The baking stone is oven and freezer safe; however, to prevent cracking it, do not subject the stone to extreme temperature variations such as from freezer directly to oven, or from oven to cold water.
Do not use the stone on an open flame.
Allow the stone to cool before cleaning. To remove baked-on foods, scrape with a wooden or plastic spatula and rinse in warm water. Do not soak or clean in dishwasher or wash with detergent or soapy water; the stone may absorb the taste and smell of the detergent. Let the stone air-dry completely before your next use.
Your baking stone will darken and retain some staining with continued use over time. This is normal and part of the stone's natural seasoning process; it will not affect its cooking performance nor affect the taste of the food.

After cooking greasy foods and after your oven has cooled, always clean top interior of oven. If this is done on a regular basis, your oven will perform like new.
All of our recipes have been tested in our kitchen and especially developed to work in the Cuisinart™ Brick Oven Premier. These mouth-watering recipes are just a sampling of what the Cuisinart™ Brick Oven Premier can do.

Documents / ResourcesDownload manual
Here you can download full pdf version of manual, it may contain additional safety instructions, warranty information, FCC rules, etc.
Advertisement


Need help?
Do you have a question about the BRK-300 and is the answer not in the manual?
Questions and answers