
Related Manuals for Sartorius Arium Comfort I H2O-I Series


Summary of Contents for Sartorius Arium Comfort I H2O-I Series
- Page 1 Operating Instructions Arium Comfort I, Comfort II ® Water Purification Device 1000025327...
-
Page 3: Table Of Contents
Contents Contents 1 About these Instructions . . . . . . . . . . . . . . . . . . . . . . . . . . . 5 8 System Menu . - Page 4 10 Malfunctions . . . . . . . . . . . . . . . . . . . . . . . . . . . . . . . . . . . . . . 81 10.1 Warning Messages .
-
Page 5: About These Instructions
If you give the device to others to use, give them these instructions too. If these instructions are lost, please contact Sartorius for a replacement or download the latest manual from our website: www.sartorius.com Applications Advice | Technical Support Contact addresses for application advice and our technical support can be found online at: www.sartorius.com... -
Page 6: Safety Information
Safety Information Safety Information Please read the following safety information thoroughly and follow the instructions exactly. This information is designed to ensure your safety and will prevent damage to your Arium Comfort system. ® − The device comes with a power supply with a built-in grounding conductor. -
Page 7: Intended Use
Comfort, do not touch the ® bulb with your bare hands. Fingerprints can cause damage to the bulb. − Never connect peripheral devices to the device interfaces unless they have been recommended by Sartorius. This will prevent damage to your Arium Comfort system. ®... -
Page 8: Product Description
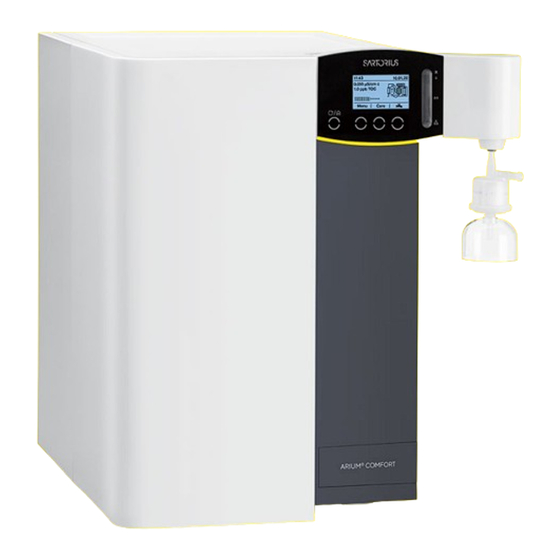
Product Description Product Description Arium Comfort Front View ® Pos . Description Display and control panel Sampling (ultrapure water) with sterile final filter Door Operating Instructions Arium Comfort I, Comfort II ®... - Page 9 Product Description The Arium Comfort systems from Sartorius combine the production of ® pure and ultrapure water in a single system. Directly connect the systems to the potable water and purify the water in two stages. In the first stage,...
-
Page 10: Arium ® Comfort I Flow Diagram
Product Description Arium Comfort I Flow Diagram ® Conductivity measurement LFR (RO permeate) Conductivity RO module #1 measurement LFF RO module #2 (feed water) Pre-treatment cartridge Inlet Pump (feed water) Outlet (waste water) UV lamp (185|254 nm) Pump Arium Inlet ®... -
Page 11: Arium ® Comfort Electrical Connections
Display port for connecting the dispenser unit (on below-bench units) RS232 serial interface with a 9-pin sub-D port for connecting a printer (Sartorius YDP30) Arium Exchange interface (for Sartorius Service personnel only) ® Connection for Arium Bagtank ® Connection for optional foot switch... -
Page 12: Arium ® Comfort Tubing Connectors
Product Description Arium Comfort Tubing Connectors ® Tubing connectors, side view right Pos . Description Tank outlet for supplying the Bagtank with pre-treated water Outlet connection for Arium Smart Station or dispense gun ® (output) Inlet for Arium Smart Station or dispense gun (input) ®... -
Page 13: Operating Concept
Operating Concept Operating Concept Operate your Arium system using the control panel and the display. The ® control panel features four function keys and a continuously variable slider. The keys are described in the figure below. The display shows system information and menu items. -
Page 14: Operation In The Operating Mode
Operating Concept Working When your Arium is in the operating mode, the ® environment working environment displays the following information: − The current conductivity of the product water (and the current water temperature without compensated conductivity display) − The current TOC value of the product water (for systems with a UV lamp &... - Page 15 Operating Concept Pos . Description Function “Eco/Home” The Eco/Home key is used to activate the “Eco mode”. In the Eco mode, the ultrapure water in your Arium Comfort system is recirculated every hour ® for 15 minutes. The purpose of this is to guarantee high water quality even during longer periods of operation.
-
Page 16: Navigation In The Menus
Operating Concept Navigation in the Menus The L, M, R keys and the Eco/Home key are available for navigating within Menu r Settings the menus. The slider has no function here. The keys (L), (M) and (R) have Displayed values different functions depending on the menu item selected. - Page 17 Operating Concept Inputting Numbers There are various places where numbers must be entered (example r r Limits “Conductivity limit value for ultrapure water”). Numbers that have several digits are entered digit by digit from right to left. Enter the first digit with the Set LFP limit: arrow keys “...
-
Page 18: Unpacking And Installation
Unpacking and Installation We recommend that you have the set-up and initial startup of your Arium ® Comfort system carried out by a qualified Sartorius service technician. Unpacking Remove your Arium Comfort system from its packaging. You will find the ®... -
Page 19: Installation
Unpacking and Installation Pre-treatment cartridge, softeners (on Comfort II version), ultrapure water cartridge, bags and Bagtank are not part of the equipment supplied with the Arium Comfort system and must be purchased separately. ® Installation WARNING Danger of electric shock! Do not place your Arium Comfort system on top of electrical equipment. -
Page 20: Wall Mounting
Unpacking and Installation Wall Mounting If you order a wall-mounted system, your Arium Comfort is supplied with a ® wall bracket to enable you to attach the system securely to the wall so that it occupies a minimum amount of space. A clear wall area of 63 × 63 cm is required. -
Page 21: Below-Bench Mounting
(H20-ACK-D) is available for this option. In order to ensure the correct operation of the device, the conversion should always be carried out by Sartorius Service. The wall mounting bracket for the display | dispenser unit is included with the conversion kit. Further information is available from Sartorius Service. -
Page 22: Arium ® Bagtank
Unpacking and Installation Arium Bagtank 20 Arium Bagtank 50 Arium Bagtank 100 ® ® ® Stores product Stores product water in Stores product water in two water in a 20 liter a 50 liter plastic bag 50 liter plastic bags plastic bag Without pressure With built-in pressure... -
Page 23: Initial Startup
Initial Startup Initial Startup Once the Arium Comfort and Arium Bagtank have been set up and ® ® connected, you can put your system into operation. NOTICE According to device specifications (Arium Comfort and Arium Bagtank), ® ® this requires a supply voltage of 230 - 240 V, 50 Hz or 115 V, 60 Hz, depending on the country standard. -
Page 24: Setting The Date And Time
After startup, the displayed values can be changed in the open menu item: Settings r Displayed values (see Chapter "8.3.1 Displayed Values", page 43). iJust For optimal operation of the system, Sartorius recommends using the iJust iJust function. Use this function to enter values for CO and water hardness of Water hardness and CO2 the feed water. -
Page 25: Water Hardness
Initial Startup 6.5.1 Enter the CO value of the feed water. CO2 value of feed water: 13.0 mg/l The available setting range is from 0.1 to 99.9 mg/L. An upper limit of 40 mg/L (ppm) applies to the Arium Comfort II system. -
Page 26: Purification Component Installation
Initial Startup Connect the sensor cable of the Arium Bagtank to port 6 (see ® Tank Volume Chapter "3.3 Arium Comfort Electrical Connections", page 11) of ® Make the electrical your Arium Comfort system. ® connection between the Bagtank and the device If the sensor cable has already been connected, this prompt does not appear. - Page 27 Initial Startup Pre-treatment cartridge installation (pre-filter) Installation of the prefilter is likewise described in the installation instructions accompanying the prefilter. Remove the new prefilter from the packaging and write the date of installation under “Date of installation” on the label. Open the device door.
- Page 28 Initial Startup Softener Installation (on Comfort II version only) Installation of the softener is likewise described in the installation instructions accompanying the softener. Remove the new softener from the packaging and write the date of installation under “Date of installation” on the label. Open the device door.
- Page 29 Initial Startup Ultrapure Water Cartridge Installation Remove the new cartridge from the packaging and write the date of installation under “Date of installation” on the label. To facilitate the connection of the adapter to the cartridge, don gloves to moisten the O-rings (1) on the connection adapter with distilled water. Avoid direct contact with skin at the connections in order to prevent any microbial contamination.
-
Page 30: System Rinsing
Initial Startup System Rinsing Connecting Feed Water Tubing (Inlet) and Rinse Water Tubing (Drain) to Startup the Arium Comfort System. Use the pre-assembled tubing from the ® Connect the feed water tubing Arium Comfort accessories. Guide the tubing to the drain. Next, open ®... -
Page 31: Start Tank Filling
Initial Startup The Arium Comfort system is rinsed. The remaining rinsing time is ® Startup shown on the display. Rinsing 50.0 min Cancel The timers for the RO modules, prefilter, softener (Comfort II version only) and cleaning (system cleaning and bag replacement) are reset after rinsing. Start Tank Filling Connect the “Tank Outlet”... -
Page 32: Conclude Startup
Initial Startup 6.10 Conclude startup Connect the power supply on the Arium Bagtank to the mains supply. ® Startup Then, turn the Arium Bagtank on via the power switch (right side on the ® Connect the Bagtank power bottom). cord to the power supply Only one Arium Bagtank 50 or 100, each with built-in pump, is equipped ®... -
Page 33: Inserting Final Filter
Initial Startup 6.11 Inserting Final Filter Remove sampling tubing from the dispenser unit and attach final filter. Startup Remove sampling tubing and attach final filter as described in the Operating Instructions Pos . Description Quick connector Vent valve Bell assembly The final filter is supplied together with a bell assembly. -
Page 34: Operation
Operation Operation Once initial startup is complete, your Arium Comfort system will be in the ® operating mode. The pre-stage continuously fills the Arium Bagtank until it ® is completely filled. At the same time, you can dispense ultrapure water. Operating Mode If the connected Arium Bagtank is completely full, backflushing takes place... -
Page 35: Dispensing Ultrapure Water
Operation Dispensing Ultrapure Water Water can be dispensed manually, volume-controlled or time-controlled. When dispensing product water, pay attention to the following aspects: Prior to dispensing the water, remove the protective cap on the bell assembly of the final filter. After dispensing the water, replace the protective cap back on the bell assembly. -
Page 36: Volume-Controlled Dispensing
Operation 7.2.2 Volume-Controlled Dispensing To perform volume-controlled dispensing, place an appropriately large vessel under the water outlet and in the operating mode press the (R) “ ” key. The currently set dispensing volume is shown in the display. For setting Dispense the dispensing volume, switch to volume entry. -
Page 37: Time-Controlled Dispensing
Operation 7.2.3 Time-Controlled Dispensing To perform time-controlled dispensing, place an appropriately large Dispense vessel under the sampling outlet and in the operating mode press the Set favorites (R) “ ” key. Volume-controlled The currently set dispensing time is shown in the display. To change the 0.2 l dispensing time, select Set dispensing time. -
Page 38: Favorite Screen
Operation 7.2.4 Favorite Screen Via the dispensing menu of your Arium , you can also configure and activate ® 11:43 10.04.15 a Favorite mode. 0.055 µS/cm c In the Favorite mode, you have the option of selecting manual water 21.0 °C dispensing using the slider and volume-controlled water dispensing via the 1.0 ppb TOC function keys (L), (M), (R). -
Page 39: Ultrapure Water Dispensing Through
Operation 7.2.5 Ultrapure Water Dispensing through the Sampling Tubing Water can also be dispensed through the sampling tubing included with the equipment supplied. It may be advisable to use the outlet tubing when, for example, you need to fill a larger vessel. To connect the tubing, proceed as follows: Release the final filter from the quick connector on the display | dispenser unit by simultaneously pulling out the filter and pressing the... -
Page 40: System Menu
System Menu System Menu Press “Menu” in the operating mode to access the System menu. All Menu configuration options in the System menu are described in the following. Save Data Settings Menu Tree System Status Back The following figure shows the menu of the Arium Comfort system. -
Page 41: Save Data
Print when dispensing are activated. The checkboxes all show active Save data functions. Printer For data printing, a data printer of the type Sartorius YDP30 should be used. SD Card For digital data storage, an SD memory card can be inserted in the Arium ®... -
Page 42: Single-Item Save
System Menu 8.2.2 Single-item Save To start a Single printout and | or Save once procedure, select under Menu Save data the item Single printout and | or Save once. The selected parameters are output. Afterwards, the system switches to the operating mode. -
Page 43: Displayed Values
System Menu 8.3.1 Displayed Values Under Menu Settings Displayed values, you can set the unit in which r r Displayed values the conductivity and | or the temperature will be indicated in the display. Conductivity Temperature Back ... -
Page 44: Limit Values
System Menu 8.3.2 Limit Values Under Menu Settings Limit Values you can define the minimum r r Limits requirements for pure water (tank) and ultrapure water (dispensing). If the set conductivity limit value is exceeded (unit: µS/cm) and | or below the range (unit: MΩcm), your Arium Comfort system issues a warning message. - Page 45 You can also use an approximate CO value from the following diagram. Sartorius recommends using test sticks to determine the water hardness. A suitable pH meter should be used to measure the pH value. You can also determine the CO content using a CO quick test.
-
Page 46: Eco-Mode
System Menu 8.3.4 ECO-Mode For economic and ecological operation of the system, we recommend that r r ECO-Mode you switch the Arium Comfort system to Eco mode when no water is being ® dispensed. In the Eco mode, the water in the system is recirculated every Automatic ECO mode: hour for 15 minutes. -
Page 47: Accessories
− Continuous − Off The default setting is one-hour interval measurement. This setting is recommended by Sartorius. For TOC critical applications, you can also select the continuous measurement mode. Please consider that continuous measurements can impact cartridge capacity. TOC Display In the operating mode, the measured TOC value is regularly indicated in the display for one hour and | or until the follow-up measurement is performed. -
Page 48: Dispense Gun
To ensure accurate TOC measurements after replacing the UV radiator, the TOC monitor must be recalibrated by Sartorius Service. The normal service interval for recalibration is one year. If your TOC measurements are more frequent, the UV radiator ages faster. -
Page 49: Foot Switch
System Menu 8.3.9 Foot Switch Under Menu Settings Accessories Foot switch, you can adapt a foot r r r Foot switch switch connected to the Arium Comfort (see Chapter "13 Accessories and ® Manual Replacement Parts", page 93) to the required operating mode (manual, Volume-controlled volume-controlled, time-controlled). -
Page 50: Date | Time
System Menu 8.3.11 Date | Time Under Menu Settings Date | Time, you can configure the settings for r r Date/Time date and time. In the first step, enter the desired format; in the second, the DD.MM.YY 24 h date and the time. -
Page 51: Pin
System Menu 8.3.15 Pin This function lets you limit access to the Menu Settings and the Care r r PIN modes. If you have active PIN protection, these two sections can only be Status: Inactive accessed by entering a PIN. Change PIN The PIN protection function is located under Menu ... -
Page 52: Measured Values
Service telephone number: − Service telephone number (can be entered by a local service techni- www.sartorius.com cian – Sartorius Internet address is displayed here when the device is Next maintenance due in 32 shipped for delivery) weeks − Next maintenance (only if a service | maintenance contract exists) -
Page 53: Warnings
System Menu 8.4.5 Warnings Under menu item Menu System status Warnings, you can display r r Warnings activated and cancelled (history) warning messages. Both lists comprise the Active warnings last 20 entries at most. History Back Chapter "10 Malfunctions"... -
Page 54: Care And Maintenance
Care and Maintenance Care and Maintenance The main menu Care contains the maintenance section for your system. Care Start system cleaning You have access to the following options: Start bag replacement − Start system cleaning Replace prefilter − Start bag replacement Replace RO module(s) −... - Page 55 Care and Maintenance The Arium Comfort system has the following factory-set care intervals. ® Component Interval System cleaning 2 – 4 months, depending on the water hardness of the feed water Replace bag 6 months Replace prefilter 3 months Replace RO module(s) 12 –...
-
Page 56: System Cleaning
® The interval for system cleaning can be 2 – 4 months. This depends on the water hardness of the feed water. Sartorius distinguishes between hard (every 2 months), medium (every 3 months) and soft (every 4 months). The water hardness entered for the iJust function determines the interval. If the iJust function is deactivated, the interval is 3 months. - Page 57 Care and Maintenance System cleaning is started under Care r Start system cleaning. It takes approx. 100 minutes and cannot be cancelled. Prepare alkaline cleaning solution. Pour at least 1 liter of water (if possible, r r System cleaning RO water) into a 1.5- to 2-liter container and add “Alkaline Cleaner Prepare alkaline cleaning Solution 1”.
- Page 58 Care and Maintenance Disconnect the “Tank Outlet“ (4) tubing from your Arium Bagtank (5). ® r r System cleaning Disconnect “Tank outlet” tubing from tank The tank valve (6) (ball cock) on the “Tank Outlet” tubing (4) must remain open during system cleaning. Attach the “Tank Outlet“...
- Page 59 Care and Maintenance Start the rinsing process. r r System cleaning Start rinsing process Start Flush out the alkaline cleaning solution with a ten-minute flushing and r r System cleaning rinsing process. Rinsing 10 min Cancel You can cancel the rinsing process “ ”...
- Page 60 Care and Maintenance Rinse the Arium Comfort system with the acid solution for 30 minutes. ® r r System cleaning Cleaning 30 min Cancel You can cancel the cleaning process using the (L) “ ” key. Cancel Information and Instructions on Disposal “Acid Cleaner Solution 2” This solution can generally be emptied down the drain after the cleaning process;...
-
Page 61: Start Bag Replacement
Bagtank at the power switch. The bag replacement is ® complete. With TOC critical applications, Sartorius recommends rinsing the bag after the bag has been replaced (see Chapter "9.6 Tank Rinsing", page 70). Operating Instructions Arium Comfort I, Comfort II... -
Page 62: Replace Prefilter
You should replace the prefilter when the water quality falls below the limits that you defined. Sartorius recommends replacing the prefilter at least every 3 months. Under Care Replace prefilter, start replacing the prefilter. - Page 63 Care and Maintenance Follow the corresponding instructions on the display. If you likewise want Care r Prefilter to replace the softener, carry out replacement in this step. The procedure Replace the prefilter and for replacing the softener is described in Chapter "9.5 Replace Softener softener according to the (on Comfort II version only)", page 68.
- Page 64 Care and Maintenance Remove the old prefilter by unscrewing the upper gray (3) and lower red (4) tubing connections. Remove the new prefilter from the packaging and write the date of installation under “Date of installation” on the label. Connect the new prefilter. Connect the upper gray (3) and the lower red (4) tubing connectors.
-
Page 65: Replace Ro Modules
Care and Maintenance Replace RO Modules The Arium Comfort system is supplied with potable water. During ultrapure ® water purification (tank water), the potable water is cleaned through RO modules. Potable water contains salts, microorganisms and particles which can lead to blockages in the RO modules. To remove these blockages, the RO modules are cleaned regularly with the system cleaning function. - Page 66 Care and Maintenance Follow the corresponding instructions on the display. If you likewise want Care r RO Modules to replace the prefilter and softener, carry out replacement in this step. Replace the RO modules, The procedures for replacing the prefilter and softener are described in prefilter and softener Chapters 9.3 and 9.5.
- Page 67 Care and Maintenance Start the rinsing process. Care r RO Modules Start rinsing process Start The new RO modules and | or the prefilter and | or softener are rinsed for Care r RO Modules 60 minutes. Rinsing 60 min Cancel Connect the “Tank Outlet”...
-
Page 68: Replace Softener (On Comfort Ii Version Only)
Care and Maintenance Replace Softener (on Comfort II version only) Under Care Replace softener you can replace the softener. Disconnect “Tank Outlet” tubing from the Arium Bagtank (“IN” tank ® Care r Softener connection) and attach it to the drain. Disconnect “Tank outlet”... - Page 69 Care and Maintenance Open the door on your Arium Comfort systems and push the ultrapure ® cartridge (1) to the side. Remove the softener (2) from the holder. Remove the old softener by unscrewing the upper blue (3) and lower gray (4) tubing connections.
-
Page 70: Tank Rinsing
Tank Rinsing A new bag may give off TOC into the pure water it contains. If you need water for TOC-critical applications after a bag replacement, Sartorius recommends rinsing the bag first. The tank rinsing duration depends on the following parameters: −... -
Page 71: Backflushing
Care and Maintenance For tank rinsing, toggle to the menu item Care Tank rinsing . Start Tank rinsing. Tank rinsing Start tank rinsing Cancel Start During tank rinsing, the tank is first filled completely, then emptied Tank rinsing completely, then filled again and emptied once again at the end. The display shows the progress of the tank rinsing. -
Page 72: Replace Uv Lamp (Only Systems With Uv Lamp)
A warning message to replace the UV lamp will automatically appear in the display after the 1-year interval expires. Sartorius recommends replacing the UV lamp once a year. If the replace- ment interval exceeded, specification-compliant water quality is no longer guaranteed. - Page 73 Care and Maintenance Unscrew the cover cap by turning counterclockwise (3) and push it back along the cable (4). Carefully unplug the adapter from the UV lamp (5). Carefully remove the old UV lamp unit from the stainless steel chamber (6). Carefully insert the new UV lamp into the stainless steel chamber.
-
Page 74: Replace Cartridge
Replace Cartridge The service lifetime of the cartridge is directly dependent on the quality and volume of the feed water to be treated. Sartorius recommends replacing the cartridge once every year. If the ultrapure water quality (sampling) has already dropped below the user’s set limit value (see Chapter "8.3.2 Limit Values", page 44), you should replace the cartridge earlier. - Page 75 Care and Maintenance Water can easily leak from the adapter. Remove the cartridge. Remove the new cartridge from the packaging and write the date of installation under “Date of installation” on the label. To facilitate the connection of the adapter to the cartridge, don gloves to moisten the O-rings (3) on the connection adapter with distilled water.
-
Page 76: Changing The Final Filter
− The product water flow rate is reduced − Bacteria breakthrough has been detected − Endotoxin breakthrough has been detected Sartorius recommends changing the final filter monthly. The final filter is supplied together with a bell assembly. To replace the final filter, proceed as follows: Release the old final filter from the quick connector on the display / dispenser unit by simultaneously pulling out the filter and... - Page 77 Care and Maintenance Pos . Description Quick connector Vent valve Bell assembly Attach the bell assembly to the final filter. Press the new final filter into the quick connector of the display | dispenser unit. To rinse and to vent the final filter: Remove the specified amount of water (water dispensing volume, see instructions for the Sterile Plus or Cell Plus final filter), e.g.
-
Page 78: Configuration Of Reminder To Replace
Information. 9.12 TOC Rinsing (for System with UV Lamp & TOC) Sartorius recommends regularly rinsing the TOC instrument in the operating mode “off”. The rinsing process is started under the Care Rinse TOC menu. -
Page 79: Depressurization
Care and Maintenance 9.13 Depressurization It is necessary to depressurize the system when replacing the UV lamp, for example. Additionally, Sartorius recommends you depressurize your Arium ® Comfort system prior to transport. In the latter case, the step “Restart after depressurization”... -
Page 80: Replacing Electrical Fuses
Care and Maintenance Restart after depressurization Next, switch your Arium Comfort system back on via the power switch. ® Care Rinsing The system starts up. Next, connect the tubing for device operation Connect the tubing for device according to the operating instructions. operation according to the operating instructions Place a vessel (1l) under the water outlet and start the rinsing process. -
Page 81: Malfunctions
Malfunctions 10 Malfunctions The Arium Comfort alerts the user to warnings and errors both visually, and, ® if the function is activated, with acoustic signals. There is an option that allows you to activate | deactivate the acoustic signals (see Chapter "8.3.13 Acoustic Signals", page 50). The visual signal with warning or error messages (change of the backlighting in the display) is activated as a basic feature and cannot be deactivated. - Page 82 Malfunctions Display Cause Warning Softener (on Comfort II version) Timer has expired Replace softener Bag tank Warning Tank contents Tank contents < 15% Warning Cleaning Timer has expired System cleaning required Warning Timer has expired Bag replacement required UV lamp Warning Timer has expired Change UV lamp...
-
Page 83: Error Messages
Malfunctions Confirm the warning message by pressing OK. This takes you back to the operating mode display. Remedy the cause of the warning message. Please contact Sartorius Ser vice if required. Device water production is still active. 10.2 Error Messages Error messages cause the background color of the display to turn red. - Page 84 Malfunctions Error code Cause Display 0170 Inlet pressure Error 0170 (on Comfort I version) Inlet pressure too low Input pressure too low An inlet pressure of > 0.5 bar (≤ 0.5 bar) is required 0170 Inlet pressure Error 0170 (Comfort II version) Inlet pressure too low Input pressure too low An inlet pressure of >...
-
Page 85: Disposal
WARNING Danger of injury due to contaminated equipment! Devices contaminated with hazardous materials (NBC contamination) will not be accepted by Sartorius for repair or disposal. 11.2 Disposing of Device and Parts 11.2.1... -
Page 86: Disposal
Take the UV lamp to an approved disposal facility for hazardous substances. Dispose of the device. Follow the disposal instructions on our website (www.sartorius.com). Inform the disposal facility that batteries have been installed in the device. Dispose of the packaging in accordance with local government regulations. -
Page 87: Technical Specifications
Plug connection 9-pin D-sub port Transmission rate 9600 baud Data bits Parity odd (space for Sartorius data printer) Stop bits SD card Standard SD card, max. 4 GB, FAT formatted Display port Alternative port for connecting the dispenser unit (on below-bench units) - Page 88 Technical Specifications Feed Water Requirements Exclusively potable tap water (feed water must meet drinking water standards of the USA, European Union and Japan). Conductivity: < 1500 μS/cm at 25 °C. Max. total hardness (max. CaCO ): 360 ppm TOC: < 2000 ppb Colloid index or SDI: <...
- Page 89 Technical Specifications Water Quality of the RO Pre-treatment Level Typical conductivity | resistivity < 20 μS/cm / 0.05 MΩcm Retention rate up to 99% Bacteria < 0.01 CFU/mL Particles No particles > 0.22 μm RO module specifications Retention rate for monovalent ions: up to 96% Retention rate for polyvalent ions: up to 96% Retention rate for microorganisms: up to 96% Retention rate for particulate contaminations:...
- Page 90 Plug connection 9-pin D-sub port Transmission rate 19200 baud Data bits Parity None (space for Sartorius data printer) Stop bits SD card Standard SD card, max. 4 GB, FAT formatted Display port Alternative port for connecting the dispenser unit (on below-bench units)
- Page 91 Technical Specifications Feed Water Requirements Exclusively potable tap water (feed water must meet drinking water standards of the USA, European Union and Japan). Conductivity: < 1500 μS/cm at 25 °C. Max. total hardness (max. CaCO ): 360 ppm TOC: < 2000 ppb Colloid index or SDI: <...
- Page 92 Technical Specifications Water Quality of the Pre-treatment Level Typical conductivity | resistivity 0.2 – 0.07 μS/cm / 5 – 15 MΩcm Retention rate up to 99% Bacteria < 0.01 CFU/mL Particles No particles > 0.22 μm RO module specifications Retention rate for monovalent ions: up to 96% Retention rate for polyvalent ions: up to 96% Retention rate for microorganisms: up to 96% Retention rate for particulate contaminations:...
-
Page 93: Arium ® Comfort Ii (H2O-Ii
Accessories and Replacement Parts 13 Accessories and Replacement Parts 13.1 Arium Comfort I ® 13.1.1 Consumables Order number Part description H2O-CPFCO-1 Pre-treatment cartridge, 1 pcs 613CPM4 Reverse osmosis module, 1 pcs 613CPM4-------V Reverse osmosis modules, 2 pcs H2O-C-PACK Comfort kit (ultrapure water cartridge for Comfort systems), 1 pcs 611CEL1 UV lamp, 1 pcs 5441307H4--CE... -
Page 94: Arium
Accessories and Replacement Parts Order number Part description 69Y03287 Printer thermal paper, 5 rolls 24 m each H2O-AFS1 Foot switch 610AWG1 Water guard H2O-ADP-20 Transport pump (230V) for Arium Bagtank ® H2O-ADP-20-US Transport pump (115 V) for Arium Bagtank ® H2O-ATR Rollers for Arium Bagtank 50 and 100... - Page 95 Accessories and Replacement Parts Order number Part description H2O-ARST-UP-B Smart Station dispensing unit ultrapure water, wall-mounted version H2O-ATES-UP Ultrapure water tube extension set H2O-ARST-P-T Smart Station dispensing unit pure water, benchtop version H2O-ARST-P-B Smart Station dispensing unit pure water, wall-mounted version H2O-ATES-P Pure water tube extension set YDP30...
-
Page 96: Ec | Eu Declaration Of Conformity
EC | EU Declaration of Conformity 14 EC | EU Declaration of Conformity Operating Instructions Arium Comfort I, Comfort II ®... -
Page 97: Declaration Of Conformity
UK Declaration of Conformity 15 UK Declaration of Conformity Operating Instructions Arium Comfort I, Comfort II ®... -
Page 98: Csa Certificate Of Compliance
Master Contract: 167555 Project: 70194029 Date Issued: November 27, 2018 Issued to: Sartorius Lab Instruments GmbH & Co. KG Otto-Brenner-Strasse 20 Goettingen, Niedersachsen 37079 GERMANY Attention: Dieter Klausgrete The products listed below are eligible to bear the CSA Mark shown with adjacent indicators 'C' and 'US' for Canada and US or with adjacent indicator 'US' for US only or without either indicator for Canada only. - Page 99 CSA Certificate of Compliance Master Contract: 167555 Certificate: 2265539 Date Issued: November 27, 2018 Project: 70194029 APPLICABLE REQUIREMENTS CAN/CSA-C22.2 No. 61010-1-12 (3 Safety Requirements for Electrical Equipment for Measurement, Control, and Laboratory Use, Part 1: General Requirements UL Std. No. 61010-1 (3 Safety Requirements for Electrical Equipment for Measurement, Control, and Laboratory Use - Part 1: General Requirements...
- Page 100 Sartorius Lab Instruments GmbH & Co. KG Otto-Brenner-Strasse 20 37079 Goettingen, Germany Phone: +49 551 308 0 www.sartorius.com The information and figures contained in these instructions correspond to the version date specified below. Sartorius reserves the right to make changes to the technology, features, specifications and design of the equipment without notice.
Need help?
Do you have a question about the Arium Comfort I H2O-I Series and is the answer not in the manual?
Questions and answers