GHOST CONTROLS AXWK - Wireless Keypad Manual
- Instructions (2 pages) ,
- Manual (10 pages) ,
- Manual (10 pages)
Advertisement
- 1 AXWK INSTRUCTIONS
- 2 ASSEMBLING YOUR KEYPAD IN 3 EASY STEPS
- 3 UNDERSTANDING NORMAL KEYPAD BEEPS AND LED'S
- 4 PROGRAMMING
- 5 SETTING UP YOUR MASTER PIN
- 6 TEACHING YOUR REMOTE TO THE KEYPAD
- 7 PROGRAMMING ADDITIONAL PINS FOR ACCESS
- 8 PROGRAMMING SPECIAL FEATURES (CAN ONLY PROGRAM USING MASTER PIN)
- 9 OUTDOOR MOUNTING PEDESTAL
- 10 TROUBLESHOOTING GUIDE
- 11 Documents / Resources
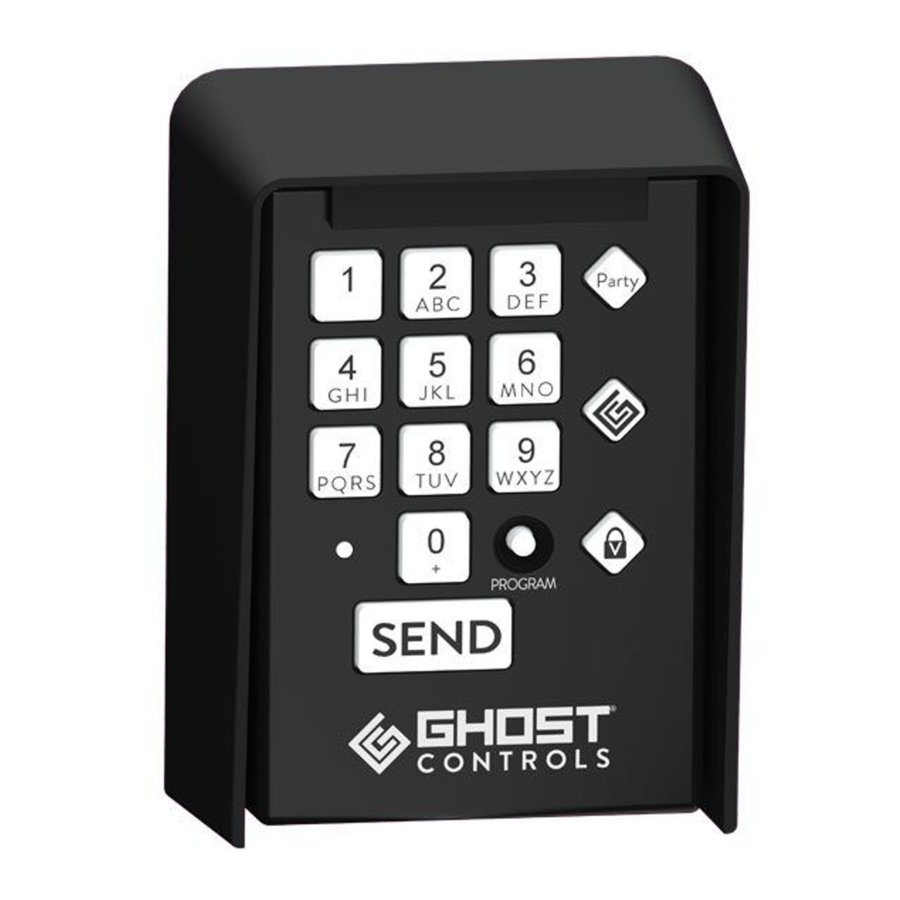
AXWK INSTRUCTIONS

ASSEMBLING YOUR KEYPAD IN 3 EASY STEPS
 NOTE: Keypad housing must be removed and two (2) C batteries (not included) need to be installed before programming or mounting keypad. Installing the batteries require you to unscrew the bottom two screws and inserting the batteries.

UNDERSTANDING NORMAL KEYPAD BEEPS AND LED'S
| SUCCESSFUL ENTRIES | FAILED ENTRIES | |
| LED's will flash ON/OFF each time you press a key indicating the keypad has accepted each entry | Invalid Pin: LED flashes and buzzer beeps TWICE then goes off. Retry till successful entry | |
| LED will flash slowly and keypad lights will remain on for 30 sec. if you have entered a valid PIN | Invalid Programming: ALL LEDs and buzzer stay on for 2 seconds then goes off. Retry till successful entry | |

* (DO NOT GIVE OUT MASTER PIN!)

Changes or modifications to this unit not expressly approved by the party responsible for compliance could void the user's authority to operate the equipment.
NOTE: This equipment has been tested and found to comply with the limits for a Class B digital device, pursuant to Part 15 of the FCC Rules. These limits are designed to provide reasonable protection against harmful interference in a residential installation. This equipment generates, uses and can radiate radio frequency energy and, if not installed and used in accordance with the instructions, may cause harmful interference to radio communications. However, there is no guarantee that interference will not occur in a particular installation.
PROGRAMMING

All GHOST CONTROLS Premium Keypads must be programmed with a 4-digit Master PIN prior to operating the Gate Opener System so that the safety and security of your system is maintained. Keypad will store up to 20 access pins, including the master access pin.
NOTE: Keypad will remain in programming mode for up to one minute between key presses to allow adequate time to go through each step. If you happen to incorrectly press a key sequence (such as SEND, SEND) then the keypad will immediately drop out of programming mode and you will have to start back at Step 1 of that programming sequence.
SETTING UP YOUR MASTER PIN
(DO NOT GIVE OUT MASTER PIN!) YOUR DEFAULT FACTORY MASTER PIN=

- REPLACE DEFAULT MASTER PIN TO A NEW 4-DIGIT PIN NUMBER (XXXX) (keep pin safe, don't lose)
EX: 
TEACHING YOUR REMOTE TO THE KEYPAD

The keypad will not transmit a signal to the gate opener controller until it has learned the unique transmitting code from a programmed working remote transmitter that currently operates your gate opener. The remote teaches the GhostCode to the keypad. Proper positioning of the transmitter to the keypad is critical for this process to work. Please see diagram and steps below.
- ENTER MASTER PIN AND THEN 58 ON KEYPAD
![]()
NEW MASTER PIN - POSITION REMOTE AND KEYPAD
(as shown in diagram) - PRESS & HOLD THE TRANSMITTER BUTTON
THAT OPERATES THE GATE UNTIL KEYPAD "LEARNS" THE SIGNAL (SUCCESS = hearing 3 beeps from keypad, pause, 2 beeps) - GATE SHOULD WORK USING YOUR KEYPAD AND NEW MASTER PIN (XXXX)
![]()


PROGRAMMING ADDITIONAL PINS FOR ACCESS
ADD AN ACCESS PIN USING YOUR NEW MASTER PIN (XXXX) Follow below:

X= master pin |?= access pin | (SUCCESS = hearing 3 beeps, pause, 2 beeps)
ADD A TEMPORARY PIN (this time based pin will not work after "DD" days) Follow below:

X= master pin |?= temp pin | (SUCCESS= hearing 3 beeps, pause, 2 beeps)
ADD A USE BASED TEMPORARY PIN (this use based pin will not work after "UU" uses) Follow below:

X= master pin |?= use temp pin | (SUCCESS = hearing 3 beeps, pause, 2 beeps)
DELETE AN ACCESS PIN (You can no longer use this pin to operate gate) Follow below:

X= master pin |?= access pin deleting | (SUCCESS = hearing 3 beeps, pause, 2 beeps)
REPLACE MASTER PIN (do not give out your master pin to allow access) Follow below:

X= master pin | N = new master pin | (SUCCESS = hearing 3 beeps, pause, 2 beeps)
PROGRAMMING SPECIAL FEATURES (CAN ONLY PROGRAM USING MASTER PIN)
 PARTYMODE® (keeps gate open to allow access to property for a set time) When you want to enable PARTYMODE® keep gate in open position and suspend gate's auto-close feature (if enabled), the gate opener will beep twice if there is an attempt to close the gate. This is to indicate that PARTYMODE® is enabled, therefore gate cannot be closed. Follow steps below:

X= master pin | (SUCCESS = hearing 2 beeps)
![]() PARTYMODE SECURETM AND 1KEYTM (use any number key and send key to operate gate to allow access) When you want to enable PARTYMODE SECURETM or 1KEYTM, any number key and the SEND key will operate the gate without the need to enter an ACCESS pin. The
PARTYMODE SECURETM AND 1KEYTM (use any number key and send key to operate gate to allow access) When you want to enable PARTYMODE SECURETM or 1KEYTM, any number key and the SEND key will operate the gate without the need to enter an ACCESS pin. The  buttons green LED will stay on when any key is pressed to indicate the keypad is in 1KEYTM mode. Follow steps below:

X = master pin | (SUCCESS = hearing 3 beeps, pause, 2 beeps)
![]() VACATIONMODE® (keeps gate closed NO access to property) When you want to enable VACATIONMODE® to keep gate in closed position (gate has to be closed to set). Gate will beep twice if there is an attempt to open the gate. This is to indicate that VACATIONMODE® is enabled and the gate can not be opened. Follow steps below:
VACATIONMODE® (keeps gate closed NO access to property) When you want to enable VACATIONMODE® to keep gate in closed position (gate has to be closed to set). Gate will beep twice if there is an attempt to open the gate. This is to indicate that VACATIONMODE® is enabled and the gate can not be opened. Follow steps below:

X= master pin | (SUCCESS = hearing 2 beeps)
OUTDOOR MOUNTING PEDESTAL
")
OUTDOOR MOUNTING PEDESTAL (AXGN) Accessory for mounting keypad to post
TROUBLESHOOTING GUIDE
| STATUS LED LIGHT | BUZZER |  |  |  | DESCRIPTION |
| NORMAL MODE | |||||
| OFF | OFF | OFF | OFF | OFF | Unit in sleep mode |
| 1 short blink | 1 short beep | N/A | N/A | N/A | When any key is pressed provides visual and audio feedback |
| 2 short blinks | 2 short beeps | N/A | N/A | N/A | Unit enters sleep mode after 2 short blinks and beeps |
| ON for 2 seconds | ON for 2 seconds | N/A | N/A | N/A | Too many PIN entry attemps. Unit goes to shut down mode for 1 min. |
| N/A | N/A | ON | OFF | OFF |  is pressed, MASTER PIN entry is expected next is pressed, MASTER PIN entry is expected next |
| N/A | N/A | OFF | ON | OFF |  is pressed, MASTER PIN entry is expected next or keypad is already operating in PARTYSECURETM or 1KEYTM mode. is pressed, MASTER PIN entry is expected next or keypad is already operating in PARTYSECURETM or 1KEYTM mode. |
| N/A | N/A | OFF | OFF | ON |  is pressed, MASTER PIN entry is expected next is pressed, MASTER PIN entry is expected next |
| PROGRAMMING MODE | |||||
| 3 short blinks | 3 short beeps | 3 blinks and stay ON | 3 blinks and stay ON | 3 blinks and stay ON | Successful initial entry into PROGRAM mode (Program key is pressed while unit is in sleep mode). Unit will automatically return to normal operation after 60 seconds of inactivity. |
| 1 short blink | 1 short beep | ON | ON | ON | When any key is pressed to provide visual and audio feedback |
| 3 short blinks PAUSE 2 short blinks | 3 short blinks PAUSE 2 short blinks | ON during beeping then OFF | ON during beeping then OFF | ON during beeping then OFF | Successful completed programming sequence |
| ON for 2 seconds | ON for 2 seconds | ON then OFF | ON then OFF | ON then OFF | Invalid entry during programming mode. Programming is not successful. Unit exits to normal operation |
| FACTORY DEFAULT MEMORY | |||||
| 3 long blinks PAUSE 2 short blinks | 3 long blinks PAUSE 2 short blinks | 3 blinks | 3 blinks | 33 blinks | Unit's PINs memory and setting is in Factory Default Mode. No other function is operational until the unit is initialized. Please refer to INITIAL SET-UP section to initialize the unit |
| 2 long blinks PAUSE 2 short blinks | 2 long blinks PAUSE 2 short blinks | 2 blinks | 2 blinks | 2 blinks | Unit's RF transmitting code is still at factory default (blank). Refer to LEARN TRANSMITTER section to program a transmitter's code to the keypad. |

Documents / Resources
References
Download manual
Here you can download full pdf version of manual, it may contain additional safety instructions, warranty information, FCC rules, etc.
Advertisement


Need help?
Do you have a question about the AXWK and is the answer not in the manual?
Questions and answers