Advertisement
OSP FURNITURE LIMITED PRODUCT WARRANTY
Design Lab Products
• 3 years on gaming desks and chairs
• Upholstery is not warranted against routine scratching and scuffing
*All warranties are limited to the original purchaser for normal commercial usage defined as a standard forty hour work week by persons weighing 250 lbs. or less.
This warranty will not cover labor, freight or damage from misuse, abuse, negligence, alteration, accident, vandalism, rusting, acts of nature or any other event
beyond the control of Office Star Products. The warranty does not cover cosmetic damage that may result from normal use. Liability for incidental or consequential
damages is excluded. The user assumes all risk of injury resulting from use of this product. When usage is more than 40 hours per week, a two year warranty on
all parts applies. Fabric and foam is warranted for one year. This warranty gives you specific legal rights, and you may also have other rights which vary from state
to state.
It is the customer's responsibility to prepay freight on any components returned to the factory. Return freight on components covered by warranty will be paid by
Office Star Products.
Our quality standards are among the highest in the industry. Sometimes, no matter how hard we try, there are times when parts are damaged or missing. Our
Parts Department will do everything possible to promptly remedy the problem. Contact us via e-mail parts.department@officestar.net by Fax 1-909-930-5629, or
toll free parts number 1-800-950-7262, Monday through Friday 8:00 a.m. - 3:30 p.m. Pacific Time.
AR1337
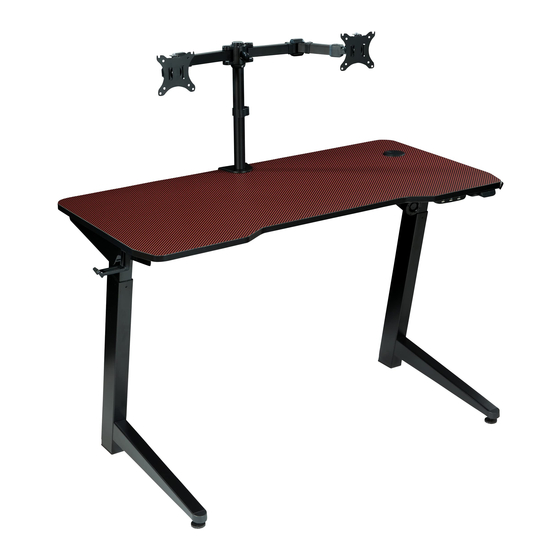
ELECTRIC LIFT GAMING DESK
ASSEMBLY INSTRUCTIONS
WARNING
1.
Do not use this product unless all bolts, screws and knobs are
securely tightened.
2.
Check that all bolts, screws and knobs are tight every three
months or as needed.
3.
Dispose of packing material properly. Do not use plastic cover as
head covering. It may cause suffocation.
4.
Do not use product as stepladder.
5.
Use product for its intended purpose only.
6.
Use mild detergent only for cleaning.
© Office Star Products December 2022
Advertisement
Table of Contents

Subscribe to Our Youtube Channel
Related Manuals for OSP furniture DESIGNlab AR1337


Summary of Contents for OSP furniture DESIGNlab AR1337
- Page 1 Do not use product as stepladder. Use product for its intended purpose only. Use mild detergent only for cleaning. OSP FURNITURE LIMITED PRODUCT WARRANTY Design Lab Products • 3 years on gaming desks and chairs • Upholstery is not warranted against routine scratching and scuffing *All warranties are limited to the original purchaser for normal commercial usage defined as a standard forty hour work week by persons weighing 250 lbs.
-
Page 2: Hardware List
PARTS HARDWARE LIST DRAWING DESCRIPTION SIZE QUANTITY Phillips Bolt 11 PCS Cable Tie 2 PCS (7) Bracket (1 PC) (8) USB Power (1 PC) Allen Bolt 15 PCS Allen Wrench 4 x 4 1 PC Long Allen Wrench 4 x 4 1 PC (9) Plastic Bracket (1 PC) (10) Bluetooth LED Light Cable (1 PC) - Page 3 AR1337 AR1337 ELECTRIC LIFT GAMING DESK ELECTRIC LIFT GAMING DESK ASSEMBLY INSTRUCTIONS ASSEMBLY INSTRUCTIONS STEP 1 STEP 3 STEP 2 STEP 4 Remove all parts from carton, separate by part numbers indicated on parts list, and verify part quantities. STEP 1 Attach one Foot (3) to each Lifting Column (2) using Allen Bolts (C) for each Foot (3). FULLY TIGHTEN ALL ALLEN BOLTS (C) USING ALLEN WRENCH (D or E).
- Page 4 AR1337 AR1337 ELECTRIC LIFT GAMING DESK ELECTRIC LIFT GAMING DESK ASSEMBLY INSTRUCTIONS ASSEMBLY INSTRUCTIONS STEP 5 STEP 7 STEP 6 STEP 5 Attach Bracket (7) to underside of Desk Top (1) using three Allen Bolts (C). FULLY TIGHTEN ALL ALLEN BOLTS (C) USING ALLEN WRENCH (D or E). STEP 7 Attach Bluetooth LED Light (6) to rear underside edge of Desk Top (1) using three Phillips Bolts (A).
-
Page 5: Step 8: Cable Connection
AR1337 AR1337 ELECTRIC LIFT GAMING DESK ELECTRIC LIFT GAMING DESK ASSEMBLY INSTRUCTIONS ASSEMBLY INSTRUCTIONS STEP 8: CABLE CONNECTION STEP 9 motor wire Manage Tear off Use cable ties (B) to manage cables and prevent damage. USB power connects magnetically to the metal plate. STEP 8 If using a power strip bracket, connect cables as shown below. -
Page 6: Troubleshooting
Handset use and settings The following tips will help you detect and eliminate the common fault and error. If the fault you met is not listed below, please contact Up & Down Button with your supplier. Only the manufacturer and professionals are capable for investigating and correcting those fault and error. FAULT &... - Page 7 PARTS HARDWARE LIST DRAWING DESCRIPTION SIZE QUANTITY Phillips Screw 8 PCS Phillips Screw 8 PCS (1) Arm Cap (1 PC) (2) Monitor Arm (1 PC) Allen Screw 3 PCS Allen Screw 2 PCS Flat Washer 16 PCS (3) Fixing Ring (1 PC) (4) Rod (1 PC) Allen Wrench 4 x 4...
-
Page 8: Monitor Mount
AR1337 AR1337 MONITOR MOUNT MONITOR MOUNT ASSEMBLY INSTRUCTIONS ASSEMBLY INSTRUCTIONS STEP 1 STEP 3 2.5x2.5 Before hanging monitors, ensure the screw is securely tightened. Please select the appropriate mounting holes according to the thickness of the table board. STEP 4 STEP 2 Applicable tabletop thickness: 20-100mm Tighten... - Page 9 AR1337 AR1337 MONITOR MOUNT MONITOR MOUNT ASSEMBLY INSTRUCTIONS ASSEMBLY INSTRUCTIONS STEP 5 STEP 7 STEP 6 ± 1 8 0 ° ± 1 8 0 ° -8 5°~ 1 5° -8 5°~ 1 5° Cables To adjust monitor(s) use the supplied Allen Wrench (G) STEP 5 Carefully slide monitor(s) onto Monitor Arm (2) and fasten using Allen Wrench (F).
Need help?
Do you have a question about the DESIGNlab AR1337 and is the answer not in the manual?
Questions and answers