Advertisement
Quick Links
IMPORTANT-PLEASE KEEP THESE INSTRUCTIONS IN CASE OF ANY CUSTOMER SERVICE ISSUES
Model Number:
IMPORTANT-PLEASE KEEP THESE INSTRUCTIONS IN CASE OF ANY CUSTOMER SERVICE ISSUES
OSP FURNITURE LIMITED PRODUCT WARRANTY
Design Lab Products
• 3 years on gaming desks and chairs
• Upholstery is not warranted against routine scratching and scuffing
*All warranties are limited to the original purchaser for normal commercial usage defined as a standard forty hour work week by persons weighing 250 lbs. or
less. This warranty will not cover labor, freight or damage from misuse, abuse, negligence, alteration, accident, vandalism, rusting, acts of nature or any other
event beyond the control of Office Star Products. The warranty does not cover cosmetic damage that may result from normal use. Liability for incidental or
consequential damages is excluded. The user assumes all risk of injury resulting from use of this product. When usage is more than 40 hours per week, a two
year warranty on all parts applies. Fabric and foam is warranted for one year. This warranty gives you specific legal rights, and you may also have other rights
which vary from state to state.
It is the customer's responsibility to prepay freight on any components returned to the factory. Return freight on components covered by warranty
will be paid by Office Star Products.
Our quality standards are among the highest in the industry. Sometimes, no matter how hard we try, there are times when parts are damaged or missing. Our
Parts Department will do everything possible to promptly remedy the problem. Contact us via e-mail parts@officestar.net, by Fax 1-909-930-5629, or toll free
parts number 1-800-950-7262, Monday through Friday 8:00 a.m. - 5:00 p.m. Pacific Time.
LDT4826GD (SF)
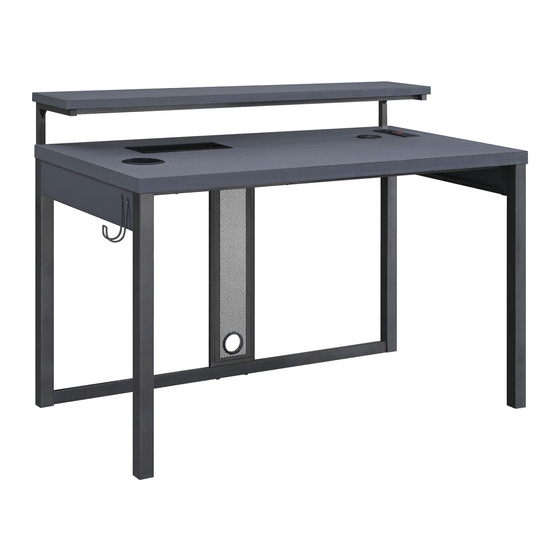
LOADOUT 48" GAMING DESK
ASSEMBLY INSTRUCTIONS
WARNING
1.
Use this product only one person at a time.
2.
Do not use this product unless all bolts screws and knobs are
securely tightened.
3.
Check that all bolts screws and knobs are tight every three
months or as needed.
4.
Do not overturn back tilt knob when decreasing tension.
5.
Dispose of packing material properly. Do not use plastic cover as
head covering. It may cause suffocation.
6.
Do not use product as a stepladder.
7.
Use this product for its intended purpose only.
8.
Use mild detergent only for cleaning.
© Office Star Products September 2020
Advertisement

Related Manuals for OSP furniture DESIGNlab LDT4826GD


Summary of Contents for OSP furniture DESIGNlab LDT4826GD
- Page 1 Do not use product as a stepladder. Use this product for its intended purpose only. Use mild detergent only for cleaning. OSP FURNITURE LIMITED PRODUCT WARRANTY Design Lab Products • 3 years on gaming desks and chairs • Upholstery is not warranted against routine scratching and scuffing *All warranties are limited to the original purchaser for normal commercial usage defined as a standard forty hour work week by persons weighing 250 lbs.
-
Page 2: Hardware List
HARDWARE LIST CAM LOCK INSTALLATION DRAWING DESCRIPTION SIZE QUANTITY Glue Ø 1 PC Wooden Dowel Ø 4 PCS Cam Screw Ø 8 PCS Screw Cam Screw in. Fully Tighten. Cam Nut Ø 8 PCS Allen Wrench Ø 1 PC Allen Bolt 6 x 12 x 10mm 12 PCS Allen Bolt... - Page 3 PART PARTS (3) Left Side Frame (1 PC) (4) Right Side Frame (1 PC) (15) Power Outlet (1 PC) (16) Remote Control (1 PC) (5) Back Panel (1 PC) (6) Middle Front Crossbar (1 PC) (17) LED Power Supply (1 PC) (18) Storage Tray (1 PC) (7) Rear Lower Crossbar (1 PC) (8) Upper Crossbar (1 PC)
- Page 4 LDT4826GD (SF) LDT4826GD (SF) LOADOUT 48” GAMING DESK LOADOUT 48” GAMING DESK ASSEMBLY INSTRUCTIONS ASSEMBLY INSTRUCTIONS STEP 3 STEP 1 STEP 4 STEP 2 Remove all the parts from carton, separate them into part numbers indicated on the list and make sure part quantities are correct. STEP 1 Screw in four Cam Screws (C) into Desktop (2), two Cam Screws (C) into both Left Side Frame (3) and Right Side Frame (4).
- Page 5 LDT4826GD (SF) LDT4826GD (SF) LOADOUT 48” GAMING DESK LOADOUT 48” GAMING DESK ASSEMBLY INSTRUCTIONS ASSEMBLY INSTRUCTIONS STEP 5 STEP6 1st Postion 2nd Postion 3rd Postion NOTE: There are THREE different positions for the Add-On Shelves as show in Figure 1. Please decide your preferred height at this time STEP 6 Secure Left Upper Frame (10) and Right Upper Frame (11) to rear of assembly using two Allen Bolts (H) for each frame.
- Page 6 LDT4826GD (SF) LDT4826GD (SF) LOADOUT 48” GAMING DESK LOADOUT 48” GAMING DESK ASSEMBLY INSTRUCTIONS ASSEMBLY INSTRUCTIONS STEP 9 STEP 7 STEP 8 STEP 7 Secure Upper Crossbar (8) between Left Upper Frame (10) and Right Upper Frame (11) using two Allen Bolts (F). FULLY TIGHTEN ALLEN BOLTS (F).
- Page 7 QUICK SAFETY WARNINGS - PLEASE READ FIRST SLOW DIY 1 DIY 2 DIY 3 AUTO DIY 4 DIY 5 DIY 6 FLASH JUMP3 JUMP7 FADE3 FADE7...
Need help?
Do you have a question about the DESIGNlab LDT4826GD and is the answer not in the manual?
Questions and answers